User Guide
Page 1
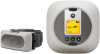
User's Guide WIRELESS FENCE FOR HOME AND TRAVEL Model: WIRELESSFENCE25 The features described in this User's Guide are subject to modifications without prior notice.
User's Guide WIRELESS FENCE FOR HOME AND TRAVEL Model: WIRELESSFENCE25 The features described in this User's Guide are subject to modifications without prior notice.
User Guide
Page 2
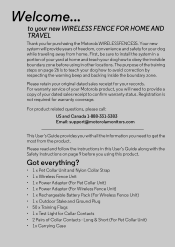
... be sure to install the system in this product. Please read and follow the instructions in a portion of freedom, convenience and safety for purchasing the Motorola WIRELESSFENCE25. Welcome... For product related questions, please call: US and Canada 1-888-331-3383 Email: support@motorolamonitors.com This User's Guide provides you need... traveling away from the product. Please retain your original dated sales receipt for Collar Contacts • 2 Pairs of your Motorola product, you for your records. Long & Short (For Pet Collar Unit) • 1x Carrying Case For warranty...
... be sure to install the system in this product. Please read and follow the instructions in a portion of freedom, convenience and safety for purchasing the Motorola WIRELESSFENCE25. Welcome... For product related questions, please call: US and Canada 1-888-331-3383 Email: support@motorolamonitors.com This User's Guide provides you need... traveling away from the product. Please retain your original dated sales receipt for Collar Contacts • 2 Pairs of your Motorola product, you for your records. Long & Short (For Pet Collar Unit) • 1x Carrying Case For warranty...
User Guide
Page 4
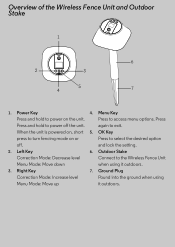
... the unit is powered on the unit. Outdoor Stake Correction Mode: Decrease level Connect to power on , short 5. again to power off . and lock the setting. 2. Menu Key Press and hold to exit.
... the unit is powered on the unit. Outdoor Stake Correction Mode: Decrease level Connect to power on , short 5. again to power off . and lock the setting. 2. Menu Key Press and hold to exit.
User Guide
Page 11
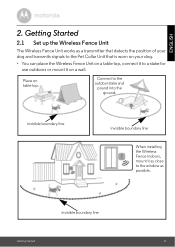
invisible boundary line invisible boundary line When installing the Wireless Fence indoors, mount it on table top. Place on a wall. invisible boundary line Getting Started 11 Getting Started 2.1 Set up the Wireless Fence Unit The Wireless Fence Unit works as a transmitter that detects the position of your dog and transmits signals to the...
invisible boundary line invisible boundary line When installing the Wireless Fence indoors, mount it on table top. Place on a wall. invisible boundary line Getting Started 11 Getting Started 2.1 Set up the Wireless Fence Unit The Wireless Fence Unit works as a transmitter that detects the position of your dog and transmits signals to the...
User Guide
Page 14
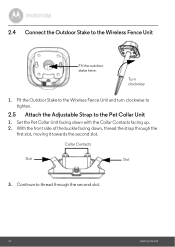
Continue to thread through the first slot, moving it towards the second slot. Set the Pet Collar Unit facing down , thread the strap through the second slot. 14 Getting Started With the front side of the buckle facing down with the Collar Contacts facing up. 2. Collar Contacts Slot Slot 3. 2.4 Connect the Outdoor Stake to the Pet Collar Unit 1. Turn clockwise 1. Fit the Outdoor Stake to the Wireless Fence Unit and turn clockwise to tighten. 2.5 Attach the Adjustable Strap to the Wireless Fence Unit Fit the outdoor stake here.
Continue to thread through the first slot, moving it towards the second slot. Set the Pet Collar Unit facing down , thread the strap through the second slot. 14 Getting Started With the front side of the buckle facing down with the Collar Contacts facing up. 2. Collar Contacts Slot Slot 3. 2.4 Connect the Outdoor Stake to the Pet Collar Unit 1. Turn clockwise 1. Fit the Outdoor Stake to the Wireless Fence Unit and turn clockwise to tighten. 2.5 Attach the Adjustable Strap to the Wireless Fence Unit Fit the outdoor stake here.
User Guide
Page 16
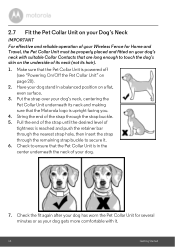
... more comfortable with suitable Collar Contacts that are long enough to ensure that the Pet Collar Unit is upright facing you. 4. Make sure that the Motorola logo is in a balanced position on a flat, even surface. 3.
... more comfortable with suitable Collar Contacts that are long enough to ensure that the Pet Collar Unit is upright facing you. 4. Make sure that the Motorola logo is in a balanced position on a flat, even surface. 3.

User Guide
Page 19
... Collar Unit to the Pet Collar Unit. 1. Collar Contacts Test light contacts Test light contacts 3. If the Test Light still does not flash, contact Customer Service at your dog's neck level and walk towards the boundary zone. If the Test Light does not flash, charge the Pet Collar Unit and re...
... Collar Unit to the Pet Collar Unit. 1. Collar Contacts Test light contacts Test light contacts 3. If the Test Light still does not flash, contact Customer Service at your dog's neck level and walk towards the boundary zone. If the Test Light does not flash, charge the Pet Collar Unit and re...
User Guide
Page 21
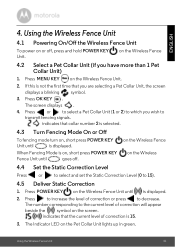
... To power on , short press POWER KEY Fence Unit until is on or off . Press MENU KEY on the Wireless 4.4 Set the Static Correction Level Press or to select and set the Static Correction Level (0 to the current level of correction or press to transmit fencing signals. on the Wireless Fence on...
... To power on , short press POWER KEY Fence Unit until is on or off . Press MENU KEY on the Wireless 4.4 Set the Static Correction Level Press or to select and set the Static Correction Level (0 to the current level of correction or press to transmit fencing signals. on the Wireless Fence on...
User Guide
Page 23
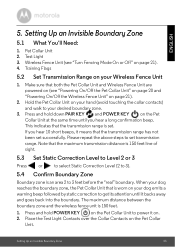
... the "real" boundary. Press and hold POWER KEY on . 2. This indicates that the maximum transmission distance is 150 feet line of sight. 5.3 Set Static Correction Level to Level 2 or 3 Press or to select Static Correction Level (2 to 3). 5.4 Confirm Boundary Zone Boundary zone is worn on ...you hear a long confirmation beep. Place the Test Light Contacts over the Collar Contacts on page 21). 2. When your desired boundary zone. 3. Setting Up an Invisible Boundary Zone 5.1 What You'll Need: 1. Make sure that both the Pet Collar Unit and Wireless Fence Unit are powered on...
... the "real" boundary. Press and hold POWER KEY on . 2. This indicates that the maximum transmission distance is 150 feet line of sight. 5.3 Set Static Correction Level to Level 2 or 3 Press or to select Static Correction Level (2 to 3). 5.4 Confirm Boundary Zone Boundary zone is worn on ...you hear a long confirmation beep. Place the Test Light Contacts over the Collar Contacts on page 21). 2. When your desired boundary zone. 3. Setting Up an Invisible Boundary Zone 5.1 What You'll Need: 1. Make sure that both the Pet Collar Unit and Wireless Fence Unit are powered on...
User Guide
Page 24
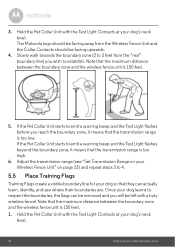
...4. 5.5 Place Training Flags Training Flags create a visible boundary line for your dog's neck level. 24 Setting Up an Invisible Boundary Zone Once your dog's neck level. Hold the Pet Collar Unit with the Test...If the Pet Collar Unit starts to respect the boundaries, the flags can actually learn, identify, and see "Set Transmission Range on your Wireless Fence Unit" on page 23) and repeat steps 3 to establish. Note that... and the wireless fence unit is 150 feet. 5. The Motorola logo should be facing away from the "real" boundary line) you will be facing upwards. 4. 3.
...4. 5.5 Place Training Flags Training Flags create a visible boundary line for your dog's neck level. 24 Setting Up an Invisible Boundary Zone Once your dog's neck level. Hold the Pet Collar Unit with the Test...If the Pet Collar Unit starts to respect the boundaries, the flags can actually learn, identify, and see "Set Transmission Range on your Wireless Fence Unit" on page 23) and repeat steps 3 to establish. Note that... and the wireless fence unit is 150 feet. 5. The Motorola logo should be facing away from the "real" boundary line) you will be facing upwards. 4. 3.
User Guide
Page 25
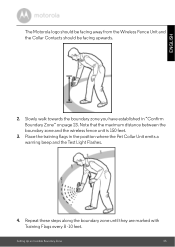
... is 150 feet. 3. Place the training flags in "Confirm Boundary Zone" on page 23. ENGLISH The Motorola logo should be facing away from the Wireless Fence Unit and the Collar Contacts should be facing upwards. 2. Setting Up an Invisible Boundary Zone 25 Slowly walk towards the boundary zone you have established in...
... is 150 feet. 3. Place the training flags in "Confirm Boundary Zone" on page 23. ENGLISH The Motorola logo should be facing away from the Wireless Fence Unit and the Collar Contacts should be facing upwards. 2. Setting Up an Invisible Boundary Zone 25 Slowly walk towards the boundary zone you have established in...

User Guide
Page 30
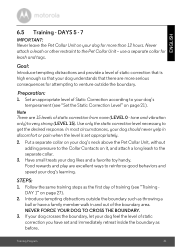
... Correction Level to reinforce good behaviors and speed up your dog for leash and tags. The lowest levels of static correction. low static level (see "Set the Static Correction Level" on it is sufficient to have your dog understand that your dog in the yard, however it , and attach a long leash...
... Correction Level to reinforce good behaviors and speed up your dog for leash and tags. The lowest levels of static correction. low static level (see "Set the Static Correction Level" on it is sufficient to have your dog understand that your dog in the yard, however it , and attach a long leash...
User Guide
Page 31
...YOUR DOG TO CROSS THE BOUNDARY. 3. Never attach a leash or other restraint to venture outside the boundary such as throwing a ball or have set appropriately. 2. In most circumstances, your dog should never yelp in and out of static correction from none (LEVEL 0 - Training Program 31 ... to the separate collar. 3. Follow the same training steps as before. Set an appropriate level of static correction that is set and immediately retreat inside the boundary as the first day of training (see "Set the Static Correction Level" on page 27). 2. Put a separate collar on...
...YOUR DOG TO CROSS THE BOUNDARY. 3. Never attach a leash or other restraint to venture outside the boundary such as throwing a ball or have set appropriately. 2. In most circumstances, your dog should never yelp in and out of static correction from none (LEVEL 0 - Training Program 31 ... to the separate collar. 3. Follow the same training steps as before. Set an appropriate level of static correction that is set and immediately retreat inside the boundary as the first day of training (see "Set the Static Correction Level" on page 27). 2. Put a separate collar on...

User Guide
Page 34
8. contact Customer Service for Home and Travel. However, if something does go wrong, please do not try to ensure high standards of reliability of the Wireless Fence for assistance. 34 Cleaning and Care Cleaning and care • Check Collar Contacts for tightness weekly. • Clean Collar Contacts with alcohol weekly. • Check your dog's neck area for irritation and wash neck weekly. • Every effort has been made to repair it yourself - Cleaning and Care IMPORTANT Power off the Pet Collar Unit before touching the Collar Contacts.
8. contact Customer Service for Home and Travel. However, if something does go wrong, please do not try to ensure high standards of reliability of the Wireless Fence for assistance. 34 Cleaning and Care Cleaning and care • Check Collar Contacts for tightness weekly. • Clean Collar Contacts with alcohol weekly. • Check your dog's neck area for irritation and wash neck weekly. • Every effort has been made to repair it yourself - Cleaning and Care IMPORTANT Power off the Pet Collar Unit before touching the Collar Contacts.

User Guide
Page 37
... Pet Collar Unit using the Test Light supplied with your product (see "Using the Test Light" on your dog still does not respond, contact Customer Service at 1-888-331-3383. For proper fit, the collar should be snug, yet loose enough to allow two fingers to the Static Correction • ...Make sure that there is properly fitted on page 19). • If your dog. Loosely fitted collar will affect performance. ENGLISH 10. Troubleshooting When your dog does not seem to respond to fit between the strap and dog's neck. • Make sure that the Pet Collar Unit is...
... Pet Collar Unit using the Test Light supplied with your product (see "Using the Test Light" on your dog still does not respond, contact Customer Service at 1-888-331-3383. For proper fit, the collar should be snug, yet loose enough to allow two fingers to the Static Correction • ...Make sure that there is properly fitted on page 19). • If your dog. Loosely fitted collar will affect performance. ENGLISH 10. Troubleshooting When your dog does not seem to respond to fit between the strap and dog's neck. • Make sure that the Pet Collar Unit is...
User Guide
Page 38
... charge repair or replace any Products or Accessories that does not conform to this User's Guide. 2. What Does this product that this Motorola branded ...product ("Product") or certified accessory ("Accessory") sold for use functionally equivalent reconditioned/ refurbished/ pre-owned or new Products, Accessories or parts...this Warranty Cover? Contact Customer Service: US and Canada 1-888-331-3383 Email: support@motorolamonitors.com Consumer Products and ...
... charge repair or replace any Products or Accessories that does not conform to this User's Guide. 2. What Does this product that this Motorola branded ...product ("Product") or certified accessory ("Accessory") sold for use functionally equivalent reconditioned/ refurbished/ pre-owned or new Products, Accessories or parts...this Warranty Cover? Contact Customer Service: US and Canada 1-888-331-3383 Email: support@motorolamonitors.com Consumer Products and ...

User Guide
Page 39
IN NO EVENT SHALL MOTOROLA OR BINATONE BE LIABLE, WHETHER IN CONTRACT OR TORT (INCLUDING NEGLIGENCE) FOR DAMAGES IN EXCESS OF THE PURCHASE PRICE OF THE PRODUCT OR ACCESSORY, OR ... LIMITED TO THE DURATION OF THIS LIMITED WARRANTY, OTHERWISE THE REPAIR OR REPLACEMENT PROVIDED UNDER THIS EXPRESS LIMITED WARRANTY IS THE EXCLUSIVE REMEDY OF THE CONSUMER, AND IS PROVIDED IN LIEU OF ALL OTHER WARRANTIES, EXPRESS OR IMPLIED. This Warranty gives you specific legal rights, and you . Some jurisdictions do not allow the...
IN NO EVENT SHALL MOTOROLA OR BINATONE BE LIABLE, WHETHER IN CONTRACT OR TORT (INCLUDING NEGLIGENCE) FOR DAMAGES IN EXCESS OF THE PURCHASE PRICE OF THE PRODUCT OR ACCESSORY, OR ... LIMITED TO THE DURATION OF THIS LIMITED WARRANTY, OTHERWISE THE REPAIR OR REPLACEMENT PROVIDED UNDER THIS EXPRESS LIMITED WARRANTY IS THE EXCLUSIVE REMEDY OF THE CONSUMER, AND IS PROVIDED IN LIEU OF ALL OTHER WARRANTIES, EXPRESS OR IMPLIED. This Warranty gives you specific legal rights, and you . Some jurisdictions do not allow the...

User Guide
Page 40
...Abuse & Misuse. Defects or damages resulting from service, testing, adjustment, installation, maintenance, alteration, or modification in any way by someone other than MOTOROLA, BINATONE or its authorised service centres, are excluded from coverage. Consumer Accessories Ninety...replacement of parts due to the consumer, whichever is longer. or (d) other peripheral equipment are Repaired or Replaced for Ninety (90) days from misuse; (b) contact with liquid, water, rain, extreme humidity or heavy perspiration, sand, dirt or the like, extreme heat, or food; (c) use of Non-Motorola...
...Abuse & Misuse. Defects or damages resulting from service, testing, adjustment, installation, maintenance, alteration, or modification in any way by someone other than MOTOROLA, BINATONE or its authorised service centres, are excluded from coverage. Consumer Accessories Ninety...replacement of parts due to the consumer, whichever is longer. or (d) other peripheral equipment are Repaired or Replaced for Ninety (90) days from misuse; (b) contact with liquid, water, rain, extreme humidity or heavy perspiration, sand, dirt or the like, extreme heat, or food; (c) use of Non-Motorola...
User Guide
Page 41
ENGLISH Altered Products. Defects, damages, or the failure of the problem; To obtain service, you must include: (a) the Product or Accessory; (b) the original proof of purchase (receipt) which includes the date, place and seller of the... and telephone number. To obtain service or information, please call: US and Canada 1-888-331-3383 Email: support@motorolamonitors.com You will receive instructions on how to Obtain Warranty Service or Other Information? General Information 41 or (d) nonconforming or non-Motorola branded housings, or parts, are excluded from coverage. Products...
ENGLISH Altered Products. Defects, damages, or the failure of the problem; To obtain service, you must include: (a) the Product or Accessory; (b) the original proof of purchase (receipt) which includes the date, place and seller of the... and telephone number. To obtain service or information, please call: US and Canada 1-888-331-3383 Email: support@motorolamonitors.com You will receive instructions on how to Obtain Warranty Service or Other Information? General Information 41 or (d) nonconforming or non-Motorola branded housings, or parts, are excluded from coverage. Products...

User Guide
Page 44
MOTOROLA and the Stylized M Logo, are trademarks or registered trademarks of their respective owners. © 2014 Motorola Mobility LLC. All rights reserved. All other trademarks are used under license. Manufactured, distributed or sold by Binatone Electronics International LTD., official licensee for this product. US_EN Version 8.0 Printed in China and are the property of Motorola Trademark Holdings, LLC.
MOTOROLA and the Stylized M Logo, are trademarks or registered trademarks of their respective owners. © 2014 Motorola Mobility LLC. All rights reserved. All other trademarks are used under license. Manufactured, distributed or sold by Binatone Electronics International LTD., official licensee for this product. US_EN Version 8.0 Printed in China and are the property of Motorola Trademark Holdings, LLC.