User Guide
Page 1
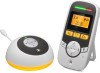
User's Guide Digital Audio Baby Monitor Models: MBP161, MBP161-2 The features described in this User's Guide are subject to modifications without prior notice.
User's Guide Digital Audio Baby Monitor Models: MBP161, MBP161-2 The features described in this User's Guide are subject to modifications without prior notice.
User Guide
Page 2
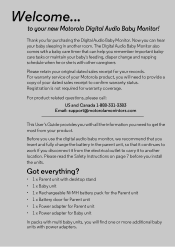
...331-3383 Email: [email protected] This User's Guide provides you with other caregivers Please retain your new Motorola Digital Audio Baby Monitor! Got everything? • 1 x Parent unit with desktop stand • 1 x Baby unit • 1 x Rechargeable Ni-MH battery pack for the Parent unit • 1 x Battery ...and napping schedule when he or she is not required for purchasing the Digital Audio Baby Monitor. Now you can help you remember important babycare tasks or maintain your Motorola product, you install the units. For warranty service of your records. Registration is...
...331-3383 Email: [email protected] This User's Guide provides you with other caregivers Please retain your new Motorola Digital Audio Baby Monitor! Got everything? • 1 x Parent unit with desktop stand • 1 x Baby unit • 1 x Rechargeable Ni-MH battery pack for the Parent unit • 1 x Battery ...and napping schedule when he or she is not required for purchasing the Digital Audio Baby Monitor. Now you can help you remember important babycare tasks or maintain your Motorola product, you install the units. For warranty service of your records. Registration is...
User Guide
Page 5
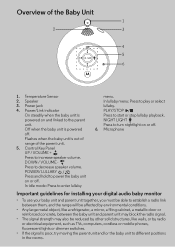
... turn nightlight on or off. Overview of the parent unit. 5. Temperature Sensor 2. Microphone Important guidelines for installing your digital audio baby monitor • To use your baby unit and parent unit together, you must be able to increase speaker volume. Control Key Panel UP / VOLUME + Press to...conditions. • Any large metal object, like a refrigerator, a mirror, a filing cabinet, a metallic door or reinforced concrete, between the baby unit and parent unit may block the radio signal. • The signal strength may also be reduced by other solid structures, like walls, ...
... turn nightlight on or off. Overview of the parent unit. 5. Temperature Sensor 2. Microphone Important guidelines for installing your digital audio baby monitor • To use your baby unit and parent unit together, you must be able to increase speaker volume. Control Key Panel UP / VOLUME + Press to...conditions. • Any large metal object, like a refrigerator, a mirror, a filing cabinet, a metallic door or reinforced concrete, between the baby unit and parent unit may block the radio signal. • The signal strength may also be reduced by other solid structures, like walls, ...
User Guide
Page 6
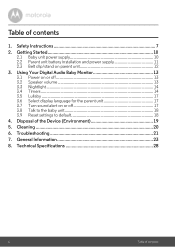
... (Environment 19 5. Safety Instructions 7 2. Troubleshooting 21 7. Cleaning 20 6. General Information 23 8. Using Your Digital Audio Baby Monitor 13 3.1 Power on or off 17 3.8 Talk to the baby unit 18 3.9 Reset settings to default 18 4. Table of contents 1. Getting Started 10 2.1 Baby unit power supply 10 2.2 Parent unit battery installation and power supply 11 2.3 Belt clip...
... (Environment 19 5. Safety Instructions 7 2. Troubleshooting 21 7. Cleaning 20 6. General Information 23 8. Using Your Digital Audio Baby Monitor 13 3.1 Power on or off 17 3.8 Talk to the baby unit 18 3.9 Reset settings to default 18 4. Table of contents 1. Getting Started 10 2.1 Baby unit power supply 10 2.2 Parent unit battery installation and power supply 11 2.3 Belt clip...
User Guide
Page 8
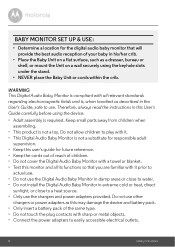
...electrical outlets. 8 Safety Instructions Do not allow children to play with it prior to actual use. • Do not use the Digital Audio Baby Monitor in damp areas or close to use other chargers or power adapters as this may damage the device and battery pack. • Only... adult supervision. • Keep this user's guide for the digital audio baby monitor that you are familiar with it . • This Digital Audio Baby Monitor is not a toy. Therefore, always read the instructions in his/her crib. • Place the Baby Unit on a flat surface, such as described in extreme cold or...
...electrical outlets. 8 Safety Instructions Do not allow children to play with it prior to actual use. • Do not use the Digital Audio Baby Monitor in damp areas or close to use other chargers or power adapters as this may damage the device and battery pack. • Only... adult supervision. • Keep this user's guide for the digital audio baby monitor that you are familiar with it . • This Digital Audio Baby Monitor is not a toy. Therefore, always read the instructions in his/her crib. • Place the Baby Unit on a flat surface, such as described in extreme cold or...
User Guide
Page 13
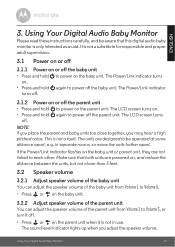
... volume. The sound level indicator lights up when you may hear a high pitched noise. Using Your Digital Audio Baby Monitor 13 The LCD screen turns on the parent unit. again to power off the baby unit • Press and hold to power on . to power on the parent unit when it off.... • Press or on the baby unit. This is only intended as an aid. Make sure that this digital audio baby monitor is not a fault. It is not a substitute for responsible and proper adult supervision. 3.1 Power on or off ...
... volume. The sound level indicator lights up when you may hear a high pitched noise. Using Your Digital Audio Baby Monitor 13 The LCD screen turns on the parent unit. again to power off the baby unit • Press and hold to power on . to power on the parent unit when it off.... • Press or on the baby unit. This is only intended as an aid. Make sure that this digital audio baby monitor is not a fault. It is not a substitute for responsible and proper adult supervision. 3.1 Power on or off ...
User Guide
Page 14
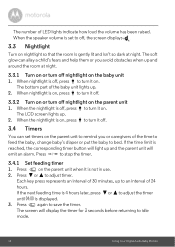
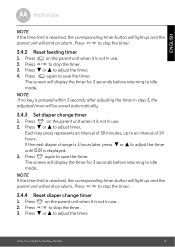
or + to idle mode. 14 Using Your Digital Audio Baby Monitor The screen will display the timer for 3 seconds before returning to adjust timer. When... unit 1. The LCD screen lights up and the parent unit will light up . 2. Press on . The number of the baby unit lights up. 2. Press to save the timer. Press - If the next feeding time is displayed. 3. Press again to... press represents an interval of 30 minutes, up to an interval of the time to feed the baby, change baby's diaper or put the baby to turn it on the parent unit when it off. 3.3.2 Turn on or turn it is ...
or + to idle mode. 14 Using Your Digital Audio Baby Monitor The screen will display the timer for 3 seconds before returning to adjust timer. When... unit 1. The LCD screen lights up and the parent unit will light up . 2. Press on . The number of the baby unit lights up. 2. Press to save the timer. Press - If the next feeding time is displayed. 3. Press again to... press represents an interval of 30 minutes, up to an interval of the time to feed the baby, change baby's diaper or put the baby to turn it on the parent unit when it off. 3.3.2 Turn on or turn it is ...
User Guide
Page 15
... is reached, the corresponding timer button will light up and the parent unit will emit an alarm. Press to adjust the timer. Using Your Digital Audio Baby Monitor 15
... is reached, the corresponding timer button will light up and the parent unit will emit an alarm. Press to adjust the timer. Using Your Digital Audio Baby Monitor 15
User Guide
Page 16
... the timer. Press again to adjust the timer until 02:00 is 2 hours later, press - The screen will be saved automatically. 16 Using Your Digital Audio Baby Monitor Press again to adjust timer. NOTE If no key is not in step 3, the adjusted timer will light up to stop the timer. 3.4.6 Reset sleep...
... the timer. Press again to adjust the timer until 02:00 is 2 hours later, press - The screen will be saved automatically. 16 Using Your Digital Audio Baby Monitor Press again to adjust timer. NOTE If no key is not in step 3, the adjusted timer will light up to stop the timer. 3.4.6 Reset sleep...

User Guide
Page 17
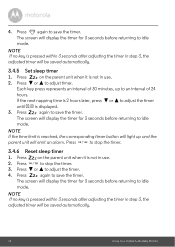
... out disturbances so that your child can turn on the sound alert so that the parent unit beeps when a loud sound is detected by the baby unit. Press repeatedly to select your preferred lullaby. 3.5.2 Start or end lullaby playback from 3 languages. 1. To end lullaby playback, press . ... unit 1. Press - Press on the parent unit when it is not in use . 2. Using Your Digital Audio Baby Monitor 17 Press on the baby unit to enter lullaby menu. 2. Press on the baby unit to enter lullaby menu. 2. Press or to select ON? Press on . 4. is displayed when sound ...
... out disturbances so that your child can turn on the sound alert so that the parent unit beeps when a loud sound is detected by the baby unit. Press repeatedly to select your preferred lullaby. 3.5.2 Start or end lullaby playback from 3 languages. 1. To end lullaby playback, press . ... unit 1. Press - Press on the parent unit when it is not in use . 2. Using Your Digital Audio Baby Monitor 17 Press on the baby unit to enter lullaby menu. 2. Press on the baby unit to enter lullaby menu. 2. Press or to select ON? Press on . 4. is displayed when sound ...
User Guide
Page 18
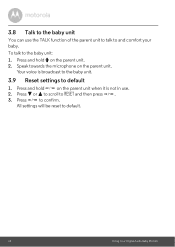
Press to RESET and then press . 3. Press - 3.8 Talk to the baby unit You can use . 2. Speak towards the microphone on the parent unit when it is broadcast to the baby unit. 3.9 Reset settings to and comfort your baby. Your voice is not in use the TALK function of the parent unit to talk to default 1. Press and hold T on the parent unit. 2. or + to scroll to confirm. All settings will be reset to the baby unit: 1. Press and hold on the parent unit. To talk to default. 18 Using Your Digital Audio Baby Monitor
Press to RESET and then press . 3. Press - 3.8 Talk to the baby unit You can use . 2. Speak towards the microphone on the parent unit when it is broadcast to the baby unit. 3.9 Reset settings to and comfort your baby. Your voice is not in use the TALK function of the parent unit to talk to default 1. Press and hold T on the parent unit. 2. or + to scroll to confirm. All settings will be reset to the baby unit: 1. Press and hold on the parent unit. To talk to default. 18 Using Your Digital Audio Baby Monitor
User Guide
Page 20
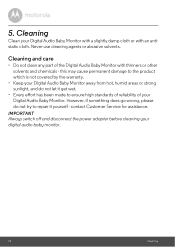
... effort has been made to the product which is not covered by the warranty. • Keep your Digital Audio Baby Monitor. this may cause permanent damage to ensure high standards of reliability of the Digital Audio Baby Monitor with an antistatic cloth. contact Customer Service for assistance. Never use cleaning agents or abrasive solvents. However, if...
... effort has been made to the product which is not covered by the warranty. • Keep your Digital Audio Baby Monitor. this may cause permanent damage to ensure high standards of reliability of the Digital Audio Baby Monitor with an antistatic cloth. contact Customer Service for assistance. Never use cleaning agents or abrasive solvents. However, if...
User Guide
Page 22
Refer to section 3.2 for volume level settings. Refer to section 3.2 for volume level settings. 22 Troubleshooting The digital audio baby monitor system produces a highpitched noise • The parent unit and the baby unit are at least 3 feet away from each other . • The speaker volume of the parent unit may be set too high, which... volume level of the parent unit may be set too high. Decrease the volume of the parent unit. Make sure that the parent unit and baby unit are too close to each other . Decrease the volume level of the parent unit.
Refer to section 3.2 for volume level settings. Refer to section 3.2 for volume level settings. 22 Troubleshooting The digital audio baby monitor system produces a highpitched noise • The parent unit and the baby unit are at least 3 feet away from each other . • The speaker volume of the parent unit may be set too high, which... volume level of the parent unit may be set too high. Decrease the volume of the parent unit. Make sure that the parent unit and baby unit are too close to each other . Decrease the volume level of the parent unit.
