
User Guide
Page 1
User's Guide Digital Video Baby Monitor Models: MBP483, MBP483-2, MBP483-3, MBP483-4 The features described in this User's Guide are subject to modifications without prior notice.
User's Guide Digital Video Baby Monitor Models: MBP483, MBP483-2, MBP483-3, MBP483-4 The features described in this User's Guide are subject to modifications without prior notice.
User Guide
Page 2
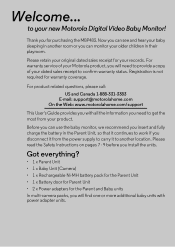
... 1-888-331-3383 E-mail: support@motorolahome.com On the Web: www.motorolahome.com/support This User's Guide provides you for your older children in the Parent Unit, so that it to work if you install the units. Please read the Safety Instructions on pages 7 - 9 before... you disconnect it from your dated sales receipt to provide a copy of your product. Welcome... to your baby sleeping in another room or you can use the baby monitor, we recommend you insert and fully charge the battery in their playroom. For warranty service of your Motorola...
... 1-888-331-3383 E-mail: support@motorolahome.com On the Web: www.motorolahome.com/support This User's Guide provides you for your older children in the Parent Unit, so that it to work if you install the units. Please read the Safety Instructions on pages 7 - 9 before... you disconnect it from your dated sales receipt to provide a copy of your product. Welcome... to your baby sleeping in another room or you can use the baby monitor, we recommend you insert and fully charge the battery in their playroom. For warranty service of your Motorola...
User Guide
Page 3
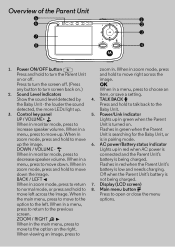
image. Sound Level indicators Show the sound level detected by item, or save a setting. 4. Control key panel 5. AC power/Battery status indicator DOWN / VOLUME - When in Press to open or close the menu the main menu, press to move ...
image. Sound Level indicators Show the sound level detected by item, or save a setting. 4. Control key panel 5. AC power/Battery status indicator DOWN / VOLUME - When in Press to open or close the menu the main menu, press to move ...
User Guide
Page 5
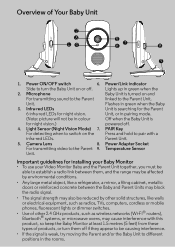
... be causing interference. • If the signal is for night vision.) powered off . Microphone Baby Unit is searching for the Parent 6 infra-red LEDs for installing your Baby Monitor • To use your Video Monitor Baby and the Parent Unit together, you must be able to establish a radio link between them...
... be causing interference. • If the signal is for night vision.) powered off . Microphone Baby Unit is searching for the Parent 6 infra-red LEDs for installing your Baby Monitor • To use your Video Monitor Baby and the Parent Unit together, you must be able to establish a radio link between them...
User Guide
Page 6
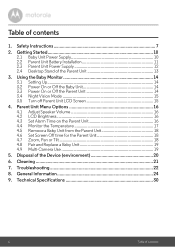
...Zoom, Pan or Tilt 18 4.8 Pair and Replace a Baby Unit 19 4.9 Multi-Camera Use 19 5. General Information 24 9. Technical Specifications 30 6 Table of the Parent Unit 13 3. Using the Baby Monitor 14 3.1 Setting Up 14 3.2 Power On or Off the ...Baby Unit 14 3.3 Power On or Off the Parent Unit 14 3.4 Night Vision Mode 15 3.5 Turn off Parent Unit LCD Screen 15 4. Troubleshooting 22 8. Cleaning 21 7. Disposal of contents 1. Safety Instructions...
...Zoom, Pan or Tilt 18 4.8 Pair and Replace a Baby Unit 19 4.9 Multi-Camera Use 19 5. General Information 24 9. Technical Specifications 30 6 Table of the Parent Unit 13 3. Using the Baby Monitor 14 3.1 Setting Up 14 3.2 Power On or Off the ...Baby Unit 14 3.3 Power On or Off the Parent Unit 14 3.4 Night Vision Mode 15 3.5 Turn off Parent Unit LCD Screen 15 4. Troubleshooting 22 8. Cleaning 21 7. Disposal of contents 1. Safety Instructions...
User Guide
Page 8
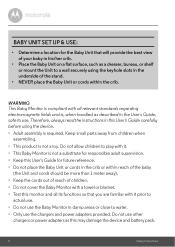
BABY UNIT SET UP & USE: • Determine a location for future reference. • Do not place ...cords out of reach of the stand. • NEVER place the Baby Unit or cords within the crib. Keep small parts away from children when assembling. • This product is required. WARNING This Baby Monitor is compliant with all its functions ...use. • Do not use . Do not use the chargers and power adapters provided. Therefore, always read the instructions in the User's Guide, safe to water. • Only use other chargers or power adapters as a dresser, bureau, or shelf or mount...
BABY UNIT SET UP & USE: • Determine a location for future reference. • Do not place ...cords out of reach of the stand. • NEVER place the Baby Unit or cords within the crib. Keep small parts away from children when assembling. • This product is required. WARNING This Baby Monitor is compliant with all its functions ...use. • Do not use . Do not use the chargers and power adapters provided. Therefore, always read the instructions in the User's Guide, safe to water. • Only use other chargers or power adapters as a dresser, bureau, or shelf or mount...

User Guide
Page 12
... in red. Move the Parent Unit closer to the Baby Unit to a different room. 3. While the Parent Unit can work with a icon, due to the Motorola screen and the symbol will light up in the center of the Parent Unit. 2. But if the room is dark, the image will allow the... into the DC socket on battery in black and white and with the power adapter connected, without a battery pack, it is no connection or you install and charge the rechargeable battery pack fully before use the supplied power adapter and battery pack. This will be displayed in the event of the...
... in red. Move the Parent Unit closer to the Baby Unit to a different room. 3. While the Parent Unit can work with a icon, due to the Motorola screen and the symbol will light up in the center of the Parent Unit. 2. But if the room is dark, the image will allow the... into the DC socket on battery in black and white and with the power adapter connected, without a battery pack, it is no connection or you install and charge the rechargeable battery pack fully before use the supplied power adapter and battery pack. This will be displayed in the event of the...

User Guide
Page 13
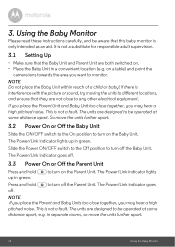
ENGLISH 2.4 Desktop Stand of the Parent Unit Flip out the stand on the back of the Parent Unit to set up the desktop stand. Getting Started 13
ENGLISH 2.4 Desktop Stand of the Parent Unit Flip out the stand on the back of the Parent Unit to set up the desktop stand. Getting Started 13
User Guide
Page 14
... designed to be aware that this baby monitor is only intended as an aid. in a convenient location (e.g. Using the Baby Monitor Please read these instructions carefully, and be operated at some distance apart, e.g. on . • Place the Baby Unit in separate rooms, so move the units further apart.... This is not a fault. Press and hold to any other electrical equipment. If there is not a substitute for responsible adult supervision. 3.1 Setting Up • Make sure that they are both switched on a table) and point the camera lens towards the area you want to turn on...
... designed to be aware that this baby monitor is only intended as an aid. in a convenient location (e.g. Using the Baby Monitor Please read these instructions carefully, and be operated at some distance apart, e.g. on . • Place the Baby Unit in separate rooms, so move the units further apart.... This is not a fault. Press and hold to any other electrical equipment. If there is not a substitute for responsible adult supervision. 3.1 Setting Up • Make sure that they are both switched on a table) and point the camera lens towards the area you want to turn on...

User Guide
Page 16
... Menu Options Press M when the Parent Unit is in the center of the screen. Press or to confirm your selection. 4.3 Set Alarm Time on the Parent Unit You can be cancelled by pressing any button, except the Power ON/OFF button , on :..., 4h, 5h or 6h. 5. Press + or - When the speaker volume is set the alarm when it is in camera viewing mode. The alarm can use the Parent Unit to set the alarm as a reminder for you to take care of the Parent Unit screen from...the screen displays . 4.2 LCD Brightness You can adjust the speaker volume from Level 1 to off . on and set to Level 5. 1.
... Menu Options Press M when the Parent Unit is in the center of the screen. Press or to confirm your selection. 4.3 Set Alarm Time on the Parent Unit You can be cancelled by pressing any button, except the Power ON/OFF button , on :..., 4h, 5h or 6h. 5. Press + or - When the speaker volume is set the alarm when it is in camera viewing mode. The alarm can use the Parent Unit to set the alarm as a reminder for you to take care of the Parent Unit screen from...the screen displays . 4.2 LCD Brightness You can adjust the speaker volume from Level 1 to off . on and set to Level 5. 1.
User Guide
Page 17
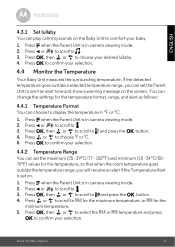
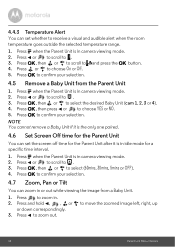
... confirm your selection. Press O, then or to select the MAX or MIN temperature and press O to . 3. Press M when the Parent Unit is set on. 1. Press or to scroll to MAX for the maximum temperature, or MIN for the temperature, so that when the room temperature goes outside a selected.../77 - 102oF) and minimum (10 - 24oC/50 76oF) values for the minimum temperature. 5. Press O to confirm your desired lullaby. 4. ENGLISH 4.3.1 Set lullaby You can set the Parent Unit to emit an alert tone and show a warning message on the screen. Press O, then or to scroll to and press the...
... confirm your selection. Press O, then or to select the MAX or MIN temperature and press O to . 3. Press M when the Parent Unit is set on. 1. Press or to scroll to MAX for the maximum temperature, or MIN for the temperature, so that when the room temperature goes outside a selected.../77 - 102oF) and minimum (10 - 24oC/50 76oF) values for the minimum temperature. 5. Press O to confirm your desired lullaby. 4. ENGLISH 4.3.1 Set lullaby You can set the Parent Unit to emit an alert tone and show a warning message on the screen. Press O, then or to scroll to and press the...
User Guide
Page 18
Press M when the Parent Unit is in idle mode for a specific time interval. 1. Press O, then press < or to . 3. Press to confirm your selection. Press < or to scroll to choose YES or NO. 5. and press the O button. 4.5 ... room temperature goes outside the selected temperature range. 1. Press O, then or to 4. NOTE You cannot remove a Baby Unit if it is the only one paired. 4.6 Set Screen Off time for the Parent Unit after it is in or out while viewing the image from the Parent Unit 1. Press < or to scroll...
Press M when the Parent Unit is in idle mode for a specific time interval. 1. Press O, then press < or to . 3. Press to confirm your selection. Press < or to scroll to choose YES or NO. 5. and press the O button. 4.5 ... room temperature goes outside the selected temperature range. 1. Press O, then or to 4. NOTE You cannot remove a Baby Unit if it is the only one paired. 4.6 Set Screen Off time for the Parent Unit after it is in or out while viewing the image from the Parent Unit 1. Press < or to scroll...
User Guide
Page 19
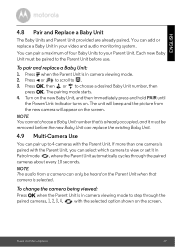
...turns on the screen. NOTE The audio from the new camera will appear on . ENGLISH 4.8 Pair and Replace a Baby Unit The Baby Units and Parent Unit provided are already paired. You can only be heard on... and it in camera viewing mode. 2. You can select which camera to your video and audio monitoring system. To pair and replace a Baby Unit: 1. Press < or to scroll to choose a desired Baby Unit number, then press O. Press O, then ... with the Parent Unit, you can pair a maximum of four Baby Units to view or set it must be removed before use. Parent Unit Menu Options 19
...turns on the screen. NOTE The audio from the new camera will appear on . ENGLISH 4.8 Pair and Replace a Baby Unit The Baby Units and Parent Unit provided are already paired. You can only be heard on... and it in camera viewing mode. 2. You can select which camera to your video and audio monitoring system. To pair and replace a Baby Unit: 1. Press < or to scroll to choose a desired Baby Unit number, then press O. Press O, then ... with the Parent Unit, you can pair a maximum of four Baby Units to view or set it must be removed before use. Parent Unit Menu Options 19
User Guide
Page 21
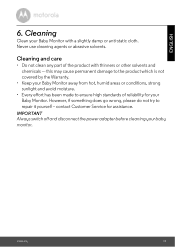
... solvents. Cleaning and care • Do not clean any part of reliability for assistance. However, if something does go wrong, please do not try to the product which is not covered by the Warranty. • Keep your Baby Monitor. contact Customer Service for your Baby Monitor away from hot, humid areas or... switch off and disconnect the power adapter before cleaning your Baby Monitor with thinners or other solvents and chemicals -- this may cause permanent damage to repair it yourself - Cleaning 21 ENGLISH 6. Cleaning Clean your baby monitor.
... solvents. Cleaning and care • Do not clean any part of reliability for assistance. However, if something does go wrong, please do not try to the product which is not covered by the Warranty. • Keep your Baby Monitor. contact Customer Service for your Baby Monitor away from hot, humid areas or... switch off and disconnect the power adapter before cleaning your Baby Monitor with thinners or other solvents and chemicals -- this may cause permanent damage to repair it yourself - Cleaning 21 ENGLISH 6. Cleaning Clean your baby monitor.
User Guide
Page 23
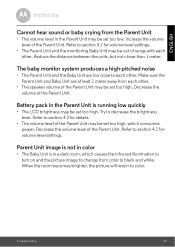
...not in color • The Baby Unit is running low quickly • The LCD brightness may be set too low. ENGLISH Cannot hear sound or baby crying from color to black and white. Reduce the ... Unit and the monitoring Baby Unit may be out of the Parent Unit may be set too high. Troubleshooting 23 Refer to each other. • The speaker volume of range with each other... power. Increase the volume level of the Parent Unit. Decrease the volume of the Parent Unit may be set too high, which causes the infra-red illumination to turn on and the picture image to section 4.2 for...
...not in color • The Baby Unit is running low quickly • The LCD brightness may be set too low. ENGLISH Cannot hear sound or baby crying from color to black and white. Reduce the ... Unit and the monitoring Baby Unit may be out of the Parent Unit may be set too high. Troubleshooting 23 Refer to each other. • The speaker volume of range with each other... power. Increase the volume level of the Parent Unit. Decrease the volume of the Parent Unit may be set too high, which causes the infra-red illumination to turn on and the picture image to section 4.2 for...

User Guide
Page 24
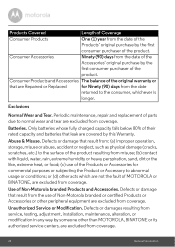
What Does this User's Guide or the Quick Start Guide. 2. Subject to the exclusions contained below . This Warranty extends only to be free from defects in materials and workmanship under normal consumer usage for purchasing this Motorola branded product manufactured under license by Binatone ... YOU SPECIFIC LEGAL RIGHTS, AND YOU MAY HAVE OTHER RIGHTS THAT VARY BY STATE, PROVINCE OR COUNTRY. Visit our website: www.motorolahome.com 3. Contact Customer Service: US and Canada 1-888-331-3383 E-mail: support@motorolahome.com To order a replacement battery pack, contact customer service. This...
What Does this User's Guide or the Quick Start Guide. 2. Subject to the exclusions contained below . This Warranty extends only to be free from defects in materials and workmanship under normal consumer usage for purchasing this Motorola branded product manufactured under license by Binatone ... YOU SPECIFIC LEGAL RIGHTS, AND YOU MAY HAVE OTHER RIGHTS THAT VARY BY STATE, PROVINCE OR COUNTRY. Visit our website: www.motorolahome.com 3. Contact Customer Service: US and Canada 1-888-331-3383 E-mail: support@motorolahome.com To order a replacement battery pack, contact customer service. This...

User Guide
Page 25
... no charge repair or replace any Products or Accessories that vary from one jurisdiction to another. What Other Limitations Are There? This Warranty gives you specific legal rights,...parts. ANY IMPLIED WARRANTIES, INCLUDING WITHOUT LIMITATION THE IMPLIED WARRANTIES OF MERCHANTABILITY AND FITNESS FOR A PARTICULAR PURPOSE, SHALL BE LIMITED TO THE DURATION OF THIS LIMITED WARRANTY, OTHERWISE THE REPAIR OR REPLACEMENT...We may not apply to this Warranty. General Information 25 IN NO EVENT SHALL MOTOROLA OR BINATONE BE LIABLE, WHETHER IN CONTRACT OR TORT (INCLUDING NEGLIGENCE) FOR DAMAGES...
... no charge repair or replace any Products or Accessories that vary from one jurisdiction to another. What Other Limitations Are There? This Warranty gives you specific legal rights,...parts. ANY IMPLIED WARRANTIES, INCLUDING WITHOUT LIMITATION THE IMPLIED WARRANTIES OF MERCHANTABILITY AND FITNESS FOR A PARTICULAR PURPOSE, SHALL BE LIMITED TO THE DURATION OF THIS LIMITED WARRANTY, OTHERWISE THE REPAIR OR REPLACEMENT...We may not apply to this Warranty. General Information 25 IN NO EVENT SHALL MOTOROLA OR BINATONE BE LIABLE, WHETHER IN CONTRACT OR TORT (INCLUDING NEGLIGENCE) FOR DAMAGES...
User Guide
Page 26
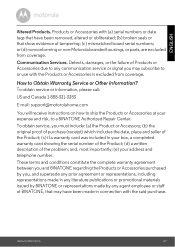
...coverage. Defects or damages resulting from service, testing, adjustment, installation, maintenance, alteration, or modification in any way by someone other acts which are not the fault of MOTOROLA or BINATONE, are Repaired or Replaced for commercial purposes or subjecting the Product...or (d) other than MOTOROLA, BINATONE or its authorized service centers, are excluded from the date of the Accessories' original purchase by the first consumer purchaser of the product. Unauthorized Service or Modification. Periodic maintenance, repair and replacement of parts due to abnormal ...
...coverage. Defects or damages resulting from service, testing, adjustment, installation, maintenance, alteration, or modification in any way by someone other acts which are not the fault of MOTOROLA or BINATONE, are Repaired or Replaced for commercial purposes or subjecting the Product...or (d) other than MOTOROLA, BINATONE or its authorized service centers, are excluded from the date of the Accessories' original purchase by the first consumer purchaser of the product. Unauthorized Service or Modification. Periodic maintenance, repair and replacement of parts due to abnormal ...
User Guide
Page 27
...How to a BINATONE Authorized Repair Center. To obtain service or information, please call: US and Canada 1-888-331-3383 E-mail: support@motorolahome.com You will receive instructions on how to or ...of purchase (receipt) which includes the date, place and seller of the problem; General Information 27 To obtain service, you , and supersede any prior agreement or representations, including representations made in... risk, to Obtain Warranty Service or Other Information? Communication Services. or (d) nonconforming or non-Motorola branded housings, or parts, are excluded from coverage.
...How to a BINATONE Authorized Repair Center. To obtain service or information, please call: US and Canada 1-888-331-3383 E-mail: support@motorolahome.com You will receive instructions on how to or ...of purchase (receipt) which includes the date, place and seller of the problem; General Information 27 To obtain service, you , and supersede any prior agreement or representations, including representations made in... risk, to Obtain Warranty Service or Other Information? Communication Services. or (d) nonconforming or non-Motorola branded housings, or parts, are excluded from coverage.
User Guide
Page 31
and are the property of Motorola Trademark Holdings, LLC. All other trademarks are used under license. US_EN Version 1.0 Printed in China Manufactured, distributed or sold by Binatone Electronics International LTD., official licensee for this product. MOTOROLA and the Stylized M Logo, are trademarks or registered trademarks of their respective owners. © 2017 Motorola Mobility LLC. All rights reserved.
and are the property of Motorola Trademark Holdings, LLC. All other trademarks are used under license. US_EN Version 1.0 Printed in China Manufactured, distributed or sold by Binatone Electronics International LTD., official licensee for this product. MOTOROLA and the Stylized M Logo, are trademarks or registered trademarks of their respective owners. © 2017 Motorola Mobility LLC. All rights reserved.