
User Manual
Page 2
... children. • Turn the coffeemaker off parts and before cleaning the appliance. • Do not operate any way. The resulting extended cord must be pulled on by or near a hot gas or electric burner or in a heated oven. • To disconnect, turn the coffeemaker OFF, then remove the power plug from the power source when the coffeemaker is not in any service covers. If the plug...
... children. • Turn the coffeemaker off parts and before cleaning the appliance. • Do not operate any way. The resulting extended cord must be pulled on by or near a hot gas or electric burner or in a heated oven. • To disconnect, turn the coffeemaker OFF, then remove the power plug from the power source when the coffeemaker is not in any service covers. If the plug...
User Manual
Page 3
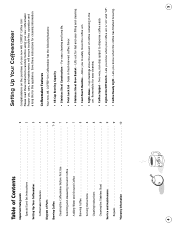
... 5 Coffeemaker Features 5 Diagram of Parts 6 Brewing Coffee 7- 8 Cleaning the Coffeemaker Before First Use 7 Selecting and Measuring Ground Coffee 7 Adding Water and Ground Coffee 7 Brewing Coffee 8 Serving Instructions 8 Cleaning Instructions 8 Cleaning the Stainless Steel 8 Service and Maintenance 9 Repairs 9 Warranty Information 10 Setting Up Your Coffeemaker Congratulations on " and "off". • Coffee Ready Light - Proper use, care, and maintenance will ensure trouble-free operation and a long life for cleaning information. Coffeemaker Features Your new MR. COFFEE®...
... 5 Coffeemaker Features 5 Diagram of Parts 6 Brewing Coffee 7- 8 Cleaning the Coffeemaker Before First Use 7 Selecting and Measuring Ground Coffee 7 Adding Water and Ground Coffee 7 Brewing Coffee 8 Serving Instructions 8 Cleaning Instructions 8 Cleaning the Stainless Steel 8 Service and Maintenance 9 Repairs 9 Warranty Information 10 Setting Up Your Coffeemaker Congratulations on " and "off". • Coffee Ready Light - Proper use, care, and maintenance will ensure trouble-free operation and a long life for cleaning information. Coffeemaker Features Your new MR. COFFEE®...
User Manual
Page 4
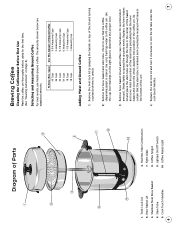
.... 4) Replace the twist lock lid and turn it clockwise to see chart above for the first time. (See "Cleaning Instructions" on the sight glass to fill coffee urn. Use cold, fresh tap water to determine the proper level. 3) Remove brew basket lid and add coffee (see that the stem tube is closed. Stem Tube 5. Coffee Spigot 9. To Brew (5oz. Twist Lock Lid 2. Sight-Glass 8. Lighted On/Off Switch 10. Use the cup...
.... 4) Replace the twist lock lid and turn it clockwise to see chart above for the first time. (See "Cleaning Instructions" on the sight glass to fill coffee urn. Use cold, fresh tap water to determine the proper level. 3) Remove brew basket lid and add coffee (see that the stem tube is closed. Stem Tube 5. Coffee Spigot 9. To Brew (5oz. Twist Lock Lid 2. Sight-Glass 8. Lighted On/Off Switch 10. Use the cup...
User Manual
Page 5
.../off switch will turn on and remain on . 2. The coffee urn will automatically switch to a "Keep Warm" setting to keep coffee at the following toll-free telephone numbers to -serve temperature. Wash all parts with clean water, dry thoroughly, and store in the U.S. Never use : 1. For difficult spots like sticky fingerprints, clean the stainless steel body of the coffeemaker. If you purchased it. Serving Instructions 1. Place a cup under the...
.../off switch will turn on and remain on . 2. The coffee urn will automatically switch to a "Keep Warm" setting to keep coffee at the following toll-free telephone numbers to -serve temperature. Wash all parts with clean water, dry thoroughly, and store in the U.S. Never use : 1. For difficult spots like sticky fingerprints, clean the stainless steel body of the coffeemaker. If you purchased it. Serving Instructions 1. Place a cup under the...
User Manual
Page 6
...or any way change the terms and conditions of this product or any component of equal or greater value. In the U.S.A., this warranty is no longer available, replacement may not apply to you . Regrese el aparato a un centro de servicio autorizado para su examinación, reparación o ajuste. • El uso de accesorios ... por o cerca de niños. • Apague la cafetera y desconéctela de la toma de corriente cuando la cafetera no sean de la marca MR. COFFEE® puede causar lesiones o daños. • No se use en exteriores. • No permita que el cordón cuelgue...
...or any way change the terms and conditions of this product or any component of equal or greater value. In the U.S.A., this warranty is no longer available, replacement may not apply to you . Regrese el aparato a un centro de servicio autorizado para su examinación, reparación o ajuste. • El uso de accesorios ... por o cerca de niños. • Apague la cafetera y desconéctela de la toma de corriente cuando la cafetera no sean de la marca MR. COFFEE® puede causar lesiones o daños. • No se use en exteriores. • No permita que el cordón cuelgue...


