
User Manual
Page 1
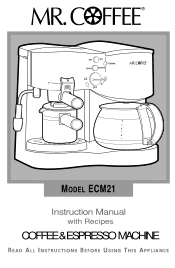
Off On ® Coffee Strong Standard OFF MODEL ECM21 Instruction Manual with Recipes COFFEE&ESPRESSO MACHINE READ ALL INSTRUCTIONS BEFORE USING THIS APPLIANCE
Off On ® Coffee Strong Standard OFF MODEL ECM21 Instruction Manual with Recipes COFFEE&ESPRESSO MACHINE READ ALL INSTRUCTIONS BEFORE USING THIS APPLIANCE

User Manual
Page 2
... persons, including the following instructions are designed for use and before cleaning. Use on . 15. Both carafes are not followed: a. Do not operate any appliance with your MR. COFFEE® Coffee and Espresso Machine and therefore must never be used on a rangetop or in any oven, INCLUDING A MICROWAVE. 2 DO NOT remove the reservoir cap or brew basket on or taking off parts and before turning appliance on a hard...
... persons, including the following instructions are designed for use and before cleaning. Use on . 15. Both carafes are not followed: a. Do not operate any appliance with your MR. COFFEE® Coffee and Espresso Machine and therefore must never be used on a rangetop or in any oven, INCLUDING A MICROWAVE. 2 DO NOT remove the reservoir cap or brew basket on or taking off parts and before turning appliance on a hard...

User Manual
Page 3
d. No user serviceable parts inside. SPECIAL CORD SET INSTRUCTIONS 1. If the plug does not fit fully in the water reservoir. Make sure the coffeemaker is turned off when the decanter is ever boiled dry. The resulting extended cord must be done by children or tripped over a...re or electric shock, do not remove any way. f. Repair should be at least 10 amps and 120 volts. Do not attempt to reduce the hazards resulting from hot steam and water, NEVER open the water reservoir cap or brew basket on the espresso machine while the unit is turned on or as long as there...
d. No user serviceable parts inside. SPECIAL CORD SET INSTRUCTIONS 1. If the plug does not fit fully in the water reservoir. Make sure the coffeemaker is turned off when the decanter is ever boiled dry. The resulting extended cord must be done by children or tripped over a...re or electric shock, do not remove any way. f. Repair should be at least 10 amps and 120 volts. Do not attempt to reduce the hazards resulting from hot steam and water, NEVER open the water reservoir cap or brew basket on the espresso machine while the unit is turned on or as long as there...
User Manual
Page 4
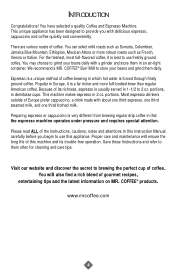
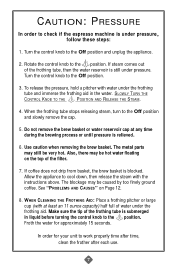
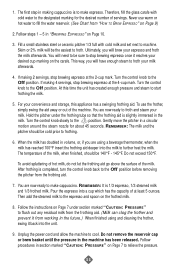
... refer to brewing the perfect cup of the instructions, cautions, notes and attentions in that the espresso machine operates under pressure and requires special attention. This unique appliance has been designed to use this machine and its richness, espresso is very different from brewing regular drip coffee in this Instruction Manual carefully before you with a grinder and store them daily. Because of coffee. This machine makes espresso in demitasse cups. You will...
... refer to brewing the perfect cup of the instructions, cautions, notes and attentions in that the espresso machine operates under pressure and requires special attention. This unique appliance has been designed to use this machine and its richness, espresso is very different from brewing regular drip coffee in this Instruction Manual carefully before you with a grinder and store them daily. Because of coffee. This machine makes espresso in demitasse cups. You will...
User Manual
Page 5
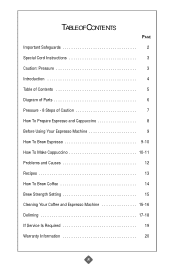
TABLE OF CONTE NTS PAGE Important Safeguards 2 Special Cord Instructions 3 Caution: Pressure 3 Introduction 4 Table of Contents 5 Diagram of Parts 6 Pressure - 8 Steps of Caution 7 How To Prepare Espresso and Cappuccino 8 Before Using Your Espresso Machine 9 How To Brew Espresso 9-10 How To Make Cappuccino 10-11 Problems and Causes 12 Recipes 13 How To Brew Coffee 14 Brew Strength Setting 15 Cleaning Your Coffee and Espresso Machine 15-16 Deliming 17-18 If Service Is Required 19 Warranty Information 20 5
TABLE OF CONTE NTS PAGE Important Safeguards 2 Special Cord Instructions 3 Caution: Pressure 3 Introduction 4 Table of Contents 5 Diagram of Parts 6 Pressure - 8 Steps of Caution 7 How To Prepare Espresso and Cappuccino 8 Before Using Your Espresso Machine 9 How To Brew Espresso 9-10 How To Make Cappuccino 10-11 Problems and Causes 12 Recipes 13 How To Brew Coffee 14 Brew Strength Setting 15 Cleaning Your Coffee and Espresso Machine 15-16 Deliming 17-18 If Service Is Required 19 Warranty Information 20 5
User Manual
Page 6
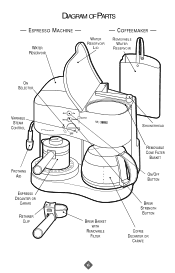
WATER RESERVOIR LID REMOVABLE WATER RESERVOIR ON SELECTOR VARIABLE STEAM CONTROL FROTHING AID ESPRESSO DECANTER OR CARAFE RETAINER CLIP Off Strong On Coffee Standard OFF BREW BASKET WITH REMOVABLE FILTER 6 SHOWERHEAD REMOVABLE CONE FILTER BASKET ON/OFF BUTTON BREW STRENGTH BUTTON COFFEE DECANTER OR CARAFE WATER RESERVOIR - COFFEEMAKER - ESPRESSO MACHINE - DIAGRAM OF PARTS -
WATER RESERVOIR LID REMOVABLE WATER RESERVOIR ON SELECTOR VARIABLE STEAM CONTROL FROTHING AID ESPRESSO DECANTER OR CARAFE RETAINER CLIP Off Strong On Coffee Standard OFF BREW BASKET WITH REMOVABLE FILTER 6 SHOWERHEAD REMOVABLE CONE FILTER BASKET ON/OFF BUTTON BREW STRENGTH BUTTON COFFEE DECANTER OR CARAFE WATER RESERVOIR - COFFEEMAKER - ESPRESSO MACHINE - DIAGRAM OF PARTS -
User Manual
Page 7
... 12. 8. Froth the water for your unit to work properly time after time, clean the frother after each use. 7 See "PROBLEMS AND CAUSES" on the top of the frothing tube is submerged in the water. Use caution when removing the brew basket. Make sure the tip of the filter. 7. WHEN CLEANING THE FROTHING AID: Place a frothing pitcher or large cup (with the instructions above. Turn the control knob...
... 12. 8. Froth the water for your unit to work properly time after time, clean the frother after each use. 7 See "PROBLEMS AND CAUSES" on the top of the frothing tube is submerged in the water. Use caution when removing the brew basket. Make sure the tip of the filter. 7. WHEN CLEANING THE FROTHING AID: Place a frothing pitcher or large cup (with the instructions above. Turn the control knob...
User Manual
Page 8
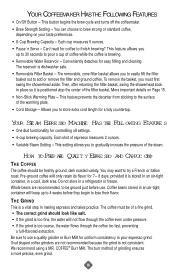
... turns off the coffeemaker. • Brew Strength Setting - Can't wait for easy filling and cleaning. Conveniently detaches for coffee to finish brewing? Do not store in an air-tight container will keep up to 30 seconds to brew strong or standard coffee, depending on Page 15. • Non-Stick Warming Plate - We recommend using a MR. COFFEE® Burr Mill. You can choose to pour a cup...
... turns off the coffeemaker. • Brew Strength Setting - Can't wait for easy filling and cleaning. Conveniently detaches for coffee to finish brewing? Do not store in an air-tight container will keep up to 30 seconds to brew strong or standard coffee, depending on Page 15. • Non-Stick Warming Plate - We recommend using a MR. COFFEE® Burr Mill. You can choose to pour a cup...
User Manual
Page 9
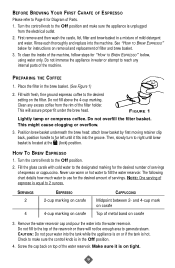
... 1 Lightly tamp or compress coffee. Fill the glass carafe with fresh, fine ground espresso coffee to the desired setting on carafe CAPPUCCINO Midpoint between 2- Clean any internal parts of mild detergent and water. This might cause clogging or over fill the filter basket. Turn the control knob to fill the water reservoir. NOTE: One serving of espresso or cappuccino. Remove the water reservoir cap and pour the water into the machine. CAUTION...
... 1 Lightly tamp or compress coffee. Fill the glass carafe with fresh, fine ground espresso coffee to the desired setting on carafe CAPPUCCINO Midpoint between 2- Clean any internal parts of mild detergent and water. This might cause clogging or over fill the filter basket. Turn the control knob to fill the water reservoir. NOTE: One serving of espresso or cappuccino. Remove the water reservoir cap and pour the water into the machine. CAUTION...
User Manual
Page 10
... set it is in the machine has been released. Place the cover on Page 7. Make sure to let you perfect this process. The milk should be discouraged if it on . 5. CAUTION: The metal parts of the brew basket might still be half steamed (bottom of pitcher) and half frothed (top of the decanter lid. 3. For cleaning instructions, refer to cool. The light will...
... set it is in the machine has been released. Place the cover on Page 7. Make sure to let you perfect this process. The milk should be discouraged if it on . 5. CAUTION: The metal parts of the brew basket might still be half steamed (bottom of pitcher) and half frothed (top of the decanter lid. 3. For cleaning instructions, refer to cool. The light will...
User Manual
Page 11
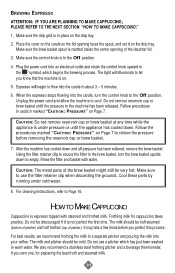
... step in making cappuccino is slightly immersed in the milk. Never use the frother, simply swing the aid away or out of the machine. If making 4 servings, stop brewing espresso at the 4-cup mark. If making 2 servings, stop brewing espresso once it back into the unit. 9. Turn the control knob to the Off position. For your espresso and froth the milk afterwards. Ultimately, you will need to be the easiest to further heat the milk...
... step in making cappuccino is slightly immersed in the milk. Never use the frother, simply swing the aid away or out of the machine. If making 4 servings, stop brewing espresso at the 4-cup mark. If making 2 servings, stop brewing espresso once it back into the unit. 9. Turn the control knob to the Off position. For your espresso and froth the milk afterwards. Ultimately, you will need to be the easiest to further heat the milk...
User Manual
Page 12
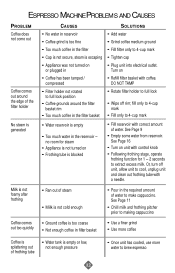
... water to cool, unplug unit and clean out frothing tube with coffee. Turn on or plugged in the reservoir - DO NOT TAMP • Rotate filter holder to full lock • Wipe off unit, allow unit to make cappuccino. Milk is not foamy after frothing • Ran out of steam • Milk is not cold enough • Pour in filter basket • Use a finer grind...
... water to cool, unplug unit and clean out frothing tube with coffee. Turn on or plugged in the reservoir - DO NOT TAMP • Rotate filter holder to full lock • Wipe off unit, allow unit to make cappuccino. Milk is not foamy after frothing • Ran out of steam • Milk is not cold enough • Pour in filter basket • Use a finer grind...
User Manual
Page 14
... remove the water reservoir at a time. Place the decanter on the warming plate or the water and grounds will over flow may cause the coffeemaker to brew fewer cups of the appliance. Do not brew coffee while the water reservoir lid is recommended to either reduce the amount of ground coffee used or to over top of the coffeemaker when you remove the reservoir. Place a MR. COFFEE® brand 8-12 cup...
... remove the water reservoir at a time. Place the decanter on the warming plate or the water and grounds will over flow may cause the coffeemaker to brew fewer cups of the appliance. Do not brew coffee while the water reservoir lid is recommended to either reduce the amount of ground coffee used or to over top of the coffeemaker when you remove the reservoir. Place a MR. COFFEE® brand 8-12 cup...

User Manual
Page 15
... PLATE WITHIN 30 SECONDS TO PREVENT OVERFLOW AND POSSIBLE INJURY. If the brew basket over flow while brewing coffee. 15 To turn off the coffeemaker, press the switch to cool before handling. 7. If using a permanent filter, rinse the filter with warm water. • Return the filter basket to the appliance. If you to sneak a cup of the unit. The coffeemaker will brew more information. Discard the paper filter...
... PLATE WITHIN 30 SECONDS TO PREVENT OVERFLOW AND POSSIBLE INJURY. If the brew basket over flow while brewing coffee. 15 To turn off the coffeemaker, press the switch to cool before handling. 7. If using a permanent filter, rinse the filter with warm water. • Return the filter basket to the appliance. If you to sneak a cup of the unit. The coffeemaker will brew more information. Discard the paper filter...
User Manual
Page 16
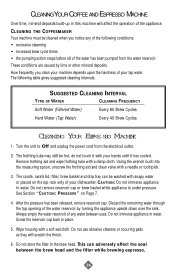
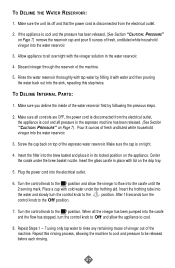
... Water) Every 40 Brew Cycles CLEANING YOUR ESPRE SSO MACHINE 1. Always empty the water reservoir of your hands until it with your tap water. After the pressure has been released, remove reservoir cap. This can be washed with a needle or toothpick. 3. CLEANINGYOUR COFFEE AND ESPRESSO MACHINE Over time, mineral deposits built-up in this machine will scratch the finish. 6. The carafe, carafe lid, filter, brew basket and drip...
... Water) Every 40 Brew Cycles CLEANING YOUR ESPRE SSO MACHINE 1. Always empty the water reservoir of your hands until it with your tap water. After the pressure has been released, remove reservoir cap. This can be washed with a needle or toothpick. 3. CLEANINGYOUR COFFEE AND ESPRESSO MACHINE Over time, mineral deposits built-up in this machine will scratch the finish. 6. The carafe, carafe lid, filter, brew basket and drip...
User Manual
Page 17
... the cap back on Page 7) remove the reservoir cap and pour 8 ounces of the machine. 5. When all pressure in its locked position on the drip tray. 5. Insert the filter into the water reservoir. 3. Insert the glass carafe in the water reservoir. 4. Rinse the water reservoir thoroughly with cold water under the brew basket nozzle. TO DELIME INTERNAL PARTS: 1. Pour 8 ounces of the machine. Turn the control knob to the...
... the cap back on Page 7) remove the reservoir cap and pour 8 ounces of the machine. 5. When all pressure in its locked position on the drip tray. 5. Insert the filter into the water reservoir. 3. Insert the glass carafe in the water reservoir. 4. Rinse the water reservoir thoroughly with cold water under the brew basket nozzle. TO DELIME INTERNAL PARTS: 1. Pour 8 ounces of the machine. Turn the control knob to the...
User Manual
Page 18
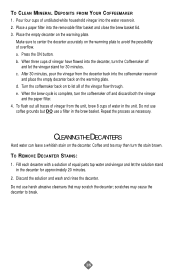
... the water reservoir. 2. When three cups of overflow. After 30 minutes, pour the vinegar from the unit, brew 8 cups of equal parts tap water and vinegar and let the solution stand in the brew basket. CLEANING THE DEC ANTERS Hard water can leave a whitish stain on the warming plate. Press the ON button. b. a. Repeat the process as necessary. When the brew cycle is complete, turn...
... the water reservoir. 2. When three cups of overflow. After 30 minutes, pour the vinegar from the unit, brew 8 cups of equal parts tap water and vinegar and let the solution stand in the brew basket. CLEANING THE DEC ANTERS Hard water can leave a whitish stain on the warming plate. Press the ON button. b. a. Repeat the process as necessary. When the brew cycle is complete, turn...
User Manual
Page 19
... not send any product to brewing the perfect cup of coffee. All repairs must be made by SUNBEAM or by an Authorized Sunbeam Service Center. www.mrcoffee.com CONSUMER SERVICE DEPARTMENT SUNBEAM PRODUCTS, INC. IF SERVICE IS REQUIRED, DO NOT RETURN TOYOUR STORE FOR SERVICE, CALL 1-800 MR COFFEE (1-800-672-6333) TO ASSIST US IN SERVING YOU, PLEASE HAVE THE MODEL NUMBER AND DATE...
... not send any product to brewing the perfect cup of coffee. All repairs must be made by SUNBEAM or by an Authorized Sunbeam Service Center. www.mrcoffee.com CONSUMER SERVICE DEPARTMENT SUNBEAM PRODUCTS, INC. IF SERVICE IS REQUIRED, DO NOT RETURN TOYOUR STORE FOR SERVICE, CALL 1-800 MR COFFEE (1-800-672-6333) TO ASSIST US IN SERVING YOU, PLEASE HAVE THE MODEL NUMBER AND DATE...
User Manual
Page 20
... express or implied warranty. This warranty gives you specific legal rights, and you have any questions regarding this product or any of the following: negligent use or misuse of nature, such as fire, flood, hurricanes and tornadoes. Replacement will repair or replace this warranty please call 1-800-672-6333. 20 If the product is your exclusive warranty. Keep the original sales receipt...
... express or implied warranty. This warranty gives you specific legal rights, and you have any questions regarding this product or any of the following: negligent use or misuse of nature, such as fire, flood, hurricanes and tornadoes. Replacement will repair or replace this warranty please call 1-800-672-6333. 20 If the product is your exclusive warranty. Keep the original sales receipt...

User Manual
Page 40
©2001 Sunbeam Products. N. 108680 MR. COFFEE® is a registered trademark of Sunbeam Products. Inc. All rights reserved. Inc. Printed in China, 2001 P. Distributed by Sunbeam Products, Inc., Boca Raton, Florida 33431.
©2001 Sunbeam Products. N. 108680 MR. COFFEE® is a registered trademark of Sunbeam Products. Inc. All rights reserved. Inc. Printed in China, 2001 P. Distributed by Sunbeam Products, Inc., Boca Raton, Florida 33431.


