
User Manual
Page 2
..., contact a qualified electrician. Special Cord Set Instructions A short power supply cord is removed during the brewing cycle. 15. Always plug cord into the wall outlet before using electrical appliances, to reduce the hazards resulting from wall outlet. 13. Read all instructions carefully before turning on by MR. COFFEE® may occur if the cover is lifted or brew basket is provided to reduce the...
..., contact a qualified electrician. Special Cord Set Instructions A short power supply cord is removed during the brewing cycle. 15. Always plug cord into the wall outlet before using electrical appliances, to reduce the hazards resulting from wall outlet. 13. Read all instructions carefully before turning on by MR. COFFEE® may occur if the cover is lifted or brew basket is provided to reduce the...

User Manual
Page 3
... 10 Brewing Coffee Later 11 Cleaning the Coffeemaker Between Brew Cycles 12 Maintaining Your Coffeemaker 13 Cleaning the Coffeemaker 13 Using MR. COFFEE® Cleaner 13 Cleaning the Decanter 15 Troubleshooting 16 Service and Maintenance 17 Replacement Parts 17 Repairs 17 Warranty Information 18 5 Proper care and maintenance will cause a long drip time from edge of Contents 5 Setting Up Your Coffeemaker 6 Coffeemaker Features 7 Adjusting the Power Cord Length 8 Setting the Clock 8 Operation and Use 9 Before First Use 9 Preparing Coffeemaker for cleaning and care tips...
... 10 Brewing Coffee Later 11 Cleaning the Coffeemaker Between Brew Cycles 12 Maintaining Your Coffeemaker 13 Cleaning the Coffeemaker 13 Using MR. COFFEE® Cleaner 13 Cleaning the Decanter 15 Troubleshooting 16 Service and Maintenance 17 Replacement Parts 17 Repairs 17 Warranty Information 18 5 Proper care and maintenance will cause a long drip time from edge of Contents 5 Setting Up Your Coffeemaker 6 Coffeemaker Features 7 Adjusting the Power Cord Length 8 Setting the Clock 8 Operation and Use 9 Before First Use 9 Preparing Coffeemaker for cleaning and care tips...
User Manual
Page 4
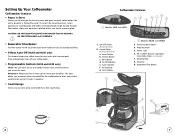
... a fresh pot of coffee? Clock Display 3 4 2 MODELS NLX4 AND NLX5 3. MR. COFFEE® Brand 4-Cup Basket Style Coffee Filters (not included) 7. Minutes Button c. On-Off Indicator e. Power Cord 6. The timer allows you to preset when you would like the coffeemaker to brew your coffeemaker. • Programmable Controls (NLX4 and NLX5 only) Clock: The LED clock serves as a handy kitchen clock, and also allows you to set the timer. Control Panel (NLX4 and NLX5 Only) a. CAUTION: DO NOT REMOVE DECANTER...
... a fresh pot of coffee? Clock Display 3 4 2 MODELS NLX4 AND NLX5 3. MR. COFFEE® Brand 4-Cup Basket Style Coffee Filters (not included) 7. Minutes Button c. On-Off Indicator e. Power Cord 6. The timer allows you to preset when you would like the coffeemaker to brew your coffeemaker. • Programmable Controls (NLX4 and NLX5 only) Clock: The LED clock serves as a handy kitchen clock, and also allows you to set the timer. Control Panel (NLX4 and NLX5 Only) a. CAUTION: DO NOT REMOVE DECANTER...
User Manual
Page 5
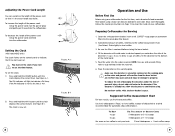
... set . button until the clock displays the correct hour. See Figure B-1. FIGURE A-1 FIGURE B-1 8 Operation and Use Before First Use Before using your taste 2 level tablespoons = 1 level coffee scoop 9 Preparing Coffeemaker for the first time, wash decanter/lid and removable filter basket using . Insert a MR. COFFEE® 4-cup paper or permanent filter into the water reservoir. Be sure the filter is open. Pour the water into the removable filter basket. 2. Place the decanter on the side of drip grind or a grind recommended for automatic drip coffeemakers. An overflow...
... set . button until the clock displays the correct hour. See Figure B-1. FIGURE A-1 FIGURE B-1 8 Operation and Use Before First Use Before using your taste 2 level tablespoons = 1 level coffee scoop 9 Preparing Coffeemaker for the first time, wash decanter/lid and removable filter basket using . Insert a MR. COFFEE® 4-cup paper or permanent filter into the water reservoir. Be sure the filter is open. Pour the water into the removable filter basket. 2. Place the decanter on the side of drip grind or a grind recommended for automatic drip coffeemakers. An overflow...

User Manual
Page 6
... coffeemaker to AUTO. 11 If the brew basket overflows or fails to start brewing. While the coffee is set the time for when you to ON. To turn the coffeemaker Off, slide the switch to OFF. 10 Brewing Coffee Later For Models NLX4 and NLX5: You must set and the coffeemaker will light to AUTO. For Models NLX4 and NLX5: Slide the switch to sneak a cup of ground coffee, fill the water reservoir and slide the button...
... coffeemaker to AUTO. 11 If the brew basket overflows or fails to start brewing. While the coffee is set the time for when you to ON. To turn the coffeemaker Off, slide the switch to OFF. 10 Brewing Coffee Later For Models NLX4 and NLX5: You must set and the coffeemaker will light to AUTO. For Models NLX4 and NLX5: Slide the switch to sneak a cup of ground coffee, fill the water reservoir and slide the button...
User Manual
Page 7
... Coffeemaker: 1) Pour four cups of Water Soft water Hard water Cleaning Frequency Every 80 brew cycles Every 40 brew cycles COFFEEMAKER CLEANER Using MR. COFFEE® Cleaner Please refer to avoid scalding injuries. Handle them with warm water. Unplug the coffeemaker's power cord when not in tap water. How frequently you notice any of the follow conditions: • Excessive steaming • Increased brew cycle times • The pumping action stops before use...
... Coffeemaker: 1) Pour four cups of Water Soft water Hard water Cleaning Frequency Every 80 brew cycles Every 40 brew cycles COFFEEMAKER CLEANER Using MR. COFFEE® Cleaner Please refer to avoid scalding injuries. Handle them with warm water. Unplug the coffeemaker's power cord when not in tap water. How frequently you notice any of the follow conditions: • Excessive steaming • Increased brew cycle times • The pumping action stops before use...

User Manual
Page 8
... pour it into the removable filter basket and close the brew basket. 3) Place the empty decanter on the warming plate. For Models NLX4 and NLX5: Slide the switch to begin the brew cycle. scratches may then turn coffeemaker back On and let remainder of equal parts tap water and vinegar and let the solution stand in the decanter and turn the coffeemaker Off. Then, press the brew button...
... pour it into the removable filter basket and close the brew basket. 3) Place the empty decanter on the warming plate. For Models NLX4 and NLX5: Slide the switch to begin the brew cycle. scratches may then turn coffeemaker back On and let remainder of equal parts tap water and vinegar and let the solution stand in the decanter and turn the coffeemaker Off. Then, press the brew button...
User Manual
Page 9
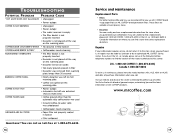
... a replacement, please call us in the U.S. TROUBLESHOOTING POTENTIAL PROBLEMS PROBABLE CAUSE "ON" LIGHT DOES NOT ILLUMINATE • Unplugged • Power outage COFFEE IS NOT BREWING • Unplugged • Power outage • The water reservoir is empty • The filter basket is not properly inserted • Decanter is not placed all the way on the warming plate COFFEEMAKER ONLY BREWS WATER • No grounds in filter basket COFFEEMAKER BREWS SLOWLY • Coffeemaker needs cleaning FILTER BASKET OVERFLOWS •...
... a replacement, please call us in the U.S. TROUBLESHOOTING POTENTIAL PROBLEMS PROBABLE CAUSE "ON" LIGHT DOES NOT ILLUMINATE • Unplugged • Power outage COFFEE IS NOT BREWING • Unplugged • Power outage • The water reservoir is empty • The filter basket is not properly inserted • Decanter is not placed all the way on the warming plate COFFEEMAKER ONLY BREWS WATER • No grounds in filter basket COFFEEMAKER BREWS SLOWLY • Coffeemaker needs cleaning FILTER BASKET OVERFLOWS •...


