Assembly Instructions
Page 1
All Rights Reserved ASSEMBLY INSTRUCTIONS Mobile Whiteboard Stand IWSTAND Made in USA Copyright © 2007, NEC Display Solutions of America.
All Rights Reserved ASSEMBLY INSTRUCTIONS Mobile Whiteboard Stand IWSTAND Made in USA Copyright © 2007, NEC Display Solutions of America.

Assembly Instructions
Page 2
... used with the IW77 Interactive Whiteboard only. Use care when placing the Whiteboard on the Stand. - NEC is not recommended and could result in death or serious injury. This stand is intended to any part of this manual has not been evaluated by unsupervised children. Explanation of Signal Words and Symbols in Safety Labels and Instructions WARNING: CAUTION...
... used with the IW77 Interactive Whiteboard only. Use care when placing the Whiteboard on the Stand. - NEC is not recommended and could result in death or serious injury. This stand is intended to any part of this manual has not been evaluated by unsupervised children. Explanation of Signal Words and Symbols in Safety Labels and Instructions WARNING: CAUTION...

Assembly Instructions
Page 3
... hold the NEC IW77 Interactive Whiteboard. lower stationary horizontal member 5 1 Frame Extrusion; M8 x 20 ( 3/4" L) 12 4 Philips Head Machine Screw; M8 - 24mm OD ( 1" OD) 16 4 Lock Nut; black 19 6 Fastener; top moving horizontal member 6 1 Frame Extrusion; All Rights Reserved, 2007 3 The following instructions will guide you through the steps for assembly. leg 8 2 Left Support Bracket 9 2 Right Support Bracket 10...
... hold the NEC IW77 Interactive Whiteboard. lower stationary horizontal member 5 1 Frame Extrusion; M8 x 20 ( 3/4" L) 12 4 Philips Head Machine Screw; M8 - 24mm OD ( 1" OD) 16 4 Lock Nut; black 19 6 Fastener; top moving horizontal member 6 1 Frame Extrusion; All Rights Reserved, 2007 3 The following instructions will guide you through the steps for assembly. leg 8 2 Left Support Bracket 9 2 Right Support Bracket 10...

Assembly Instructions
Page 4
.... Frame member 5 and 6 have been color coded for color code and identification numbers. When the two are on the...considered the front of the frame members have access holes located in the slot. See Parts List for easy identification. Orange ) and then upper moving frame rail ( 5 ... up with a screw ( 14 ) and 6 5 2 4 3 14 15 Detail A 4 © NEC Display Solutions of the rail. The upper rail ( 6 ) has four holes on one side. Assemble as shown... ) to sliding frame verticals (2 - IWSTAND Assembly Instructions Frame Assembly The first step in the assembly process is...
.... Frame member 5 and 6 have been color coded for color code and identification numbers. When the two are on the...considered the front of the frame members have access holes located in the slot. See Parts List for easy identification. Orange ) and then upper moving frame rail ( 5 ... up with a screw ( 14 ) and 6 5 2 4 3 14 15 Detail A 4 © NEC Display Solutions of the rail. The upper rail ( 6 ) has four holes on one side. Assemble as shown... ) to sliding frame verticals (2 - IWSTAND Assembly Instructions Frame Assembly The first step in the assembly process is...

Assembly Instructions
Page 5
... Attachment There are two support brackets ( 8, 9 )for other support bracket. IWSTAND Assembly Instructions 6 Mounting Rail Attachment Using a Philips screwdriver attach the board mounting rail (1) as shown. Repeat for each end of leg extrusion and top horizontal rail. 15 14 2, 3 16 15 14 8 9 7 18 17 19 © NEC Display Solutions of support bracket, through the washer...
... Attachment There are two support brackets ( 8, 9 )for other support bracket. IWSTAND Assembly Instructions 6 Mounting Rail Attachment Using a Philips screwdriver attach the board mounting rail (1) as shown. Repeat for each end of leg extrusion and top horizontal rail. 15 14 2, 3 16 15 14 8 9 7 18 17 19 © NEC Display Solutions of support bracket, through the washer...
Assembly Instructions
Page 6
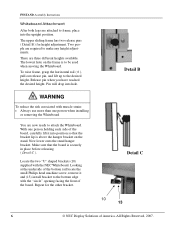
IWSTAND Assembly Instructions Whiteboard Attachment After both legs are attached to frame, place into hole. There are now ready to be used when moving the Whiteboard. WARNING To reduce the risk associated with muscle strain: • Always use more than one person holding each side of ...shaped brackets (10) supplied with the "circle" opening facing the front of the board, carefully lift it and (13) install bracket to the bottom edge with the NEC Whiteboard. Repeat for height adjustment. Pin will drop into the upright position. Now lower onto the stand hanger bracket. To raise ...
IWSTAND Assembly Instructions Whiteboard Attachment After both legs are attached to frame, place into hole. There are now ready to be used when moving the Whiteboard. WARNING To reduce the risk associated with muscle strain: • Always use more than one person holding each side of ...shaped brackets (10) supplied with the "circle" opening facing the front of the board, carefully lift it and (13) install bracket to the bottom edge with the NEC Whiteboard. Repeat for height adjustment. Pin will drop into the upright position. Now lower onto the stand hanger bracket. To raise ...
Assembly Instructions
Page 7
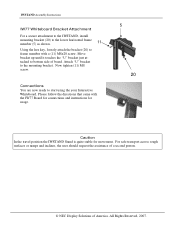
...start using the your Interactive Whiteboard. Now tighten (11) M8 screw. Connections You are now ready to the mounting bracket. Move bracket up until it touches the "U" bracket just attached to frame member with the IW77 Board for connections and instructions for usage. 5 ...request the assistance of a second person. © NEC Display Solutions of board. Please follow the directions that came with a (11) M8x20 screw. IWSTAND Assembly Instructions IW77 Whiteboard Bracket Attachment For a secure attachment to the IWSTAND, install mounting bracket (20) to the lower horizontal frame ...
...start using the your Interactive Whiteboard. Now tighten (11) M8 screw. Connections You are now ready to the mounting bracket. Move bracket up until it touches the "U" bracket just attached to frame member with the IW77 Board for connections and instructions for usage. 5 ...request the assistance of a second person. © NEC Display Solutions of board. Please follow the directions that came with a (11) M8x20 screw. IWSTAND Assembly Instructions IW77 Whiteboard Bracket Attachment For a secure attachment to the IWSTAND, install mounting bracket (20) to the lower horizontal frame ...

Assembly Instructions
Page 8
..., so the above limitations and exclusions may also have a problem caused by accident, abuse, misuse, improper care, or alteration. For additional information about NEC products or for additional contact information, visit our website at ...repair or replace the defective stand at www.necdisplay.com 8 © NEC Display Solutions of the product. All Rights Reserved, 2007 This warranty does not cover repairs due to note that our warranty is expected that vary from defect in materials or workmanship, NEC will be extremely pleased with normal use. This warranty gives you specific...
..., so the above limitations and exclusions may also have a problem caused by accident, abuse, misuse, improper care, or alteration. For additional information about NEC products or for additional contact information, visit our website at ...repair or replace the defective stand at www.necdisplay.com 8 © NEC Display Solutions of the product. All Rights Reserved, 2007 This warranty does not cover repairs due to note that our warranty is expected that vary from defect in materials or workmanship, NEC will be extremely pleased with normal use. This warranty gives you specific...
Quick Reference Guide
Page 1
Interactive Whiteboard 77 Getting Started Quick Reference Guide
Interactive Whiteboard 77 Getting Started Quick Reference Guide
Quick Reference Guide
Page 2
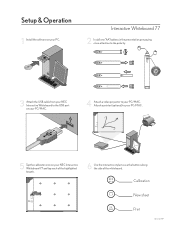
Interactive Whiteboard 77 2 Install one "AA" battery in the presentation pen paying close attention to the polarity. + 3 Attach the USB cable from your NEC Interactive Whiteboard to the USB port on your PC/MAC. 4 Attach a video projector to your NEC Interactive Whiteboard 77 and tap each of the whiteboard. alfher P re ca uc iÛn : n o ver d... la v ista . Attach a printer (optional) to use the buttons along the side of the highlighted targets. 6 Use the interactive stylus to your PC. New sheet Print NEC 020719 Setup & Operation 1 Install the software on your PC/MAC .
Interactive Whiteboard 77 2 Install one "AA" battery in the presentation pen paying close attention to the polarity. + 3 Attach the USB cable from your NEC Interactive Whiteboard to the USB port on your PC/MAC. 4 Attach a video projector to your NEC Interactive Whiteboard 77 and tap each of the whiteboard. alfher P re ca uc iÛn : n o ver d... la v ista . Attach a printer (optional) to use the buttons along the side of the highlighted targets. 6 Use the interactive stylus to your PC. New sheet Print NEC 020719 Setup & Operation 1 Install the software on your PC/MAC .
Safety Guide
Page 1
Interactive Whiteboard 77 Product Safety Guide Including Installation Instructions
Interactive Whiteboard 77 Product Safety Guide Including Installation Instructions
Safety Guide
Page 2
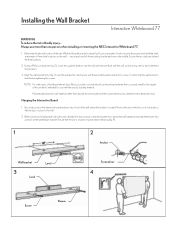
... 4 Screw Sheave one at each end of the unit, carefully lift it into position so that specific building material. Hanging the Interactive Board 1. Installing the Wall Bracket Interactive Whiteboard 77 WARNING To reduce the risk of building materials (e.g. NOTE: For other than one in place before...they are behind the hole locations. 2. Mounting hardware for each side of the mounting bracket and one person when installing or removing the NEC Interactive Whiteboard 77. 1. Position the unit on the floor on its backside so that no studs are flush with the provided...
... 4 Screw Sheave one at each end of the unit, carefully lift it into position so that specific building material. Hanging the Interactive Board 1. Installing the Wall Bracket Interactive Whiteboard 77 WARNING To reduce the risk of building materials (e.g. NOTE: For other than one in place before...they are behind the hole locations. 2. Mounting hardware for each side of the mounting bracket and one person when installing or removing the NEC Interactive Whiteboard 77. 1. Position the unit on the floor on its backside so that no studs are flush with the provided...
Safety Guide
Page 3
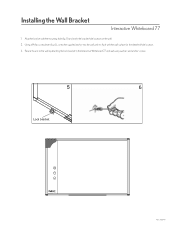
Installing the Wall Bracket Interactive Whiteboard 77 1. Using a Phillips screwdriver (fig. 6) , screw the supplied anchor into the wall until it is flush with the mounting hole (fig. 5) and mark the bracket hole location on the wall. 2. Secure the unit to the wall by attaching the lock bracket to the Interactive Whiteboard 77 and wall using washers and anchor screws. 5 6 Lock bracket NEC 030710 Align the bracket with the wall surface for the identified hole location. 3.
Installing the Wall Bracket Interactive Whiteboard 77 1. Using a Phillips screwdriver (fig. 6) , screw the supplied anchor into the wall until it is flush with the mounting hole (fig. 5) and mark the bracket hole location on the wall. 2. Secure the unit to the wall by attaching the lock bracket to the Interactive Whiteboard 77 and wall using washers and anchor screws. 5 6 Lock bracket NEC 030710 Align the bracket with the wall surface for the identified hole location. 3.