
Assembly Instructions
Page 2
... situation, which if not avoided, may lead to an unsafe condition. Explanation of this Mobile Whiteboard Stand. Use care when lifting and placing the IW77 Interactive Whiteboard on an unstable or unlevel floor is a registered trademark of NEC Corporation 2 © NEC Display Solutions of hand or fingers between mating parts. IWSTAND Assembly Instructions Thank you for...
... situation, which if not avoided, may lead to an unsafe condition. Explanation of this Mobile Whiteboard Stand. Use care when lifting and placing the IW77 Interactive Whiteboard on an unstable or unlevel floor is a registered trademark of NEC Corporation 2 © NEC Display Solutions of hand or fingers between mating parts. IWSTAND Assembly Instructions Thank you for...

Assembly Instructions
Page 3
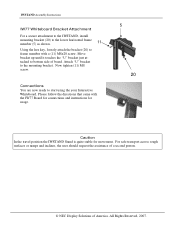
...these important instructions. M6 x 35 ( 1 1/8" L) 13 2 Philips Head Machine Screw; black 20 2 Bracket, Lower Board Yellow © NEC Display Solutions of America. lower stationary horizontal member 5 1 Frame Extrusion; top moving horizontal member 6 1 Frame Extrusion; M4 x 10 ( ... M8 x 60 ( 2 3/8" L) 15 8 Washer; Estimated assembly time is important to layout parts prior to hold the NEC IW77 Interactive Whiteboard. IWSTAND Assembly Instructions The IWSTAND is designed to beginning assembly. leg 8 2 Left Support Bracket 9 2 Right Support Bracket 10 2 "U" Bracket ...
...these important instructions. M6 x 35 ( 1 1/8" L) 13 2 Philips Head Machine Screw; black 20 2 Bracket, Lower Board Yellow © NEC Display Solutions of America. lower stationary horizontal member 5 1 Frame Extrusion; top moving horizontal member 6 1 Frame Extrusion; M4 x 10 ( ... M8 x 60 ( 2 3/8" L) 15 8 Washer; Estimated assembly time is important to layout parts prior to hold the NEC IW77 Interactive Whiteboard. IWSTAND Assembly Instructions The IWSTAND is designed to beginning assembly. leg 8 2 Left Support Bracket 9 2 Right Support Bracket 10 2 "U" Bracket ...
Assembly Instructions
Page 7
... to start using the your Interactive Whiteboard. Connections You are now ready to the mounting bracket. All Rights Reserved, 2007. For safe transport across rough surfaces or ramps and inclines, the user should request the assistance of a second person. © NEC Display Solutions of board. IWSTAND Assembly Instructions IW77 Whiteboard Bracket Attachment For a secure attachment...
... to start using the your Interactive Whiteboard. Connections You are now ready to the mounting bracket. All Rights Reserved, 2007. For safe transport across rough surfaces or ramps and inclines, the user should request the assistance of a second person. © NEC Display Solutions of board. IWSTAND Assembly Instructions IW77 Whiteboard Bracket Attachment For a secure attachment...
Quick Reference Guide
Page 1
Interactive Whiteboard 77 Getting Started Quick Reference Guide
Interactive Whiteboard 77 Getting Started Quick Reference Guide
Quick Reference Guide
Page 2
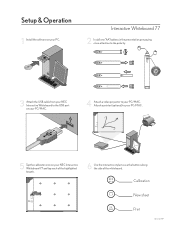
... 2 Install one "AA" battery in the presentation pen paying close attention to the polarity. + 3 Attach the USB cable from your NEC Interactive Whiteboard to the USB port on your PC. New sheet Print NEC 020719 Attach a printer (optional) to your PC/MAC . alfher P re ca uc iÛn : n o ver d irec tam ent e la luz del...
... 2 Install one "AA" battery in the presentation pen paying close attention to the polarity. + 3 Attach the USB cable from your NEC Interactive Whiteboard to the USB port on your PC. New sheet Print NEC 020719 Attach a printer (optional) to your PC/MAC . alfher P re ca uc iÛn : n o ver d irec tam ent e la luz del...
Safety Guide
Page 1
Interactive Whiteboard 77 Product Safety Guide Including Installation Instructions
Interactive Whiteboard 77 Product Safety Guide Including Installation Instructions
Safety Guide
Page 2
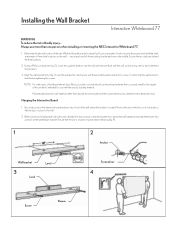
one at each end of the unit and is intended for the weight of the mounting bracket and one person when installing or removing the NEC Interactive Whiteboard 77. 1. Align the wall bracket holes (fig. 3) over the wall anchors and secure with the wall surface using one person holding ...Position the unit on the floor on its backside so that the unit is securely in front of bodily injury... Installing the Wall Bracket Interactive Whiteboard 77 WARNING To reduce the risk of the wall where the bracket is located. Mounting hardware for each side of building materials (e.g. Ensure...
one at each end of the unit and is intended for the weight of the mounting bracket and one person when installing or removing the NEC Interactive Whiteboard 77. 1. Align the wall bracket holes (fig. 3) over the wall anchors and secure with the wall surface using one person holding ...Position the unit on the floor on its backside so that the unit is securely in front of bodily injury... Installing the Wall Bracket Interactive Whiteboard 77 WARNING To reduce the risk of the wall where the bracket is located. Mounting hardware for each side of building materials (e.g. Ensure...
Safety Guide
Page 3
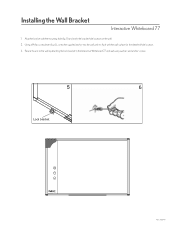
Secure the unit to the wall by attaching the lock bracket to the Interactive Whiteboard 77 and wall using washers and anchor screws. 5 6 Lock bracket NEC 030710 Installing the Wall Bracket Interactive Whiteboard 77 1. Align the bracket with the wall surface for the identified hole location. 3. Using a Phillips screwdriver (fig. 6) , screw the supplied anchor into the wall until it is flush with the mounting hole (fig. 5) and mark the bracket hole location on the wall. 2.
Secure the unit to the wall by attaching the lock bracket to the Interactive Whiteboard 77 and wall using washers and anchor screws. 5 6 Lock bracket NEC 030710 Installing the Wall Bracket Interactive Whiteboard 77 1. Align the bracket with the wall surface for the identified hole location. 3. Using a Phillips screwdriver (fig. 6) , screw the supplied anchor into the wall until it is flush with the mounting hole (fig. 5) and mark the bracket hole location on the wall. 2.