Quick Reference Guide
Page 1
Interactive Whiteboard 77 Getting Started Quick Reference Guide
Interactive Whiteboard 77 Getting Started Quick Reference Guide
Quick Reference Guide
Page 2
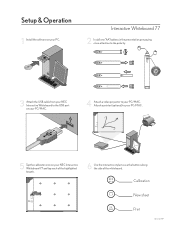
... the calibraton icon on your PC/MAC . Attach a printer (optional) to your NEC Interactive Whiteboard 77 and tap each of the highlighted targets. 6 Use the interactive stylus to your PC. New sheet Print NEC 020719 Setup & Operation 1 Install the software on your PC/MAC. Interactive Whiteboard 77 2 Install one "AA" battery in the presentation pen paying close attention to...
... the calibraton icon on your PC/MAC . Attach a printer (optional) to your NEC Interactive Whiteboard 77 and tap each of the highlighted targets. 6 Use the interactive stylus to your PC. New sheet Print NEC 020719 Setup & Operation 1 Install the software on your PC/MAC. Interactive Whiteboard 77 2 Install one "AA" battery in the presentation pen paying close attention to...
Safety Guide
Page 1
Interactive Whiteboard 77 Product Safety Guide Including Installation Instructions
Interactive Whiteboard 77 Product Safety Guide Including Installation Instructions
Safety Guide
Page 2
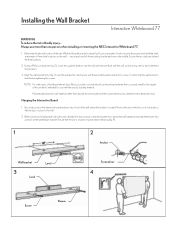
...in place before tightening the screws. Ensure that no studs are not included with the wall surface using one person when installing or removing the NEC Interactive Whiteboard 77. 1. Using a Phillips screwdriver (fig. 2), screw the supplied anchors into position on the wall - Align the wall bracket holes (fig.... 3. Position the unit on the floor on its backside so that the wall bracket is located. Installing the Wall Bracket Interactive Whiteboard 77 WARNING To reduce the risk of the unit. Always use with the provided washer and anchor screws. Confirm that the top ...
...in place before tightening the screws. Ensure that no studs are not included with the wall surface using one person when installing or removing the NEC Interactive Whiteboard 77. 1. Using a Phillips screwdriver (fig. 2), screw the supplied anchors into position on the wall - Align the wall bracket holes (fig.... 3. Position the unit on the floor on its backside so that the wall bracket is located. Installing the Wall Bracket Interactive Whiteboard 77 WARNING To reduce the risk of the unit. Always use with the provided washer and anchor screws. Confirm that the top ...
Safety Guide
Page 3
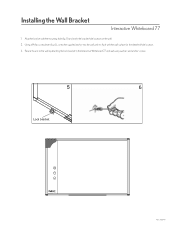
Using a Phillips screwdriver (fig. 6) , screw the supplied anchor into the wall until it is flush with the mounting hole (fig. 5) and mark the bracket hole location on the wall. 2. Align the bracket with the wall surface for the identified hole location. 3. Secure the unit to the wall by attaching the lock bracket to the Interactive Whiteboard 77 and wall using washers and anchor screws. 5 6 Lock bracket NEC 030710 Installing the Wall Bracket Interactive Whiteboard 77 1.
Using a Phillips screwdriver (fig. 6) , screw the supplied anchor into the wall until it is flush with the mounting hole (fig. 5) and mark the bracket hole location on the wall. 2. Align the bracket with the wall surface for the identified hole location. 3. Secure the unit to the wall by attaching the lock bracket to the Interactive Whiteboard 77 and wall using washers and anchor screws. 5 6 Lock bracket NEC 030710 Installing the Wall Bracket Interactive Whiteboard 77 1.