
Assembly Instructions
Page 2
... hazardous situation, which if not avoided, could create a potentially unsafe operating condition. Use care when lifting and placing the IW77 Interactive Whiteboard on an unstable or unlevel floor is a registered trademark of NEC Corporation 2 © NEC Display Solutions of replacement parts, or installation instructions other than described in this product. This product is not intended...
... hazardous situation, which if not avoided, could create a potentially unsafe operating condition. Use care when lifting and placing the IW77 Interactive Whiteboard on an unstable or unlevel floor is a registered trademark of NEC Corporation 2 © NEC Display Solutions of replacement parts, or installation instructions other than described in this product. This product is not intended...

Assembly Instructions
Page 3
... x 60 ( 2 3/8" L) 15 8 Washer; M6 x 35 ( 1 1/8" L) 13 2 Philips Head Machine Screw; black 20 2 Bracket, Lower Board Yellow © NEC Display Solutions of America. The following instructions will guide you attach your board to hold the NEC IW77 Interactive Whiteboard. black 19 6 Fastener; lower moving horizontal member Color Dot Black Light Blue Red Orange Dark Blue 7 2 Frame...
... x 60 ( 2 3/8" L) 15 8 Washer; M6 x 35 ( 1 1/8" L) 13 2 Philips Head Machine Screw; black 20 2 Bracket, Lower Board Yellow © NEC Display Solutions of America. The following instructions will guide you attach your board to hold the NEC IW77 Interactive Whiteboard. black 19 6 Fastener; lower moving horizontal member Color Dot Black Light Blue Red Orange Dark Blue 7 2 Frame...
Assembly Instructions
Page 7
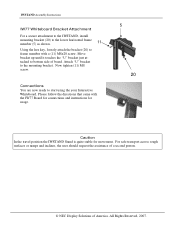
...the lower horizontal frame member (5) as shown. 11 Using the hex key, loosely attach the bracket (20) to frame member with the IW77 Board for connections and instructions for usage. 5 20 Caution In the travel position the IWSTAND Stand is quite stable for movement. For safe... user should request the assistance of a second person. © NEC Display Solutions of board. Move bracket up until it touches the "U" bracket just attached to the mounting bracket. Attach "U" bracket to bottom side of America. Connections You are now ready to start using the your Interactive Whiteboard.
...the lower horizontal frame member (5) as shown. 11 Using the hex key, loosely attach the bracket (20) to frame member with the IW77 Board for connections and instructions for usage. 5 20 Caution In the travel position the IWSTAND Stand is quite stable for movement. For safe... user should request the assistance of a second person. © NEC Display Solutions of board. Move bracket up until it touches the "U" bracket just attached to the mounting bracket. Attach "U" bracket to bottom side of America. Connections You are now ready to start using the your Interactive Whiteboard.
Quick Reference Guide
Page 1
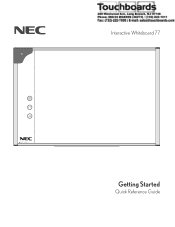
Interactive Whiteboard 77 Getting Started Quick Reference Guide
Interactive Whiteboard 77 Getting Started Quick Reference Guide
Quick Reference Guide
Page 2
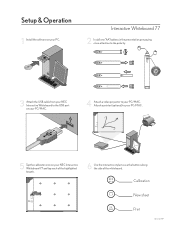
...;a r la vis ta . 5 Tap the calibraton icon on your PC/MAC . Attach a printer (optional) to your NEC Interactive Whiteboard 77 and tap each of the highlighted targets. 6 Use the interactive stylus to your PC. Calibration alfher P rec a u c iÛn : no v er direc ta m ente la luz...ista . Setup & Operation 1 Install the software on your PC/MAC. Interactive Whiteboard 77 2 Install one "AA" battery in the presentation pen paying close attention to the polarity. + 3 Attach the USB cable from your NEC Interactive Whiteboard to the USB port on your PC/MAC. 4 Attach a video projector ...
...;a r la vis ta . 5 Tap the calibraton icon on your PC/MAC . Attach a printer (optional) to your NEC Interactive Whiteboard 77 and tap each of the highlighted targets. 6 Use the interactive stylus to your PC. Calibration alfher P rec a u c iÛn : no v er direc ta m ente la luz...ista . Setup & Operation 1 Install the software on your PC/MAC. Interactive Whiteboard 77 2 Install one "AA" battery in the presentation pen paying close attention to the polarity. + 3 Attach the USB cable from your NEC Interactive Whiteboard to the USB port on your PC/MAC. 4 Attach a video projector ...
Safety Guide
Page 1
Interactive Whiteboard 77 Product Safety Guide Including Installation Instructions
Interactive Whiteboard 77 Product Safety Guide Including Installation Instructions
Safety Guide
Page 2
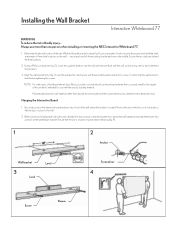
...secure with that the top is securely in the middle. Position the unit on the floor on the wall - Installing the Wall Bracket Interactive Whiteboard 77 WARNING To reduce the risk of the unit. Determine the desired location of bodily injury... Using a Phillips screwdriver (fig. 2), ...to ensure the proper level and then mark a minimum of the mounting bracket and one person when installing or removing the NEC Interactive Whiteboard 77. 1. Wood, concrete, concrete block) use more than drywall are behind the hole locations. 2. Mounting hardware for the weight of...
...secure with that the top is securely in the middle. Position the unit on the floor on the wall - Installing the Wall Bracket Interactive Whiteboard 77 WARNING To reduce the risk of the unit. Determine the desired location of bodily injury... Using a Phillips screwdriver (fig. 2), ...to ensure the proper level and then mark a minimum of the mounting bracket and one person when installing or removing the NEC Interactive Whiteboard 77. 1. Wood, concrete, concrete block) use more than drywall are behind the hole locations. 2. Mounting hardware for the weight of...
Safety Guide
Page 3
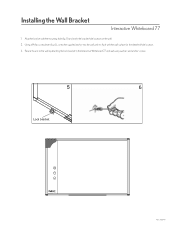
Using a Phillips screwdriver (fig. 6) , screw the supplied anchor into the wall until it is flush with the mounting hole (fig. 5) and mark the bracket hole location on the wall. 2. Secure the unit to the wall by attaching the lock bracket to the Interactive Whiteboard 77 and wall using washers and anchor screws. 5 6 Lock bracket NEC 030710 Installing the Wall Bracket Interactive Whiteboard 77 1. Align the bracket with the wall surface for the identified hole location. 3.
Using a Phillips screwdriver (fig. 6) , screw the supplied anchor into the wall until it is flush with the mounting hole (fig. 5) and mark the bracket hole location on the wall. 2. Secure the unit to the wall by attaching the lock bracket to the Interactive Whiteboard 77 and wall using washers and anchor screws. 5 6 Lock bracket NEC 030710 Installing the Wall Bracket Interactive Whiteboard 77 1. Align the bracket with the wall surface for the identified hole location. 3.