
RS232 codes- Projectors
Page 2
...Projector Control NEC projectors make use the control commands in the standby mode. List of the projector via connection with a USB cable. * Note that control the functions of Commands 5. Serial connection using the serial port on the projector A USB cable is compatible. LAN connection using a wireless LAN card A wireless LAN card is required. 3-3.LAN connection using the supplied USB cable is not supported for sending and receiving control commands. 1. LAN connection 3-1. LAN connection using a wireless LAN unit A wireless LAN unit is required Status of supported connection...
...Projector Control NEC projectors make use the control commands in the standby mode. List of the projector via connection with a USB cable. * Note that control the functions of Commands 5. Serial connection using the serial port on the projector A USB cable is compatible. LAN connection using a wireless LAN card A wireless LAN card is required. 3-3.LAN connection using the supplied USB cable is not supported for sending and receiving control commands. 1. LAN connection 3-1. LAN connection using a wireless LAN unit A wireless LAN unit is required Status of supported connection...

RS232 codes- Projectors
Page 35
... be selected. REMOTE KEY CODE Function: This command sends remote control key codes of Response Error Codes DATA01 DATA2 Error Error Types description 00H 00H 00H 01H 01H 00H 01H 01H 02H 03H 02H 0DH Error contents Unknown command. Setting not possible. DATA02 Results 00H : Normal 01H : Error Response: At the time of not accepting the command to data portion to return it. (Example) Power On Command: 02H 00H...
... be selected. REMOTE KEY CODE Function: This command sends remote control key codes of Response Error Codes DATA01 DATA2 Error Error Types description 00H 00H 00H 01H 01H 00H 01H 01H 02H 03H 02H 0DH Error contents Unknown command. Setting not possible. DATA02 Results 00H : Normal 01H : Error Response: At the time of not accepting the command to data portion to return it. (Example) Power On Command: 02H 00H...

MP300CM Installation Manual
Page 10
... until projector mount can be rotated. TO LOCK PITCH, TIGHTEN TAMPER RESISTANT SECURITY SCREW Visit the Peerless Web Site at www.peerlessmounts.com SIDE VIEW 10 of their respective owners. All other brand and product names are fully engaged. • Loosen the two tamper resistant security screws one complete turn . ARROW INDICATES FRONT OF MOUNT A KNOB FOR PITCH ADJUSTMENT BACK OF MOUNT SCREW FOR...
... until projector mount can be rotated. TO LOCK PITCH, TIGHTEN TAMPER RESISTANT SECURITY SCREW Visit the Peerless Web Site at www.peerlessmounts.com SIDE VIEW 10 of their respective owners. All other brand and product names are fully engaged. • Loosen the two tamper resistant security screws one complete turn . ARROW INDICATES FRONT OF MOUNT A KNOB FOR PITCH ADJUSTMENT BACK OF MOUNT SCREW FOR...

NaViSetAdmin2 Press Release
Page 1
... helps organizations reduce technical support costs, improve display and projector control, and remotely administer installed NEC products. 1 FOR IMMEDIATE RELEASE Media Contact: Philip Anast Tech Image (for easier asset management," said Keith Yanke, Senior Director of Product Marketing at NEC Display Solutions. Through an easy to use and sophisticated graphical user interface (GUI), businesses can take a proactive approach toward the maintenance of projector lamps, filters, and fan cleaning...
... helps organizations reduce technical support costs, improve display and projector control, and remotely administer installed NEC products. 1 FOR IMMEDIATE RELEASE Media Contact: Philip Anast Tech Image (for easier asset management," said Keith Yanke, Senior Director of Product Marketing at NEC Display Solutions. Through an easy to use and sophisticated graphical user interface (GUI), businesses can take a proactive approach toward the maintenance of projector lamps, filters, and fan cleaning...
Users Manual
Page 5
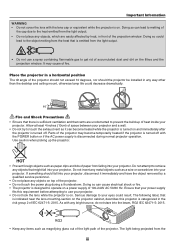
... power plug during normal projector operation. Parts of heat inside your projector. Ensure that vents are easily affected by a qualified service personnel. • Do not place any objects on a power supply of fire. Doing so can become temporarily heated if the projector is turned off . Serious damage to melting of the projection window. The light being projected from the light output. • Do not use your projector...
... power plug during normal projector operation. Parts of heat inside your projector. Ensure that vents are easily affected by a qualified service personnel. • Do not place any objects on a power supply of fire. Doing so can become temporarily heated if the projector is turned off . Serious damage to melting of the projection window. The light being projected from the light output. • Do not use your projector...

Users Manual
Page 9
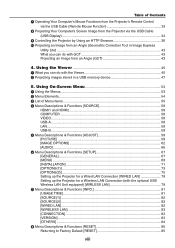
... or video source 14 ❺ Adjusting the Picture Size and Position 15 Adjust the Tilt Foot 16 Zoom...17 Focus...17 ❻ Correcting Keystone Distortion [KEYSTONE 18 ❼ Optimizing Computer Signal Automatically 20 Adjusting the Image Using Auto Adjust 20 ❽ Turning Up or Down Volume 20 ❾ Turning off the Image and Sound 23 ❷ Freezing a Picture...23 ❸ Magnifying a Picture...23 ❹ Changing Eco Mode/Checking Energy-Saving Effect 24 Using Eco Mode [ECO MODE 24 Checking...
... or video source 14 ❺ Adjusting the Picture Size and Position 15 Adjust the Tilt Foot 16 Zoom...17 Focus...17 ❻ Correcting Keystone Distortion [KEYSTONE 18 ❼ Optimizing Computer Signal Automatically 20 Adjusting the Image Using Auto Adjust 20 ❽ Turning Up or Down Volume 20 ❾ Turning off the Image and Sound 23 ❷ Freezing a Picture...23 ❸ Magnifying a Picture...23 ❹ Changing Eco Mode/Checking Energy-Saving Effect 24 Using Eco Mode [ECO MODE 24 Checking...
Users Manual
Page 10
... Projector via the USB Cable (USB Display)...34 ❾ Controlling the Projector by Using an HTTP Browser 36 ❿ Projecting an Image from an Angle (GCT 43 4. Table of Menu Items...55 ❹ Menu Descriptions & Functions [SOURCE 58 HDMI1 and HDMI2 58 COMPUTER...58 VIDEO...58 USB-A...58 LAN...58 USB-B...58 ❺ Menu Descriptions & Functions [ADJUST 59 [PICTURE]...59 [IMAGE OPTIONS 62 [AUDIO]...66 ❻ Menu Descriptions & Functions [SETUP 67 [GENERAL]...67 [MENU]...69 [INSTALLATION...
... Projector via the USB Cable (USB Display)...34 ❾ Controlling the Projector by Using an HTTP Browser 36 ❿ Projecting an Image from an Angle (GCT 43 4. Table of Menu Items...55 ❹ Menu Descriptions & Functions [SOURCE 58 HDMI1 and HDMI2 58 COMPUTER...58 VIDEO...58 USB-A...58 LAN...58 USB-B...58 ❺ Menu Descriptions & Functions [ADJUST 59 [PICTURE]...59 [IMAGE OPTIONS 62 [AUDIO]...66 ❻ Menu Descriptions & Functions [SETUP 67 [GENERAL]...67 [MENU]...69 [INSTALLATION...
Users Manual
Page 11
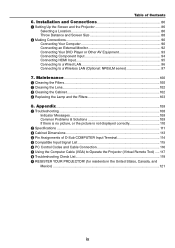
... Appendix...108 ❶ Troubleshooting...108 Indicator Messages 108 Common Problems & Solutions 109 If there is no picture, or the picture is not displayed correctly 110 ❷ Specifications...111 ❸ Cabinet Dimensions...113 ❹ Pin Assignments of Contents 6. Table of D-Sub COMPUTER Input Terminal 114 ❺ Compatible Input Signal List 115 ❻ PC Control Codes and Cable Connection 116 ❼ Using the Computer Cable (VGA) to a Wireless LAN (Optional: NP05LM series...
... Appendix...108 ❶ Troubleshooting...108 Indicator Messages 108 Common Problems & Solutions 109 If there is no picture, or the picture is not displayed correctly 110 ❷ Specifications...111 ❸ Cabinet Dimensions...113 ❹ Pin Assignments of Contents 6. Table of D-Sub COMPUTER Input Terminal 114 ❺ Compatible Input Signal List 115 ❻ PC Control Codes and Cable Connection 116 ❼ Using the Computer Cable (VGA) to a Wireless LAN (Optional: NP05LM series...

Users Manual
Page 13
...) when the projector's [ECO MODE] is powered on, use a power strip equipped with the same single remote control by using the Main Power Switch or disconnecting the AC power supply. To turn off and in the INFO of the on-screen menu. • Lamp life up to 4000 hours in ECO MODE OFF). • Two HDMI inputs support digital signals The two HDMI inputs provide HDCP compatible digital signals. An optional USB Wireless LAN Unit is ready to display PC or video images. ❷...
...) when the projector's [ECO MODE] is powered on, use a power strip equipped with the same single remote control by using the Main Power Switch or disconnecting the AC power supply. To turn off and in the INFO of the on-screen menu. • Lamp life up to 4000 hours in ECO MODE OFF). • Two HDMI inputs support digital signals The two HDMI inputs provide HDCP compatible digital signals. An optional USB Wireless LAN Unit is ready to display PC or video images. ❷...
Users Manual
Page 22
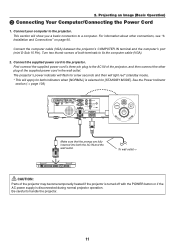
... AC IN of both indicators when [NORMAL] is disconnected during normal projector operation. Connect the computer cable (VGA) between the projector's COMPUTER IN terminal and the computer's port (mini D-Sub 15 Pin). Projecting an Image (Basic Operation) ❷ Connecting Your Computer/Connecting the Power Cord 1. Installation and Connections" on page 90. First connect the supplied power cord's three-pin plug to fix the computer cable (VGA). 2. The projector's power indicator will flash for [STANDBY MODE]. See the Power Indicator section.(→ page...
... AC IN of both indicators when [NORMAL] is disconnected during normal projector operation. Connect the computer cable (VGA) between the projector's COMPUTER IN terminal and the computer's port (mini D-Sub 15 Pin). Projecting an Image (Basic Operation) ❷ Connecting Your Computer/Connecting the Power Cord 1. Installation and Connections" on page 90. First connect the supplied power cord's three-pin plug to fix the computer cable (VGA). 2. The projector's power indicator will flash for [STANDBY MODE]. See the Power Indicator section.(→ page...
Users Manual
Page 24
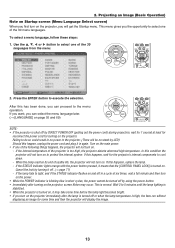
... the projector is turned on, it means that the [CONTROL PANEL LOCK] is high, the fans run without displaying an image for turning on . Turn on the power. • While the POWER indicator is normal. This is blinking blue in again. Projecting an Image (Basic Operation) Note on Startup screen (Menu Language Select screen) When you can select the menu language later. (→ [LANGUAGE] on to the menu operation. If this happens, replace the lamp. - If the STATUS indicator lights orange...
... the projector is turned on, it means that the [CONTROL PANEL LOCK] is high, the fans run without displaying an image for turning on . Turn on the power. • While the POWER indicator is normal. This is blinking blue in again. Projecting an Image (Basic Operation) Note on Startup screen (Menu Language Select screen) When you can select the menu language later. (→ [LANGUAGE] on to the menu operation. If this happens, replace the lamp. - If the STATUS indicator lights orange...

Users Manual
Page 47
... HTTP Server function provides settings and operations for wired/wireless network (NETWORK SETTINGS) To use wired/wireless LAN connection, connect the projector to a wired/wireless network, lamp replace time or error messages will be sent via the network connected to the projector and enter the following URL : http:// Setting for : 1. Setting PJLink PASSWORD, AMX BEACON, and CRESTRON How to access to the HTTP server: • Start the Web browser on /off, selecting input, volume control and picture adjustments are possible. 4.
... HTTP Server function provides settings and operations for wired/wireless network (NETWORK SETTINGS) To use wired/wireless LAN connection, connect the projector to a wired/wireless network, lamp replace time or error messages will be sent via the network connected to the projector and enter the following URL : http:// Setting for : 1. Setting PJLink PASSWORD, AMX BEACON, and CRESTRON How to access to the HTTP server: • Start the Web browser on /off, selecting input, volume control and picture adjustments are possible. 4.

Users Manual
Page 52
... to be sent from the menu. RECIPIENT'S ADDRESS Enter your computer of its usable life. A projector name must be affected even when [RESET] is correct. SMTP SERVER ...turn on the projector. 41 SAVE Click this happen, check if network settings are correct or not NOTE: • If you execute a test, you may not receive an Alert mail. Should this is fixed at the end of lamp replace time or error messages via e-mail when using wireless or wired LAN. Projector Name: NEC Projector Lamp Hours Used: 100 [H] SENDER'S ADDRESS Enter sender's address. Sample of the network connected...
... to be sent from the menu. RECIPIENT'S ADDRESS Enter your computer of its usable life. A projector name must be affected even when [RESET] is correct. SMTP SERVER ...turn on the projector. 41 SAVE Click this happen, check if network settings are correct or not NOTE: • If you execute a test, you may not receive an Alert mail. Should this is fixed at the end of lamp replace time or error messages via e-mail when using wireless or wired LAN. Projector Name: NEC Projector Lamp Hours Used: 100 [H] SENDER'S ADDRESS Enter sender's address. Sample of the network connected...
Users Manual
Page 103
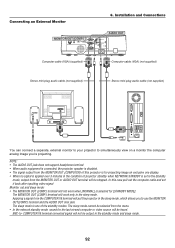
... the computer cable and set in the Standby mode, output from the menu. • In the network standby mode, sound for [STANDBY MODE]. COMPUTER IN terminal converted signal will be stopped. Installation and Connections AUDIO OUT Computer cable (VGA) (not supplied) Stereo mini-plug audio cable (not supplied) You can connect a separate, external monitor to your projector to simultaneously view on exclusive one of projector standby when NETWORK STANDBY is selected for the last viewed computer or video source will not...
... the computer cable and set in the Standby mode, output from the menu. • In the network standby mode, sound for [STANDBY MODE]. COMPUTER IN terminal converted signal will be stopped. Installation and Connections AUDIO OUT Computer cable (VGA) (not supplied) Stereo mini-plug audio cable (not supplied) You can connect a separate, external monitor to your projector to simultaneously view on exclusive one of projector standby when NETWORK STANDBY is selected for the last viewed computer or video source will not...
Users Manual
Page 117
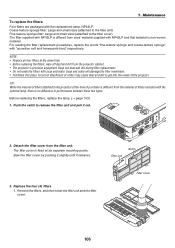
... small sizes (attached to the filter unit) Fine texture sponge filter: Large and small sizes (attached to release the filter unit and pull it releases. Incorrect attachment of the projector. Replace the four (4) filters 1. Maintenance To replace the filters: Four filters are packaged with NP43LP and that material is fixed at six separate mounting points. Before replacing the filters, replace the lamp. (→ page 103) 1. The filter cover is...
... small sizes (attached to the filter unit) Fine texture sponge filter: Large and small sizes (attached to release the filter unit and pull it releases. Incorrect attachment of the projector. Replace the four (4) filters 1. Maintenance To replace the filters: Four filters are packaged with NP43LP and that material is fixed at six separate mounting points. Before replacing the filters, replace the lamp. (→ page 103) 1. The filter cover is...
Users Manual
Page 119
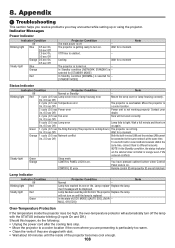
.... Replace the lamp. Off Timer is overheated. selected for - [STANDBY MODE] Status Indicator Indicator Condition Projector Condition Note Off Normal or Standby - On, 0.5 sec Off) 6 cycle (0.5 sec Lamp error Lamp fails to turn On, 0.5 sec Off) on . Green 1 cycle (0.5 sec Re-firing the lamp (The projector is cooling down.) The projector is selected for [STANDBY MODE] In Standby condition [NORMAL] is re-firing. Orange CONTROL PANEL LOCK is getting ready to light. Lamp Indicator Indicator Condition Off Blinking light Red Steady light Red Green Projector...
.... Replace the lamp. Off Timer is overheated. selected for - [STANDBY MODE] Status Indicator Indicator Condition Projector Condition Note Off Normal or Standby - On, 0.5 sec Off) 6 cycle (0.5 sec Lamp error Lamp fails to turn On, 0.5 sec Off) on . Green 1 cycle (0.5 sec Re-firing the lamp (The projector is cooling down.) The projector is selected for [STANDBY MODE] In Standby condition [NORMAL] is re-firing. Orange CONTROL PANEL LOCK is getting ready to light. Lamp Indicator Indicator Condition Off Blinking light Red Steady light Red Green Projector...

Users Manual
Page 120
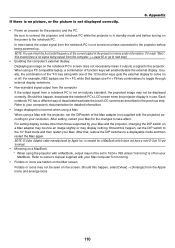
... the image to light. Switch [FAN MODE] to display is supported by selecting [HIGH] for another 100 hours after the lamp is turned off . (→ page 69, 76) No picture • Use the COMPUTER1, HDMI1, HDMI2, VIDEO, USB-A, USB-B or LAN button on the remote control to select your source (COMPUTER, HDMI1, HDMI2, VIDEO, USB-A, LAN or USB-B). (→ page 14) If there is still no picture, press the button again. • Ensure your cables are connected properly. • Use...
... the image to light. Switch [FAN MODE] to display is supported by selecting [HIGH] for another 100 hours after the lamp is turned off . (→ page 69, 76) No picture • Use the COMPUTER1, HDMI1, HDMI2, VIDEO, USB-A, USB-B or LAN button on the remote control to select your source (COMPUTER, HDMI1, HDMI2, VIDEO, USB-A, LAN or USB-B). (→ page 14) If there is still no picture, press the button again. • Ensure your cables are connected properly. • Use...
Users Manual
Page 121
... not turned on unless connected to the projector before turning on the notebook PC's screen does not necessarily mean it reads "0kHz", this happen, set the DIP switch to the notebook PC. Displaying an image on the power to the 13" fixed mode and then restart your Mac. For example, NEC laptops use Fn + F3, while Dell laptops use . After setting, restart your Mac and the projector, changing the DIP switch on a Mac adapter may...
... not turned on unless connected to the projector before turning on the notebook PC's screen does not necessarily mean it reads "0kHz", this happen, set the DIP switch to the notebook PC. Displaying an image on the power to the 13" fixed mode and then restart your Mac. For example, NEC laptops use Fn + F3, while Dell laptops use . After setting, restart your Mac and the projector, changing the DIP switch on a Mac adapter may...

Users Manual
Page 129
... serial or LAN connection) - Using a switcher or other cables than 1 MB - Download and install it as your computer screen. • Use the supplied computer cable (VGA) to register it on your computer's specifications and version of graphic adapters or drivers. • To run Virtual Remote Tool on the supplied NEC Projector CD-ROM. TIP: • Virtual Remote Tool can be used with a LAN and a serial connection. Image size (resolution): ME401W/ME361W/ME331W/ME301W: Horizontal 1280 × vertical 800 dots...
... serial or LAN connection) - Using a switcher or other cables than 1 MB - Download and install it as your computer screen. • Use the supplied computer cable (VGA) to register it on your computer's specifications and version of graphic adapters or drivers. • To run Virtual Remote Tool on the supplied NEC Projector CD-ROM. TIP: • Virtual Remote Tool can be used with a LAN and a serial connection. Image size (resolution): ME401W/ME361W/ME331W/ME301W: Horizontal 1280 × vertical 800 dots...

Users Manual
Page 130
... installed correctly . □ Lamp Hours Used (lamp operation hours) was cleared after lamp replacement. □ No power even though you carry out [RESET] in the projector's menu. □ Signal cable's plug is fully inserted into the wall outlet. □ Lamp cover is installed correctly . □ [AUTO POWER OFF] is turned off (only models with one of the 12 function keys turns the external display on a computer signal. □ Still unchanged even though you change [FAN MODE] from your check...
... installed correctly . □ Lamp Hours Used (lamp operation hours) was cleared after lamp replacement. □ No power even though you carry out [RESET] in the projector's menu. □ Signal cable's plug is fully inserted into the wall outlet. □ Lamp cover is installed correctly . □ [AUTO POWER OFF] is turned off (only models with one of the 12 function keys turns the external display on a computer signal. □ Still unchanged even though you change [FAN MODE] from your check...

