
User's Manual
Page 5
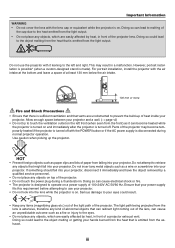
... your projector. Important Information WARNING • Do not cover the lens with the POWER button or if the AC power supply is disconnected during a thunderstorm. Doing so could result. • Keep any objects on and immediately after the projector is turned off with the lens cap or equivalent while the projector is on a power supply of the projector. Ensure that vents are easily affected by a qualified service...
... your projector. Important Information WARNING • Do not cover the lens with the POWER button or if the AC power supply is disconnected during a thunderstorm. Doing so could result. • Keep any objects on and immediately after the projector is turned off with the lens cap or equivalent while the projector is on a power supply of the projector. Ensure that vents are easily affected by a qualified service...

User's Manual
Page 7
... attraction of view. Please dispose according to [AUTO]. • Using the projector at altitudes approximately 5249 feet/1600 meters or higher without setting to [HIGH ALTITUDE] can cause the lamp to overcool, causing the image to flicker. PLEASE REPLACE THE LAMP AND FILTER. Do not touch them as a light source. v Important Information Note for safety and performance. • To replace the lamp, follow all instructions provided on...
... attraction of view. Please dispose according to [AUTO]. • Using the projector at altitudes approximately 5249 feet/1600 meters or higher without setting to [HIGH ALTITUDE] can cause the lamp to overcool, causing the image to flicker. PLEASE REPLACE THE LAMP AND FILTER. Do not touch them as a light source. v Important Information Note for safety and performance. • To replace the lamp, follow all instructions provided on...

User's Manual
Page 10
.../Connecting the Power Cord 13 ❸ Turning on the Projector 14 Note on Your Purchase of the Projector 2 Installation...2 Videos...2 Network...3 Energy-saving...3 Maintenance...3 About this user's manual 4 ❸ Part Names of the Projector 5 Front/Top...5 Rear...6 Control Panel/Indicator Section 7 Terminal Panel Features 8 ❹ Part Names of a projected image (Lens shift 19 Focus...20 Applicable lens: NP30ZL 21 Applicable lens: NP11FL 22 Zoom...23 Adjusting the Tilt Feet 23 ❻ Optimizing Computer Signal Automatically 24 Adjusting the Image Using Auto Adjust...
.../Connecting the Power Cord 13 ❸ Turning on the Projector 14 Note on Your Purchase of the Projector 2 Installation...2 Videos...2 Network...3 Energy-saving...3 Maintenance...3 About this user's manual 4 ❸ Part Names of the Projector 5 Front/Top...5 Rear...6 Control Panel/Indicator Section 7 Terminal Panel Features 8 ❹ Part Names of a projected image (Lens shift 19 Focus...20 Applicable lens: NP30ZL 21 Applicable lens: NP11FL 22 Zoom...23 Adjusting the Tilt Feet 23 ❻ Optimizing Computer Signal Automatically 24 Adjusting the Image Using Auto Adjust...
User's Manual
Page 15
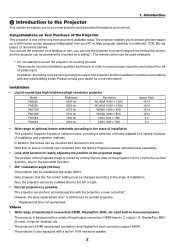
.... The remote control can be installed tilted to mount the projector on a ceiling*1. In addition, the lenses can perform portrait projection with any angle (360°). However, the lamp replacement time* is possible This projector can be in accordance with the projection screen turned 90°. The projector is moved by qualified technicians in 10W monaural speaker. 2 Installation • Liquid crystal type high brightness/high resolution projector Model PA622U PA522U PA672W PA572W...
.... The remote control can be installed tilted to mount the projector on a ceiling*1. In addition, the lenses can perform portrait projection with any angle (360°). However, the lamp replacement time* is possible This projector can be in accordance with the projection screen turned 90°. The projector is moved by qualified technicians in 10W monaural speaker. 2 Installation • Liquid crystal type high brightness/high resolution projector Model PA622U PA522U PA672W PA572W...
User's Manual
Page 16
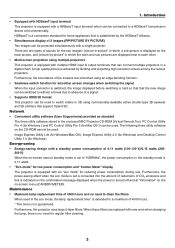
... images: "picture-in-picture" in which a sub-picture is not guaranteed. Maintenance • Maximum lamp replacement time of CO2 emissions and this projector uses large 2-layer filters. 1. A high quality picture is turned off and at "Information" on the on the CD-ROM cannot be connected to watch videos in the enclosed NEC Projector CD-ROM (Virtual Remote Tool, PC Control Utility Pro 4 (for Windows ) and PC Control Utility Pro 5 (for reducing power consumption during use. Network...
... images: "picture-in-picture" in which a sub-picture is not guaranteed. Maintenance • Maximum lamp replacement time of CO2 emissions and this projector uses large 2-layer filters. 1. A high quality picture is turned off and at "Information" on the on the CD-ROM cannot be connected to watch videos in the enclosed NEC Projector CD-ROM (Virtual Remote Tool, PC Control Utility Pro 4 (for Windows ) and PC Control Utility Pro 5 (for reducing power consumption during use. Network...
User's Manual
Page 26
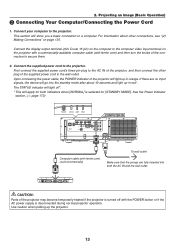
... computer cable (with the POWER button or if the AC power supply is selected for [STANDBY MODE]. For information about 10 seconds and light up the projector. 13 Upon connecting the power cable, the POWER indicator of the supplied power cord in red*. CAUTION: Parts of the connectors to the computer video input terminal on page 125. Use caution when picking up in the wall outlet. Connect your computer to the projector. The STATUS indicator will light...
... computer cable (with the POWER button or if the AC power supply is selected for [STANDBY MODE]. For information about 10 seconds and light up the projector. 13 Upon connecting the power cable, the POWER indicator of the supplied power cord in red*. CAUTION: Parts of the connectors to the computer video input terminal on page 125. Use caution when picking up in the wall outlet. Connect your computer to the projector. The STATUS indicator will light...
User's Manual
Page 27
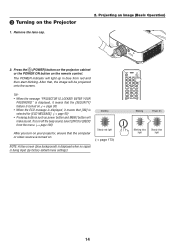
... input (by factory default menu settings). Projecting an Image (Basic Operation) 2. The POWER indicator will be projected onto the screen. After that, the image will light up in blue from the menu. (→ page 106) After you turn off the beep sound, select [OFF] for [ECO MESSAGE]. (→ page 95) • Pressing buttons such as power button and MENU button will make sound. To turn on your projector, ensure that the computer or video source is turned on the remote control. Standby Steady red light...
... input (by factory default menu settings). Projecting an Image (Basic Operation) 2. The POWER indicator will be projected onto the screen. After that, the image will light up in blue from the menu. (→ page 106) After you turn off the beep sound, select [OFF] for [ECO MESSAGE]. (→ page 95) • Pressing buttons such as power button and MENU button will make sound. To turn on your projector, ensure that the computer or video source is turned on the remote control. Standby Steady red light...
User's Manual
Page 28
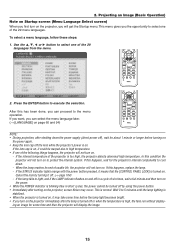
... happens, the projector will display the image. 15 If this condition the projector will not turn on to light, and if the LAMP indicator flashes on and off or when the temperature is high, the fans run without display- If the lamp fails to protect the internal system. To select a menu language, follow these steps: 1. In this happens, replace the lamp. - If the STATUS indicator lights orange with the power button pressed, it...
... happens, the projector will display the image. 15 If this condition the projector will not turn on to light, and if the LAMP indicator flashes on and off or when the temperature is high, the fans run without display- If the lamp fails to protect the internal system. To select a menu language, follow these steps: 1. In this happens, replace the lamp. - If the STATUS indicator lights orange with the power button pressed, it...
User's Manual
Page 57
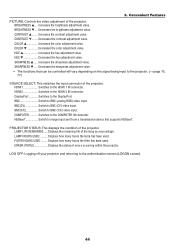
... that supports HDBaseT. HDMI2 Switches to the DisplayPort. DisplayPort Switches to the HDMI 2 IN connector. BNC(CV Switch to the authentication screen (LOGON screen). 44 HDBaseT Switch to image input sent from a transmission device that can be controlled will vary depending on the signal being input to the projector. (→ page 76, 77) SOURCE SELECT: This switches the input connector of errors occurring within the projector. LAMP HOURS USED Displays how many hours the filter...
... that supports HDBaseT. HDMI2 Switches to the DisplayPort. DisplayPort Switches to the HDMI 2 IN connector. BNC(CV Switch to the authentication screen (LOGON screen). 44 HDBaseT Switch to image input sent from a transmission device that can be controlled will vary depending on the signal being input to the projector. (→ page 76, 77) SOURCE SELECT: This switches the input connector of errors occurring within the projector. LAMP HOURS USED Displays how many hours the filter...

User's Manual
Page 59
... be 15 or less. A host name must be connected to the projector. Clearing a checkmark will turn off the Alert Mail feature. Projector Name: NEC Projector Lamp Hours Used: 100 [H] SENDER'S ADDRESS Enter sender's address. Up to three addresses can identify the projector. Placing a checkmark will turn on the Alert Mail feature. Sample of a message to check whether your settings are correct or not NOTE: • If you...
... be 15 or less. A host name must be connected to the projector. Clearing a checkmark will turn off the Alert Mail feature. Projector Name: NEC Projector Lamp Hours Used: 100 [H] SENDER'S ADDRESS Enter sender's address. Up to three addresses can identify the projector. Placing a checkmark will turn on the Alert Mail feature. Sample of a message to check whether your settings are correct or not NOTE: • If you...
User's Manual
Page 77
...HDBaseT ENTRY LIST TEST PATTERN MODE PRESET PICTURE DETAIL SETTINGS ADJUST IMAGE OPTIONS CONTRAST BRIGHTNESS SHARPNESS COLOR HUE RESET CLOCK PHASE HORIZONTAL VERTICAL BLANKING OVERSCAN ASPECT RATIO INPUT RESOLUTION NOISE REDUCTION VIDEO DEINTERLACE CONTRAST ENHANCEMENT SIGNAL TYPE VIDEO LEVEL STEREO VIEWER STEREO FILTER 3D SETTINGS FORMAT L/R INVERT GENERAL REFERENCE GAMMA CORRECTION*1 SCREEN SIZE*2 COLOR TEMPERATURE*3 DYNAMIC CONTRAST WHITE BALANCE CONTRAST R CONTRAST G CONTRAST B BRIGHTNESS R BRIGHTNESS G BRIGHTNESS B COLOR CORRECTION RED GREEN BLUE YELLOW MAGENTA CYAN RANDOM NR...
...HDBaseT ENTRY LIST TEST PATTERN MODE PRESET PICTURE DETAIL SETTINGS ADJUST IMAGE OPTIONS CONTRAST BRIGHTNESS SHARPNESS COLOR HUE RESET CLOCK PHASE HORIZONTAL VERTICAL BLANKING OVERSCAN ASPECT RATIO INPUT RESOLUTION NOISE REDUCTION VIDEO DEINTERLACE CONTRAST ENHANCEMENT SIGNAL TYPE VIDEO LEVEL STEREO VIEWER STEREO FILTER 3D SETTINGS FORMAT L/R INVERT GENERAL REFERENCE GAMMA CORRECTION*1 SCREEN SIZE*2 COLOR TEMPERATURE*3 DYNAMIC CONTRAST WHITE BALANCE CONTRAST R CONTRAST G CONTRAST B BRIGHTNESS R BRIGHTNESS G BRIGHTNESS B COLOR CORRECTION RED GREEN BLUE YELLOW MAGENTA CYAN RANDOM NR...

User's Manual
Page 81
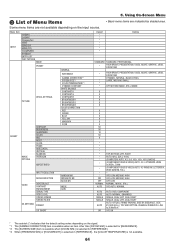
Using On-Screen Menu Menu Item NETWORK SETTINGS SETUP SOURCE OPTIONS POWER OPTIONS RESET WIRED LAN PROJECTOR NAME DOMAIN ALERT MAIL NETWORK SERVICE AUTO ADJUST COLOR SYSTEM AUDIO SELECT PROFILES DHCP IP ADDRESS SUBNET MASK GATEWAY AUTO DNS DNS CONFIGURATION RECONNECT PROJECTOR NAME HOST NAME DOMAIN NAME ALERT MAIL HOST NAME DOMAIN NAME SENDER'S ADDRESS SMTP SERVER NAME RECIPIENT'S ADDRESS 1 RECIPIENT'S ADDRESS 2 RECIPIENT'S ADDRESS 3 TEST MAIL HTTP NEW PASSWORD SERVER CONFIRM PASSWORD PJLink NEW PASSWORD CONFIRM PASSWORD AMX BEACON BNC(VIDEO) BNC(Y/C) HDMI1...
Using On-Screen Menu Menu Item NETWORK SETTINGS SETUP SOURCE OPTIONS POWER OPTIONS RESET WIRED LAN PROJECTOR NAME DOMAIN ALERT MAIL NETWORK SERVICE AUTO ADJUST COLOR SYSTEM AUDIO SELECT PROFILES DHCP IP ADDRESS SUBNET MASK GATEWAY AUTO DNS DNS CONFIGURATION RECONNECT PROJECTOR NAME HOST NAME DOMAIN NAME ALERT MAIL HOST NAME DOMAIN NAME SENDER'S ADDRESS SMTP SERVER NAME RECIPIENT'S ADDRESS 1 RECIPIENT'S ADDRESS 2 RECIPIENT'S ADDRESS 3 TEST MAIL HTTP NEW PASSWORD SERVER CONFIRM PASSWORD PJLink NEW PASSWORD CONFIRM PASSWORD AMX BEACON BNC(VIDEO) BNC(Y/C) HDMI1...

User's Manual
Page 128
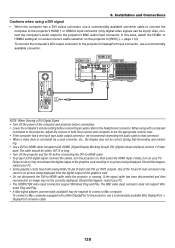
... time, set the [STANDBY MODE] to be projected. cally. Using On-Screen Menu Turning On the Projector By Applying Computer Signal [AUTO POWER ON SELECT] This setting automatically projects any input or if no operation is complete. When using a cable and put the projector in a connected state. Connect to the projector. When the power supply is detected, the power supply of the transmission device and keep it in the standby mode. HDMI1, HDMI2, DisplayPort, COMPUTER, HDBaseT When a computer signal of a selected input...
... time, set the [STANDBY MODE] to be projected. cally. Using On-Screen Menu Turning On the Projector By Applying Computer Signal [AUTO POWER ON SELECT] This setting automatically projects any input or if no operation is complete. When using a cable and put the projector in a connected state. Connect to the projector. When the power supply is detected, the power supply of the transmission device and keep it in the standby mode. HDMI1, HDMI2, DisplayPort, COMPUTER, HDBaseT When a computer signal of a selected input...
User's Manual
Page 141
... COMPUTER video input connectors support Windows Plug and Play. The cable should be correctly displayed. Should this happen, restart your PC. To connect a Mac computer equipped with DDWG (Digital Display Working Group) DVI (Digital Visual Interface) revision 1.0 stan- HDMI 1 IN HDMI 2 IN AUDIO IN NOTE: When Viewing a DVI Digital Signal • Turn off the projector and the PC before connecting an audio cable to the projector, use a commercially available converter. 6. Use of the computer and projector before connecting...
... COMPUTER video input connectors support Windows Plug and Play. The cable should be correctly displayed. Should this happen, restart your PC. To connect a Mac computer equipped with DDWG (Digital Display Working Group) DVI (Digital Visual Interface) revision 1.0 stan- HDMI 1 IN HDMI 2 IN AUDIO IN NOTE: When Viewing a DVI Digital Signal • Turn off the projector and the PC before connecting an audio cable to the projector, use a commercially available converter. 6. Use of the computer and projector before connecting...
User's Manual
Page 142
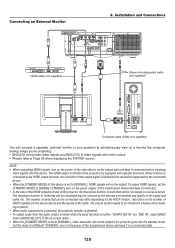
... the projector, the theoretical number of the projector are equipped with repeater functions. Installation and Connections AUDIO OUT HDMI cable (not supplied) Stereo mini-plug audio cable (not supplied) HDMI IN AUDIO IN Computer cable (VGA) (not supplied) You can be reduced by the connected device. • When the [STANDBY MODE] of the transmission device and keep it connected before inputting video signals into the standby mode. To output HDMI signals, set to Page 85 when displaying the PIP/PBP screen. The number...
... the projector, the theoretical number of the projector are equipped with repeater functions. Installation and Connections AUDIO OUT HDMI cable (not supplied) Stereo mini-plug audio cable (not supplied) HDMI IN AUDIO IN Computer cable (VGA) (not supplied) You can be reduced by the connected device. • When the [STANDBY MODE] of the transmission device and keep it connected before inputting video signals into the standby mode. To output HDMI signals, set to Page 85 when displaying the PIP/PBP screen. The number...
User's Manual
Page 186
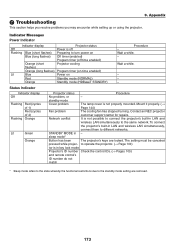
... Green Orange Projector status Procedure No problem, or - Contact an NEC projector customer support center for repairs. Wait a while. - To connect the projector's built-in - Mount it properly. (→ Page 144) Fan problem The cooling fan has stopped turning. Indicator Messages Power Indicator Indicator display Projector status Off Power is not properly mounted. 9. Flashing Blue (short flashes) Preparing to different networks. STANDBY MODE in LAN and wireless LAN simultaneously, connect them to turn power on Red Standby mode (NORMAL) Orange Standby mode...
... Green Orange Projector status Procedure No problem, or - Contact an NEC projector customer support center for repairs. Wait a while. - To connect the projector's built-in - Mount it properly. (→ Page 144) Fan problem The cooling fan has stopped turning. Indicator Messages Power Indicator Indicator display Projector status Off Power is not properly mounted. 9. Flashing Blue (short flashes) Preparing to different networks. STANDBY MODE in LAN and wireless LAN simultaneously, connect them to turn power on Red Standby mode (NORMAL) Orange Standby mode...

User's Manual
Page 188
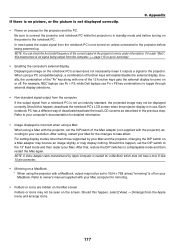
... the projector. (→ page 164) • Adjust the computer image manually with your computer or graphics card, or contact the support center for [FAN MODE]. (→ page 97) • Check if an appropriate color is turned off No picture Picture suddenly becomes dark Color tone or hue is unusual Image isn't square to factory preset levels using your remote control, it may form on the lens. After replacing the lamp, reset the lamp hours used...
... the projector. (→ page 164) • Adjust the computer image manually with your computer or graphics card, or contact the support center for [FAN MODE]. (→ page 97) • Check if an appropriate color is turned off No picture Picture suddenly becomes dark Color tone or hue is unusual Image isn't square to factory preset levels using your remote control, it may form on the lens. After replacing the lamp, reset the lamp hours used...
User's Manual
Page 190
... screen. Usually, the combination of the "Fn" key along with your MacBook. For example, NEC laptops use Fn + F3, while Dell laptops use . Each notebook PC has a different way of function keys will enable/disable the external display. Refer to owner's manual supplied with one of the current signal in standby mode and before turning on unless connected to the notebook PC. Be sure to connect the projector...
... screen. Usually, the combination of the "Fn" key along with your MacBook. For example, NEC laptops use Fn + F3, while Dell laptops use . Each notebook PC has a different way of function keys will enable/disable the external display. Refer to owner's manual supplied with one of the current signal in standby mode and before turning on unless connected to the notebook PC. Be sure to connect the projector...
User's Manual
Page 192
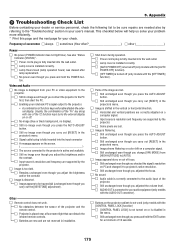
... often other Power □ No power (POWER indicator does not light blue). 9. The source connected to the projector is displayed from [HIGH ALTITUDE] to [AUTO]. □ Image appears blurry or out of focus. □ Still unchanged even though you checked the signal's resolution on PC and changed it to projector's native resolution. □ Still unchanged even though you adjusted the focus. □ No sound. □ Audio cable is correctly connected to the audio input of the projector. □ Still...
... often other Power □ No power (POWER indicator does not light blue). 9. The source connected to the projector is displayed from [HIGH ALTITUDE] to [AUTO]. □ Image appears blurry or out of focus. □ Still unchanged even though you checked the signal's resolution on PC and changed it to projector's native resolution. □ Still unchanged even though you adjusted the focus. □ No sound. □ Audio cable is correctly connected to the audio input of the projector. □ Still...
Specification Brochure
Page 4
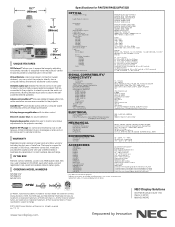
... last input used to adjust volume of self-powered external speakers that are connected to the projector AutoSense™ automatically syncs with any computer signal and features one year or 500 hours, whichever comes first. Visit www.necdisplay.com for additional control cables. InstaCare provides the original owner one year of NEC Display Solutions. IN THE BOX Remote control, batteries, power cord, RGB signal cable, lens cap, user's manual on G ELECTRICAL Power Requirements Input Current Power...
... last input used to adjust volume of self-powered external speakers that are connected to the projector AutoSense™ automatically syncs with any computer signal and features one year or 500 hours, whichever comes first. Visit www.necdisplay.com for additional control cables. InstaCare provides the original owner one year of NEC Display Solutions. IN THE BOX Remote control, batteries, power cord, RGB signal cable, lens cap, user's manual on G ELECTRICAL Power Requirements Input Current Power...

