
NP115 : RS232 codes- Projectors
Page 2
.... 3-3.LAN connection using the LAN port on the projector A serial cable is required Status of connection methods are required. 3-2. Connection Method The following 3 kinds of supported connection Serial connection using a wireless LAN unit A wireless LAN unit is required. 2. 2. USB connection using a wired LAN card A wired LAN card and LAN cable are available for sending and receiving control commands. 1. LAN connection using the USB port on the projector A USB cable is required. 3-4. LAN connection 3-1. LAN connection using the serial port on the projector A LAN cable is...
.... 3-3.LAN connection using the LAN port on the projector A serial cable is required Status of connection methods are required. 3-2. Connection Method The following 3 kinds of supported connection Serial connection using a wireless LAN unit A wireless LAN unit is required. 2. 2. USB connection using a wired LAN card A wired LAN card and LAN cable are available for sending and receiving control commands. 1. LAN connection using the USB port on the projector A USB cable is required. 3-4. LAN connection 3-1. LAN connection using the serial port on the projector A LAN cable is...

NP115 : RS232 codes- Projectors
Page 34
... 02H 0DH Error contents Unknown command. Invalid values specified. Setting not possible. REMOTE KEY CODE Function: This command sends remote control key codes of projector. Command: 02H 0FH 00H 00H 02H DATA01 DATA02 CKS (*3) Data Portion Contents DATA01 .. 02 : Remote control key code (Word type) Key number DATA01 DATA02 Key name 1 01H 00H POWER 2 02H 00H POWER ON (!!) 3 03H 00H POWER OFF (!!) 4 04H 00H SOURCE (AUTO) (!!) 5 05H 00H AUTO (!) (!!) 6 06H 00H MENU (!!) (!!!) 7 07H...
... 02H 0DH Error contents Unknown command. Invalid values specified. Setting not possible. REMOTE KEY CODE Function: This command sends remote control key codes of projector. Command: 02H 0FH 00H 00H 02H DATA01 DATA02 CKS (*3) Data Portion Contents DATA01 .. 02 : Remote control key code (Word type) Key number DATA01 DATA02 Key name 1 01H 00H POWER 2 02H 00H POWER ON (!!) 3 03H 00H POWER OFF (!!) 4 04H 00H SOURCE (AUTO) (!!) 5 05H 00H AUTO (!) (!!) 6 06H 00H MENU (!!) (!!!) 7 07H...

NP115 : PC Control Connectors and Cables for all projectors and plasmas
Page 1
... models that end using the NEC Image Express Utility to send images to the projector for presentations as well as basic projector control, projector lamp and error status or asset management. (These functions can purchase a MAC or Sun type keyboard/mouse cable (mini-DIN 8P) at a local computer or electronics store. Soldering a mini-DIN connector can be accomplished via LAN or USB with D-Sub 9Pin PC Control port...
... models that end using the NEC Image Express Utility to send images to the projector for presentations as well as basic projector control, projector lamp and error status or asset management. (These functions can purchase a MAC or Sun type keyboard/mouse cable (mini-DIN 8P) at a local computer or electronics store. Soldering a mini-DIN connector can be accomplished via LAN or USB with D-Sub 9Pin PC Control port...
NP4100 : brochure
Page 1
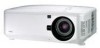
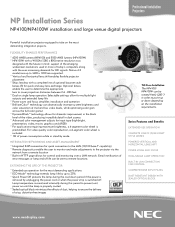
... remote locations. EXTENDING THE LIFE OF THE PROJECTOR ° Extended use operation for HD signals. Series Features and Benefits EXTENDED USE OPERATION COMPLETE LINE OF (5) BAYONET STYLE LENSES POWERED VERTICAL AND HORIZONTAL LENS SHIFT POWER ZOOM AND FOCUS DUAL/SINGLE LAMP OPERATION BUILT-IN LAN CONNECTION FOR CONTROL COMPREHENSIVE INPUT PANEL DUST-RESISTANT DESIGN WITH SEALED OPTICAL BLOCK www.necdisplay.com Native 4:3 resolutions up or down period if the power is removed by mode INTEGRATED NETWORKING...
... remote locations. EXTENDING THE LIFE OF THE PROJECTOR ° Extended use operation for HD signals. Series Features and Benefits EXTENDED USE OPERATION COMPLETE LINE OF (5) BAYONET STYLE LENSES POWERED VERTICAL AND HORIZONTAL LENS SHIFT POWER ZOOM AND FOCUS DUAL/SINGLE LAMP OPERATION BUILT-IN LAN CONNECTION FOR CONTROL COMPREHENSIVE INPUT PANEL DUST-RESISTANT DESIGN WITH SEALED OPTICAL BLOCK www.necdisplay.com Native 4:3 resolutions up or down period if the power is removed by mode INTEGRATED NETWORKING...

NP4100 : brochure
Page 2
... and replacement cables. The lamp is covered for details. IN THE BOX Remote control, batteries, power cord, 6-segment color wheel, user's manual on CD-ROM, quick start guide, product registration card, anti-theft screw for lens SIGNAL COMPATIBILITY/CONNECTIVITY Scan Rate Supported Video Standards SD/HD Video Signal Compatibility PC Signal Compatibility Macintosh Compatibility Input/Output Terminals RGB 1 (analog) RGB2 (analog) RGB3 (digital) Video 1 Video 2 Video 3 Audio Audio Out Monitor Out Audio External Control Sync Compatibility Networking Screen Trigger USB...
... and replacement cables. The lamp is covered for details. IN THE BOX Remote control, batteries, power cord, 6-segment color wheel, user's manual on CD-ROM, quick start guide, product registration card, anti-theft screw for lens SIGNAL COMPATIBILITY/CONNECTIVITY Scan Rate Supported Video Standards SD/HD Video Signal Compatibility PC Signal Compatibility Macintosh Compatibility Input/Output Terminals RGB 1 (analog) RGB2 (analog) RGB3 (digital) Video 1 Video 2 Video 3 Audio Audio Out Monitor Out Audio External Control Sync Compatibility Networking Screen Trigger USB...

NP4100 : installation guide
Page 1
..., only vertical image size varies. NP4100 Installation Guide Desktop and Ceiling Mount NEC Display Solutions of 9 v 1.1 Contents Product Description, Lens Specs, Screen/Aspect Ratio Notes and Formulas Diagrams & Distance Charts; 4:3 16:9 Lens Shift Adjustable Range Tilt Capabilities Cabinet Dimensions Lens Dimensions Ceiling Mount Dimensions Input Panel and Control Codes Pg 1 Pg 2 Pg 3 Pg 4 Pg 5 Pg 6 Pg 7 Pg 8 Pg 9 Product Description Type: 1 chip DLP Projector 0.7 DMD Resolution: 1024 x 768 (4:3) / 1024 x 576 (16:9) Powered: Lens Shift, Horizontal & Vertical /Zoom/ Focus Fan Noise...
..., only vertical image size varies. NP4100 Installation Guide Desktop and Ceiling Mount NEC Display Solutions of 9 v 1.1 Contents Product Description, Lens Specs, Screen/Aspect Ratio Notes and Formulas Diagrams & Distance Charts; 4:3 16:9 Lens Shift Adjustable Range Tilt Capabilities Cabinet Dimensions Lens Dimensions Ceiling Mount Dimensions Input Panel and Control Codes Pg 1 Pg 2 Pg 3 Pg 4 Pg 5 Pg 6 Pg 7 Pg 8 Pg 9 Product Description Type: 1 chip DLP Projector 0.7 DMD Resolution: 1024 x 768 (4:3) / 1024 x 576 (16:9) Powered: Lens Shift, Horizontal & Vertical /Zoom/ Focus Fan Noise...
NP4100 : user's manual
Page 13
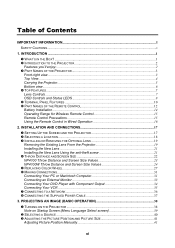
PROJECTING AN IMAGE (BASIC OPERATION 38 TURNING ON THE PROJECTOR ...38 Note on Startup Screen (Menu Language Select screen 39 SELECTING A SOURCE ...40 ADJUSTING THE PICTURE POSITION AND PICTURE SIZE 41 Adjusting Picture Position Manually 41 xi INSTALLATION AND CONNECTIONS 17 SETTING UP THE SCREEN AND THE PROJECTOR 17 SELECTING A LOCATION...18 INSTALLING OR REMOVING THE OPTIONAL LENS 19 Removing the Existing Lens From the Projector 19 Installing the New Lens ...21 Installing the New Lens Using the anti-theft screw 21 THROW DISTANCE AND SCREEN SIZE 22 NP4100 Throw Distance and...
PROJECTING AN IMAGE (BASIC OPERATION 38 TURNING ON THE PROJECTOR ...38 Note on Startup Screen (Menu Language Select screen 39 SELECTING A SOURCE ...40 ADJUSTING THE PICTURE POSITION AND PICTURE SIZE 41 Adjusting Picture Position Manually 41 xi INSTALLATION AND CONNECTIONS 17 SETTING UP THE SCREEN AND THE PROJECTOR 17 SELECTING A LOCATION...18 INSTALLING OR REMOVING THE OPTIONAL LENS 19 Removing the Existing Lens From the Projector 19 Installing the New Lens ...21 Installing the New Lens Using the anti-theft screw 21 THROW DISTANCE AND SCREEN SIZE 22 NP4100 Throw Distance and...

NP4100 : user's manual
Page 15
... THE PROJECTOR ...107 Cleaning the Cabinet ...107 Cleaning the Lens ...107 Cleaning the Filters ...108 REPLACING CONSUMABLE PARTS 110 Replacing the Filters ...110 Replacing the Lamps ...112 Resetting the Lamp Hours Counter 114 7. Table of the Address for Troubleshooting...119 IMAGE PROBLEMS ...120 Lamp Problems...121 Remote Control Problems...121 Audio Problems ...122 HAVING THE PROJECTOR SERVICED 123 8. TROUBLESHOOTING CHECK LIST 140 xiii APPENDIX...115 USING THE OPTIONAL REMOTE MOUSE RECEIVER (NP01MR 115 Connecting the remote mouse receiver to your computer 115 When operating...
... THE PROJECTOR ...107 Cleaning the Cabinet ...107 Cleaning the Lens ...107 Cleaning the Filters ...108 REPLACING CONSUMABLE PARTS 110 Replacing the Filters ...110 Replacing the Lamps ...112 Resetting the Lamp Hours Counter 114 7. Table of the Address for Troubleshooting...119 IMAGE PROBLEMS ...120 Lamp Problems...121 Remote Control Problems...121 Audio Problems ...122 HAVING THE PROJECTOR SERVICED 123 8. TROUBLESHOOTING CHECK LIST 140 xiii APPENDIX...115 USING THE OPTIONAL REMOTE MOUSE RECEIVER (NP01MR 115 Connecting the remote mouse receiver to your computer 115 When operating...

NP4100 : user's manual
Page 17
... for password protection, cabinet control panel lock to project from off center screen installations. High brightness High brightness output of BrilliantColor™ and 6-segment color wheel offers a more true color reproduction 2 Powered zoom and focus provide quick and easy adjustment. 1. Direct Power Off and Auto Power On The projector has a feature called "Direct Power Off". Also, the power cable can be removed immediately after turning on the remote control or projector cabinet. Combination of 6200 and 5500 lumens (NP4100...
... for password protection, cabinet control panel lock to project from off center screen installations. High brightness High brightness output of BrilliantColor™ and 6-segment color wheel offers a more true color reproduction 2 Powered zoom and focus provide quick and easy adjustment. 1. Direct Power Off and Auto Power On The projector has a feature called "Direct Power Off". Also, the power cable can be removed immediately after turning on the remote control or projector cabinet. Combination of 6200 and 5500 lumens (NP4100...

NP4100 : user's manual
Page 18
... Projector Front-right view 1. Part Names of the grill openings. 3 Intake vent Lamp cooling vent - Lens Remove lens hole cap before removing the lens 11. OSD control panel See OSD Controls and Status LEDS 5. I/O connector panel Connect various input devices 6. do not obstruct 7. Anti-Theft Screw Prevent theft of projector 9. Height adjuster Adjusts level of the lens 12. Introduction ITEM 1. 2. 3. Intake vent and front filter Keeps the front fan free of dust - Lens release button Press the release button before use...
... Projector Front-right view 1. Part Names of the grill openings. 3 Intake vent Lamp cooling vent - Lens Remove lens hole cap before removing the lens 11. OSD control panel See OSD Controls and Status LEDS 5. I/O connector panel Connect various input devices 6. do not obstruct 7. Anti-Theft Screw Prevent theft of projector 9. Height adjuster Adjusts level of the lens 12. Introduction ITEM 1. 2. 3. Intake vent and front filter Keeps the front fan free of dust - Lens release button Press the release button before use...

NP4100 : user's manual
Page 26
... or Component signal from computer or component video enabled device 31 Connect a VGA cable (not supplied) from a computer 31 Connect the audio cable (not supplied) from a computer. Connect a LAN cable (not supplied) from a computer 103 Connect the USB cable (not supplied) from the input device - Note: To use this jack for anything other than intended use this feature, you must turn on the Screen Trigger function on start up of the 133 projector. POWER SWITCH 13. AC...
... or Component signal from computer or component video enabled device 31 Connect a VGA cable (not supplied) from a computer 31 Connect the audio cable (not supplied) from a computer. Connect a LAN cable (not supplied) from a computer 103 Connect the USB cable (not supplied) from the input device - Note: To use this jack for anything other than intended use this feature, you must turn on the Screen Trigger function on start up of the 133 projector. POWER SWITCH 13. AC...
NP4100 : user's manual
Page 53
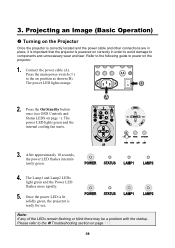
... following guide to the Troubleshooting section on the projector. 1. Please refer to power on page 117. 38 Projecting an Image (Basic Operation) Turning on the Projector Once the projector is correctly located and the power cable and other connections are in order to avoid damage to the on page 8). Press the main power switch ( I ) to components and unnecessary wear and tear. The power LED lights green and the internal cooling fan starts...
... following guide to the Troubleshooting section on the projector. 1. Please refer to power on page 117. 38 Projecting an Image (Basic Operation) Turning on the Projector Once the projector is correctly located and the power cable and other connections are in order to avoid damage to the on page 8). Press the main power switch ( I ) to components and unnecessary wear and tear. The power LED lights green and the internal cooling fan starts...
NP4100 : user's manual
Page 64
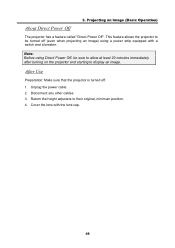
... projector is turned off (even when projecting an image) using Direct Power Off, be sure to allow at least 20 minutes immediately after turning on the projector and starting to display an image. Unplug the power cable. 2. Return the height adjusters to be turned off . 1. This feature allows the projector to their original, minimum position. 4. Disconnect any other cables. 3. Cover the lens with a switch and a breaker. 3. Projecting an Image (Basic Operation) About Direct Power...
... projector is turned off (even when projecting an image) using Direct Power Off, be sure to allow at least 20 minutes immediately after turning on the projector and starting to display an image. Unplug the power cable. 2. Return the height adjusters to be turned off . 1. This feature allows the projector to their original, minimum position. 4. Disconnect any other cables. 3. Cover the lens with a switch and a breaker. 3. Projecting an Image (Basic Operation) About Direct Power...

NP4100 : user's manual
Page 80
...-N/PAL60/SECAM S-Video WXGA Mode Source Display Auto/NTSC3.58/NTSC4.43/PAL/PAL-M/PAL-N/PAL60/SECAM NP4100: Off/On NP4100W: Off/ On Off/ On Control ID 1-254 Filter Message Lamp 1 Life Remaining, Lamp 2 Life Remaining Lamp 1 Hours Used, Lamp 2 Hours Used Off/100[H]/200[H]/500[H]/1000[H] Filter Hours Used Input Terminal Source Name Horizontal Frequency Vertical Frequency Video Type Sync Type Sync Polarity Scan Type IP Address, Subnet Mask, Gateway, MAC Address Product, Serial Number, Firmware, Data Current Signal, All Data, Clear Lamp 1 Hours, Clear Lamp 2 Hours, Clear Filter Hours 65
...-N/PAL60/SECAM S-Video WXGA Mode Source Display Auto/NTSC3.58/NTSC4.43/PAL/PAL-M/PAL-N/PAL60/SECAM NP4100: Off/On NP4100W: Off/ On Off/ On Control ID 1-254 Filter Message Lamp 1 Life Remaining, Lamp 2 Life Remaining Lamp 1 Hours Used, Lamp 2 Hours Used Off/100[H]/200[H]/500[H]/1000[H] Filter Hours Used Input Terminal Source Name Horizontal Frequency Vertical Frequency Video Type Sync Type Sync Polarity Scan Type IP Address, Subnet Mask, Gateway, MAC Address Product, Serial Number, Firmware, Data Current Signal, All Data, Clear Lamp 1 Hours, Clear Lamp 2 Hours, Clear Filter Hours 65

NP4100 : user's manual
Page 83
.... Using On-Screen Display Adjust Menu Descriptions and Functions The Adjust menu contains overall projector settings for Picture will change depending on page 76. See Detail Settings Menu Descriptions and Functions on the preset selected. ITEM Preset Detail Setting Contrast Brightness Sharpness Color Hue Reset DESCRIPTION Select a set of the picture. 5. Adjust the Sharpness value using ◄or► to increase or decrease color input to sharpen or blur the borders between light...
.... Using On-Screen Display Adjust Menu Descriptions and Functions The Adjust menu contains overall projector settings for Picture will change depending on page 76. See Detail Settings Menu Descriptions and Functions on the preset selected. ITEM Preset Detail Setting Contrast Brightness Sharpness Color Hue Reset DESCRIPTION Select a set of the picture. 5. Adjust the Sharpness value using ◄or► to increase or decrease color input to sharpen or blur the borders between light...
NP4100 : user's manual
Page 110
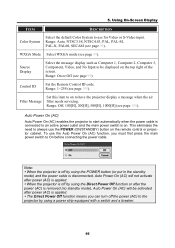
...). To use for Video or S-Video input. Auto Power On (AC) Auto Power On (AC) enables the projector to start automatically when the power cable is applied. When the projector is off the power (AC) to the projector by using the Direct Power Off function or after the power (AC) is removed (no standby mode), Auto Power On (AC) will not activate after power (AC) is connected to have the projector display a message when the air Filter Message filter needs servicing. Set this item...
...). To use for Video or S-Video input. Auto Power On (AC) Auto Power On (AC) enables the projector to start automatically when the power cable is applied. When the projector is off the power (AC) to the projector by using the Direct Power Off function or after the power (AC) is removed (no standby mode), Auto Power On (AC) will not activate after power (AC) is connected to have the projector display a message when the air Filter Message filter needs servicing. Set this item...

NP4100 : user's manual
Page 132
... indicator messages are used by the projector to alert users of problems with setup or internal parts. Troubleshooting 7. The Power LED PROJECTOR STATUS LED CONDITION LED SEQUENCE PROJECTOR CONDITION AC off Off Off Off Cooling Orange blink 0.5 secs on 0.5 secs off After power off Power up sequence Green blink 0.5 secs on 0.5 secs off Start up Standby Orange on On Standby Power on Green on On On The Status LED PROJECTOR STATUS LED CONDITION Normal condition Off Cover ERROR Red 1 time blink (repeatedly) Temperature ERROR Red 2 times blink (repeatedly) Fan ERROR...
... indicator messages are used by the projector to alert users of problems with setup or internal parts. Troubleshooting 7. The Power LED PROJECTOR STATUS LED CONDITION LED SEQUENCE PROJECTOR CONDITION AC off Off Off Off Cooling Orange blink 0.5 secs on 0.5 secs off After power off Power up sequence Green blink 0.5 secs on 0.5 secs off Start up Standby Orange on On Standby Power on Green on On On The Status LED PROJECTOR STATUS LED CONDITION Normal condition Off Cover ERROR Red 1 time blink (repeatedly) Temperature ERROR Red 2 times blink (repeatedly) Fan ERROR...

NP4100 : user's manual
Page 135
... top or bottom (trapezoid effect) 1. Problem: The color of the OSD. Problem: The image is clean. 5. Use the Keystone button on the Adjust menu of the projected image does not match the source image. Adjust the Brightness setting on the remote control or projector to "Source" under "Information" menu. (see page 99) When "WXGA Mode" is set to -screen distance is as possible. 2. Problem: The image is not caused by a connected PC's video card, connect to another computer. To ensure...
... top or bottom (trapezoid effect) 1. Problem: The color of the OSD. Problem: The image is clean. 5. Use the Keystone button on the Adjust menu of the projected image does not match the source image. Adjust the Brightness setting on the remote control or projector to "Source" under "Information" menu. (see page 99) When "WXGA Mode" is set to -screen distance is as possible. 2. Problem: The image is not caused by a connected PC's video card, connect to another computer. To ensure...

NP4100 : user's manual
Page 155
.... Image is turned off . Some pixels are supported by referring to your problem more efficiently. Auto Power Off is shifted in the projector's menu. Lamp Hours Used (lamp operation hours) was cleared after lamp replacement. Still no image even though you connect the projector to be sure repairs are correctly adjusted on page 117 of the 12 function keys turns the external display on a computer signal. The source connected to the projector. Image is active and available. Image shows flickering...
.... Image is turned off . Some pixels are supported by referring to your problem more efficiently. Auto Power Off is shifted in the projector's menu. Lamp Hours Used (lamp operation hours) was cleared after lamp replacement. Still no image even though you connect the projector to be sure repairs are correctly adjusted on page 117 of the 12 function keys turns the external display on a computer signal. The source connected to the projector. Image is active and available. Image shows flickering...

NP4100 : user's manual
Page 156
Troubleshooting Check List Other Remote control does not work (only models with the Control Panel Lock function). Projector is disabled in the menu. In the space below please describe your projector is not used Projector Installation environment Model number: Screen size: inch Serial No: Screen type: White matte Beads Polarization Date of purchase: Wide angle High contrast Lamp operating time (hours): Lamp Mode: Normal Eco Throw distance: feet/inch/m Information on input signal: Orientation: Ceiling mount Desktop Horizontal synch frequency [ ] kHz Power outlet ...
Troubleshooting Check List Other Remote control does not work (only models with the Control Panel Lock function). Projector is disabled in the menu. In the space below please describe your projector is not used Projector Installation environment Model number: Screen size: inch Serial No: Screen type: White matte Beads Polarization Date of purchase: Wide angle High contrast Lamp operating time (hours): Lamp Mode: Normal Eco Throw distance: feet/inch/m Information on input signal: Orientation: Ceiling mount Desktop Horizontal synch frequency [ ] kHz Power outlet ...


