
P Series Specification Brochure
Page 1
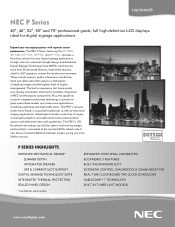
... Suite (DSTS), which boasts more lifelike viewing. Large-Screen LCD NEC P Series 40", 46", 52", 55" and 70" professional-grade, full high-definition LCD displays ideal for select models ENHANCED VIDEO WALL CAPABILITIES ECO-FRIENDLY FEATURES BUILT-IN EXPANSION SLOT EXTENSIVE CONTROL, DIAGNOSTICS & COMMUNICATION REAL-TIME CLOCK/ROUND-THE-CLOCK SCHEDULING CABLECOMP+™ TECHNOLOGY BUILT-IN TUNER (-AVT MODELS) www.necdisplay.com Plus, the capability...
... Suite (DSTS), which boasts more lifelike viewing. Large-Screen LCD NEC P Series 40", 46", 52", 55" and 70" professional-grade, full high-definition LCD displays ideal for select models ENHANCED VIDEO WALL CAPABILITIES ECO-FRIENDLY FEATURES BUILT-IN EXPANSION SLOT EXTENSIVE CONTROL, DIAGNOSTICS & COMMUNICATION REAL-TIME CLOCK/ROUND-THE-CLOCK SCHEDULING CABLECOMP+™ TECHNOLOGY BUILT-IN TUNER (-AVT MODELS) www.necdisplay.com Plus, the capability...
P Series Specification Brochure
Page 3
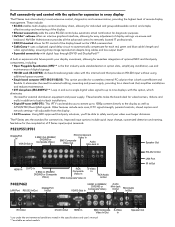
.../Clear QAM signals. Other features include auto scan, DTV signal strength, parental controls, closed caption and network settings-all the advanced control to remotely located IT professionals. • DDC/CI standard allows for PC control of optional NEC and third-party components, including: • Open Pluggable Specification (OPS)** is both cost-efficient and flexible. It eliminates the need for external cabling, mounting and power supply, providing for easy adjustment of digital signage. •...
.../Clear QAM signals. Other features include auto scan, DTV signal strength, parental controls, closed caption and network settings-all the advanced control to remotely located IT professionals. • DDC/CI standard allows for PC control of optional NEC and third-party components, including: • Open Pluggable Specification (OPS)** is both cost-efficient and flexible. It eliminates the need for external cabling, mounting and power supply, providing for easy adjustment of digital signage. •...

P Series Specification Brochure
Page 4
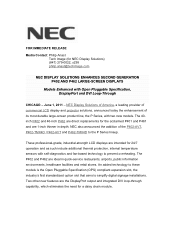
..., External Speaker Jack x 2 P402-AVT P462-AVT NA 5 BNC (RGBHV, DVD/HD, or Video), BNC Composite RCA Audio, External Speaker Jack x 2 RS-232C, IR Remote 15W Stereo P521-AVT P551-AVT P701-AVT FEATURES Additional Features Speakers Thin bezel (P701-standard bezel), advanced thermal capabilities, sealed professional panel, expansion slot, Ethernet Control and Communication, CableComp+, TileMatrix (10x10), TileComp, programmable lookup tables, Plug and Play (DDC/CI, DDC2B), PIP (remote), POP, 6-axis color adjustment, multi...
..., External Speaker Jack x 2 P402-AVT P462-AVT NA 5 BNC (RGBHV, DVD/HD, or Video), BNC Composite RCA Audio, External Speaker Jack x 2 RS-232C, IR Remote 15W Stereo P521-AVT P551-AVT P701-AVT FEATURES Additional Features Speakers Thin bezel (P701-standard bezel), advanced thermal capabilities, sealed professional panel, expansion slot, Ethernet Control and Communication, CableComp+, TileMatrix (10x10), TileComp, programmable lookup tables, Plug and Play (DDC/CI, DDC2B), PIP (remote), POP, 6-axis color adjustment, multi...
Press Release
Page 1
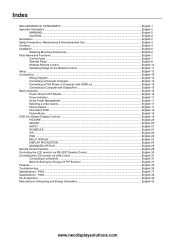
... protection, internal temperature sensors with self-diagnostics and fan-based technology to prevent overheating. The P402 and P462 are the DisplayPort output and integrated DVI loop-through capability, which eliminates the need for NEC Display Solutions) (847) 279-0022, x238 [email protected] NEC DISPLAY SOLUTIONS ENHANCES SECOND GENERATION P402 AND P462 LARGE-SCREEN DISPLAYS Models Enhanced with two new models. Two other...
... protection, internal temperature sensors with self-diagnostics and fan-based technology to prevent overheating. The P402 and P462 are the DisplayPort output and integrated DVI loop-through capability, which eliminates the need for NEC Display Solutions) (847) 279-0022, x238 [email protected] NEC DISPLAY SOLUTIONS ENHANCES SECOND GENERATION P402 AND P462 LARGE-SCREEN DISPLAYS Models Enhanced with two new models. Two other...
Users Manual
Page 2
... Use English-3 Contents ...English-4 Installation ...English-5 Attaching Mounting Accessories ...English-6 Parts Name and Functions...English-7 Control Panel ...English-7 Terminal Panel ...English-8 Wireless Remote Control ...English-10 Operating Range for the Remote Control English-11 Setup ...English-12 Connections ...English-14 Wiring Diagram ...English-14 Connecting a Personal Computer English-15 Connecting a DVD Player or Computer with HDMI out English-15 Connecting a Computer with DisplayPort English-15 Basic Operation...English-16 Power ON and OFF Modes ...English...
... Use English-3 Contents ...English-4 Installation ...English-5 Attaching Mounting Accessories ...English-6 Parts Name and Functions...English-7 Control Panel ...English-7 Terminal Panel ...English-8 Wireless Remote Control ...English-10 Operating Range for the Remote Control English-11 Setup ...English-12 Connections ...English-14 Wiring Diagram ...English-14 Connecting a Personal Computer English-15 Connecting a DVD Player or Computer with HDMI out English-15 Connecting a Computer with DisplayPort English-15 Basic Operation...English-16 Power ON and OFF Modes ...English...
Users Manual
Page 5
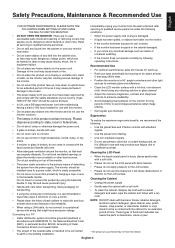
... extended period of a Coaxial Cable. English-3 Connecting to a TV* • Cable distribution system should be installed close to the LCD surface. • Please do not rub the LCD panel with ANSI/NFPA 70, the National Electrical Code (NEC), in accordance with hard material. • Please do not apply pressure to a power outlet, which can properly dissipate. These types of fluids and materials...
... extended period of a Coaxial Cable. English-3 Connecting to a TV* • Cable distribution system should be installed close to the LCD surface. • Please do not rub the LCD panel with ANSI/NFPA 70, the National Electrical Code (NEC), in accordance with hard material. • Please do not apply pressure to a power outlet, which can properly dissipate. These types of fluids and materials...
Users Manual
Page 7
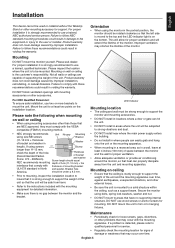
... weight of damage or weakness that heat can easily grab and hang onto the unit or the mounting apparatus. • When mounting in a recessed area, as a support beam. Mounting on wall or ceiling • When using screws under 8.5 mm. • Prior to mounting, inspect the installation location to comply with the VESAcompatible (FDMlv1) mounting method. • NEC strongly recommends using the monitor in voiding the warranty...
... weight of damage or weakness that heat can easily grab and hang onto the unit or the mounting apparatus. • When mounting in a recessed area, as a support beam. Mounting on wall or ceiling • When using screws under 8.5 mm. • Prior to mounting, inspect the installation location to comply with the VESAcompatible (FDMlv1) mounting method. • NEC strongly recommends using the monitor in voiding the warranty...
Users Manual
Page 9
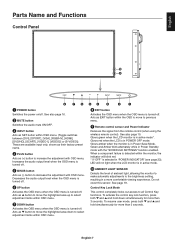
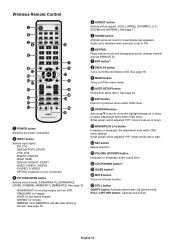
... blink red. * If "OFF" is selected in "POWER INDICATOR" (see page 23), LED will not light when the LCD monitor is turned-off . Increases the audio output level when the OSD menu is turned-off . Acts as (+) button to increase the adjustment with OSD menu. Control Key Lock Mode This control completely locks out access to previous menu. ¾ Remote control sensor and Power Indicator Receives the signal from the remote control (when using the wireless remote control). See also page 16. · MUTE button Switches...
... blink red. * If "OFF" is selected in "POWER INDICATOR" (see page 23), LED will not light when the LCD monitor is turned-off . Increases the audio output level when the OSD menu is turned-off . Acts as (+) button to increase the adjustment with OSD menu. Control Key Lock Mode This control completely locks out access to previous menu. ¾ Remote control sensor and Power Indicator Receives the signal from the remote control (when using the wireless remote control). See also page 16. · MUTE button Switches...
Users Manual
Page 10
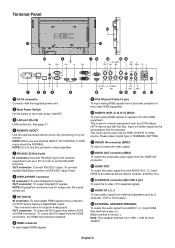
...) To input the S-video (Y/C separate signal). ƺ AUDIO IN 1, 2, 3 To input audio signal from external equipment such as a computer, VCR or DVD player. ƻ EXTERNAL SPEAKER TERMINAL To output the audio signal from external equipment such as a DVD player, HDTV device and Set-Top-Box. NOTE: Do not use Remote IN/OUT, IR CONTROL in order to connect equipment such as a PC in OSD menu should be used with the supplied power cord. · Main Power Switch On/Off switch to your monitor. OUT...
...) To input the S-video (Y/C separate signal). ƺ AUDIO IN 1, 2, 3 To input audio signal from external equipment such as a computer, VCR or DVD player. ƻ EXTERNAL SPEAKER TERMINAL To output the audio signal from external equipment such as a DVD player, HDTV device and Set-Top-Box. NOTE: Do not use Remote IN/OUT, IR CONTROL in order to connect equipment such as a PC in OSD menu should be used with the supplied power cord. · Main Power Switch On/Off switch to your monitor. OUT...
Users Manual
Page 12
.../HV HDMI: HDMI DVD/HD: DVD/HD, SCART VIDEO: VIDEO1, VIDEO2 S-VIDEO: S-VIDEO OPTION: Depends on /off the menu mode. µ AUTO SETUP button Enters auto setup menu. STANDARD: for internal/external speakers. AMBIENT1 and AMBIENT2: activate auto dimming function. See page 17. ´ SOUND button Artificial surround sound for images. Audio out is disabled when surround is set REMOTE ID. ¶ ENT button*2 º DISPLAY button Turns on/off the information OSD. Small screen which adjusted "PIP" mode moves up...
.../HV HDMI: HDMI DVD/HD: DVD/HD, SCART VIDEO: VIDEO1, VIDEO2 S-VIDEO: S-VIDEO OPTION: Depends on /off the menu mode. µ AUTO SETUP button Enters auto setup menu. STANDARD: for internal/external speakers. AMBIENT1 and AMBIENT2: activate auto dimming function. See page 17. ´ SOUND button Artificial surround sound for images. Audio out is disabled when surround is set REMOTE ID. ¶ ENT button*2 º DISPLAY button Turns on/off the information OSD. Small screen which adjusted "PIP" mode moves up...
Users Manual
Page 14
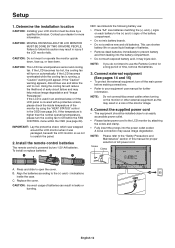
... LCD monitor must be installed close to an easily accessible power outlet. • Please fasten power cord to cool. CAUTION: Do not mount or operate the monitor upside down, face up, or face down. If the LCD is used in an enclosed area or if the LCD panel is powered by using the "HEAT STATUS" control in leaks or bursting. To install or replace batteries: NEC recommends the following battery use the Remote Control...
... LCD monitor must be installed close to an easily accessible power outlet. • Please fasten power cord to cool. CAUTION: Do not mount or operate the monitor upside down, face up, or face down. If the LCD is used in an enclosed area or if the LCD panel is powered by using the "HEAT STATUS" control in leaks or bursting. To install or replace batteries: NEC recommends the following battery use the Remote Control...
Users Manual
Page 23
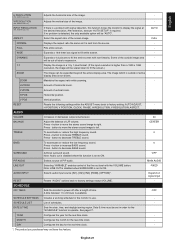
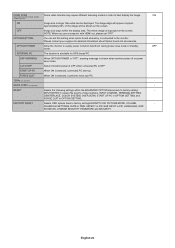
... format. (If the input resolution is set to expansion. 1:1 Display the image in order for the monitor to decrease BASS sound. RESET Resets the following settings within the ADJUST menu back to increase BASS sound. Note: Audio out is disabled when this function is available. Depend on signal input RESET Resets "AUDIO" options back to 24 hours is set to fill the entire screen with signal detection, this feature. A time between 1 to factory settings except VOLUME...
... format. (If the input resolution is set to expansion. 1:1 Display the image in order for the monitor to decrease BASS sound. RESET Resets the following settings within the ADJUST menu back to increase BASS sound. Note: Audio out is disabled when this function is available. Depend on signal input RESET Resets "AUDIO" options back to 24 hours is set to fill the entire screen with signal detection, this feature. A time between 1 to factory settings except VOLUME...
Users Manual
Page 26
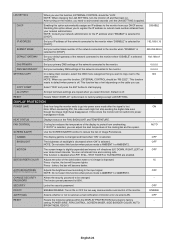
... select this item. SECURITY Locks the security password. After turning on the cable you use . AUTO BRIGHTNESS DPORT, DVI, VGA, RGB/HV inputs only Adjusts the brightness level according to wait several seconds until the LAN SETTING is selected, you select this function when picture mode is off. You can adjust the start copying. setting: POWER SAVE, FAN CONTROL, SCREEN SAVER, SIDE BORDER COLOR, AUTO BRIGHTNESS, DDC/CI.
... select this item. SECURITY Locks the security password. After turning on the cable you use . AUTO BRIGHTNESS DPORT, DVI, VGA, RGB/HV inputs only Adjusts the brightness level according to wait several seconds until the LAN SETTING is selected, you select this function when picture mode is off. You can adjust the start copying. setting: POWER SAVE, FAN CONTROL, SCREEN SAVER, SIDE BORDER COLOR, AUTO BRIGHTNESS, DDC/CI.
Users Manual
Page 28
... you use a computer with HDMI out, please set this setting when option board accessory is selected, connected PC start-up. Allow the monitor to supply power to the monitor. ON OFF - English-26 Image size is displayed on the screen. Approximately 95% of input signals), INPUT CHANGE, TERMINAL SETTING, DEINTERLACE, COLOR SYSTEM, OVER SCAN, START UP PC in OPTION SETTING and FORCE QUIT in PIP, LANGUAGE, OSD ROTATION, CHANGE SECURITY PASSWORD and SECURITY. Resets...
... you use a computer with HDMI out, please set this setting when option board accessory is selected, connected PC start-up. Allow the monitor to supply power to the monitor. ON OFF - English-26 Image size is displayed on the screen. Approximately 95% of input signals), INPUT CHANGE, TERMINAL SETTING, DEINTERLACE, COLOR SYSTEM, OVER SCAN, START UP PC in OPTION SETTING and FORCE QUIT in PIP, LANGUAGE, OSD ROTATION, CHANGE SECURITY PASSWORD and SECURITY. Resets...
Users Manual
Page 29
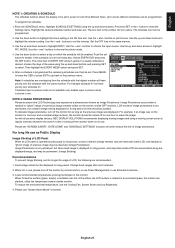
... personal display devices, NEC DISPLAY SOLUTIONS recommends displaying moving screen saver at different times. Press the SET or the + button to choose the input source. buttons to set to the number will be programmed. buttons to set button to select. Push the set the minutes. If a weekly schedule is shown in use, please turn off for long period, ionic impurities inside monitor. If selected input or picture mode is not available now, disable input or picture mode is...
... personal display devices, NEC DISPLAY SOLUTIONS recommends displaying moving screen saver at different times. Press the SET or the + button to choose the input source. buttons to set to the number will be programmed. buttons to set button to select. Push the set the minutes. If a weekly schedule is shown in use, please turn off for long period, ionic impurities inside monitor. If selected input or picture mode is not available now, disable input or picture mode is...
Users Manual
Page 30
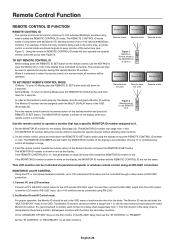
... the REMOTE ID SET button on the display. This MONITOR ID number allows the remote control to operate this feature to work properly, the display must be set up to 100 individual LCD monitors can be controlled via remote. If the MONITOR ID number is in red on the remote control, use REMOTE ID:3 Remote works Use the remote control to 100. You can range from the LCD monitor to 0 Monitor ID:1 Monitor ID:2 Monitor ID:3 Remote works Monitor ID:3 TO SET/RESET REMOTE CONTROL MODE ID Mode - The REMOTE CONTROL ID mode works in white on...
... the REMOTE ID SET button on the display. This MONITOR ID number allows the remote control to operate this feature to work properly, the display must be set up to 100 individual LCD monitors can be controlled via remote. If the MONITOR ID number is in red on the remote control, use REMOTE ID:3 Remote works Use the remote control to 100. You can range from the LCD monitor to 0 Monitor ID:1 Monitor ID:2 Monitor ID:3 Remote works Monitor ID:3 TO SET/RESET REMOTE CONTROL MODE ID Mode - The REMOTE CONTROL ID mode works in white on...
Users Manual
Page 37
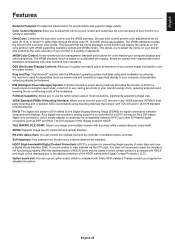
... compatibility with other peripherals. Plug and Play: The Microsoft® solution with accuracy while compensating for horizontal and vertical direction. As a digital-only connector, analog support is based on a calibrated color space, allows for preventing illegal copying of video data sent over multiple screens with the Windows® operating system facilitates setup and installation by allowing the monitor to send its capabilities (such as screen size and resolutions supported...
... compatibility with other peripherals. Plug and Play: The Microsoft® solution with accuracy while compensating for horizontal and vertical direction. As a digital-only connector, analog support is based on a calibrated color space, allows for preventing illegal copying of video data sent over multiple screens with the Windows® operating system facilitates setup and installation by allowing the monitor to send its capabilities (such as screen size and resolutions supported...
Users Manual
Page 38
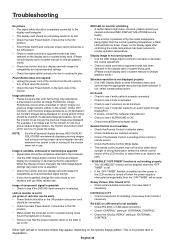
... operating temperature, a RED LED will blink six times. This is not permanent, but constant images being used . (Please consult display card or system manual to change the video mode to noninterlace and use . Image persistence • Please be aware that LCD Technology may appear, depending on the screen. To alleviate image persistence, turn off for bent or pushed-in "EXTERNAL CONTROL". Troubleshooting No picture • The signal cable should be completely connected...
... operating temperature, a RED LED will blink six times. This is not permanent, but constant images being used . (Please consult display card or system manual to change the video mode to noninterlace and use . Image persistence • Please be aware that LCD Technology may appear, depending on the screen. To alleviate image persistence, turn off for bent or pushed-in "EXTERNAL CONTROL". Troubleshooting No picture • The signal cable should be completely connected...

Users Manual
Page 39
...;C) regarding over 40°C Dimension 919.7 (W) x 532.2 (H) x 118.0 (D) mm / 36.2 (W) x 21.0 (H) x 4.6 (D) inches (with Standard V1.1a, applicable to change without handle) Weight 20.8 kg (45.9 lbs) VESA compatible arm mounting interface 300 mm x 300 mm (M6, 4 Holes) Power Management VESA DPM Plug & Play VESA DDC2B, DDC/CI, DisplayPort Accessories Setup manual, Power Cord, Video Signal cable, Remote Control, AA Battery x 2, Clamp x 3, Screw x 5, CD-ROM, Thumbscrew for optional stand x 2, Cable cover NOTE: Technical specifi...
...;C) regarding over 40°C Dimension 919.7 (W) x 532.2 (H) x 118.0 (D) mm / 36.2 (W) x 21.0 (H) x 4.6 (D) inches (with Standard V1.1a, applicable to change without handle) Weight 20.8 kg (45.9 lbs) VESA compatible arm mounting interface 300 mm x 300 mm (M6, 4 Holes) Power Management VESA DPM Plug & Play VESA DDC2B, DDC/CI, DisplayPort Accessories Setup manual, Power Cord, Video Signal cable, Remote Control, AA Battery x 2, Clamp x 3, Screw x 5, CD-ROM, Thumbscrew for optional stand x 2, Cable cover NOTE: Technical specifi...

Users Manual
Page 40
...), 1080p, 1080i DisplayPort DisplayPort Connector Digital RGB DisplayPort Complies with handle) 1055.4 (W) x 608.6 (H) x 103.0 (D) mm / 41.6 (W) x 24.0 (H) x 4.1 (D) inches (without handle) Weight 23.8 kg (52.5 lbs) VESA compatible arm mounting interface 300 mm x 300 mm (M6, 4 Holes) Power Management VESA DPM Plug & Play VESA DDC2B, DDC/CI, DisplayPort Accessories Setup manual, Power Cord, Video Signal cable, Remote Control, AA Battery x 2, Clamp x 3, Screw x 5, CD-ROM, Thumbscrew for optional stand x 2, Cable cover NOTE: Technical specifi...
...), 1080p, 1080i DisplayPort DisplayPort Connector Digital RGB DisplayPort Complies with handle) 1055.4 (W) x 608.6 (H) x 103.0 (D) mm / 41.6 (W) x 24.0 (H) x 4.1 (D) inches (without handle) Weight 23.8 kg (52.5 lbs) VESA compatible arm mounting interface 300 mm x 300 mm (M6, 4 Holes) Power Management VESA DPM Plug & Play VESA DDC2B, DDC/CI, DisplayPort Accessories Setup manual, Power Cord, Video Signal cable, Remote Control, AA Battery x 2, Clamp x 3, Screw x 5, CD-ROM, Thumbscrew for optional stand x 2, Cable cover NOTE: Technical specifi...


