
User Manual
Page 2
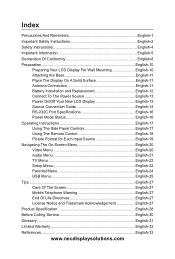
... Antenna Connection English-11 Battery Installation and Replacement English-12 Connect To The Power Source English-13 Power On/Off Your New LCD Display English-13 Source Connection Guide English-14 RS-232C Port Specifications English-16 Power Mode Status English-16 Operating Instructions English-17 Using The Side Panel Controls English-17 Using The Remote Control English-18 Picture Format for Each Input Source English-19 Navigating The On-Screen Menu English-20 Video Menu English-20 Audio Menu English-21 TV Menu English-22 Setup Menu...
... Antenna Connection English-11 Battery Installation and Replacement English-12 Connect To The Power Source English-13 Power On/Off Your New LCD Display English-13 Source Connection Guide English-14 RS-232C Port Specifications English-16 Power Mode Status English-16 Operating Instructions English-17 Using The Side Panel Controls English-17 Using The Remote Control English-18 Picture Format for Each Input Source English-19 Navigating The On-Screen Menu English-20 Video Menu English-20 Audio Menu English-21 TV Menu English-22 Setup Menu...
User Manual
Page 4
... long periods of the obsolete outlet. 10. Protect the power cord from being walked on or pinched particularly at plugs, convenience receptacles, and the point where they exit from tip-over. Use only with the cart, stand, tripod, bracket, or table specified by the manufacturer. 12. S3125A 13. Servicing is required when the apparatus has been damaged in...
... long periods of the obsolete outlet. 10. Protect the power cord from being walked on or pinched particularly at plugs, convenience receptacles, and the point where they exit from tip-over. Use only with the cart, stand, tripod, bracket, or table specified by the manufacturer. 12. S3125A 13. Servicing is required when the apparatus has been damaged in...
User Manual
Page 5
..., or anything other hazards. The mains plug is provided to call your authorized dealer or service center. If an outside antenna is connected to the receiver, confirm that provides guidelines for the grounding electrode. This could void the user's warranty. NOTE: To the display system installer: This reminder is used as recommended by NEC could cause the product to protect against...
..., or anything other hazards. The mains plug is provided to call your authorized dealer or service center. If an outside antenna is connected to the receiver, confirm that provides guidelines for the grounding electrode. This could void the user's warranty. NOTE: To the display system installer: This reminder is used as recommended by NEC could cause the product to protect against...
User Manual
Page 8
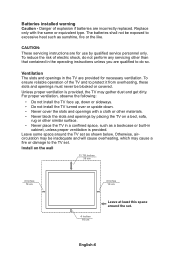
...install the TV turned over or upside down. • Never cover the slots and openings with the same or equivalent type. Install on a bed, sofa, rug or other than that contained in cabinet, unless proper ventilation is provided, the TV may gather dust and get dirty. English-6 Replace.... CAUTION: These servicing instructions are provided for use by placing the TV on the wall 11 7/8 inches 30 cm 4 inches 10 cm 4 inches 10 cm 4 inches 10 cm Leave at least this space around the TV set . Unless proper ventilation is provided. To ensure reliable operation of explosion if ...
...install the TV turned over or upside down. • Never cover the slots and openings with the same or equivalent type. Install on a bed, sofa, rug or other than that contained in cabinet, unless proper ventilation is provided, the TV may gather dust and get dirty. English-6 Replace.... CAUTION: These servicing instructions are provided for use by placing the TV on the wall 11 7/8 inches 30 cm 4 inches 10 cm 4 inches 10 cm 4 inches 10 cm Leave at least this space around the TV set . Unless proper ventilation is provided. To ensure reliable operation of explosion if ...
User Manual
Page 12
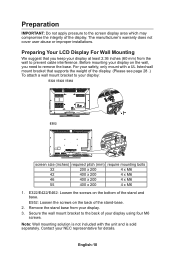
... a UL listed wall mount bracket that you need to the back of your NEC representative for details. Remove the stand base from the wall to the screen display area which may compromise the integrity of the display. (Please see page 28 .) To attach a wall mount bracket to your display on the bottom of the stand-base. 2. Before mounting your display: E322 / E422 / E462 E552 E552 screen size (inches) required pitch (mm) require mounting bolts 32 200...
... a UL listed wall mount bracket that you need to the back of your NEC representative for details. Remove the stand base from the wall to the screen display area which may compromise the integrity of the display. (Please see page 28 .) To attach a wall mount bracket to your display on the bottom of the stand-base. 2. Before mounting your display: E322 / E422 / E462 E552 E552 screen size (inches) required pitch (mm) require mounting bolts 32 200...
User Manual
Page 15
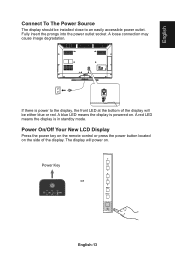
... standby mode. The display will be installed close to the display, the front LED at the bottom of the display. Power Key or DP N Q English-13 Power On/Off Your New LCD Display Press the power key on the remote control or press the power button located on the side of the display will power on . A red LED means the display is powered on . If there is power to an easily accessible power outlet. English Connect To The Power Source...
... standby mode. The display will be installed close to the display, the front LED at the bottom of the display. Power Key or DP N Q English-13 Power On/Off Your New LCD Display Press the power key on the remote control or press the power button located on the side of the display will power on . A red LED means the display is powered on . If there is power to an easily accessible power outlet. English Connect To The Power Source...
User Manual
Page 17
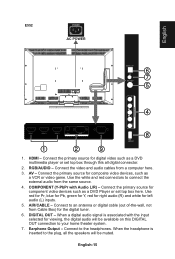
... component video devices such as a VCR or video game. RGB/AUDIO - AV - When a digital audio signal is inserted to connect the external audio from a computer here. 3. Connect the primary source for digital video such as a DVD multimedia player or set top box here. Use red for Pr, blue for Pb, green for Y, red for right audio (R) and white for viewing, the digital audio will be available on this all digital connector. 2. Connect to an antenna or digital cable (out of-the-wall, not from Cable Box...
... component video devices such as a VCR or video game. RGB/AUDIO - AV - When a digital audio signal is inserted to connect the external audio from a computer here. 3. Connect the primary source for digital video such as a DVD multimedia player or set top box here. Use red for Pr, blue for Pb, green for Y, red for right audio (R) and white for viewing, the digital audio will be available on this all digital connector. 2. Connect to an antenna or digital cable (out of-the-wall, not from Cable Box...
User Manual
Page 18
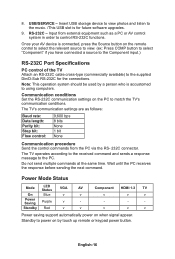
... have connected a source to the Component input.) RS-232C Port Specifications PC control of the TV Attach an RS-232C cable cross-type (commercially available) to the supplied Din/D-Sub RS-232C for future software upgrades. 9. English-16 RS-232C - Note: This operation system should be used by touch up remote or keypad power button. Wait until the PC receives the response before sending the next command. Power Mode Status Mode LED...
... have connected a source to the Component input.) RS-232C Port Specifications PC control of the TV Attach an RS-232C cable cross-type (commercially available) to the supplied Din/D-Sub RS-232C for future software upgrades. 9. English-16 RS-232C - Note: This operation system should be used by touch up remote or keypad power button. Wait until the PC receives the response before sending the next command. Power Mode Status Mode LED...

User Manual
Page 20
... the menu. Mute Switch the sound On/Off. Menu Press to open the OSD menu OK Press to choose PC IN or HDMI source mode. 0 ─ 9 / - Using The Remote Control Power Press to turn On/Off (standby) the power. (Note: To completely turn off the power, unplug the AC cord from the power outlet.) TV Press to browse through the channels. to choose ATSC/NTSC tuner source mode. AV Press to choose Component source mode. COMP...
... the menu. Mute Switch the sound On/Off. Menu Press to open the OSD menu OK Press to choose PC IN or HDMI source mode. 0 ─ 9 / - Using The Remote Control Power Press to turn On/Off (standby) the power. (Note: To completely turn off the power, unplug the AC cord from the power outlet.) TV Press to browse through the channels. to choose ATSC/NTSC tuner source mode. AV Press to choose Component source mode. COMP...
User Manual
Page 21
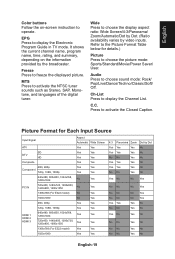
... No Yes No Yes No Yes Yes Yes Yes Yes Yes Yes Yes Yes Yes Yes Yes Yes 4:3 Panorama Zoom Dot by video inputs. English Color buttons Follow the on the information provided by the broadcaster. C.C. It shows the current channel name, program name, time, rating, and summary, depending on -screen instruction to choose the picture mode: Sports/Standard/Movie/Power Saver/ User.
... No Yes No Yes No Yes Yes Yes Yes Yes Yes Yes Yes Yes Yes Yes Yes Yes 4:3 Panorama Zoom Dot by video inputs. English Color buttons Follow the on the information provided by the broadcaster. C.C. It shows the current channel name, program name, time, rating, and summary, depending on -screen instruction to choose the picture mode: Sports/Standard/Movie/Power Saver/ User.

User Manual
Page 22
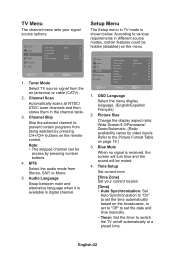
... the Menu button to display and Exit to navigate, select, adjust or confirm an item on the OSD (On Screen Display) menu. Note: Some features may only be more natural. [Blue Stretch] Level down the brightest part of the preset picture modes: Standard, Movie, Power Saver, User, Sports. 2. Hue Adjust the skin tones from receiving signal. [Adaptive Luma Control] Automatically adjusts the brightness and contrast after analyzing the input signal. Use...
... the Menu button to display and Exit to navigate, select, adjust or confirm an item on the OSD (On Screen Display) menu. Note: Some features may only be more natural. [Blue Stretch] Level down the brightest part of the preset picture modes: Standard, Movie, Power Saver, User, Sports. 2. Hue Adjust the skin tones from receiving signal. [Adaptive Luma Control] Automatically adjusts the brightness and contrast after analyzing the input signal. Use...
User Manual
Page 23
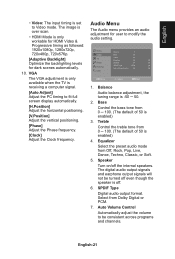
...; HDMI Mode is off. 6. SPDIF Type Digital audio output format. The digital audio output signals and earphone output signals will not be consistent across programs and channels. English-21 Audio Menu The Audio menu provides an audio adjustment for dark scenes automatically. 10. Video Audio TV Setup Parental USB Balance Bass Treble Equalizer Speaker SPDIF Type Auto Volume Control 0 50 50 Off On PCM Off OK Enter Select EXIT Exit 1. Balance Audio balance adjustment, the tuning range is set to fit full screen display automatically. [H.Position] Adjust...
...; HDMI Mode is off. 6. SPDIF Type Digital audio output format. The digital audio output signals and earphone output signals will not be consistent across programs and channels. English-21 Audio Menu The Audio menu provides an audio adjustment for dark scenes automatically. 10. Video Audio TV Setup Parental USB Balance Bass Treble Equalizer Speaker SPDIF Type Auto Volume Control 0 50 50 Off On PCM Off OK Enter Select EXIT Exit 1. Balance Audio balance adjustment, the tuning range is set to fit full screen display automatically. [H.Position] Adjust...
User Manual
Page 24
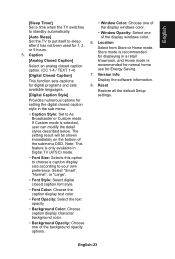
.... Video Audio TV Setup Parental USB OK Enter OSD Language Picture Size Blue Mute Time Setup Caption Location Version Info Monitor ID Reset Select English Wide Screen On Home 1 EXIT Exit 1. Video Audio TV Setup Parental USB Tuner Mode Channel Scan Channel Skip MTS Audio Language Cable Stereo English OK Enter Select EXIT Exit 1. buttons on the broadcaster, or set to "Off" to set the date and time manually. • Timer: Set the timer to prevent certain programs from being watched by pressing CH+/CH- Setup Menu...
.... Video Audio TV Setup Parental USB OK Enter OSD Language Picture Size Blue Mute Time Setup Caption Location Version Info Monitor ID Reset Select English Wide Screen On Home 1 EXIT Exit 1. Video Audio TV Setup Parental USB Tuner Mode Channel Scan Channel Skip MTS Audio Language Cable Stereo English OK Enter Select EXIT Exit 1. buttons on the broadcaster, or set to "Off" to set the date and time manually. • Timer: Set the timer to prevent certain programs from being watched by pressing CH+/CH- Setup Menu...
User Manual
Page 25
... the submenu OSD. Reset Restore all the default Setup settings. The setting result will be shown immediately on the bottom of the display windows color. 6. If Custom mode is recommended for normal home use for displaying in a retail showroom, and Home mode is selected, user can modify the detail styles described below. English [Sleep Timer] Set a time when the TV switches to standby automatically. [Auto Sleep] Set the TV to put...
... the submenu OSD. Reset Restore all the default Setup settings. The setting result will be shown immediately on the bottom of the display windows color. 6. If Custom mode is recommended for normal home use for displaying in a retail showroom, and Home mode is selected, user can modify the detail styles described below. English [Sleep Timer] Set a time when the TV switches to standby automatically. [Auto Sleep] Set the TV to put...
User Manual
Page 26
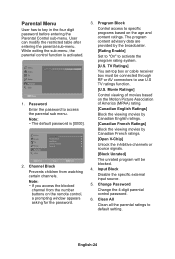
... programs based on the remote control, a prompting window appears asking for the password. 3. Clean All Clean all the parental ratings to use U.S TV ratings function. [U.S. TV Ratings] You set-top box or cable receiver box must be blocked. 4. English-24 Video Password **** Audio TV Setup Parental USB EXIT Back 1. Note: • If you access the blocked channel from watching certain channels. Change Password Change the 4-digit parental control password. 6. Input Block Disable the specific external input source. 5. Video Audio TV Setup Parental USB...
... programs based on the remote control, a prompting window appears asking for the password. 3. Clean All Clean all the parental ratings to use U.S TV ratings function. [U.S. TV Ratings] You set-top box or cable receiver box must be blocked. 4. English-24 Video Password **** Audio TV Setup Parental USB EXIT Back 1. Note: • If you access the blocked channel from watching certain channels. Change Password Change the 4-digit parental control password. 6. Input Block Disable the specific external input source. 5. Video Audio TV Setup Parental USB...
User Manual
Page 27
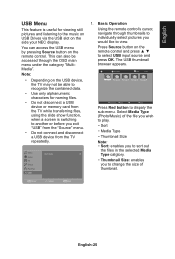
... in the selected Media Type catgtory. • Thumbnail Size: enables you would like to view. Press Source button on the remote control and press ▲ ▼ to dispaly the sub-menu. File name 1 01/01 Photo File name 1 File name 2 File name 3 File name 4 File name 5 Media Type Size Sort Press Red button to select USB input source and press OK. Video Audio TV Setup Parental USB Multi-Media 1. Basic Operation Using the remote control's cursor, navigate...
... in the selected Media Type catgtory. • Thumbnail Size: enables you would like to view. Press Source button on the remote control and press ▲ ▼ to dispaly the sub-menu. File name 1 01/01 Photo File name 1 File name 2 File name 3 File name 4 File name 5 Media Type Size Sort Press Red button to select USB input source and press OK. Video Audio TV Setup Parental USB Multi-Media 1. Basic Operation Using the remote control's cursor, navigate...
User Manual
Page 30
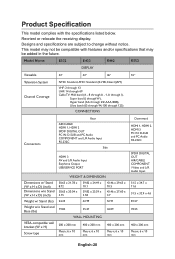
... (J through W), Hyper band (AA through ZZ, AAA, BBB), Ultra band (65 through 94, 100 through 125) CONNECTIONS Connectors Rear AIR/CABLE HDMI 1, HDMI 2 SPDIF DIGITAL OUT PC IN: D-SUB and PC Audio COMPONENT and L/R Audio Input RS-232C Side HDMI 3 AV and L/R Audio Input Earphone Output USB/SERVICE PORT Dimensions w/ Stand (W x H x D) (inch) Dimensions w/o Stand (W x H x D) (inch) Weight w/ Stand (lbs) Weight w/o Stand and Base (lbs) VESA-compatible wall bracket (W x H) Screw type WEIGHT & DIMENSIOIN 30.65 x 21.78 x 8.72 30.65 x 20.04 x 3.15 39.82 x 24.49...
... (J through W), Hyper band (AA through ZZ, AAA, BBB), Ultra band (65 through 94, 100 through 125) CONNECTIONS Connectors Rear AIR/CABLE HDMI 1, HDMI 2 SPDIF DIGITAL OUT PC IN: D-SUB and PC Audio COMPONENT and L/R Audio Input RS-232C Side HDMI 3 AV and L/R Audio Input Earphone Output USB/SERVICE PORT Dimensions w/ Stand (W x H x D) (inch) Dimensions w/o Stand (W x H x D) (inch) Weight w/ Stand (lbs) Weight w/o Stand and Base (lbs) VESA-compatible wall bracket (W x H) Screw type WEIGHT & DIMENSIOIN 30.65 x 21.78 x 8.72 30.65 x 20.04 x 3.15 39.82 x 24.49...

User Manual
Page 32
... the Closed Caption settings as charges for receiver installation and adjustments of the images on the display. These tips may save you time and money as some text modes may block the visibility of customer controls are working and replace batteries if necessary. • Clean the remote control sensor lens on the display. • If necessary, utilize the buttons located on the remote control. hairdryer, nearby neon lights, etc.). • Power cycle...
... the Closed Caption settings as charges for receiver installation and adjustments of the images on the display. These tips may save you time and money as some text modes may block the visibility of customer controls are working and replace batteries if necessary. • Clean the remote control sensor lens on the display. • If necessary, utilize the buttons located on the remote control. hairdryer, nearby neon lights, etc.). • Power cycle...

User Manual
Page 33
...-screen listing of features shown on the rear of audio and video signals. RF Radio Frequency or modulated signal design used for which allows stereo sounds to receive higher picture resolution and offer sound connection options. These connectors are located on the display screen is made available for television broadcasts. MPAA Motion Picture Association of 720p or 1080i active scan lines. HDMI Inputs High-Definition Multimedia Interface Audio / Video Inputs are used by the carrier for user adjustments...
...-screen listing of features shown on the rear of audio and video signals. RF Radio Frequency or modulated signal design used for which allows stereo sounds to receive higher picture resolution and offer sound connection options. These connectors are located on the display screen is made available for television broadcasts. MPAA Motion Picture Association of 720p or 1080i active scan lines. HDMI Inputs High-Definition Multimedia Interface Audio / Video Inputs are used by the carrier for user adjustments...
User Manual
Page 34
This warranty covers only NEC DISPLAY SOLUTIONS supplied components. No warranty service is provided outside of time resulting in image persistence (afterimage effects), accident, misuse or abuse or operated contrary to the instructions contained in the User's Manual. It shall be your nearest authorized NEC Display Solutions of purchase. The Product shall not have been previously altered, repaired, or serviced by anyone other factors, While NEC DISPLAY SOLUTIONS Products...
This warranty covers only NEC DISPLAY SOLUTIONS supplied components. No warranty service is provided outside of time resulting in image persistence (afterimage effects), accident, misuse or abuse or operated contrary to the instructions contained in the User's Manual. It shall be your nearest authorized NEC Display Solutions of purchase. The Product shall not have been previously altered, repaired, or serviced by anyone other factors, While NEC DISPLAY SOLUTIONS Products...


