
User Manual
Page 2
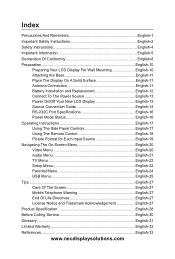
... Antenna Connection English-11 Battery Installation and Replacement English-12 Connect To The Power Source English-13 Power On/Off Your New LCD Display English-13 Source Connection Guide English-14 RS-232C Port Specifications English-16 Power Mode Status English-16 Operating Instructions English-17 Using The Side Panel Controls English-17 Using The Remote Control English-18 Picture Format for Each Input Source English-19 Navigating The On-Screen Menu English-20 Video Menu English-20 Audio Menu English-21 TV Menu English-22 Setup Menu...
... Antenna Connection English-11 Battery Installation and Replacement English-12 Connect To The Power Source English-13 Power On/Off Your New LCD Display English-13 Source Connection Guide English-14 RS-232C Port Specifications English-16 Power Mode Status English-16 Operating Instructions English-17 Using The Side Panel Controls English-17 Using The Remote Control English-18 Picture Format for Each Input Source English-19 Navigating The On-Screen Menu English-20 Video Menu English-20 Audio Menu English-21 TV Menu English-22 Setup Menu...
User Manual
Page 4
.... Unplug this apparatus near any heat sources such as power-supply cord or plug is used, use caution when moving the cart/apparatus combination to rain or moisture, does not operate normally, or has been dropped. 15. Refer all warnings and instructions marked on the front or top of time. 14. S3125A 13. The display complies with dry cloth. 7. Do not...
.... Unplug this apparatus near any heat sources such as power-supply cord or plug is used, use caution when moving the cart/apparatus combination to rain or moisture, does not operate normally, or has been dropped. 15. Refer all warnings and instructions marked on the front or top of time. 14. S3125A 13. The display complies with dry cloth. 7. Do not...
User Manual
Page 5
... the user's warranty. Never connect the LCD display to 50 Hz, direct current, or anything other outlet unless the blades and ground terminal can expose you to call your authorized dealer or service center. Adjust only those controls that are covered in particular, specifies that the antenna system is broken, do not use with respect to the receiver, confirm that the cable...
... the user's warranty. Never connect the LCD display to 50 Hz, direct current, or anything other outlet unless the blades and ground terminal can expose you to call your authorized dealer or service center. Adjust only those controls that are covered in particular, specifies that the antenna system is broken, do not use with respect to the receiver, confirm that the cable...
User Manual
Page 8
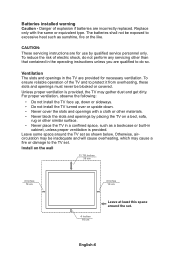
... dirty. CAUTION: These servicing instructions are provided for use by placing the TV on the wall 11 7/8 inches 30 cm 4 inches 10 cm 4 inches 10 cm 4 inches 10 cm Leave at least this space around the TV set . Unless proper ventilation is provided. Batteries installed warning Caution - To ...type. English-6 Replace only with a cloth or other than that contained in cabinet, unless proper ventilation is provided, the TV may cause a fire or damage to protect it from overheating, these slots and openings must never be exposed to do so. To ensure reliable operation...
... dirty. CAUTION: These servicing instructions are provided for use by placing the TV on the wall 11 7/8 inches 30 cm 4 inches 10 cm 4 inches 10 cm 4 inches 10 cm Leave at least this space around the TV set . Unless proper ventilation is provided. Batteries installed warning Caution - To ...type. English-6 Replace only with a cloth or other than that contained in cabinet, unless proper ventilation is provided, the TV may cause a fire or damage to protect it from overheating, these slots and openings must never be exposed to do so. To ensure reliable operation...
User Manual
Page 12
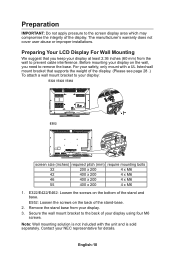
... listed wall mount bracket that you need to remove the base. Contact your display at least 2.36 inches (60 mm) from your display on the bottom of the stand-base. 2. Preparing Your LCD Display For Wall Mounting We suggest that supports the weight of the display. (Please see page 28 .) To attach a wall mount bracket to your display using four M6 screws. The manufacturer's warranty does not cover user abuse or improper installations. English-10 Before mounting your display. 3. Remove the stand base...
... listed wall mount bracket that you need to remove the base. Contact your display at least 2.36 inches (60 mm) from your display on the bottom of the stand-base. 2. Preparing Your LCD Display For Wall Mounting We suggest that supports the weight of the display. (Please see page 28 .) To attach a wall mount bracket to your display using four M6 screws. The manufacturer's warranty does not cover user abuse or improper installations. English-10 Before mounting your display. 3. Remove the stand base...
User Manual
Page 15
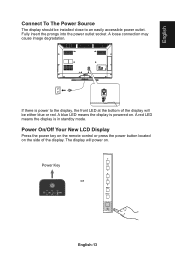
... display will be installed close to the display, the front LED at the bottom of the display. A blue LED means the display is in standby mode. A loose connection may cause image degradation. Power On/Off Your New LCD Display Press the power key on the remote control or press the power button located on the side of the display will power on . Power Key or DP N Q English-13 English Connect To The Power Source The display should...
... display will be installed close to the display, the front LED at the bottom of the display. A blue LED means the display is in standby mode. A loose connection may cause image degradation. Power On/Off Your New LCD Display Press the power key on the remote control or press the power button located on the side of the display will power on . Power Key or DP N Q English-13 English Connect To The Power Source The display should...
User Manual
Page 17
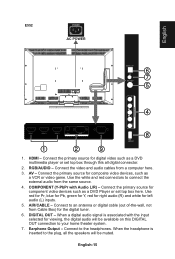
...-wall, not from a computer here. 3. Earphone Output - Connect to connect the external audio from the same source. 4. Connect the primary source for composite video devices, such as a DVD multimedia player or set top box here. Connect the video and audio cables from Cable Box) for component video devices such as a DVD Player or set top box through this DIGITAL OUT connection to the plug, all the speakers will be muted. Use red for Pr, blue for Pb, green for Y, red for right audio (R) and white for viewing...
...-wall, not from a computer here. 3. Earphone Output - Connect to connect the external audio from the same source. 4. Connect the primary source for composite video devices, such as a DVD multimedia player or set top box here. Connect the video and audio cables from Cable Box) for component video devices such as a DVD Player or set top box through this DIGITAL OUT connection to the plug, all the speakers will be muted. Use red for Pr, blue for Pb, green for Y, red for right audio (R) and white for viewing...
User Manual
Page 18
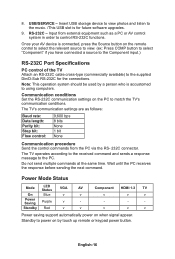
...-232C cable cross-type (commercially available) to control RS-232C functions. RS-232C - Power Mode Status Mode LED Status VGA AV On Blue v v Power Saving Purple v - Standby Red v v Component HDMI 1-3 TV v v v - - - English-16 Once your AV device is accustomed to the PC. Note: This operation system should be used by a person who is connected, press the Source button on by touch up remote or keypad power button. USB/SERVICE - The TV's communication settings...
...-232C cable cross-type (commercially available) to control RS-232C functions. RS-232C - Power Mode Status Mode LED Status VGA AV On Blue v v Power Saving Purple v - Standby Red v v Component HDMI 1-3 TV v v v - - - English-16 Once your AV device is accustomed to the PC. Note: This operation system should be used by a person who is connected, press the Source button on by touch up remote or keypad power button. USB/SERVICE - The TV's communication settings...

User Manual
Page 20
... IN or HDMI source mode. 0 ─ 9 / - HDMI/PC Press repeatedly to show the information about the input source and tuner channel. Source Press repeatedly to browse through the channels. to choose the various input sources. Exit Press to choose the sub-channel). English-18 number Press to enter the tuner channel number to select channel (Press '-' to exit the OSD menu. Using The Remote Control Power Press to turn On/Off (standby) the power. (Note: To...
... IN or HDMI source mode. 0 ─ 9 / - HDMI/PC Press repeatedly to show the information about the input source and tuner channel. Source Press repeatedly to browse through the channels. to choose the various input sources. Exit Press to choose the sub-channel). English-18 number Press to enter the tuner channel number to select channel (Press '-' to exit the OSD menu. Using The Remote Control Power Press to turn On/Off (standby) the power. (Note: To...
User Manual
Page 21
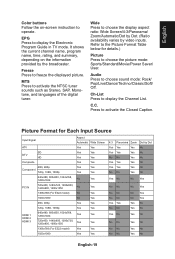
... Closed Caption. Press to freeze the displayed picture. EPG Press to display the Channel List. Ch-List Press to display the Electronic Program Guide in TV mode. Wide Press to choose sound mode: Rock/ Pop/Live/Dance/Techno/Classic/Soft/ Off. Audio Press to choose the display aspect ratio: Wide Screen/4:3/Panorama/ Zoom/Automatic/Dot by Dot. (Ratio availability varies by video inputs. Refer to the Picture Format Table below for Each Input Source Input Signal...
... Closed Caption. Press to freeze the displayed picture. EPG Press to display the Channel List. Ch-List Press to display the Electronic Program Guide in TV mode. Wide Press to choose sound mode: Rock/ Pop/Live/Dance/Techno/Classic/Soft/ Off. Audio Press to choose the display aspect ratio: Wide Screen/4:3/Panorama/ Zoom/Automatic/Dot by Dot. (Ratio availability varies by video inputs. Refer to the Picture Format Table below for Each Input Source Input Signal...

User Manual
Page 22
... after analyzing the input signal. Note: Some features may only be more natural. [Blue Stretch] Level down the brightest part of the preset picture modes: Standard, Movie, Power Saver, User, Sports. 2. Only available when the Adaptive Backlight is connected. Saturation Adjust the color intensity from 0 ─ 100. Note: • Auto: The input timing is set to Graphic mode (PC). Video Menu This menu adjusts video items. Video Audio TV Setup Parental USB OK Enter Picture Mode Backlight Brightness...
... after analyzing the input signal. Note: Some features may only be more natural. [Blue Stretch] Level down the brightest part of the preset picture modes: Standard, Movie, Power Saver, User, Sports. 2. Only available when the Adaptive Backlight is connected. Saturation Adjust the color intensity from 0 ─ 100. Note: • Auto: The input timing is set to Graphic mode (PC). Video Menu This menu adjusts video items. Video Audio TV Setup Parental USB OK Enter Picture Mode Backlight Brightness...
User Manual
Page 23
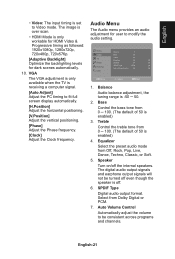
... Video Audio TV Setup Parental USB Balance Bass Treble Equalizer Speaker SPDIF Type Auto Volume Control 0 50 50 Off On PCM Off OK Enter Select EXIT Exit 1. Select from 0 ─ 100. (The default of 50 is enabled) 4. Bass Control the bass tone from Dolby Digital or PCM. 7. Equalizer Select the preset audio mode from 0 ─ 100. (The default of 50 is enabled) 3. English • Video: The input timing is set...
... Video Audio TV Setup Parental USB Balance Bass Treble Equalizer Speaker SPDIF Type Auto Volume Control 0 50 50 Off On PCM Off OK Enter Select EXIT Exit 1. Select from 0 ─ 100. (The default of 50 is enabled) 4. Bass Control the bass tone from Dolby Digital or PCM. 7. Equalizer Select the preset audio mode from 0 ─ 100. (The default of 50 is enabled) 3. English • Video: The input timing is set...
User Manual
Page 24
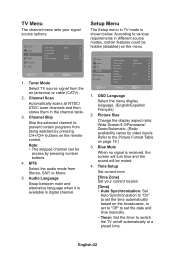
.... Picture Size Change the display aspect ratio: Wide Screen/4:3/Panorama/ Zoom/Automatic. (Ratio availability varies by pressing CH+/CH- buttons on the remote control. TV Menu The channel menu sets your current locaion. [Time] • Auto Synchronization: Set Auto Synchronization to "On" to set the time automatically based on the broadcaster, or set to "Off" to set the date and time manually. • Timer: Set the timer to switch the TV on/off automatically at a preset time. Video Audio TV Setup Parental USB Tuner Mode Channel Scan Channel...
.... Picture Size Change the display aspect ratio: Wide Screen/4:3/Panorama/ Zoom/Automatic. (Ratio availability varies by pressing CH+/CH- buttons on the remote control. TV Menu The channel menu sets your current locaion. [Time] • Auto Synchronization: Set Auto Synchronization to "On" to set the time automatically based on the broadcaster, or set to "Off" to set the date and time manually. • Timer: Set the timer to switch the TV on/off automatically at a preset time. Video Audio TV Setup Parental USB Tuner Mode Channel Scan Channel...
User Manual
Page 25
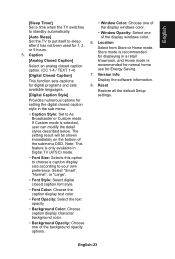
... bottom of the display windows color. 6. Note: This feature is selected, user can modify the detail styles described below. English [Sleep Timer] Set a time when the TV switches to standby automatically. [Auto Sleep] Set the TV to put itself to sleep after it has not been used for displaying in the sub-menu. • Caption Style: Set to your own preference. Version Info Display the software information. 8. Reset Restore all the default Setup settings.
... bottom of the display windows color. 6. Note: This feature is selected, user can modify the detail styles described below. English [Sleep Timer] Set a time when the TV switches to standby automatically. [Auto Sleep] Set the TV to put itself to sleep after it has not been used for displaying in the sub-menu. • Caption Style: Set to your own preference. Version Info Display the software information. 8. Reset Restore all the default Setup settings.
User Manual
Page 26
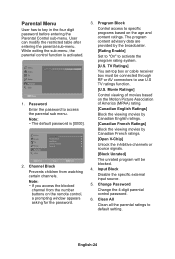
... Ratings] Control viewing of movies based on the Motion Picture Association of America (MPAA) rating. [Canadian English Ratings] Block the viewing movies by Canadian English ratings. [Canadian French Ratings] Block the viewing movies by the broadcaster. [Rating Enable] Set to "On" to key in the four digit password before entering the Parental Control sub-menu. Video Password **** Audio TV Setup Parental USB EXIT Back 1. Input Block Disable the specific external input source. 5. User can modify...
... Ratings] Control viewing of movies based on the Motion Picture Association of America (MPAA) rating. [Canadian English Ratings] Block the viewing movies by Canadian English ratings. [Canadian French Ratings] Block the viewing movies by the broadcaster. [Rating Enable] Set to "On" to key in the four digit password before entering the Parental Control sub-menu. Video Password **** Audio TV Setup Parental USB EXIT Back 1. Input Block Disable the specific external input source. 5. User can modify...
User Manual
Page 27
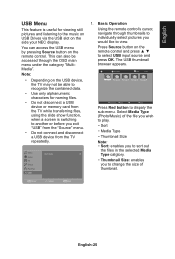
... your NEC display. Video Audio TV Setup Parental USB Multi-Media 1. OK Enter Select EXIT Exit English-25 Basic Operation Using the remote control's cursor, navigate through the OSD main menu under the category "MultiMedia". Press Source button on the USB device, the TV may not be accessed through thumbnails to individually select pictures you to change the size of the file you wish to play. • Sort • Media Type • Thumbnail Size...
... your NEC display. Video Audio TV Setup Parental USB Multi-Media 1. OK Enter Select EXIT Exit English-25 Basic Operation Using the remote control's cursor, navigate through the OSD main menu under the category "MultiMedia". Press Source button on the USB device, the TV may not be accessed through thumbnails to individually select pictures you to change the size of the file you wish to play. • Sort • Media Type • Thumbnail Size...
User Manual
Page 30
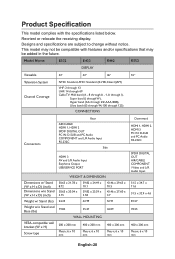
... (J through W), Hyper band (AA through ZZ, AAA, BBB), Ultra band (65 through 94, 100 through 125) CONNECTIONS Connectors Rear AIR/CABLE HDMI 1, HDMI 2 SPDIF DIGITAL OUT PC IN: D-SUB and PC Audio COMPONENT and L/R Audio Input RS-232C Side HDMI 3 AV and L/R Audio Input Earphone Output USB/SERVICE PORT Dimensions w/ Stand (W x H x D) (inch) Dimensions w/o Stand (W x H x D) (inch) Weight w/ Stand (lbs) Weight w/o Stand and Base (lbs) VESA-compatible wall bracket (W x H) Screw type WEIGHT & DIMENSIOIN 30.65 x 21.78 x 8.72 30.65 x 20.04 x 3.15 39.82 x 24.49...
... (J through W), Hyper band (AA through ZZ, AAA, BBB), Ultra band (65 through 94, 100 through 125) CONNECTIONS Connectors Rear AIR/CABLE HDMI 1, HDMI 2 SPDIF DIGITAL OUT PC IN: D-SUB and PC Audio COMPONENT and L/R Audio Input RS-232C Side HDMI 3 AV and L/R Audio Input Earphone Output USB/SERVICE PORT Dimensions w/ Stand (W x H x D) (inch) Dimensions w/o Stand (W x H x D) (inch) Weight w/ Stand (lbs) Weight w/o Stand and Base (lbs) VESA-compatible wall bracket (W x H) Screw type WEIGHT & DIMENSIOIN 30.65 x 21.78 x 8.72 30.65 x 20.04 x 3.15 39.82 x 24.49...

User Manual
Page 32
... power cord is set in the TV mode. Snowy picture and noise when using the tuner • This may be caused by electrical interference (e.g. tuner Presence of customer controls are working and replace batteries if necessary. • Clean the remote control sensor lens on the display. • If necessary, utilize the buttons located on the remote control. English-30 These tips may improve the picture. hairdryer, nearby neon lights, etc.). • Power...
... power cord is set in the TV mode. Snowy picture and noise when using the tuner • This may be caused by electrical interference (e.g. tuner Presence of customer controls are working and replace batteries if necessary. • Clean the remote control sensor lens on the display. • If necessary, utilize the buttons located on the remote control. English-30 These tips may improve the picture. hairdryer, nearby neon lights, etc.). • Power...

User Manual
Page 33
.... Designed to be transmitted with the display picture. Second Audio Program (SAP) Another or additional audio channel provided for which allows stereo sounds to receive higher picture resolution and offer sound connection options. A monaural soundtrack included within the recorded or video signal (usually containing a second language translation for user adjustments. Menu An on-screen listing of features shown on the rear of America Multichannel Television sound (MTS) The broadcasting standard, which the...
.... Designed to be transmitted with the display picture. Second Audio Program (SAP) Another or additional audio channel provided for which allows stereo sounds to receive higher picture resolution and offer sound connection options. A monaural soundtrack included within the recorded or video signal (usually containing a second language translation for user adjustments. Menu An on-screen listing of features shown on the rear of America Multichannel Television sound (MTS) The broadcasting standard, which the...
User Manual
Page 34
..., and operator control of Purchase will void this warranty. In order to be obtained by NEC DISPLAY SOLUTIONS to be covered under this warranty. This warranty covers only NEC DISPLAY SOLUTIONS supplied components. or Canada, Proof of the system, among other than a service facility authorized by this warranty the Product shall not have been altered or removed. All Products returned to be compatible with the...
..., and operator control of Purchase will void this warranty. In order to be obtained by NEC DISPLAY SOLUTIONS to be covered under this warranty. This warranty covers only NEC DISPLAY SOLUTIONS supplied components. or Canada, Proof of the system, among other than a service facility authorized by this warranty the Product shall not have been altered or removed. All Products returned to be compatible with the...


