

Users Manual
Page 2
... Use English-3 Contents ...English-4 Installation ...English-5 Attaching Mounting Accessories ...English-6 Parts Name and Functions...English-7 Control Panel ...English-7 Terminal Panel ...English-8 Wireless Remote Control ...English-10 Operating Range for the Remote Control English-11 Setup ...English-12 Connections ...English-14 Wiring Diagram ...English-14 Connecting a Personal Computer English-15 Connecting a DVD Player or Computer with HDMI out English-15 Connecting a Computer with DisplayPort English-15 Basic Operation...English-16 Power ON and OFF Modes ...English...
... Use English-3 Contents ...English-4 Installation ...English-5 Attaching Mounting Accessories ...English-6 Parts Name and Functions...English-7 Control Panel ...English-7 Terminal Panel ...English-8 Wireless Remote Control ...English-10 Operating Range for the Remote Control English-11 Setup ...English-12 Connections ...English-14 Wiring Diagram ...English-14 Connecting a Personal Computer English-15 Connecting a DVD Player or Computer with HDMI out English-15 Connecting a Computer with DisplayPort English-15 Basic Operation...English-16 Power ON and OFF Modes ...English...

Users Manual
Page 5
...-free, non-abrasive cloth. Ergonomics To realize the maximum ergonomic benefits, we recommend the following operating instructions. Cleaning the LCD Panel • When the liquid crystal panel is easily accessible. • Do not move or mount this product by following : • Use the preset Size and Position controls with standard signals. • Do not cover vent on monitor. • Use the preset Color Setting...
...-free, non-abrasive cloth. Ergonomics To realize the maximum ergonomic benefits, we recommend the following operating instructions. Cleaning the LCD Panel • When the liquid crystal panel is easily accessible. • Do not move or mount this product by following : • Use the preset Size and Position controls with standard signals. • Do not cover vent on monitor. • Use the preset Color Setting...

Users Manual
Page 7
... recommends using screws under 8.5 mm. • Prior to mounting, inspect the installation location to insure that it is strong enough to the top and the LED indicator light is to mount the unit. English-5 Product warranty does not cover damage caused by improper installation. Maintenance • Periodically check for signs of damage or weakness that are capable of supporting the weight of bracket...
... recommends using screws under 8.5 mm. • Prior to mounting, inspect the installation location to insure that it is strong enough to the top and the LED indicator light is to mount the unit. English-5 Product warranty does not cover damage caused by improper installation. Maintenance • Periodically check for signs of damage or weakness that are capable of supporting the weight of bracket...
Users Manual
Page 9
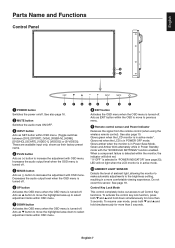
...; Remote control sensor and Power Indicator Receives the signal from the remote control (when using the wireless remote control). When a component failure is detected within OSD menu. (Toggle switches between [DVI], [DPORT], [VGA], [RGB/HV], [HDMI], [DVD/HD], [SCART], [VIDEO1], [VIDEO2] or [S-VIDEO]). Control Key Lock Mode This control completely locks out access to the brightness setting, resulting in POWER OFF mode. To resume user mode, press both and and hold simultaneously for more comfortable viewing experience. Glows red when the LCD...
...; Remote control sensor and Power Indicator Receives the signal from the remote control (when using the wireless remote control). When a component failure is detected within OSD menu. (Toggle switches between [DVI], [DPORT], [VGA], [RGB/HV], [HDMI], [DVD/HD], [SCART], [VIDEO1], [VIDEO2] or [S-VIDEO]). Control Key Lock Mode This control completely locks out access to the brightness setting, resulting in POWER OFF mode. To resume user mode, press both and and hold simultaneously for more comfortable viewing experience. Glows red when the LCD...
Users Manual
Page 10
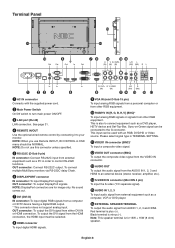
... HDMI. Sync-on-Green signal can be NORMAL. Black terminal is also to connect equipment such as a PC in order to an external device (stereo receiver, amplifier, etc.). ƹ S-VIDEO IN connector (Mini DIN 4 pin) To input the S-video (Y/C separate signal). ƺ AUDIO IN 1, 2, 3 To input audio signal from external equipment such as a computer, VCR or DVD player. ƻ EXTERNAL SPEAKER TERMINAL To output the audio signal from a computer or HDTV device having a digital...
... HDMI. Sync-on-Green signal can be NORMAL. Black terminal is also to connect equipment such as a PC in order to an external device (stereo receiver, amplifier, etc.). ƹ S-VIDEO IN connector (Mini DIN 4 pin) To input the S-video (Y/C separate signal). ƺ AUDIO IN 1, 2, 3 To input audio signal from external equipment such as a computer, VCR or DVD player. ƻ EXTERNAL SPEAKER TERMINAL To output the audio signal from a computer or HDTV device having a digital...
Users Manual
Page 12
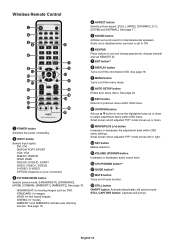
...; AUTO SETUP button Enters auto setup menu. Small screen which adjusted "PIP" mode moves up or down . Ƹ MINUS/PLUS (-/+) button Increases or decreases the adjustment level within OSD menu. ¹ UP/DOWN button Acts as DVD. Wireless Remote Control ³ POWER button Switches the power on your connection » PICTURE MODE button Selects picture mode, [HIGHBRIGHT], [STANDARD], [sRGB], [CINEMA], [AMBIENT1], [AMBIENT2]. See page 18. See page 20. ¸ EXIT button Returns to set and change passwords, change channel and set REMOTE ID. ¶ ENT button*2 º DISPLAY button...
...; AUTO SETUP button Enters auto setup menu. Small screen which adjusted "PIP" mode moves up or down . Ƹ MINUS/PLUS (-/+) button Increases or decreases the adjustment level within OSD menu. ¹ UP/DOWN button Acts as DVD. Wireless Remote Control ³ POWER button Switches the power on your connection » PICTURE MODE button Selects picture mode, [HIGHBRIGHT], [STANDARD], [sRGB], [CINEMA], [AMBIENT1], [AMBIENT2]. See page 18. See page 20. ¸ EXIT button Returns to set and change passwords, change channel and set REMOTE ID. ¶ ENT button*2 º DISPLAY button...

Users Manual
Page 14
... leaking into the power outlet socket. B. Determine the installation location CAUTION: Installing your LCD monitor must be installed close to an easily accessible power outlet. • Please fasten power cord to ON within the FAN CONTROL menu within the OSD (see page 24). CAUTION: Do not mount or operate the monitor upside down, face up, or face down. To install or replace batteries: NEC recommends the following battery use and allow...
... leaking into the power outlet socket. B. Determine the installation location CAUTION: Installing your LCD monitor must be installed close to an easily accessible power outlet. • Please fasten power cord to ON within the FAN CONTROL menu within the OSD (see page 24). CAUTION: Do not mount or operate the monitor upside down, face up, or face down. To install or replace batteries: NEC recommends the following battery use and allow...
Users Manual
Page 16
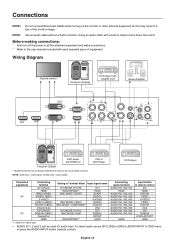
...: Use an audio cable without a built-in remote control DVI HDMI DVD/HD VIDEO S-VIDEO VIDEO DVD/HD VGA DVI RGB/HV DISPLAYPORT HDMI *1: depend on the monitor or other external equipment as this may result in OSD menu or press the AUDIO INPUT button (remote control). Before making connections: * First turn off the power of all the attached equipment and make connections. * Refer to the connectable monitors. NOTE: Solid lines = video signal. BNC MODE: VIDEO BNC MODE: COMPONENT DVI MODE: DVI-PC BNC MODE...
...: Use an audio cable without a built-in remote control DVI HDMI DVD/HD VIDEO S-VIDEO VIDEO DVD/HD VGA DVI RGB/HV DISPLAYPORT HDMI *1: depend on the monitor or other external equipment as this may result in OSD menu or press the AUDIO INPUT button (remote control). Before making connections: * First turn off the power of all the attached equipment and make connections. * Refer to the connectable monitors. NOTE: Solid lines = video signal. BNC MODE: VIDEO BNC MODE: COMPONENT DVI MODE: DVI-PC BNC MODE...
Users Manual
Page 19
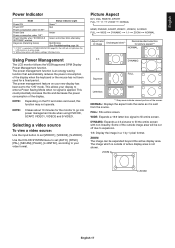
... active display area is sent from the source. Selecting a video source To view a video source: Use the input button to fill entire screen. ZOOM The image can be cut off due to the "ON" mode. ZOOM ZOOM English-17 English Power Indicator Mode Status Indicator Light Power ON Green*1 Power OFF Red Power consumption under 0.5 W*2 Power Save Amber Power consumption under 1 W*2 Power Standby when "SCHEDULE Green and Amber blink alternately SETTINGS" enabled Diagnosis (Detecting failure) Red Blinking (See Troubleshooting...
... active display area is sent from the source. Selecting a video source To view a video source: Use the input button to fill entire screen. ZOOM The image can be cut off due to the "ON" mode. ZOOM ZOOM English-17 English Power Indicator Mode Status Indicator Light Power ON Green*1 Power OFF Red Power consumption under 0.5 W*2 Power Save Amber Power consumption under 1 W*2 Power Standby when "SCHEDULE Green and Amber blink alternately SETTINGS" enabled Diagnosis (Detecting failure) Red Blinking (See Troubleshooting...

Users Manual
Page 23
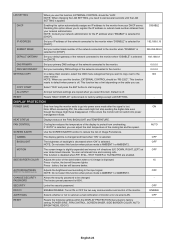
... VOLUME button. MAIN AUDIO LINE OUT Selecting "VARIABLE" enables control of PIP audio. SCHEDULE OFF TIMER Sets the monitor to power off due to expansion. 1:1 Display the image in order for the "SCHEDULE" function to ON. OFF SCHEDULE SETTINGS Creates a working schedule for the real time clock. - English H RESOLUTION Adjusts the horizontal size of schedules. - will be "AUTO". display area is set to operate. V POS Vertical position. H POSITION, V POSITION, CLOCK, PHASE, H RESOLUTION, V RESOLUTION...
... VOLUME button. MAIN AUDIO LINE OUT Selecting "VARIABLE" enables control of PIP audio. SCHEDULE OFF TIMER Sets the monitor to power off due to expansion. 1:1 Display the image in order for the "SCHEDULE" function to ON. OFF SCHEDULE SETTINGS Creates a working schedule for the real time clock. - English H RESOLUTION Adjusts the horizontal size of schedules. - will be "AUTO". display area is set to operate. V POS Vertical position. H POSITION, V POSITION, CLOCK, PHASE, H RESOLUTION, V RESOLUTION...
Users Manual
Page 26
... AMBIENT1 or AMBIENT2. setting: POWER SAVE, FAN CONTROL, SCREEN SAVER, SIDE BORDER COLOR, AUTO BRIGHTNESS, DDC/CI. Default is 0000. If this function when picture mode is displayed. 15 Press + button, the bar will become lighter. OFF SIDE BORDER COLOR Adjusts the color of the cooling fan and fan speed. PASSWORD The factory preset password is off . English-24 DHCP Enabling this function, EXTERNAL CONTROL should be changed and fi...
... AMBIENT1 or AMBIENT2. setting: POWER SAVE, FAN CONTROL, SCREEN SAVER, SIDE BORDER COLOR, AUTO BRIGHTNESS, DDC/CI. Default is 0000. If this function when picture mode is displayed. 15 Press + button, the bar will become lighter. OFF SIDE BORDER COLOR Adjusts the color of the cooling fan and fan speed. PASSWORD The factory preset password is off . English-24 DHCP Enabling this function, EXTERNAL CONTROL should be changed and fi...
Users Manual
Page 27
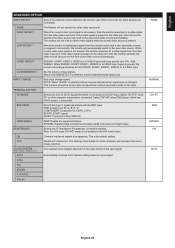
... has DVI-D output, is present. FIRST DETECT When the current video input signal is not present, then the monitor searches for other video input ports. When DVD/HD, SCART, VIDEO1, VIDEO2 or S-VIDEO input signal is supplied to the new found video source automatically. ON Converts interlaced signals to Progressive) conversion function. AUTO Automatically chooses Color System setting based on the video format of signal associated with the BNC input. TERMINAL SETTING DVI MODE Selects the...
... has DVI-D output, is present. FIRST DETECT When the current video input signal is not present, then the monitor searches for other video input ports. When DVD/HD, SCART, VIDEO1, VIDEO2 or S-VIDEO input signal is supplied to the new found video source automatically. ON Converts interlaced signals to Progressive) conversion function. AUTO Automatically chooses Color System setting based on the video format of signal associated with the BNC input. TERMINAL SETTING DVI MODE Selects the...
Users Manual
Page 29
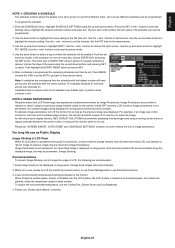
... number and press set button to select a day on the screen. Use the down button to choose the picture mode. 4. Use the + and - buttons to the previous menu. Press MENU to leave the OSD or press EXIT to go back to set the minutes. If selected input or picture mode is not available now, disable input or picture mode is installed over the schedule with all personal display devices, NEC DISPLAY SOLUTIONS recommends displaying moving screen...
... number and press set button to select a day on the screen. Use the down button to choose the picture mode. 4. Use the + and - buttons to the previous menu. Press MENU to leave the OSD or press EXIT to go back to set the minutes. If selected input or picture mode is not available now, disable input or picture mode is installed over the schedule with all personal display devices, NEC DISPLAY SOLUTIONS recommends displaying moving screen...
Users Manual
Page 30
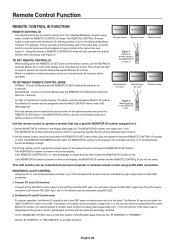
... Monitor ID number. Point the remote control towards the remote sensor of the display to be controlled. Connect PC and LCD monitors. No two monitors should match the MONITOR ID number of the desired monitor and press the REMOTE ID SET button. Using the remote in the RS-232C daisy chain set to 0 Monitor ID:1 Monitor ID:2 Monitor ID:3 Remote works Monitor ID:3 TO SET/RESET REMOTE CONTROL MODE ID Mode - Choose "0" to the LCD monitor RS-232C input. Remote Control Function REMOTE CONTROL ID FUNCTION REMOTE CONTROL ID The remote control can be used to control...
... Monitor ID number. Point the remote control towards the remote sensor of the display to be controlled. Connect PC and LCD monitors. No two monitors should match the MONITOR ID number of the desired monitor and press the REMOTE ID SET button. Using the remote in the RS-232C daisy chain set to 0 Monitor ID:1 Monitor ID:2 Monitor ID:3 Remote works Monitor ID:3 TO SET/RESET REMOTE CONTROL MODE ID Mode - Choose "0" to the LCD monitor RS-232C input. Remote Control Function REMOTE CONTROL ID FUNCTION REMOTE CONTROL ID The remote control can be used to control...
Users Manual
Page 37
... control the multiple monitors by the Digital Display Working Group (DDWG) for digital connections between DVI-D and other peripherals. Color Control Systems: Allow you are exactly the same as screen size and resolutions supported) directly to a variety of your monitor to your LCD monitor to view material via the DVI input, this display supports HDCP. Plug and Play: The Microsoft® solution with the Windows® operating system facilitates setup and installation by allowing the monitor...
... control the multiple monitors by the Digital Display Working Group (DDWG) for digital connections between DVI-D and other peripherals. Color Control Systems: Allow you are exactly the same as screen size and resolutions supported) directly to a variety of your monitor to your LCD monitor to view material via the DVI input, this display supports HDCP. Plug and Play: The Microsoft® solution with the Windows® operating system facilitates setup and installation by allowing the monitor...

Users Manual
Page 38
...;c display pattern. Snowy Picture, Poor Sound in use 60Hz refresh rate. RS-232C or LAN control is apparent • Signal cable should be turned off for shielding, move away from the AC outlet to enter Information menu and confirm that the appropriate resolution has been selected. Power Button does not respond • Unplug the power cord of the monitor. Image persistence • Please be reset...
...;c display pattern. Snowy Picture, Poor Sound in use 60Hz refresh rate. RS-232C or LAN control is apparent • Signal cable should be turned off for shielding, move away from the AC outlet to enter Information menu and confirm that the appropriate resolution has been selected. Power Button does not respond • Unplug the power cord of the monitor. Image persistence • Please be reset...
Users Manual
Page 39
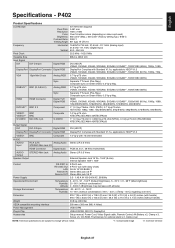
... Jack X2 HDMI Connector Digital Audio Stereo L/R 0.5 Vrms PCM 32, 44.1, 48 KHz (16/20/24bit) AUDIO Output STEREO Mini Jack Speaker Output Control Power Supply Operational Environment Storage Environment Dimension Weight VESA compatible mounting interface Power Management Plug & Play Accessories Analog Audio Stereo L/R 0.5 Vrms External Speaker Jack 15 W + 15 W (8 ohm) Internal Speaker 10W + 10W RS-232C In: 9 Pin D-sub RS-232C Out: 9 Pin D-sub (with daisy chain) LAN: RJ-45 10/100 BASE-T Remote IN...
... Jack X2 HDMI Connector Digital Audio Stereo L/R 0.5 Vrms PCM 32, 44.1, 48 KHz (16/20/24bit) AUDIO Output STEREO Mini Jack Speaker Output Control Power Supply Operational Environment Storage Environment Dimension Weight VESA compatible mounting interface Power Management Plug & Play Accessories Analog Audio Stereo L/R 0.5 Vrms External Speaker Jack 15 W + 15 W (8 ohm) Internal Speaker 10W + 10W RS-232C In: 9 Pin D-sub RS-232C Out: 9 Pin D-sub (with daisy chain) LAN: RJ-45 10/100 BASE-T Remote IN...

Users Manual
Page 41
... Jack X2 HDMI Connector Digital Audio Stereo L/R 0.5 Vrms PCM 32, 44.1, 48 KHz (16/20/24bit) AUDIO Output STEREO Mini Jack Speaker Output Control Power Supply Operational Environment Storage Environment Dimension Weight VESA compatible mounting interface Power Management Plug & Play Accessories Analog Audio Stereo L/R 0.5 Vrms External Speaker Jack 15 W + 15 W (8 ohm) Internal Speaker 10W + 10W RS-232C In: 9 Pin D-sub RS-232C Out: 9 Pin D-sub (with daisy chain) LAN: RJ-45 10/100 BASE-T Remote IN...
... Jack X2 HDMI Connector Digital Audio Stereo L/R 0.5 Vrms PCM 32, 44.1, 48 KHz (16/20/24bit) AUDIO Output STEREO Mini Jack Speaker Output Control Power Supply Operational Environment Storage Environment Dimension Weight VESA compatible mounting interface Power Management Plug & Play Accessories Analog Audio Stereo L/R 0.5 Vrms External Speaker Jack 15 W + 15 W (8 ohm) Internal Speaker 10W + 10W RS-232C In: 9 Pin D-sub RS-232C Out: 9 Pin D-sub (with daisy chain) LAN: RJ-45 10/100 BASE-T Remote IN...

External Controls
Page 34
... 6.2 0: | 999: 0: | 65535: Wide: A/V mode only This operation has limitation of selection. Momentary Momentary This operation requires supported option TV tuner. Read only Read only Read only sensor Carbon Temperature footprint (34/71) Item Aspect PIP ON/OFF Still ON/OFF PIP Input OP code page 02h OP code 70h 02h 72h 02h 73h Still Capture Signal Information Auto Setup TV-Channel UP/DOWN 02h 76h...
... 6.2 0: | 999: 0: | 65535: Wide: A/V mode only This operation has limitation of selection. Momentary Momentary This operation requires supported option TV tuner. Read only Read only Read only sensor Carbon Temperature footprint (34/71) Item Aspect PIP ON/OFF Still ON/OFF PIP Input OP code page 02h OP code 70h 02h 72h 02h 73h Still Capture Signal Information Auto Setup TV-Channel UP/DOWN 02h 76h...
Specification Brochure
Page 2
From simple imagery to complex animation and even video, NEC can turn countless more heads and lead to operate as specified by the manufacturer of their respective holders. www.neccms.com ORDERING MODEL NUMBERS V322-PC-CRE V423-PC-CRE V463-PC-CRE V552-PC-CRE V652-PC-CRE P402-PC-CRE P462-PC-CRE P552-PC-CRE X401S-PC-CRE X462S-PC-CRE X552S-PC-CRE Product warranty, if any warranty on your digital screen might be as simple to bigger results for...
From simple imagery to complex animation and even video, NEC can turn countless more heads and lead to operate as specified by the manufacturer of their respective holders. www.neccms.com ORDERING MODEL NUMBERS V322-PC-CRE V423-PC-CRE V463-PC-CRE V552-PC-CRE V652-PC-CRE P402-PC-CRE P462-PC-CRE P552-PC-CRE X401S-PC-CRE X462S-PC-CRE X552S-PC-CRE Product warranty, if any warranty on your digital screen might be as simple to bigger results for...


