

Specification Brochure
Page 2
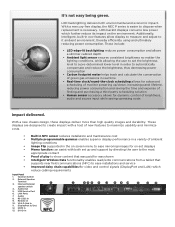
...set via the on screen menu thereby minimizing any black screens during source transitions • Two port LAN hub simplifies installation and monitoring of deployed displays • Simple point and zoom feature allows presenters to zoom in to customers. Meeting the requirements for displaying two sources ...is never an accident. Bright, high-contrast, full high definition panels in -Picture provides flexibility for rugged 24/7 use, the NEC P Series professional-grade LCD displays deliver a perfect picture. Display design delivers smooth video and crisp imagery.
...set via the on screen menu thereby minimizing any black screens during source transitions • Two port LAN hub simplifies installation and monitoring of deployed displays • Simple point and zoom feature allows presenters to zoom in to customers. Meeting the requirements for displaying two sources ...is never an accident. Bright, high-contrast, full high definition panels in -Picture provides flexibility for rugged 24/7 use, the NEC P Series professional-grade LCD displays deliver a perfect picture. Display design delivers smooth video and crisp imagery.
Specification Brochure
Page 3
... Ports 7. External Speaker Terminal 1 3. DisplayPort In/Out 12. Remote In 10. It's not easy being green. With a mercury-free display, the NEC P series is easier to it ambient environment, thereby e ciently using and ultimately reducing power consumption. RS-232C In 9. HDMI In 13. USB Service ...the conservation of green gas emissions in real time • Real-time clock/round-the-clock scheduling allows for advanced scheduling of monitor powering up and support by directing the user to the most appropriate contact • Proof of play to show content that was...
... Ports 7. External Speaker Terminal 1 3. DisplayPort In/Out 12. Remote In 10. It's not easy being green. With a mercury-free display, the NEC P series is easier to it ambient environment, thereby e ciently using and ultimately reducing power consumption. RS-232C In 9. HDMI In 13. USB Service ...the conservation of green gas emissions in real time • Real-time clock/round-the-clock scheduling allows for advanced scheduling of monitor powering up and support by directing the user to the most appropriate contact • Proof of play to show content that was...
Launch Press Release
Page 3
... installation, service, or location details • Enhanced Picture-in-Picture, which enables confirmation that paid content was actually displayed The P403, P463, P553 and P703 displays will be stored in the on-screen menu to control only certain parts of the display while protecting other important...or to supply different content to up to four different displays with a 3-year parts and labor warranty, including the backlight. # # # About NEC Display Solutions of innovative desktop LCD monitors, commercial- For digital images, please visit http://necdisplay.com/digital-
... installation, service, or location details • Enhanced Picture-in-Picture, which enables confirmation that paid content was actually displayed The P403, P463, P553 and P703 displays will be stored in the on-screen menu to control only certain parts of the display while protecting other important...or to supply different content to up to four different displays with a 3-year parts and labor warranty, including the backlight. # # # About NEC Display Solutions of innovative desktop LCD monitors, commercial- For digital images, please visit http://necdisplay.com/digital-
Users Manual
Page 2
P463...English-48 Specifications - P403...English-47 Specifications - P553...English-49 Pin Assignment...English-50 Manufacturer's Recycling and Energy Information English-51 ... CONTROL...English-25 ADVANCED OPTION1 ...English-26 ADVANCED OPTION2 ...English-28 Remote Control Function ...English-30 Multiple Monitors Connection ...English-31 Controlling the LCD monitor via RS-232C Remote Control English-32 Controlling the LCD monitor via LAN Control English-34 Connecting to a Network ...English-34 Network Setting by Using an HTTP Browser...
P463...English-48 Specifications - P403...English-47 Specifications - P553...English-49 Pin Assignment...English-50 Manufacturer's Recycling and Energy Information English-51 ... CONTROL...English-25 ADVANCED OPTION1 ...English-26 ADVANCED OPTION2 ...English-28 Remote Control Function ...English-30 Multiple Monitors Connection ...English-31 Controlling the LCD monitor via RS-232C Remote Control English-32 Controlling the LCD monitor via LAN Control English-34 Connecting to a Network ...English-34 Network Setting by Using an HTTP Browser...
Users Manual
Page 3
... brands and product names are trademarks or registered trademarks of their respective owners. This booklet is a registered trademark of NEC Corporation. NEC is available from that interference will not occur in the countries of EU and Switzerland. DisplayPort and DisplayPort Compliance Logo ...outlet on the supplied CD-ROM. Use the attached specified cables with the MultiSync P403 (P403)/MultiSync P463 (P463)/MultiSync P553 (P553) colour monitor so as speciÞed in a residential installation. CRESTRON and ROOMVIEW are designed to provide reasonable protection against ...
... brands and product names are trademarks or registered trademarks of their respective owners. This booklet is a registered trademark of NEC Corporation. NEC is available from that interference will not occur in the countries of EU and Switzerland. DisplayPort and DisplayPort Compliance Logo ...outlet on the supplied CD-ROM. Use the attached specified cables with the MultiSync P403 (P403)/MultiSync P463 (P463)/MultiSync P553 (P553) colour monitor so as speciÞed in a residential installation. CRESTRON and ROOMVIEW are designed to provide reasonable protection against ...

Users Manual
Page 4
...REFRAIN FROM OPENING THE CABINET AS THERE ARE HIGH VOLTAGE COMPONENTS INSIDE. Voltage 120* 230 230 China 220 Japan 100 * When operating the MultiSync monitor with the safety standard of the AC power outlet being used. For all other cases, please use a power cord that important literature concerning the ... power outlet and has been approved by and complies with its AC 125-240V power supply, use the power cord provided with this monitor in order to cause electric shock. If a power cord is intended to make any kind of television broadcast signals. REFER SERVICING TO...
...REFRAIN FROM OPENING THE CABINET AS THERE ARE HIGH VOLTAGE COMPONENTS INSIDE. Voltage 120* 230 230 China 220 Japan 100 * When operating the MultiSync monitor with the safety standard of the AC power outlet being used. For all other cases, please use a power cord that important literature concerning the ... power outlet and has been approved by and complies with its AC 125-240V power supply, use the power cord provided with this monitor in order to cause electric shock. If a power cord is intended to make any kind of television broadcast signals. REFER SERVICING TO...

Users Manual
Page 5
... screen. • The power supply cord you purchased may expose you notice any cleaning solution or glass cleaner! • Adjust the monitor's brightness, contrast and sharpness controls to deteriorate, crack or peel. * The product you use with wiring that heat can be in ...the cabinet, dampen the cloth with a neutral detergent and water, wipe the cabinet and follow with ANSI/NFPA 70, the National Electrical Code (NEC), in contact with benzene thinner, alkaline detergent, alcoholic system detergent, glass cleaner, wax, polish cleaner, soap powder, or insecticide. English-3 Refer...
... screen. • The power supply cord you purchased may expose you notice any cleaning solution or glass cleaner! • Adjust the monitor's brightness, contrast and sharpness controls to deteriorate, crack or peel. * The product you use with wiring that heat can be in ...the cabinet, dampen the cloth with a neutral detergent and water, wipe the cabinet and follow with ANSI/NFPA 70, the National Electrical Code (NEC), in contact with benzene thinner, alkaline detergent, alcoholic system detergent, glass cleaner, wax, polish cleaner, soap powder, or insecticide. English-3 Refer...

Users Manual
Page 6
...* should contain the following: • LCD monitor • Power cord*1 • Video Signal Cable • Wireless Remote Control and AAA Batteries • Setup Manual • Clamp x 1 (P403/P463)/x 3 (P553) • Screw with washer (M4 x 10) x 1 (P403/P463)/x 3 (P553) • Thumbscrew for optional stand x 2*2 ...your original box and packing material to transport or ship the monitor. *1 Type and number of the power outlet and has been approved by and complies with washer (M4 x 10) x 1 (P403/P463)/ x 3 (P553) Clamp x 1 (P403/P463)/ x 3 (P553) CD-ROM Setup Manual Thumbscrew for ...
...* should contain the following: • LCD monitor • Power cord*1 • Video Signal Cable • Wireless Remote Control and AAA Batteries • Setup Manual • Clamp x 1 (P403/P463)/x 3 (P553) • Screw with washer (M4 x 10) x 1 (P403/P463)/x 3 (P553) • Thumbscrew for optional stand x 2*2 ...your original box and packing material to transport or ship the monitor. *1 Type and number of the power outlet and has been approved by and complies with washer (M4 x 10) x 1 (P403/P463)/ x 3 (P553) Clamp x 1 (P403/P463)/ x 3 (P553) CD-ROM Setup Manual Thumbscrew for ...
Users Manual
Page 7
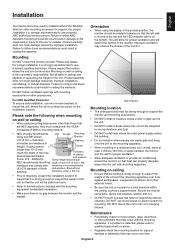
... ventilation and will be safe from the unit and mounting apparatus. Not all walls or ceilings are NEC approved, they must be strong enough to support the monitor and mounting accessories. • DO NOT install in voiding the warranty. Maintenance • Periodically check... for detailed information. • Make sure there is mounted to follow NEC standard mounting procedures could result in North America....
... ventilation and will be safe from the unit and mounting apparatus. Not all walls or ceilings are NEC approved, they must be strong enough to support the monitor and mounting accessories. • DO NOT install in voiding the warranty. Maintenance • Periodically check... for detailed information. • Make sure there is mounted to follow NEC standard mounting procedures could result in North America....
Users Manual
Page 8
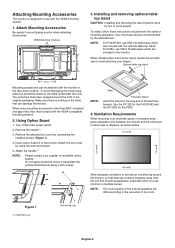
.... The protective sheet was wrapped around the monitor, so that can be done by using mounting accessories other than NEC compliant and approved, they must be attached with screws. Use the ST-322 for the P403/P463 and the ST-5220 for available option boards...pinching your supplier for the P553. 4. Figure 1 *1: P403/P463 only. (P403/P463 only) English-6 Using Option Board 1. Ventilation Requirements When mounting in to manipulate the optional board before fixing it with the monitor in the original packaging. Installing and removing optional table top stand...
.... The protective sheet was wrapped around the monitor, so that can be done by using mounting accessories other than NEC compliant and approved, they must be attached with screws. Use the ST-322 for the P403/P463 and the ST-5220 for available option boards...pinching your supplier for the P553. 4. Figure 1 *1: P403/P463 only. (P403/P463 only) English-6 Using Option Board 1. Ventilation Requirements When mounting in to manipulate the optional board before fixing it with the monitor in the original packaging. Installing and removing optional table top stand...

Users Manual
Page 9
For the P403/P463, the clamps and screws are included with the optional table top stand fasten the LCD to prevent the monitor from the wall before moving the LCD. English 5. Prevent Tipping When using the provided clamps and screws. Be sure to the monitor using the display with the optional table top ...stand. 100 mm Screw Holes Clamp Cord or chain Screw (M4) Before attaching the LCD monitor to the wall, make sure that the wall can support the weight of the monitor in order to a wall using a cord or chain that can support the weight of the...
For the P403/P463, the clamps and screws are included with the optional table top stand fasten the LCD to prevent the monitor from the wall before moving the LCD. English 5. Prevent Tipping When using the provided clamps and screws. Be sure to the monitor using the display with the optional table top ...stand. 100 mm Screw Holes Clamp Cord or chain Screw (M4) Before attaching the LCD monitor to the wall, make sure that the wall can support the weight of the monitor in order to a wall using a cord or chain that can support the weight of the...
Users Manual
Page 10
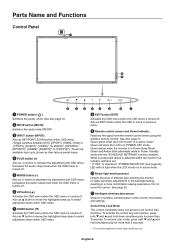
...menu is turned-off . Green and Amber blink alternately while in "POWER INDICATOR" (see page 24), LED will not light when the LCD monitor is detected within the OSD to move the highlighted area down simultaneously for more than 3 seconds. *: This function depends on /off . ... for more than 3 seconds. See page 28. ¸ Intelligent wireless data sensor Sensor for wireless communication of ambient light, allowing the monitor to make automatic adjustments to previous menu. ¾ Remote control sensor and Power Indicator Receives the signal from the remote control (when using...
...menu is turned-off . Green and Amber blink alternately while in "POWER INDICATOR" (see page 24), LED will not light when the LCD monitor is detected within the OSD to move the highlighted area down simultaneously for more than 3 seconds. *: This function depends on /off . ... for more than 3 seconds. See page 28. ¸ Intelligent wireless data sensor Sensor for wireless communication of ambient light, allowing the monitor to make automatic adjustments to previous menu. ¾ Remote control sensor and Power Indicator Receives the signal from the remote control (when using...

Users Manual
Page 11
... which is for available option board. Ƽ Internal speaker English-9 See page 24 VIDEO OUT SETTING. NOTE: Please power off the monitor when you have any questions, please ask your monitor. NOTE: Please give priority for 15 W + 15 W (8 ohm) speaker. ¿ Internal/External speaker switch : Internal speaker : External speaker. To output signal...
... which is for available option board. Ƽ Internal speaker English-9 See page 24 VIDEO OUT SETTING. NOTE: Please power off the monitor when you have any questions, please ask your monitor. NOTE: Please give priority for 15 W + 15 W (8 ohm) speaker. ¿ Internal/External speaker switch : Internal speaker : External speaker. To output signal...
Users Manual
Page 13
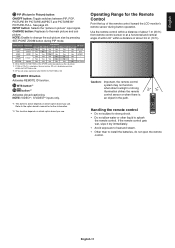
... 7 m (23 ft.) from remote control sensor or at a horizontal and vertical angle of within 30° within a distance of the remote control toward the LCD monitor's remote sensor during PIP mode.
... 7 m (23 ft.) from remote control sensor or at a horizontal and vertical angle of within 30° within a distance of the remote control toward the LCD monitor's remote sensor during PIP mode.

Users Manual
Page 14
... the cover. Replace the cover. English-12 Align the batteries according to your dealer for further information. To install or replace batteries: NEC recommends the following battery use and allow the unit to scratch the panel. 2. C. Install the remote control batteries The remote control is... covered with a protective screen, please check the inside the case. NOTE: Do not connect/disconnect cables when turning on the monitor or other external equipment as not to cool. Using the cooling fan will turn off the main power before making connections. •...
... the cover. Replace the cover. English-12 Align the batteries according to your dealer for further information. To install or replace batteries: NEC recommends the following battery use and allow the unit to scratch the panel. 2. C. Install the remote control batteries The remote control is... covered with a protective screen, please check the inside the case. NOTE: Do not connect/disconnect cables when turning on the monitor or other external equipment as not to cool. Using the cooling fan will turn off the main power before making connections. •...
Users Manual
Page 16
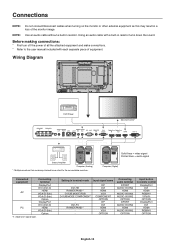
... English-14 Connections NOTE: Do not connect/disconnect cables when turning on signal type. Using an audio cable with each separate piece of the monitor image. Solid lines = video signal Dotted lines = audio signal Computer (Digital) Connected equipment Connecting terminal DisplayPort DVI (DVI-D) AV HDMI VGA... (D-Sub) VGA (D-Sub) Option DisplayPort DVI (DVI-D) PC HDMI VGA (D-Sub) Option *1: depend on the monitor or other external equipment as this may result in resistor turns down the sound. Setting in terminal mode Input signal name DVI-HD RAW/...
... English-14 Connections NOTE: Do not connect/disconnect cables when turning on signal type. Using an audio cable with each separate piece of the monitor image. Solid lines = video signal Dotted lines = audio signal Computer (Digital) Connected equipment Connecting terminal DisplayPort DVI (DVI-D) AV HDMI VGA... (D-Sub) VGA (D-Sub) Option DisplayPort DVI (DVI-D) PC HDMI VGA (D-Sub) Option *1: depend on the monitor or other external equipment as this may result in resistor turns down the sound. Setting in terminal mode Input signal name DVI-HD RAW/...
Users Manual
Page 17
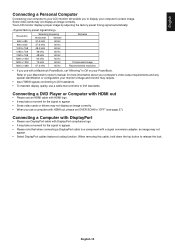
...'s manual for more information about your computer's video output requirements and any special identification or configuration your monitor's image and monitor may require. • Input TMDS signals conforming to DVI standards. • To maintain display quality, use a computer with... DisplayPort • Please use DisplayPort cable with HDMI out, please set "Mirroring" to display your computer's screen image. Your LCD monitor displays proper image by adjusting the factory preset timing signal automatically. Connecting a DVD Player or Computer with HDMI out • Please ...
...'s manual for more information about your computer's video output requirements and any special identification or configuration your monitor's image and monitor may require. • Input TMDS signals conforming to DVI standards. • To maintain display quality, use a computer with... DisplayPort • Please use DisplayPort cable with HDMI out, please set "Mirroring" to display your computer's screen image. Your LCD monitor displays proper image by adjusting the factory preset timing signal automatically. Connecting a DVD Player or Computer with HDMI out • Please ...
Users Manual
Page 18
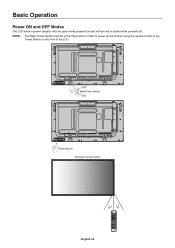
OFF Main Power Switch ON Power Button Using the remote control English-16 NOTE: The Main Power Switch must be in the ON position in order to power up the monitor using the remote control or the Power Button on and will turn green while powered on the front of the LCD. Basic Operation Power ON and OFF Modes The LCD monitor power indicator will turn red or amber while powered off.
OFF Main Power Switch ON Power Button Using the remote control English-16 NOTE: The Main Power Switch must be in the ON position in order to power up the monitor using the remote control or the Power Button on and will turn green while powered on the front of the LCD. Basic Operation Power ON and OFF Modes The LCD monitor power indicator will turn red or amber while powered off.

Users Manual
Page 19
...been used , this function may not operate. ZOOM ZOOM *4: This function depends on which is outside image area will not light when the LCD monitor is in a 1 by 1 pixel format. This allows your display to fill the entire screen with factory settings, VGA input only..../Pr2*4 FULL WIDE DYNAMIC 1:1 ZOOM NORMAL Aspect ratio of image Unchanged view*3 Recommended selection for a fixed period. Using Power Management The LCD monitor follows the VESA approved DPM Display Power Management function. Use the COLOR SYSTEM menu to set [AUTO], [NTSC], [PAL], [SECAM], [PAL60], [4....
...been used , this function may not operate. ZOOM ZOOM *4: This function depends on which is outside image area will not light when the LCD monitor is in a 1 by 1 pixel format. This allows your display to fill the entire screen with factory settings, VGA input only..../Pr2*4 FULL WIDE DYNAMIC 1:1 ZOOM NORMAL Aspect ratio of image Unchanged view*3 Recommended selection for a fixed period. Using Power Management The LCD monitor follows the VESA approved DPM Display Power Management function. Use the COLOR SYSTEM menu to set [AUTO], [NTSC], [PAL], [SECAM], [PAL60], [4....

Users Manual
Page 20
Information OSD The Information OSD provides information such as: Monitor ID, Input Source, Picture Size, etc. English-18 Press the DISPLAY button on the remote to bring up the Information OSD. ³ Input Name · Audio input mode » Picture aspect ¿ Input Signal Information ᕥ Sub picture information Picture Mode DVI, VGA, RGB/HV*, DPORT, DPORT2*, DPORT3* STANDARD sRGB CUSTOM1 CUSTOM2 HIGHBRIGHT HDMI, Y/Pb/Pr, SCART*, VIDEO*, S-VIDEO*, HDMI2*, Y/Pb/Pr2* STANDARD CINEMA CUSTOM1 CUSTOM2 HIGHBRIGHT *: This function depends on which option board you use.
Information OSD The Information OSD provides information such as: Monitor ID, Input Source, Picture Size, etc. English-18 Press the DISPLAY button on the remote to bring up the Information OSD. ³ Input Name · Audio input mode » Picture aspect ¿ Input Signal Information ᕥ Sub picture information Picture Mode DVI, VGA, RGB/HV*, DPORT, DPORT2*, DPORT3* STANDARD sRGB CUSTOM1 CUSTOM2 HIGHBRIGHT HDMI, Y/Pb/Pr, SCART*, VIDEO*, S-VIDEO*, HDMI2*, Y/Pb/Pr2* STANDARD CINEMA CUSTOM1 CUSTOM2 HIGHBRIGHT *: This function depends on which option board you use.


