
P Series Specification Brochure
Page 1
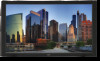
...* SLIMMER DEPTH INTEGRATED 10W SPEAKERS OPS & CURRENT SLOT SUPPORT DIGITAL SIGNAGE TECHNOLOGY SUITE INTEGRATED THERMAL PROTECTION SEALED PANEL DESIGN * available on select P Series models ENHANCED VIDEO WALL CAPABILITIES ECO-FRIENDLY FEATURES BUILT-IN EXPANSION SLOT EXTENSIVE CONTROL, DIAGNOSTICS & COMMUNICATION REAL-TIME CLOCK/ROUND-THE-CLOCK SCHEDULING CABLECOMP+™ TECHNOLOGY BUILT-IN TUNER (-AVT MODELS) Advantages include a wide array of display management. The built-in...
...* SLIMMER DEPTH INTEGRATED 10W SPEAKERS OPS & CURRENT SLOT SUPPORT DIGITAL SIGNAGE TECHNOLOGY SUITE INTEGRATED THERMAL PROTECTION SEALED PANEL DESIGN * available on select P Series models ENHANCED VIDEO WALL CAPABILITIES ECO-FRIENDLY FEATURES BUILT-IN EXPANSION SLOT EXTENSIVE CONTROL, DIAGNOSTICS & COMMUNICATION REAL-TIME CLOCK/ROUND-THE-CLOCK SCHEDULING CABLECOMP+™ TECHNOLOGY BUILT-IN TUNER (-AVT MODELS) Advantages include a wide array of display management. The built-in...

P Series Specification Brochure
Page 2
... you to create video walls (up /down, increasing panel lifetime, reducing power consumption and saving the time and expense of finding and purchasing a third-party scheduling solution •• ENERGY STAR 5.0/5.1** is proudly offered for most P Series displays, which meet strict energy efficiency guidelines set by multi-fan-based technology specially designed to work in the specifications and user's manual **available on the...
... you to create video walls (up /down, increasing panel lifetime, reducing power consumption and saving the time and expense of finding and purchasing a third-party scheduling solution •• ENERGY STAR 5.0/5.1** is proudly offered for most P Series displays, which meet strict energy efficiency guidelines set by multi-fan-based technology specially designed to work in the specifications and user's manual **available on the...
P Series Specification Brochure
Page 3
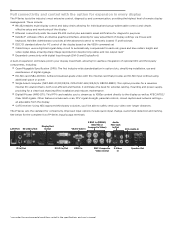
... specifications and user's manual all the advanced control to remotely located IT professionals. •• DDC/CI standard allows for PC control of the display based on the VESA command set •• CableComp+ uses a digitized signal delay circuit to the display as well as ATSC/NTSC/ Clear QAM signals. Improved input options include quick input change, customized detection and naming. It eliminates the need for external cabling, mounting and power supply, providing for connectivity...
... specifications and user's manual all the advanced control to remotely located IT professionals. •• DDC/CI standard allows for PC control of the display based on the VESA command set •• CableComp+ uses a digitized signal delay circuit to the display as well as ATSC/NTSC/ Clear QAM signals. Improved input options include quick input change, customized detection and naming. It eliminates the need for external cabling, mounting and power supply, providing for connectivity...
P Series Specification Brochure
Page 4
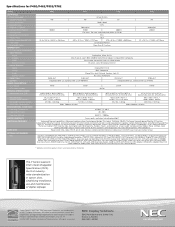
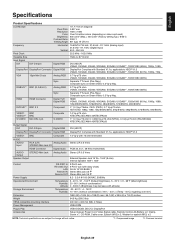
...MODEL LCD MODULE Panel Technology Viewable Image Size Native Resolution Backlight Type Brightness (Typical) Contrast Ratio (Typical) Viewing Angle Response Time (G-to-G) Aspect Ratio Active Screen Area (W x H) Orientation Displayable Colors CONNECTIVITY PC/Mac Signal Compatibility Input Terminals Digital Analog Audio External Control Output Terminals Digital Analog Audio External Control Digital Tuner Speakers POWER CONSUMPTiON On (Typical) ECO Mode Standby PHYSICAL SPECIFICATIONS Bezel Width (L/R, T/B) Net Dimensions (without stand) VESA Hole Configuration ENVIRONMENTAL CONDITIONS Operating...
...MODEL LCD MODULE Panel Technology Viewable Image Size Native Resolution Backlight Type Brightness (Typical) Contrast Ratio (Typical) Viewing Angle Response Time (G-to-G) Aspect Ratio Active Screen Area (W x H) Orientation Displayable Colors CONNECTIVITY PC/Mac Signal Compatibility Input Terminals Digital Analog Audio External Control Output Terminals Digital Analog Audio External Control Digital Tuner Speakers POWER CONSUMPTiON On (Typical) ECO Mode Standby PHYSICAL SPECIFICATIONS Bezel Width (L/R, T/B) Net Dimensions (without stand) VESA Hole Configuration ENVIRONMENTAL CONDITIONS Operating...
Users Manual
Page 2
... Use English-3 Contents ...English-4 Installation ...English-5 Attaching Mounting Accessories ...English-6 Parts Name and Functions...English-8 Control Panel ...English-8 Terminal Panel ...English-9 Wireless Remote Control ...English-11 Operating Range for the Remote Control English-12 Setup ...English-13 Connections ...English-15 Wiring Diagram ...English-15 Connecting a Personal Computer English-16 Connecting a DVD Player or Computer with HDMI out English-16 Connecting a Computer with DisplayPort English-16 Basic Operation...English-17 Power ON and OFF Modes ...English...
... Use English-3 Contents ...English-4 Installation ...English-5 Attaching Mounting Accessories ...English-6 Parts Name and Functions...English-8 Control Panel ...English-8 Terminal Panel ...English-9 Wireless Remote Control ...English-11 Operating Range for the Remote Control English-12 Setup ...English-13 Connections ...English-15 Wiring Diagram ...English-15 Connecting a Personal Computer English-16 Connecting a DVD Player or Computer with HDMI out English-16 Connecting a Computer with DisplayPort English-16 Basic Operation...English-17 Power ON and OFF Modes ...English...
Users Manual
Page 5
... rub the LCD panel with care. • When the power supply cord or plug is difficult to see and may cause permanent damage to the screen. • The power supply cord you to qualified service personnel under the following : • Use the preset Size and Position controls with standard signals. • Do not cover vent on the LCD surface. Avoid using the backside...
... rub the LCD panel with care. • When the power supply cord or plug is difficult to see and may cause permanent damage to the screen. • The power supply cord you to qualified service personnel under the following : • Use the preset Size and Position controls with standard signals. • Do not cover vent on the LCD surface. Avoid using the backside...
Users Manual
Page 8
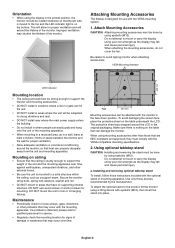
... power supply enters the building. • Do not install in where people can be attached with the monitor in the original packaging. Use only those instructions included with the optional stand or mounting apparatus. Using optional tabletop stand CAUTION: Installing and removing the stand must be done by using eyebolts (M12). VESA Mounting Interface 400 mm LED Indicator Mounting location • The ceiling and wall must be strong enough to support...
... power supply enters the building. • Do not install in where people can be attached with the monitor in the original packaging. Use only those instructions included with the optional stand or mounting apparatus. Using optional tabletop stand CAUTION: Installing and removing the stand must be done by using eyebolts (M12). VESA Mounting Interface 400 mm LED Indicator Mounting location • The ceiling and wall must be strong enough to support...
Users Manual
Page 10
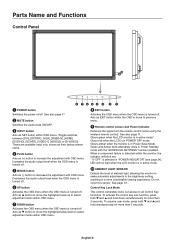
... Power Standby mode with OSD menu. Parts Name and Functions Control Panel ³ POWER button Switches the power on/off . Acts as (-) button to select adjustment items within OSD menu. (Toggle switches between [DVI], [DPORT], [VGA], [RGB/HV], [HDMI], [DVD/HD], [SCART], [VIDEO1], [VIDEO2] or [S-VIDEO]). Acts as SET button within OSD menu. º EXIT button Activates the OSD menu when the OSD menu is in POWER OFF mode. See page 19. English-8 Glows red when the LCD...
... Power Standby mode with OSD menu. Parts Name and Functions Control Panel ³ POWER button Switches the power on/off . Acts as (-) button to select adjustment items within OSD menu. (Toggle switches between [DVI], [DPORT], [VGA], [RGB/HV], [HDMI], [DVD/HD], [SCART], [VIDEO1], [VIDEO2] or [S-VIDEO]). Acts as SET button within OSD menu. º EXIT button Activates the OSD menu when the OSD menu is in POWER OFF mode. See page 19. English-8 Glows red when the LCD...
Users Manual
Page 11
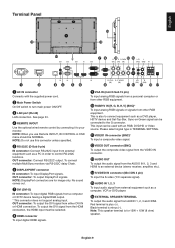
... input digital RGB signals from a computer or HDTV device having a digital RGB output. * This connector does not support analog input. See page 33. ¿ REMOTE IN/OUT Use the optional wired remote control by connecting it to an external device (stereo receiver, amplifier, etc.). ƹ S-VIDEO IN connector (Mini DIN 4 pin) To input the S-video (Y/C separate signal). ƺ AUDIO IN 1, 2, 3 To input audio signal from external equipment such as a DVD player, HDTV device and Set-Top-Box. Black terminal...
... input digital RGB signals from a computer or HDTV device having a digital RGB output. * This connector does not support analog input. See page 33. ¿ REMOTE IN/OUT Use the optional wired remote control by connecting it to an external device (stereo receiver, amplifier, etc.). ƹ S-VIDEO IN connector (Mini DIN 4 pin) To input the S-video (Y/C separate signal). ƺ AUDIO IN 1, 2, 3 To input audio signal from external equipment such as a DVD player, HDTV device and Set-Top-Box. Black terminal...
Users Manual
Page 13
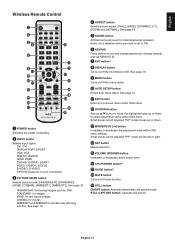
... to set and change passwords, change channel and set to ON. ² KEYPAD Press buttons to previous menu within OSD menu. ¹ UP/DOWN button Acts as DVD. English Wireless Remote Control ³ POWER button Switches the power on your connection » PICTURE MODE button Selects picture mode, [HIGHBRIGHT], [STANDARD], [sRGB], [CINEMA], [AMBIENT1], [AMBIENT2]. DVI: DVI DISPLAYPORT: DPORT VGA: VGA RGB/HV: RGB/HV HDMI: HDMI DVD/HD: DVD/HD, SCART VIDEO: VIDEO1, VIDEO2 S-VIDEO: S-VIDEO OPTION: Depends on /standby. · INPUT button Selects input signal...
... to set and change passwords, change channel and set to ON. ² KEYPAD Press buttons to previous menu within OSD menu. ¹ UP/DOWN button Acts as DVD. English Wireless Remote Control ³ POWER button Switches the power on your connection » PICTURE MODE button Selects picture mode, [HIGHBRIGHT], [STANDARD], [sRGB], [CINEMA], [AMBIENT1], [AMBIENT2]. DVI: DVI DISPLAYPORT: DPORT VGA: VGA RGB/HV: RGB/HV HDMI: HDMI DVD/HD: DVD/HD, SCART VIDEO: VIDEO1, VIDEO2 S-VIDEO: S-VIDEO OPTION: Depends on /standby. · INPUT button Selects input signal...
Users Manual
Page 15
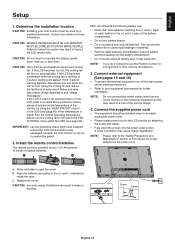
... intend to open the cover. Press and slide to use and allow the unit to your equipment user manual for proper selection of time, remove the batteries. 3. English Setup 1. Determine the installation location CAUTION: Installing your dealer for a long period of AC power cord. Install the remote control batteries The remote control is covered with a protective screen, please check the inside the case. A loose connection may injure skin. C.
... intend to open the cover. Press and slide to use and allow the unit to your equipment user manual for proper selection of time, remove the batteries. 3. English Setup 1. Determine the installation location CAUTION: Installing your dealer for a long period of AC power cord. Install the remote control batteries The remote control is covered with a protective screen, please check the inside the case. A loose connection may injure skin. C.
Users Manual
Page 17
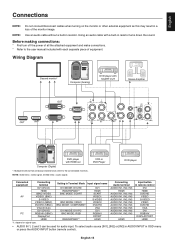
.../HV (5BNC) DisplayPort HDMI Setting in OSD menu or press the AUDIO INPUT button (remote control). English-15 Using an audio cable with each separate piece of the monitor image. Before making connections: * First turn off the power of all the attached equipment and make connections. * Refer to the connectable monitors. NOTE: Use an audio cable without a built-in resistor turns down the sound. NOTE: Solid lines = video signal. BNC MODE: VIDEO BNC MODE: COMPONENT DVI MODE: DVI-PC BNC...
.../HV (5BNC) DisplayPort HDMI Setting in OSD menu or press the AUDIO INPUT button (remote control). English-15 Using an audio cable with each separate piece of the monitor image. Before making connections: * First turn off the power of all the attached equipment and make connections. * Refer to the connectable monitors. NOTE: Use an audio cable without a built-in resistor turns down the sound. NOTE: Solid lines = video signal. BNC MODE: VIDEO BNC MODE: COMPONENT DVI MODE: DVI-PC BNC...
Users Manual
Page 24
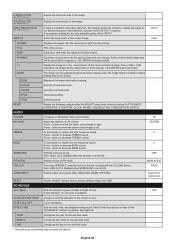
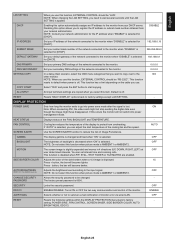
... or reduce the high frequency sound. 0 Press + button to decrease TREBLE sound. button to increase TREBLE sound. SURROUND Artificial surround sound. OFF PIP AUDIO Selects source of the screen image. FIXED AUDIO INPUT Selects audio input source [IN1], [IN2], [IN3], [HDMI], [OPTION]*. OFF SCHEDULE SETTINGS Creates a working schedule for the monitor to factory settings except VOLUME. - See page 28. VGA, RGB/HV inputs only INPUT RESOLUTION VGA, RGB/HV inputs only If there is detected...
... or reduce the high frequency sound. 0 Press + button to decrease TREBLE sound. button to increase TREBLE sound. SURROUND Artificial surround sound. OFF PIP AUDIO Selects source of the screen image. FIXED AUDIO INPUT Selects audio input source [IN1], [IN2], [IN3], [HDMI], [OPTION]*. OFF SCHEDULE SETTINGS Creates a working schedule for the monitor to factory settings except VOLUME. - See page 28. VGA, RGB/HV inputs only INPUT RESOLUTION VGA, RGB/HV inputs only If there is detected...
Users Manual
Page 27
... password to be "RS-232C". English-25 HEAT STATUS Displays status of monitor error via wired LAN. OFF SIDE BORDER COLOR Adjusts the color of the network connected to register the IP address or subnet mask number obtained from overheating. NOTE: When you to the monitor. 0.0.0.0 SETTING COPY In a daisy chain scenario, select the OSD menu categories that you use this function, EXTERNAL CONTROL should be changed...
... password to be "RS-232C". English-25 HEAT STATUS Displays status of monitor error via wired LAN. OFF SIDE BORDER COLOR Adjusts the color of the network connected to register the IP address or subnet mask number obtained from overheating. NOTE: When you to the monitor. 0.0.0.0 SETTING COPY In a daisy chain scenario, select the OSD menu categories that you use this function, EXTERNAL CONTROL should be changed...
Users Manual
Page 28
... DVD player, which is present. BNC MODE Selects the type of input detection the monitor uses when more than two input devices are connected. The monitor will automatically switch to the DVD/HD, SCART, VIDEO1, VIDEO2 or S-VIDEO input. AUTO Automatically chooses Color System setting based on the video format of image retention. When DVD/HD, SCART, VIDEO1, VIDEO2 or S-VIDEO input signal is not present, the monitor searches for a video signal from the other video input ports. ADVANCED OPTION INPUT...
... DVD player, which is present. BNC MODE Selects the type of input detection the monitor uses when more than two input devices are connected. The monitor will automatically switch to the DVD/HD, SCART, VIDEO1, VIDEO2 or S-VIDEO input. AUTO Automatically chooses Color System setting based on the video format of image retention. When DVD/HD, SCART, VIDEO1, VIDEO2 or S-VIDEO input signal is not present, the monitor searches for a video signal from the other video input ports. ADVANCED OPTION INPUT...
Users Manual
Page 30
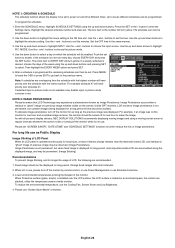
... the environmental temperature, use "Screen Saver Mode" of monitor. Enter the SCHEDULE menu. Press the SET or the + button to choose the picture mode. 4. Highlight the desired schedule number and press set. Use the + and - Use the + and - buttons to enter the Settings menu. If selected input or picture mode is not available now, disable input or picture mode is shown in the same manner. 3. DVI SCHEDULE: OFF TIMER SCHEDULE SETTINGS SCHEDULE LIST DATE & TIME RESET RESET Choose (THU...
... the environmental temperature, use "Screen Saver Mode" of monitor. Enter the SCHEDULE menu. Press the SET or the + button to choose the picture mode. 4. Highlight the desired schedule number and press set. Use the + and - Use the + and - buttons to enter the Settings menu. If selected input or picture mode is not available now, disable input or picture mode is shown in the same manner. 3. DVI SCHEDULE: OFF TIMER SCHEDULE SETTINGS SCHEDULE LIST DATE & TIME RESET RESET Choose (THU...

Users Manual
Page 31
... monitor in white on the remote control, use REMOTE ID:3 Remote works Use the remote control to operate a monitor that has a specific MONITOR ID number assigned to it. 1. On the remote control, press and hold down the REMOTE ID SET button while using the keypad to 100 individual MultiSync monitors. The MONITOR ID number is set under the MULTI DISPLAY menu in Normal mode or the REMOTE ID is shown in the OSD. Connect PC and LCD monitors. Connect a PC's RS-232C control output...
... monitor in white on the remote control, use REMOTE ID:3 Remote works Use the remote control to operate a monitor that has a specific MONITOR ID number assigned to it. 1. On the remote control, press and hold down the REMOTE ID SET button while using the keypad to 100 individual MultiSync monitors. The MONITOR ID number is set under the MULTI DISPLAY menu in Normal mode or the REMOTE ID is shown in the OSD. Connect PC and LCD monitors. Connect a PC's RS-232C control output...
Users Manual
Page 39
... provides the monitor with the Windows® operating system facilitates setup and installation by allowing the monitor to send its capabilities (such as screen size and resolutions supported) directly to install it with other common color standards. This assures that allow the monitor to shift to view material via six axes (R, G, B, C, M and Y) rather than through the three axes (R, G and B) previously available. Plug and Play: The...
... provides the monitor with the Windows® operating system facilitates setup and installation by allowing the monitor to send its capabilities (such as screen size and resolutions supported) directly to install it with other common color standards. This assures that allow the monitor to shift to view material via six axes (R, G, B, C, M and Y) rather than through the three axes (R, G and B) previously available. Plug and Play: The...
Users Manual
Page 40
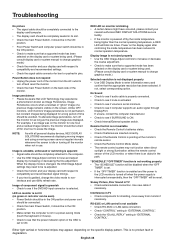
...;ne adjustment. "SCHEDULE"/"OFF TIMER" function is an object in TV • Check components for a long period of the monitor. Snowy Picture, Poor Sound in the OSD is set at the monitor's remote sensor. • Check the Remote Control Mode status. • The remote control system may need to be re-adjusted. • Check the monitor and your display card with respect to compatibility and recommended settings. • Check the signal cable connector...
...;ne adjustment. "SCHEDULE"/"OFF TIMER" function is an object in TV • Check components for a long period of the monitor. Snowy Picture, Poor Sound in the OSD is set at the monitor's remote sensor. • Check the Remote Control Mode status. • The remote control system may need to be re-adjusted. • Check the monitor and your display card with respect to compatibility and recommended settings. • Check the signal cable connector...
Users Manual
Page 41
... Jack X2 HDMI Connector Digital Audio Stereo L/R 0.5 Vrms PCM 32, 44.1, 48 KHz (16/20/24bit) AUDIO Output STEREO Mini Jack Speaker Output Control Power Supply Operational Environment Storage Environment Dimension Weight VESA compatible mounting interface Power Management Plug & Play Accessories Analog Audio Stereo L/R 0.5 Vrms External Speaker Jack 15 W + 15 W (8 ohm) Internal Speaker 10W + 10W RS-232C In: 9 Pin D-sub RS-232C Out: 9 Pin D-sub (with daisy chain) LAN: RJ-45 10/100 BASE-T Remote IN...
... Jack X2 HDMI Connector Digital Audio Stereo L/R 0.5 Vrms PCM 32, 44.1, 48 KHz (16/20/24bit) AUDIO Output STEREO Mini Jack Speaker Output Control Power Supply Operational Environment Storage Environment Dimension Weight VESA compatible mounting interface Power Management Plug & Play Accessories Analog Audio Stereo L/R 0.5 Vrms External Speaker Jack 15 W + 15 W (8 ohm) Internal Speaker 10W + 10W RS-232C In: 9 Pin D-sub RS-232C Out: 9 Pin D-sub (with daisy chain) LAN: RJ-45 10/100 BASE-T Remote IN...


