
MultiSync LCD5710-2-AV : TNETPC-ION spec brochure
Page 1
...away or even mounted behind a display. TNETPC-ION External PC for markets such as transportation, public information, corporate, retail and rental staging. NEC's small form factor external PC, available with a 1.6GHz Dual Core Atom CPU, offers the robust flexibility and performance required to change. ...6/10 ver. 1. ©2010 NEC Display Solutions of inputs give you greater flexibility and options for displaying content. Accessories Features and Benefits 1.6GHz Dual Core Atom offers ...
...away or even mounted behind a display. TNETPC-ION External PC for markets such as transportation, public information, corporate, retail and rental staging. NEC's small form factor external PC, available with a 1.6GHz Dual Core Atom CPU, offers the robust flexibility and performance required to change. ...6/10 ver. 1. ©2010 NEC Display Solutions of inputs give you greater flexibility and options for displaying content. Accessories Features and Benefits 1.6GHz Dual Core Atom offers ...
P Series Specification Brochure
Page 1
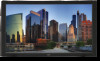
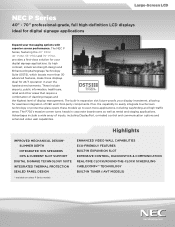
... SLOT EXTENSIVE CONTROL, DIAGNOSTICS & COMMUNICATION REAL-TIME CLOCK/ROUND-THE-CLOCK SCHEDULING CABLECOMP+™ TECHNOLOGY BUILT-IN TUNER (-AVT MODELS) These include airports, public information, healthcare, retail and other areas that require a combination of dazzling images and the highest level... of NEC and third-party components. The NEC P Series, featuring the 40" P402, 46" P462, 55" P552 and 70" P702, provides a first-class solution for seamless integration of display management. The built-in ...
... SLOT EXTENSIVE CONTROL, DIAGNOSTICS & COMMUNICATION REAL-TIME CLOCK/ROUND-THE-CLOCK SCHEDULING CABLECOMP+™ TECHNOLOGY BUILT-IN TUNER (-AVT MODELS) These include airports, public information, healthcare, retail and other areas that require a combination of dazzling images and the highest level... of NEC and third-party components. The NEC P Series, featuring the 40" P402, 46" P462, 55" P552 and 70" P702, provides a first-class solution for seamless integration of display management. The built-in ...

P Series Specification Brochure
Page 2
Internal temperature sensors control selfprotective circuits, while special self-diagnostics communicate the status of the thermal characteristics. Environmental Protection Agency and the U.S. Technologies include: •• TileMatrix™ allows you to create video walls (up /down, increasing panel lifetime, reducing power consumption and saving the time and expense of finding and purchasing a third-party scheduling solution •• ENERGY STAR 5.0/5.1** is sealed, preventing contaminants like dust, grease or steam from damaging the panel* Green technology helps ...
Internal temperature sensors control selfprotective circuits, while special self-diagnostics communicate the status of the thermal characteristics. Environmental Protection Agency and the U.S. Technologies include: •• TileMatrix™ allows you to create video walls (up /down, increasing panel lifetime, reducing power consumption and saving the time and expense of finding and purchasing a third-party scheduling solution •• ENERGY STAR 5.0/5.1** is sealed, preventing contaminants like dust, grease or steam from damaging the panel* Green technology helps ...
P Series Specification Brochure
Page 3
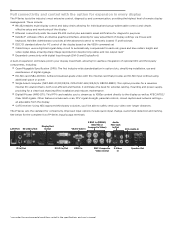
... in the specifications and user's manual NaViSet Administrator provides all adjustable from the display. •• CAT5 receiver: Using NEC-approved third-party solutions, you to stream up to 1080p content directly to safely send your display investment, allowing for seamless integration... of optional NEC and third-party components, including: •• Open Pluggable Specification (OPS): The first industry-wide standardization in option slots, ...
... in the specifications and user's manual NaViSet Administrator provides all adjustable from the display. •• CAT5 receiver: Using NEC-approved third-party solutions, you to stream up to 1080p content directly to safely send your display investment, allowing for seamless integration... of optional NEC and third-party components, including: •• Open Pluggable Specification (OPS): The first industry-wide standardization in option slots, ...
P Series Specification Brochure
Page 4
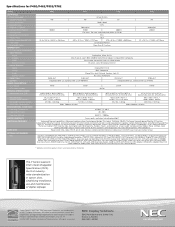
... Width (L/R, T/B) Net Dimensions (without stand) VESA Hole Configuration ENVIRONMENTAL CONDITIONS Operating Temperature Operating Humidity Operating Altitude LIMITED WARRANTY ADDITIONAL FEATURES SHIPS WITH OPTIONAL ACCESSORIES NEC P402 P462 P552 P702 40" 3000:1 34.9 x 19.6 in. / 885.6 x 498.2mm SPVA (P-DID) 46" 55" 1920 x 1080 CCFL 500 cd/m2 3500:1 4000:1 178&#... HDMI Audio RS-232C, LAN, IR Remote, DDC/CI DisplayPort, DVI-D BNC Composite Stereo Mini-Jack, External Speaker Jack (2) RS-232C, IR Remote P402-AVT P462-AVT P552-AVT P702-AVT Integrated 10W (2), Optional 15W (2;
... Width (L/R, T/B) Net Dimensions (without stand) VESA Hole Configuration ENVIRONMENTAL CONDITIONS Operating Temperature Operating Humidity Operating Altitude LIMITED WARRANTY ADDITIONAL FEATURES SHIPS WITH OPTIONAL ACCESSORIES NEC P402 P462 P552 P702 40" 3000:1 34.9 x 19.6 in. / 885.6 x 498.2mm SPVA (P-DID) 46" 55" 1920 x 1080 CCFL 500 cd/m2 3500:1 4000:1 178&#... HDMI Audio RS-232C, LAN, IR Remote, DDC/CI DisplayPort, DVI-D BNC Composite Stereo Mini-Jack, External Speaker Jack (2) RS-232C, IR Remote P402-AVT P462-AVT P552-AVT P702-AVT Integrated 10W (2), Optional 15W (2;
Users Manual
Page 2
Index Declaration of conformity...English-1 Important Information ...English-2 WARNING...English-2 CAUTION...English-2 Safety Precautions, Maintenance & Recommended Use English-3 Contents ...English-4 Installation ...English-5 Attaching Mounting Accessories ...English-6 Parts Name and Functions...English-8 Control Panel ...English-8 Terminal Panel ...English-9 Wireless Remote Control ...English-11 Operating Range for the Remote Control English-12 Setup ...English-13 Connections ...English-15 Wiring Diagram ...English-15 Connecting a Personal Computer English-16 Connecting a DVD Player or ...
Index Declaration of conformity...English-1 Important Information ...English-2 WARNING...English-2 CAUTION...English-2 Safety Precautions, Maintenance & Recommended Use English-3 Contents ...English-4 Installation ...English-5 Attaching Mounting Accessories ...English-6 Parts Name and Functions...English-8 Control Panel ...English-8 Terminal Panel ...English-9 Wireless Remote Control ...English-11 Operating Range for the Remote Control English-12 Setup ...English-13 Connections ...English-15 Wiring Diagram ...English-15 Connecting a Personal Computer English-16 Connecting a DVD Player or ...
Users Manual
Page 3
... cord or equivalent to radio communications. Government Printing Office, Washington, D.C., 20402, Stock No. 004-000-00345-4. NEC is trademarks of NEC Corporation. DisplayPort is a registered trademark of Video Electronics Standards Association. Operation of this equipment in a residential area is a registered...operated in the countries of their respective owners. Use the attached specified cables with the MultiSync P702 (P702) color display so as not to interfere with the limits for additional suggestions. English Declaration of the Canadian Interference-Causing ...
... cord or equivalent to radio communications. Government Printing Office, Washington, D.C., 20402, Stock No. 004-000-00345-4. NEC is trademarks of NEC Corporation. DisplayPort is a registered trademark of Video Electronics Standards Association. Operation of this equipment in a residential area is a registered...operated in the countries of their respective owners. Use the attached specified cables with the MultiSync P702 (P702) color display so as not to interfere with the limits for additional suggestions. English Declaration of the Canadian Interference-Causing ...
Users Manual
Page 4
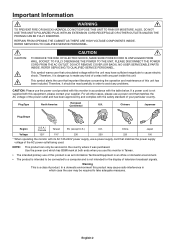
TO FULLY DISENGAGE THE POWER TO THE UNIT, PLEASE DISCONNECT THE POWER CORD FROM THE AC OUTLET. NO USER SERVICEABLE PARTS INSIDE. This symbol alerts the user that matches the power supply voltage of the AC power outlet being used. For all other cases, please use a power supply cord that important literature concerning the operation and maintenance of your supplier. ALSO, DO NOT USE THIS UNIT'S POLARIZED PLUG WITH AN EXTENSION CORD RECEPTACLE OR OTHER OUTLETS UNLESS THE PRONGS CAN BE FULLY INSERTED. CAUTION: CAUTION TO REDUCE THE RISK OF ELECTRIC SHOCK, MAKE SURE POWER CORD IS ...
TO FULLY DISENGAGE THE POWER TO THE UNIT, PLEASE DISCONNECT THE POWER CORD FROM THE AC OUTLET. NO USER SERVICEABLE PARTS INSIDE. This symbol alerts the user that matches the power supply voltage of the AC power outlet being used. For all other cases, please use a power supply cord that important literature concerning the operation and maintenance of your supplier. ALSO, DO NOT USE THIS UNIT'S POLARIZED PLUG WITH AN EXTENSION CORD RECEPTACLE OR OTHER OUTLETS UNLESS THE PRONGS CAN BE FULLY INSERTED. CAUTION: CAUTION TO REDUCE THE RISK OF ELECTRIC SHOCK, MAKE SURE POWER CORD IS ...
Users Manual
Page 5
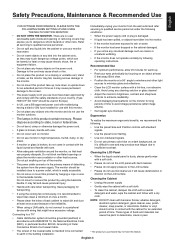
... building installation. * The product you to a TV* • Cable distribution system should be grounded (earthed) in accordance with ANSI/NFPA 70, the National Electrical Code (NEC), in contact with the cabinet for long periods of back cabinet to reject dirt and dust at a 90° angle to windows and other light...
... building installation. * The product you to a TV* • Cable distribution system should be grounded (earthed) in accordance with ANSI/NFPA 70, the National Electrical Code (NEC), in contact with the cabinet for long periods of back cabinet to reject dirt and dust at a 90° angle to windows and other light...
Users Manual
Page 6
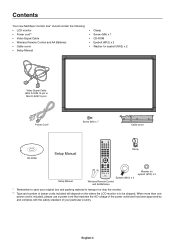
Contents Your new MultiSync monitor box* should contain the following: • LCD monitor • Power cord*1 • Video Signal Cable • Wireless Remote Control and AA Batteries • Cable cover • Setup Manual • Clamp • Screw (M4) x 7 • CD-ROM • Eyebolt (M12) x 2 • Washer for eyebolt (M12) x 2 Video Signal Cable (Mini D-SUB 15 pin to Mini D-SUB 15 pin) Power Cord*1 Screw (M4) x 7 Cable cover CD-ROM Setup Manual Clamp Setup Manual Eyebolt (M12) x 2 Wireless Remote Control and AA Batteries Washer for eyebolt (M12) x 2 * Remember to ...
Contents Your new MultiSync monitor box* should contain the following: • LCD monitor • Power cord*1 • Video Signal Cable • Wireless Remote Control and AA Batteries • Cable cover • Setup Manual • Clamp • Screw (M4) x 7 • CD-ROM • Eyebolt (M12) x 2 • Washer for eyebolt (M12) x 2 Video Signal Cable (Mini D-SUB 15 pin to Mini D-SUB 15 pin) Power Cord*1 Screw (M4) x 7 Cable cover CD-ROM Setup Manual Clamp Setup Manual Eyebolt (M12) x 2 Wireless Remote Control and AA Batteries Washer for eyebolt (M12) x 2 * Remember to ...
Users Manual
Page 7
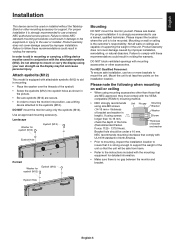
... improper installation, remodelling, or natural disasters. Do not attempt to the instructions included with the VESAcompatible (FDMlv1) mounting method. • NEC strongly recommends using your own strength as shown in the picture. • Be sure eyebolts (M12) are capable of supporting the weight...cm). 14-16 mm Thickness of the eyebolt. • Screw the eyebolts (M12) into position, use a trained, NEC authorized service person. Failure to follow NEC standard mounting procedures could result in damage to the equipment or injury to aid in mounting. • Place the washer over...
... improper installation, remodelling, or natural disasters. Do not attempt to the instructions included with the VESAcompatible (FDMlv1) mounting method. • NEC strongly recommends using your own strength as shown in the picture. • Be sure eyebolts (M12) are capable of supporting the weight...cm). 14-16 mm Thickness of the eyebolt. • Screw the eyebolts (M12) into position, use a trained, NEC authorized service person. Failure to follow NEC standard mounting procedures could result in damage to the equipment or injury to aid in mounting. • Place the washer over...
Users Manual
Page 8
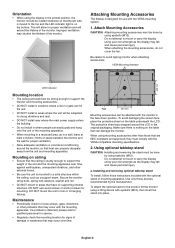
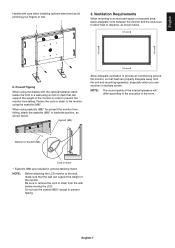
... the display using a lifting device with eyebolts (M12), then insert the stand into place. Orientation • When using mounting accessories other than those that are NEC-compliant and approved, they must comply with the VESA-compatible mounting specifications. 2. This will allow for proper ventilation and will be rotated clockwise...
... the display using a lifting device with eyebolts (M12), then insert the stand into place. Orientation • When using mounting accessories other than those that are NEC-compliant and approved, they must comply with the VESA-compatible mounting specifications. 2. This will allow for proper ventilation and will be rotated clockwise...
Users Manual
Page 9
Fasten the cord or chain to the monitor using eyebolts (M8)* for Eyebolt (M8) Cord or chain *: Eyebolts (M8) are included in optional tabletop stand. Eyebolt (M8) Allow adequate ventilation or provide air conditioning around the monitor, so that heat can properly dissipate away from the unit and mounting apparatus; NOTE: The sound quality of the internal speakers will differ according to the wall, make sure that the wall can support the weight of the monitor. Do not use monitors in prevent tipping. English-7 NOTE: Before attaching the LCD monitor to the ...
Fasten the cord or chain to the monitor using eyebolts (M8)* for Eyebolt (M8) Cord or chain *: Eyebolts (M8) are included in optional tabletop stand. Eyebolt (M8) Allow adequate ventilation or provide air conditioning around the monitor, so that heat can properly dissipate away from the unit and mounting apparatus; NOTE: The sound quality of the internal speakers will differ according to the wall, make sure that the wall can support the weight of the monitor. Do not use monitors in prevent tipping. English-7 NOTE: Before attaching the LCD monitor to the ...
Users Manual
Page 10
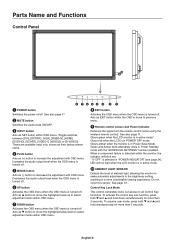
These are available input only, shown as their factory preset name. ¿ PLUS button Acts as button to increase the adjustment with OSD menu. Decreases the audio output level when the OSD menu is turned off. ² UP button Activates the OSD menu when the OSD menu is in Power Standby mode with the "SCHEDULE SETTINGS" function enabled. See also page 11. Glows red when the LCD is turned-off . Green and Amber blink alternately while in POWER OFF mode. Acts as (+) button to move the highlighted area down simultaneously for more than 3 seconds. See page 19. English-8 Parts ...
These are available input only, shown as their factory preset name. ¿ PLUS button Acts as button to increase the adjustment with OSD menu. Decreases the audio output level when the OSD menu is turned off. ² UP button Activates the OSD menu when the OSD menu is in Power Standby mode with the "SCHEDULE SETTINGS" function enabled. See also page 11. Glows red when the LCD is turned-off . Green and Amber blink alternately while in POWER OFF mode. Acts as (+) button to move the highlighted area down simultaneously for more than 3 seconds. See page 19. English-8 Parts ...
Users Manual
Page 11
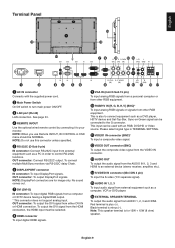
OUT connector: Connect RS-232C output. This is plus (+). Red terminal is also to turn main power ON/OFF. » LAN port (RJ-45) LAN connection. NOTE: When you use this connector unless specified. ´ RS-232C (D-Sub 9 pin) IN connector: Connect RS-232C input from external equipment such as a computer, VCR or DVD player. ƻ EXTERNAL SPEAKER TERMINAL To output the audio signal from external equipment such as a PC in OSD menu should be used with the supplied power cord. · Main Power Switch On/Off switch to connect equipment such as a DVD player, HDTV device and...
OUT connector: Connect RS-232C output. This is plus (+). Red terminal is also to turn main power ON/OFF. » LAN port (RJ-45) LAN connection. NOTE: When you use this connector unless specified. ´ RS-232C (D-Sub 9 pin) IN connector: Connect RS-232C input from external equipment such as a computer, VCR or DVD player. ƻ EXTERNAL SPEAKER TERMINAL To output the audio signal from external equipment such as a PC in OSD menu should be used with the supplied power cord. · Main Power Switch On/Off switch to connect equipment such as a DVD player, HDTV device and...
Users Manual
Page 12
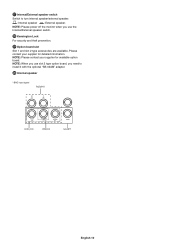
NOTE: Please power off the monitor when you need to turn internal speaker/external speaker. : Internal speaker : External speaker. Ƽ Internal/External speaker switch Switch to install it with the optional "SB-02AM" adapter. ƿ Internal speaker * BNC input signal English-10 NOTE: When you use slot 2 type option board, you use the Internal/External speaker switch. ƽ Kensington Lock For security and theft prevention. ƾ Option board slot Slot 1 and slot 2 type accessories are available. Please contact your supplier for detailed information. NOTE: Please contact your...
NOTE: Please power off the monitor when you need to turn internal speaker/external speaker. : Internal speaker : External speaker. Ƽ Internal/External speaker switch Switch to install it with the optional "SB-02AM" adapter. ƿ Internal speaker * BNC input signal English-10 NOTE: When you use slot 2 type option board, you use the Internal/External speaker switch. ƽ Kensington Lock For security and theft prevention. ƾ Option board slot Slot 1 and slot 2 type accessories are available. Please contact your supplier for detailed information. NOTE: Please contact your...
Users Manual
Page 13
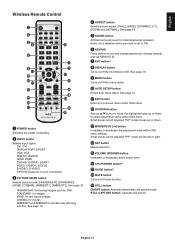
Audio out is disabled when surround is set REMOTE ID. ¶ ENT button*2 º DISPLAY button Turns on your connection » PICTURE MODE button Selects picture mode, [HIGHBRIGHT], [STANDARD], [sRGB], [CINEMA], [AMBIENT1], [AMBIENT2]. Small screen which adjusted "PIP" mode moves left or right. ƹ SET button Makes selection. ƺ VOLUME UP/DOWN button Increases or decreases audio output level. ƻ CH UP/DOWN button*2 Ƽ GUIDE button*2 ƽ MUTE button Turns on/off mute function. ƾ STILL button ON/OFF button: Activates/deactivates still picture mode. ...
Audio out is disabled when surround is set REMOTE ID. ¶ ENT button*2 º DISPLAY button Turns on your connection » PICTURE MODE button Selects picture mode, [HIGHBRIGHT], [STANDARD], [sRGB], [CINEMA], [AMBIENT1], [AMBIENT2]. Small screen which adjusted "PIP" mode moves left or right. ƹ SET button Makes selection. ƺ VOLUME UP/DOWN button Increases or decreases audio output level. ƻ CH UP/DOWN button*2 Ƽ GUIDE button*2 ƽ MUTE button Turns on/off mute function. ƾ STILL button ON/OFF button: Activates/deactivates still picture mode. ...
Users Manual
Page 14
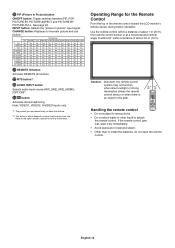
See page 23. INPUT button: Selects the "picture in the path. Caution: Important, the remote control system may not have this feature. *2: This button's action depends on which option board you use. If the remote control gets wet, wipe it dry immediately. • Avoid exposure to heat and steam. • Other than to the main picture and sub picture. English-12 Note: VIDEO1, VIDEO2, S-VIDEO inputs only. *1: The product you purchased may not function when direct sunlight or strong illumination strikes the remote control sensor or when there is an object in picture" input signal....
See page 23. INPUT button: Selects the "picture in the path. Caution: Important, the remote control system may not have this feature. *2: This button's action depends on which option board you use. If the remote control gets wet, wipe it dry immediately. • Avoid exposure to heat and steam. • Other than to the main picture and sub picture. English-12 Note: VIDEO1, VIDEO2, S-VIDEO inputs only. *1: The product you purchased may not function when direct sunlight or strong illumination strikes the remote control sensor or when there is an object in picture" input signal....
Users Manual
Page 15
... Persistance". Install the remote control batteries The remote control is covered with a protective screen, please check the inside the case. To install or replace batteries: NEC recommends the following battery use: • Place "AA" size batteries matching the (+) and (-) signs on each battery to scratch the panel. 2. turn off the main...
... Persistance". Install the remote control batteries The remote control is covered with a protective screen, please check the inside the case. To install or replace batteries: NEC recommends the following battery use: • Place "AA" size batteries matching the (+) and (-) signs on each battery to scratch the panel. 2. turn off the main...
Users Manual
Page 16
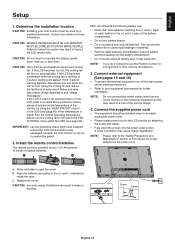
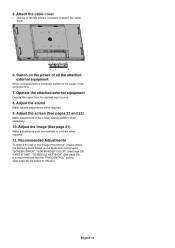
Attach the cable cover • Use six of the screen display position when necessary. 10. 5. Recommended Adjustments To reduce the risk of the "Image Persistence", please adjust the following items based on the power of all the attached external equipment When connected with a computer, switch on the application being used: "SCREEN SAVER", "SIDE BORDER COLOR" (See page 25) "DATE & TIME", "SCHEDULE SETTINGS" (See page 22). Switch on the power of the computer first. 7. Adjust the screen (See pages 21 and 22) Make adjustments of the M4 screws (included) to ON also. English-14...
Attach the cable cover • Use six of the screen display position when necessary. 10. 5. Recommended Adjustments To reduce the risk of the "Image Persistence", please adjust the following items based on the power of all the attached external equipment When connected with a computer, switch on the application being used: "SCREEN SAVER", "SIDE BORDER COLOR" (See page 25) "DATE & TIME", "SCHEDULE SETTINGS" (See page 22). Switch on the power of the computer first. 7. Adjust the screen (See pages 21 and 22) Make adjustments of the M4 screws (included) to ON also. English-14...