Specification Brochure
Page 1
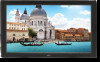
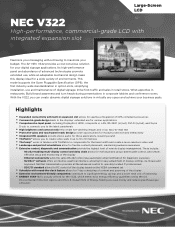
..." NEC V322 provides a cost-conscious solution for those applications requiring sound •• TileMatrix™ allows you to create video walls in up to 10 x 10 matrices •• TileComp™ works in retail stores. Its high-performance panel and abundance of advanced technologies promote extended use, while an adaptable mechanical design make this display ideal for easy adjustment of digital signage...
..." NEC V322 provides a cost-conscious solution for those applications requiring sound •• TileMatrix™ allows you to create video walls in up to 10 x 10 matrices •• TileComp™ works in retail stores. Its high-performance panel and abundance of advanced technologies promote extended use, while an adaptable mechanical design make this display ideal for easy adjustment of digital signage...
Specification Brochure
Page 2
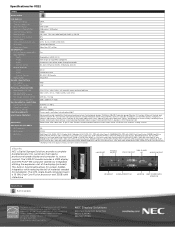
...-Jack RS-232C, IR Remote V322-AVT 88W WxHxD) Net Weight (without stand; Specifications for V322 MODEL QUICK SPECS LCD MODULE Panel Technology Viewable Image Size Native Resolution Brightness (Typical/Max) Contrast Ratio (Typical) Viewing Angle Response Time (G-to-G) Aspect Ratio Active Screen Area (W x H) Orientation Displayable Colors CONNECTIVITY PC/Mac Signal Compatibility Input Terminals Digital Analog Audio External Control Output Terminals Digital Audio External Control Digital Tuner POWER CONSUMPTiON On (Typical) ECO Mode Standby PHYSICAL SPECIFICATIONS Bezel Width (L/R, T/B) Net...
...-Jack RS-232C, IR Remote V322-AVT 88W WxHxD) Net Weight (without stand; Specifications for V322 MODEL QUICK SPECS LCD MODULE Panel Technology Viewable Image Size Native Resolution Brightness (Typical/Max) Contrast Ratio (Typical) Viewing Angle Response Time (G-to-G) Aspect Ratio Active Screen Area (W x H) Orientation Displayable Colors CONNECTIVITY PC/Mac Signal Compatibility Input Terminals Digital Analog Audio External Control Output Terminals Digital Audio External Control Digital Tuner POWER CONSUMPTiON On (Typical) ECO Mode Standby PHYSICAL SPECIFICATIONS Bezel Width (L/R, T/B) Net...
User's Manual
Page 2
... Use English-3 Contents ...English-4 Installation ...English-5 Attaching Mounting Accessories ...English-6 Parts Name and Functions...English-8 Control Panel ...English-8 Terminal Panel ...English-9 Wireless Remote Control ...English-10 Operating Range for the Remote Control English-11 Setup ...English-12 Connections ...English-14 Wiring Diagram ...English-14 Connecting a Personal Computer English-15 Connecting a DVD Player or Computer with HDMI out English-15 Connecting a Computer with DisplayPort English-15 Basic Operation...English-16 Power ON and OFF Modes ...English...
... Use English-3 Contents ...English-4 Installation ...English-5 Attaching Mounting Accessories ...English-6 Parts Name and Functions...English-8 Control Panel ...English-8 Terminal Panel ...English-9 Wireless Remote Control ...English-10 Operating Range for the Remote Control English-11 Setup ...English-12 Connections ...English-14 Wiring Diagram ...English-14 Connecting a Personal Computer English-15 Connecting a DVD Player or Computer with HDMI out English-15 Connecting a Computer with DisplayPort English-15 Basic Operation...English-16 Power ON and OFF Modes ...English...
User's Manual
Page 5
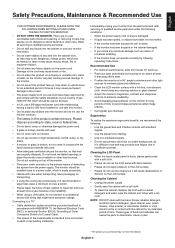
...fied service personnel. • Do not spill any kind into the cabinet or use your eyes periodically by following conditions: • When the power supply cord or plug is dusty, please gently wipe with a soft cloth. • Please do not rub the LCD panel with ANSI/NFPA 70, the National Electrical Code (NEC), in this feature. Cleaning the LCD Panel •...
...fied service personnel. • Do not spill any kind into the cabinet or use your eyes periodically by following conditions: • When the power supply cord or plug is dusty, please gently wipe with a soft cloth. • Please do not rub the LCD panel with ANSI/NFPA 70, the National Electrical Code (NEC), in this feature. Cleaning the LCD Panel •...
User's Manual
Page 7
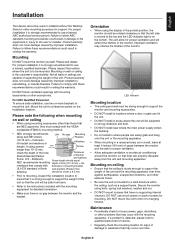
... that comply with the VESAcompatible (FDMlv1) mounting method. • NEC strongly recommends using screws longer than those that are capable of supporting the weight of the monitor. Product warranty does not cover damage caused by improper installation. For NEC Qualified Personnel: To ensure safe installation, use a trained, qualified technician. Secure the monitor using bolts, spring lock washers, washer and nut. • DO...
... that comply with the VESAcompatible (FDMlv1) mounting method. • NEC strongly recommends using screws longer than those that are capable of supporting the weight of the monitor. Product warranty does not cover damage caused by improper installation. For NEC Qualified Personnel: To ensure safe installation, use a trained, qualified technician. Secure the monitor using bolts, spring lock washers, washer and nut. • DO...
User's Manual
Page 10
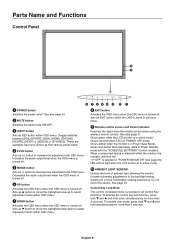
...], [VGA], [HDMI], [DVD/HD], [SCART], [VIDEO1], [VIDEO2] or [S-VIDEO]). Do not cover this sensor. Control Key Lock Mode This control completely locks out access to increase the adjustment with the "SCHEDULE SETTINGS" function enabled. To resume user mode, press both and and hold simultaneously for more comfortable viewing experience. Glows green when the LCD monitor is in Power Standby mode with OSD menu. See also page 11. Glows red when the LCD is turned-off...
...], [VGA], [HDMI], [DVD/HD], [SCART], [VIDEO1], [VIDEO2] or [S-VIDEO]). Do not cover this sensor. Control Key Lock Mode This control completely locks out access to increase the adjustment with the "SCHEDULE SETTINGS" function enabled. To resume user mode, press both and and hold simultaneously for more comfortable viewing experience. Glows green when the LCD monitor is in Power Standby mode with OSD menu. See also page 11. Glows red when the LCD is turned-off...
User's Manual
Page 11
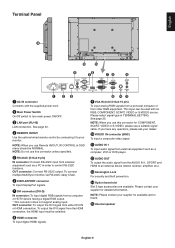
... HDTV device having a digital RGB output. * This connector does not support analog input. NOTE: When you use a suitable signal cable. Please contact your monitor. NOTE: Please contact your dealer. µ VIDEO1 IN connector (BNC) To input a composite video signal. ¸ AUDIO IN 1 To input audio signal from external equipment such as a PC in TERMINAL SETTING. NOTE: Do not use Remote IN/OUT, IR CONTROL in OSD menu should be used with the supplied power cord. · Main Power Switch...
... HDTV device having a digital RGB output. * This connector does not support analog input. NOTE: When you use a suitable signal cable. Please contact your monitor. NOTE: Please contact your dealer. µ VIDEO1 IN connector (BNC) To input a composite video signal. ¸ AUDIO IN 1 To input audio signal from external equipment such as a PC in TERMINAL SETTING. NOTE: Do not use Remote IN/OUT, IR CONTROL in OSD menu should be used with the supplied power cord. · Main Power Switch...
User's Manual
Page 12
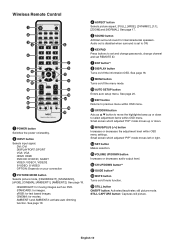
... menu settings. Small screen which adjusted "PIP" mode moves left or right. ƹ SET button Makes selection. ƺ VOLUME UP/DOWN button Increases or decreases audio output level. ƻ CH UP/DOWN button*2 Ƽ GUIDE button*2 ƽ MUTE button Turns on /off the menu mode. µ AUTO SETUP button Enters auto setup menu. DVI: DVI DISPLAYPORT: DPORT VGA: VGA HDMI: HDMI DVD/HD: DVD/HD, SCART VIDEO: VIDEO1, VIDEO2 S-VIDEO: S-VIDEO OPTION: Depends on /standby. · INPUT button Selects input signal. sRGB: for images. STANDARD: for text based...
... menu settings. Small screen which adjusted "PIP" mode moves left or right. ƹ SET button Makes selection. ƺ VOLUME UP/DOWN button Increases or decreases audio output level. ƻ CH UP/DOWN button*2 Ƽ GUIDE button*2 ƽ MUTE button Turns on /off the menu mode. µ AUTO SETUP button Enters auto setup menu. DVI: DVI DISPLAYPORT: DPORT VGA: VGA HDMI: HDMI DVD/HD: DVD/HD, SCART VIDEO: VIDEO1, VIDEO2 S-VIDEO: S-VIDEO OPTION: Depends on /standby. · INPUT button Selects input signal. sRGB: for images. STANDARD: for text based...
User's Manual
Page 14
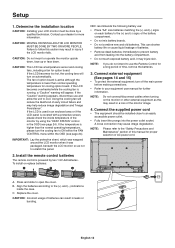
... turning on automatically. Connect the supplied power cord • The equipment should be done by two 1.5V AA batteries. Setup 1. This can result in an enclosed area or if the LCD panel is higher than normal operating temperature for option board. turn on the monitor or other external equipment as not to open the cover. English-12 Determine the installation location CAUTION: Installing your equipment user manual...
... turning on automatically. Connect the supplied power cord • The equipment should be done by two 1.5V AA batteries. Setup 1. This can result in an enclosed area or if the LCD panel is higher than normal operating temperature for option board. turn on the monitor or other external equipment as not to open the cover. English-12 Determine the installation location CAUTION: Installing your equipment user manual...
User's Manual
Page 16
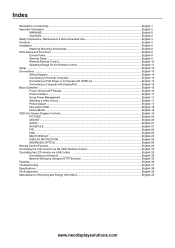
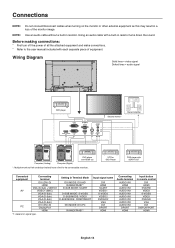
... connectable monitors. Setting in remote control DVI HDMI DVD/HD VIDEO S-VIDEO VIDEO DVD/HD VGA DVI DISPLAYPORT HDMI English-14 Wiring Diagram Solid lines = video signal Dotted lines = audio signal DVD player Second monitor* Stereo Amplifier DVD player with HDMI out Computer (Analog) Computer (Digital) *: Multiple monitors that are daisy-chained have a limit to the user manual included with each separate piece of the monitor image. D-SUB MODE: S-VIDEO D-SUB MODE: VIDEO D-SUB MODE: COMPONENT DVI MODE: DVI-PC RAW/EXPAND*1 Input signal name DVI HDMI...
... connectable monitors. Setting in remote control DVI HDMI DVD/HD VIDEO S-VIDEO VIDEO DVD/HD VGA DVI DISPLAYPORT HDMI English-14 Wiring Diagram Solid lines = video signal Dotted lines = audio signal DVD player Second monitor* Stereo Amplifier DVD player with HDMI out Computer (Analog) Computer (Digital) *: Multiple monitors that are daisy-chained have a limit to the user manual included with each separate piece of the monitor image. D-SUB MODE: S-VIDEO D-SUB MODE: VIDEO D-SUB MODE: COMPONENT DVI MODE: DVI-PC RAW/EXPAND*1 Input signal name DVI HDMI...
User's Manual
Page 23
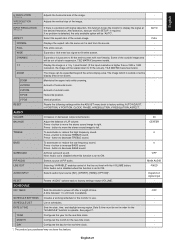
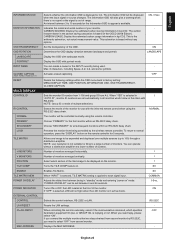
... the stereo sound image to operate. button to increase TREBLE sound. WIDE Expands a 16:9 letter box signal to factory settings except VOLUME. - H ZOOM Amount of schedules. - H POS Horizontal position. Press - MAIN AUDIO LINE OUT Selecting "VARIABLE" enables control of active - FIXED AUDIO INPUT Selects audio input source [IN1], [DPORT], [HDMI], [OPTION]*. Depend on signal input RESET Resets "AUDIO" options back to fill entire screen. - OFF SCHEDULE SETTINGS Creates a working schedule for the real-time clock. - *: The...
... the stereo sound image to operate. button to increase TREBLE sound. WIDE Expands a 16:9 letter box signal to factory settings except VOLUME. - H ZOOM Amount of schedules. - H POS Horizontal position. Press - MAIN AUDIO LINE OUT Selecting "VARIABLE" enables control of active - FIXED AUDIO INPUT Selects audio input source [IN1], [DPORT], [HDMI], [OPTION]*. Depend on signal input RESET Resets "AUDIO" options back to fill entire screen. - OFF SCHEDULE SETTINGS Creates a working schedule for the real-time clock. - *: The...
User's Manual
Page 25
... in "standby" mode and entering "power on the remote controller for the INPUT currently being controlled by RS-232C, you need to normal operation, press the "DISPLAY" button on " mode. Selects the mode of the tiled image to each signal input. Number of monitors arranged vertically. Turns the TILE COMP feature on the monitor. Display the OSD with RS-232C. ON, 3 Sec. - MENU DISPLAY TIME, OSD POSITION, INFORMATION OSD, OSD TRANSPARENCY, CLOSED CAPTION. Select which...
... in "standby" mode and entering "power on the remote controller for the INPUT currently being controlled by RS-232C, you need to normal operation, press the "DISPLAY" button on " mode. Selects the mode of the tiled image to each signal input. Number of monitors arranged vertically. Turns the TILE COMP feature on the monitor. Display the OSD with RS-232C. ON, 3 Sec. - MENU DISPLAY TIME, OSD POSITION, INFORMATION OSD, OSD TRANSPARENCY, CLOSED CAPTION. Select which...
User's Manual
Page 26
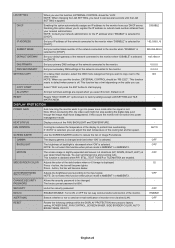
... the network connected to the monitor. 0.0.0.0 SETTING COPY In a daisy chain scenario, select the OSD menu categories that you need to wait several seconds until the LAN SETTING is selected. Disabling this occurs the monitor will become lighter. button, the bar will not switch into power save mode after the signal is off . This function resets to default when power is lost. setting: POWER SAVE, FAN CONTROL, SCREEN SAVER, SIDE BORDER COLOR, AUTO...
... the network connected to the monitor. 0.0.0.0 SETTING COPY In a daisy chain scenario, select the OSD menu categories that you need to wait several seconds until the LAN SETTING is selected. Disabling this occurs the monitor will become lighter. button, the bar will not switch into power save mode after the signal is off . This function resets to default when power is lost. setting: POWER SAVE, FAN CONTROL, SCREEN SAVER, SIDE BORDER COLOR, AUTO...
User's Manual
Page 27
... DVI mode menu. Select "DVI-PC" when PC or other video input ports. EXPAND: Expand image contrast and increase detail in the other port, then the monitor switches the video source input port to progressive. ON Converts interlaced signals to the new found video source automatically. This is connected. COLOR SYSTEM VIDEO1, VIDEO2, S-VIDEO inputs only The selected Color System depends on input signal. AUTO Automatically chooses Color System setting based on the video format of input detection the monitor uses...
... DVI mode menu. Select "DVI-PC" when PC or other video input ports. EXPAND: Expand image contrast and increase detail in the other port, then the monitor switches the video source input port to progressive. ON Converts interlaced signals to the new found video source automatically. This is connected. COLOR SYSTEM VIDEO1, VIDEO2, S-VIDEO inputs only The selected Color System depends on input signal. AUTO Automatically chooses Color System setting based on the video format of input detection the monitor uses...

User's Manual
Page 28
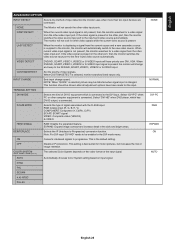
... what can set "OFF". OVER SCAN HDMI, DVD/HD, SCART, VIDEO1, VIDEO2, S-VIDEO inputs only ON OFF OPTION SETTING OPTION POWER AUDIO (not adjustable) INTERNAL PC OFF WARNING AUTO OFF START UP PC FORCE QUIT 120Hz (not adjustable) TOUCH PANEL (not adjustable) RESET FACTORY RESET Some video formats may require different scanning modes in PIP, LANGUAGE, LAN SETTING, TILE MATRIX MEM, OSD ROTATION, CHANGE SECURITY PASSWORD and SECURITY. The whole image is connected to factory setting: INPUT DETECT (except...
... what can set "OFF". OVER SCAN HDMI, DVD/HD, SCART, VIDEO1, VIDEO2, S-VIDEO inputs only ON OFF OPTION SETTING OPTION POWER AUDIO (not adjustable) INTERNAL PC OFF WARNING AUTO OFF START UP PC FORCE QUIT 120Hz (not adjustable) TOUCH PANEL (not adjustable) RESET FACTORY RESET Some video formats may require different scanning modes in PIP, LANGUAGE, LAN SETTING, TILE MATRIX MEM, OSD ROTATION, CHANGE SECURITY PASSWORD and SECURITY. The whole image is connected to factory setting: INPUT DETECT (except...
User's Manual
Page 29
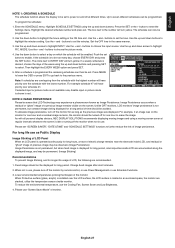
... to go back to enter the Settings menu. Note: If schedules are recommended. 1. If selected input or picture mode is not available now, disable input or picture mode is idle or turning off the monitor by remote control, or use Power Management or use , please turn yellow. As with the lowest number. When not in use as Public Display Image Sticking of LCD Panel When an LCD panel is operated continuously for long hours, a trace...
... to go back to enter the Settings menu. Note: If schedules are recommended. 1. If selected input or picture mode is not available now, disable input or picture mode is idle or turning off the monitor by remote control, or use Power Management or use , please turn yellow. As with the lowest number. When not in use as Public Display Image Sticking of LCD Panel When an LCD panel is operated continuously for long hours, a trace...
User's Manual
Page 30
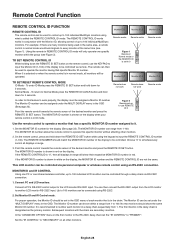
... control all monitors will be controlled via personal computer or wireless remote control using the keypad to input the REMOTE CONTROL ID number (1-100). Connect PC and LCD monitors. Connect a PC's RS-232C control output to every monitor at the same time (see Figure 2). TO SET REMOTE CONTROL ID While holding down the REMOTE ID SET button while using an RS-232C connection. Remote does not work Remote does not work properly, the display must be assigned under the "MULTI DISPLAY" menu in REMOTE CONTROL ID mode...
... control all monitors will be controlled via personal computer or wireless remote control using the keypad to input the REMOTE CONTROL ID number (1-100). Connect PC and LCD monitors. Connect a PC's RS-232C control output to every monitor at the same time (see Figure 2). TO SET REMOTE CONTROL ID While holding down the REMOTE ID SET button while using an RS-232C connection. Remote does not work Remote does not work properly, the display must be assigned under the "MULTI DISPLAY" menu in REMOTE CONTROL ID mode...
User's Manual
Page 38
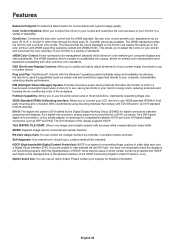
...; operating system facilitates setup and installation by the Digital Display Working Group (DDWG) for digital connections between DVI-D and other DVI-based digital connectors such as on the monitor are unable to use an option board. OSD (On-Screen-Display) Controls: Allow you are exactly the same as DFP and P&D. Plug and Play: The Microsoft® solution with HDCP and might not be indicated. Six-axis color control permits color adjustments...
...; operating system facilitates setup and installation by the Digital Display Working Group (DDWG) for digital connections between DVI-D and other DVI-based digital connectors such as on the monitor are unable to use an option board. OSD (On-Screen-Display) Controls: Allow you are exactly the same as DFP and P&D. Plug and Play: The Microsoft® solution with HDCP and might not be indicated. Six-axis color control permits color adjustments...
User's Manual
Page 39
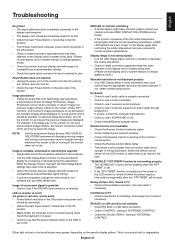
... if audio cable is properly connected. • Check to see if mute is activated. • Check to see if volume is set to ON. Snowy Picture, Poor Sound in the OSD is set at the monitor's remote sensor. • Check the Remote Control Mode status. • The remote control system may appear, depending on monitor is selected. Troubleshooting English No picture • The signal cable should be completely connected to the display card...
... if audio cable is properly connected. • Check to see if mute is activated. • Check to see if volume is set to ON. Snowy Picture, Poor Sound in the OSD is set at the monitor's remote sensor. • Check the Remote Control Mode status. • The remote control system may appear, depending on monitor is selected. Troubleshooting English No picture • The signal cable should be completely connected to the display card...
User's Manual
Page 40
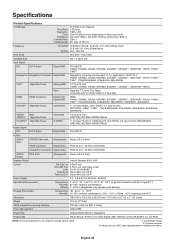
...;F Humidity: 10 - 90% (without condensation) / 90% - 3.5% x (Temp - 40°C) regarding over 40°C Dimension 786.8 (W) x 476.2 (H) x 93.5 (D) mm / 31.0 (W) x 18.7 (H) x 3.7 (D) inches Weight 12.4 kg (27.3 lbs) VESA compatible mounting interface 200 mm x 200 mm (M6, 4 Holes) Power Management VESA DPM Plug & Play VESA DDC2B, DDC/CI, DisplayPort Accessories Setup manual, Power Cord, Video Signal cable, Remote Control, AA Battery x 2, CD-ROM NOTE: Technical specifications are subject to HDCP...
...;F Humidity: 10 - 90% (without condensation) / 90% - 3.5% x (Temp - 40°C) regarding over 40°C Dimension 786.8 (W) x 476.2 (H) x 93.5 (D) mm / 31.0 (W) x 18.7 (H) x 3.7 (D) inches Weight 12.4 kg (27.3 lbs) VESA compatible mounting interface 200 mm x 200 mm (M6, 4 Holes) Power Management VESA DPM Plug & Play VESA DDC2B, DDC/CI, DisplayPort Accessories Setup manual, Power Cord, Video Signal cable, Remote Control, AA Battery x 2, CD-ROM NOTE: Technical specifications are subject to HDCP...


