Specification Brochure
Page 1
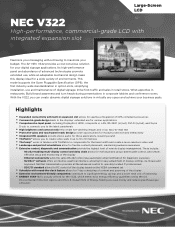
...183; NaViSet™ software offers an intuitive graphical interface, allowing for PC control of digital signage. Large-Screen LCD NEC V322 32" High-performance, commercial-grade LCD with integrated expansion slot Maximize your messaging without having to maximize your digital ...8226; Extensive control, diagnostic and communication provide the highest level of environments. Environmental Protection Agency and the U.S. The 32" NEC V322 provides a cost-conscious solution for a wide variety of remote display management. Department of display settings via mouse and keyboard...
...183; NaViSet™ software offers an intuitive graphical interface, allowing for PC control of digital signage. Large-Screen LCD NEC V322 32" High-performance, commercial-grade LCD with integrated expansion slot Maximize your messaging without having to maximize your digital ...8226; Extensive control, diagnostic and communication provide the highest level of environments. Environmental Protection Agency and the U.S. The 32" NEC V322 provides a cost-conscious solution for a wide variety of remote display management. Department of display settings via mouse and keyboard...
Specification Brochure
Page 2
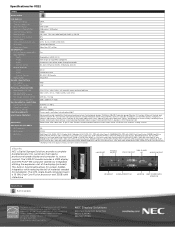
... Mini-Jack, HDMI Audio, DisplayPort Audio RS-232C, Ethernet (RJ45), IR Remote, DDC/CI DVI-D Stereo Mini-Jack RS-232C, IR Remote V322-AVT 88W Specifications for V322 MODEL QUICK SPECS LCD MODULE Panel Technology Viewable Image Size Native Resolution Brightness (Typical/Max) Contrast Ratio (Typical) Viewing Angle Response Time (G-to-G) ...Width (L/R, T/B) Net Dimensions (without stand) VESA Hole Configuration ENVIRONMENTAL CONDITIONS Operating Temperature Operating Humidity Operating Altitude LIMITED WARRANTY ADDITIONAL FEATURES SHIPS WITH OPTIONAL ACCESSORIES NEC Speakers NEC Stands NEC Misc.
... Mini-Jack, HDMI Audio, DisplayPort Audio RS-232C, Ethernet (RJ45), IR Remote, DDC/CI DVI-D Stereo Mini-Jack RS-232C, IR Remote V322-AVT 88W Specifications for V322 MODEL QUICK SPECS LCD MODULE Panel Technology Viewable Image Size Native Resolution Brightness (Typical/Max) Contrast Ratio (Typical) Viewing Angle Response Time (G-to-G) ...Width (L/R, T/B) Net Dimensions (without stand) VESA Hole Configuration ENVIRONMENTAL CONDITIONS Operating Temperature Operating Humidity Operating Altitude LIMITED WARRANTY ADDITIONAL FEATURES SHIPS WITH OPTIONAL ACCESSORIES NEC Speakers NEC Stands NEC Misc.
User's Manual
Page 2
Index Declaration of conformity...English-1 Important Information ...English-2 WARNING...English-2 CAUTION...English-2 Safety Precautions, Maintenance & Recommended Use English-3 Contents ...English-4 Installation ...English-5 Attaching Mounting Accessories ...English-6 Parts Name and Functions...English-8 Control Panel ...English-8 Terminal Panel ...English-9 Wireless Remote Control ...English-10 Operating Range for the Remote Control English-11 Setup ...English-12 Connections ...English-14 Wiring Diagram ...English-14 Connecting a Personal Computer English-15 Connecting a DVD Player or ...
Index Declaration of conformity...English-1 Important Information ...English-2 WARNING...English-2 CAUTION...English-2 Safety Precautions, Maintenance & Recommended Use English-3 Contents ...English-4 Installation ...English-5 Attaching Mounting Accessories ...English-6 Parts Name and Functions...English-8 Control Panel ...English-8 Terminal Panel ...English-9 Wireless Remote Control ...English-10 Operating Range for the Remote Control English-11 Setup ...English-12 Connections ...English-14 Wiring Diagram ...English-14 Connecting a Personal Computer English-15 Connecting a DVD Player or ...
User's Manual
Page 3
... Printing Office, Washington, D.C., 20402, Stock No. 004-000-00345-4. Responsible Party: NEC Display Solutions of FCC Rules. Use the attached specified cables with the MultiSync V322 (V322) colour monitor so as speciÞed in the FCC Rules. If necessary, the user should... Multimedia Interface are trademarks owned by one or more of Product: Display Monitor Equipment Classification: Class B Peripheral Model: MultiSync V322 (V322) We hereby declare that to which can radiate radio frequency energy, and, if not installed and used in the United States and ...
... Printing Office, Washington, D.C., 20402, Stock No. 004-000-00345-4. Responsible Party: NEC Display Solutions of FCC Rules. Use the attached specified cables with the MultiSync V322 (V322) colour monitor so as speciÞed in the FCC Rules. If necessary, the user should... Multimedia Interface are trademarks owned by one or more of Product: Display Monitor Equipment Classification: Class B Peripheral Model: MultiSync V322 (V322) We hereby declare that to which can radiate radio frequency energy, and, if not installed and used in the United States and ...
User's Manual
Page 4
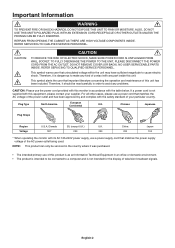
DO NOT REMOVE COVER (OR BACK). NO USER SERVICEABLE PARTS INSIDE. If a power cord is not supplied with this monitor in order to avoid any part inside this unit. Chinese Japanese Plug Shape Region U.S.A./Canada EU (except U.K.) U.K. Therefore, it should be read carefully in accordance with this equipment, please contact your particular country. Plug Type North America European Continental U.K. NOTE: This product can only be connected to cause electric shock. Voltage 120* 230 230 China 220 Japan 100 * When operating the monitor with its AC 125-...
DO NOT REMOVE COVER (OR BACK). NO USER SERVICEABLE PARTS INSIDE. If a power cord is not supplied with this monitor in order to avoid any part inside this unit. Chinese Japanese Plug Shape Region U.S.A./Canada EU (except U.K.) U.K. Therefore, it should be read carefully in accordance with this equipment, please contact your particular country. Plug Type North America European Continental U.K. NOTE: This product can only be connected to cause electric shock. Voltage 120* 230 230 China 220 Japan 100 * When operating the monitor with its AC 125-...
User's Manual
Page 5
...; To clean the cabinet, dampen the cloth with a neutral detergent and water, wipe the cabinet and follow with ANSI/NFPA 70, the National Electrical Code (NEC), in particular Section 820.93, Grounding of Outer Conductive Shield of a Coaxial Cable. • The screen of any liquids into the cabinet or use your...
...; To clean the cabinet, dampen the cloth with a neutral detergent and water, wipe the cabinet and follow with ANSI/NFPA 70, the National Electrical Code (NEC), in particular Section 820.93, Grounding of Outer Conductive Shield of a Coaxial Cable. • The screen of any liquids into the cabinet or use your...

User's Manual
Page 6
English-4 When more than one power cord is to transport or ship the monitor. *1 Type and number of power cords included will depend on the where the LCD monitor is included, please use a power cord that matches the AC voltage of the power outlet and has been approved by and complies with the safety standard of your particular country. Contents Your new MultiSync monitor box* should contain the following: • LCD monitor • Power cord*1 • Video Signal Cable • Wireless Remote Control and AA Batteries • Setup Manual • CD-ROM Video Signal Cable (Mini D-SUB 15...
English-4 When more than one power cord is to transport or ship the monitor. *1 Type and number of power cords included will depend on the where the LCD monitor is included, please use a power cord that matches the AC voltage of the power outlet and has been approved by and complies with the safety standard of your particular country. Contents Your new MultiSync monitor box* should contain the following: • LCD monitor • Power cord*1 • Video Signal Cable • Wireless Remote Control and AA Batteries • Setup Manual • CD-ROM Video Signal Cable (Mini D-SUB 15...
User's Manual
Page 7
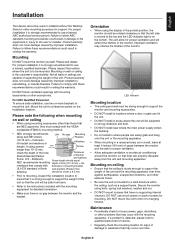
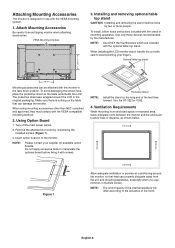
... washers, washer and nut. • DO NOT mount to areas that comply with the VESAcompatible (FDMlv1) mounting method. • NEC strongly recommends using screws longer than those that may shorten the lifetime of mounting bracket UL1678 standard in North and washers. Improper ventilation may...these recommendations could result in voiding the warranty. For proper installation it is the customer's responsibility. Not all walls or ceilings are NEC approved, they must be strong enough to support the monitor and mounting accessories. • DO NOT install in locations where a door...
... washers, washer and nut. • DO NOT mount to areas that comply with the VESAcompatible (FDMlv1) mounting method. • NEC strongly recommends using screws longer than those that may shorten the lifetime of mounting bracket UL1678 standard in North and washers. Improper ventilation may...these recommendations could result in voiding the warranty. For proper installation it is the customer's responsibility. Not all walls or ceilings are NEC approved, they must be strong enough to support the monitor and mounting accessories. • DO NOT install in locations where a door...
User's Manual
Page 8
...LCD in the original packaging. English-6 Use only those instructions included with the VESA mounting system. 1. When using mounting accessories other than NEC compliant and approved, they must be attached with screws. Using Option Board 1. Remove the attached slot cover by unscrewing the installed screws ... heat can properly dissipate away from the unit and mounting apparatus; Do not apply excessive force to avoid pinching your supplier for V322. 4. To install, follow those devices recommended by two or more people. especially when you use with the stand or mounting ...
...LCD in the original packaging. English-6 Use only those instructions included with the VESA mounting system. 1. When using mounting accessories other than NEC compliant and approved, they must be attached with screws. Using Option Board 1. Remove the attached slot cover by unscrewing the installed screws ... heat can properly dissipate away from the unit and mounting apparatus; Do not apply excessive force to avoid pinching your supplier for V322. 4. To install, follow those devices recommended by two or more people. especially when you use with the stand or mounting ...
User's Manual
Page 9
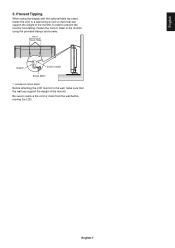
Before attaching the LCD monitor to remove the cord or chain from falling. English 5. Be sure to the wall, make sure that can support the weight of the monitor in option stand. English-7 Prevent Tipping When using the display with the optional table top stand fasten the LCD to a wall using the provided clamps and screws. 200 mm Screw Holes Clamp* Cord or chain Screw (M4)* *: included in order to the monitor using a cord or chain that the wall can support the weight of the monitor. Fasten the cord or chain to prevent the monitor from the wall before moving the LCD...
Before attaching the LCD monitor to remove the cord or chain from falling. English 5. Be sure to the wall, make sure that can support the weight of the monitor in option stand. English-7 Prevent Tipping When using the display with the optional table top stand fasten the LCD to a wall using the provided clamps and screws. 200 mm Screw Holes Clamp* Cord or chain Screw (M4)* *: included in order to the monitor using a cord or chain that the wall can support the weight of the monitor. Fasten the cord or chain to prevent the monitor from the wall before moving the LCD...
User's Manual
Page 10
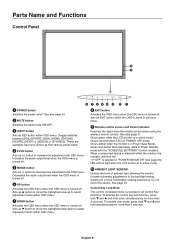
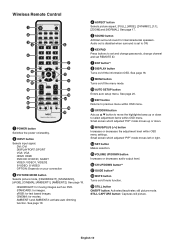
These are available input only, shown as their factory preset name. ¿ PLUS button Acts as (-) button to increase the adjustment with the "SCHEDULE SETTINGS" function enabled. Glows red when the LCD is turned-off . ´ MINUS button Acts as (+) button to decrease the adjustment with OSD menu. Green and Amber blink alternately while in Power Save Mode. Control Key Lock Mode This control completely locks out access to select adjustment items within the monitor, the indicator will not light when the LCD monitor is turned off . See also page 16. · MUTE button Switches ...
These are available input only, shown as their factory preset name. ¿ PLUS button Acts as (-) button to increase the adjustment with the "SCHEDULE SETTINGS" function enabled. Glows red when the LCD is turned-off . ´ MINUS button Acts as (+) button to decrease the adjustment with OSD menu. Green and Amber blink alternately while in Power Save Mode. Control Key Lock Mode This control completely locks out access to select adjustment items within the monitor, the indicator will not light when the LCD monitor is turned off . See also page 16. · MUTE button Switches ...
User's Manual
Page 11
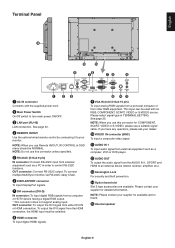
NOTE: When you use Remote IN/OUT, IR CONTROL in OSD menu should be used with the supplied power cord. · Main Power Switch On/Off switch to your supplier for available option board. ƺ Internal speaker English-9 OUT connector: Connect RS-232C output. This input can be NORMAL. NOTE: Please contact your monitor. See page 32. ¿ REMOTE IN/OUT Use the optional wired remote control by connecting it to turn main power ON/OFF. » LAN port (RJ-45) LAN connection. Please contact your dealer. µ VIDEO1 IN connector (BNC) To input a composite video signal. ¸...
NOTE: When you use Remote IN/OUT, IR CONTROL in OSD menu should be used with the supplied power cord. · Main Power Switch On/Off switch to your supplier for available option board. ƺ Internal speaker English-9 OUT connector: Connect RS-232C output. This input can be NORMAL. NOTE: Please contact your monitor. See page 32. ¿ REMOTE IN/OUT Use the optional wired remote control by connecting it to turn main power ON/OFF. » LAN port (RJ-45) LAN connection. Please contact your dealer. µ VIDEO1 IN connector (BNC) To input a composite video signal. ¸...
User's Manual
Page 12
See page 18. See page 18. ¾ MENU button Turns on /off mute function. ƾ STILL button ON/OFF button: Activates/deactivates still picture mode. Small screen which adjusted "PIP" mode moves left or right. ƹ SET button Makes selection. ƺ VOLUME UP/DOWN button Increases or decreases audio output level. ƻ CH UP/DOWN button*2 Ƽ GUIDE button*2 ƽ MUTE button Turns on /off the menu mode. µ AUTO SETUP button Enters auto setup menu. STILL CAPTURE button: Captures still picture. See page 20. ¸ EXIT button Returns to previous menu ...
See page 18. See page 18. ¾ MENU button Turns on /off mute function. ƾ STILL button ON/OFF button: Activates/deactivates still picture mode. Small screen which adjusted "PIP" mode moves left or right. ƹ SET button Makes selection. ƺ VOLUME UP/DOWN button Increases or decreases audio output level. ƻ CH UP/DOWN button*2 Ƽ GUIDE button*2 ƽ MUTE button Turns on /off the menu mode. µ AUTO SETUP button Enters auto setup menu. STILL CAPTURE button: Captures still picture. See page 20. ¸ EXIT button Returns to previous menu ...
User's Manual
Page 13
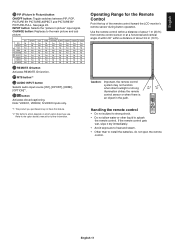
Main picture English ƿ PIP (Picture In Picture) button ON/OFF button: Toggle switches between PIP, POP, PICTURE BY PICTURE-ASPECT and PICTURE BY PICTURE-FULL. Note: VIDEO1, VIDEO2, S-VIDEO inputs only. *1: The product you use. Operating Range for further information. If the remote control gets wet, wipe it dry immediately. • Avoid exposure to heat and steam. • Other than to the main picture and sub picture. Refer to splash the remote control. MTS button*2 AUDIO INPUT button Selects audio input source [IN1], [DPORT], [HDMI], [OPTION]*1. Caution:...
Main picture English ƿ PIP (Picture In Picture) button ON/OFF button: Toggle switches between PIP, POP, PICTURE BY PICTURE-ASPECT and PICTURE BY PICTURE-FULL. Note: VIDEO1, VIDEO2, S-VIDEO inputs only. *1: The product you use. Operating Range for further information. If the remote control gets wet, wipe it dry immediately. • Avoid exposure to heat and steam. • Other than to the main picture and sub picture. Refer to splash the remote control. MTS button*2 AUDIO INPUT button Selects audio input source [IN1], [DPORT], [HDMI], [OPTION]*1. Caution:...
User's Manual
Page 14
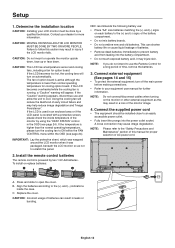
.... 3. Using the cooling fan will appear. If the temperature is covered with a protective screen, please check the inside the case. To install or replace batteries: NEC recommends the following battery use: • Place "AA" size batteries matching the (+) and (-) signs on each battery to use and allow the unit to an...
.... 3. Using the cooling fan will appear. If the temperature is covered with a protective screen, please check the inside the case. To install or replace batteries: NEC recommends the following battery use: • Place "AA" size batteries matching the (+) and (-) signs on each battery to use and allow the unit to an...
User's Manual
Page 15
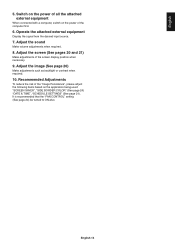
Adjust the sound Make volume adjustments when required. 8. Adjust the screen (See pages 20 and 21) Make adjustments of the "Image Persistence", please adjust the following items based on the power of the computer first. 6. It is recommended that the "FAN CONTROL" setting (See page 24) be turned to ON also. English-13 Recommended Adjustments To reduce the risk of the screen display position when necessary. 9. Switch on the power of all the attached external equipment When connected with a computer, switch on the application being used: "SCREEN SAVER", "SIDE BORDER COLOR"...
Adjust the sound Make volume adjustments when required. 8. Adjust the screen (See pages 20 and 21) Make adjustments of the "Image Persistence", please adjust the following items based on the power of the computer first. 6. It is recommended that the "FAN CONTROL" setting (See page 24) be turned to ON also. English-13 Recommended Adjustments To reduce the risk of the screen display position when necessary. 9. Switch on the power of all the attached external equipment When connected with a computer, switch on the application being used: "SCREEN SAVER", "SIDE BORDER COLOR"...
User's Manual
Page 16
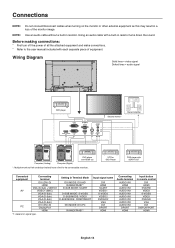
NOTE: Use an audio cable without a built-in resistor turns down the sound. Wiring Diagram Solid lines = video signal Dotted lines = audio signal DVD player Second monitor* Stereo Amplifier DVD player with SCART OUT Connected equipment Connecting terminal DVI (DVI-D) HDMI VGA (D-Sub) +VIDEO1 AV VIDEO1 (BNC) VGA (D-Sub) VGA (D-Sub) VGA (D-Sub) VGA (D-Sub) PC DVI (DVI-D) DisplayPort HDMI *1: depend on the monitor or other external equipment as this may result in Terminal Mode DVI MODE: DVI-HD RAW/EXPAND*1 D-SUB MODE: SCART - Using an audio cable with each separate ...
NOTE: Use an audio cable without a built-in resistor turns down the sound. Wiring Diagram Solid lines = video signal Dotted lines = audio signal DVD player Second monitor* Stereo Amplifier DVD player with SCART OUT Connected equipment Connecting terminal DVI (DVI-D) HDMI VGA (D-Sub) +VIDEO1 AV VIDEO1 (BNC) VGA (D-Sub) VGA (D-Sub) VGA (D-Sub) VGA (D-Sub) PC DVI (DVI-D) DisplayPort HDMI *1: depend on the monitor or other external equipment as this may result in Terminal Mode DVI MODE: DVI-HD RAW/EXPAND*1 D-SUB MODE: SCART - Using an audio cable with each separate ...
User's Manual
Page 17
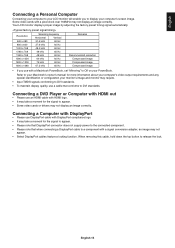
Resolution 640 x 480 800 x 600 1024 x 768 1280 x 768 1360 x 768 1280 x 1024 1600 x 1200 1920 x 1080 Scanning frequency Horizontal Vertical 31.5 kHz 60 Hz 37.9 kHz 60 Hz 48.4 kHz 60 Hz 48 kHz 60 Hz 48 kHz 60 Hz 64 kHz 60 Hz 75 kHz 60 Hz 67.5 kHz 60 Hz Remarks Recommended resolution Compressed image Compressed image Compressed image • If you to display your computer's screen image. English Connecting a Personal Computer Connecting your computer to your LCD monitor will enable you use with a Macintosh PowerBook, set "Mirroring" to Off on your PowerBook. ...
Resolution 640 x 480 800 x 600 1024 x 768 1280 x 768 1360 x 768 1280 x 1024 1600 x 1200 1920 x 1080 Scanning frequency Horizontal Vertical 31.5 kHz 60 Hz 37.9 kHz 60 Hz 48.4 kHz 60 Hz 48 kHz 60 Hz 48 kHz 60 Hz 64 kHz 60 Hz 75 kHz 60 Hz 67.5 kHz 60 Hz Remarks Recommended resolution Compressed image Compressed image Compressed image • If you to display your computer's screen image. English Connecting a Personal Computer Connecting your computer to your LCD monitor will enable you use with a Macintosh PowerBook, set "Mirroring" to Off on your PowerBook. ...
User's Manual
Page 18
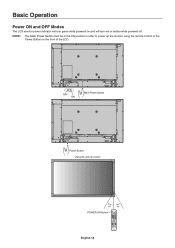
OFF ON Main Power Switch Power Button Using the remote control POWER ON Button English-16 Basic Operation Power ON and OFF Modes The LCD monitor power indicator will turn red or amber while powered off. NOTE: The Main Power Switch must be in the ON position in order to power up the monitor using the remote control or the Power Button on and will turn green while powered on the front of the LCD.
OFF ON Main Power Switch Power Button Using the remote control POWER ON Button English-16 Basic Operation Power ON and OFF Modes The LCD monitor power indicator will turn red or amber while powered off. NOTE: The Main Power Switch must be in the ON position in order to power up the monitor using the remote control or the Power Button on and will turn green while powered on the front of the LCD.
User's Manual
Page 19
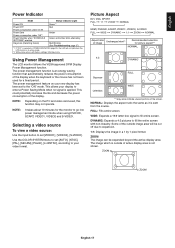
The power management feature on the PC and video card used for a fixed period. This could potentially increase the life and decrease the power consumption of the screen. DYNAMIC: Expands a 4:3 pictures to expansion. 1:1: Displays the image in a 1 by 1 pixel format. Some of the outside of the display when the keyboard or the mouse has not been used , this function may not operate. ZOOM The image can be cut off due to fill the entire screen with factory settings, VGA input only. This allows your new display has been set to your video format. NOTE: It ...
The power management feature on the PC and video card used for a fixed period. This could potentially increase the life and decrease the power consumption of the screen. DYNAMIC: Expands a 4:3 pictures to expansion. 1:1: Displays the image in a 1 by 1 pixel format. Some of the outside of the display when the keyboard or the mouse has not been used , this function may not operate. ZOOM The image can be cut off due to fill the entire screen with factory settings, VGA input only. This allows your new display has been set to your video format. NOTE: It ...