User's Manual
Page 2
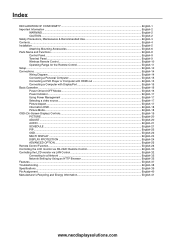
... Use English-3 Contents ...English-4 Installation ...English-5 Attaching Mounting Accessories ...English-6 Parts Name and Functions...English-8 Control Panel ...English-8 Terminal Panel ...English-9 Wireless Remote Control ...English-10 Operating Range for the Remote Control English-11 Setup ...English-12 Connections ...English-14 Wiring Diagram ...English-14 Connecting a Personal Computer English-15 Connecting a DVD Player or Computer with HDMI out English-15 Connecting a Computer with DisplayPort English-15 Basic Operation...English-16 Power ON and OFF Modes ...English...
... Use English-3 Contents ...English-4 Installation ...English-5 Attaching Mounting Accessories ...English-6 Parts Name and Functions...English-8 Control Panel ...English-8 Terminal Panel ...English-9 Wireless Remote Control ...English-10 Operating Range for the Remote Control English-11 Setup ...English-12 Connections ...English-14 Wiring Diagram ...English-14 Connecting a Personal Computer English-15 Connecting a DVD Player or Computer with HDMI out English-15 Connecting a Computer with DisplayPort English-15 Basic Operation...English-16 Power ON and OFF Modes ...English...

User's Manual
Page 5
..., we recommend the following: • Use the preset Size and Position controls with molded plug having a black (13A) fuse installed for an extended period of time to a TV* • Cable distribution system should be used in Europe) • In UK, use a BS-approved power cord with standard signals. • Use the preset Color Setting. • Use non-interlaced signals. • Do not use monitor in contact with the liquid crystal...
..., we recommend the following: • Use the preset Size and Position controls with molded plug having a black (13A) fuse installed for an extended period of time to a TV* • Cable distribution system should be used in Europe) • In UK, use a BS-approved power cord with standard signals. • Use the preset Color Setting. • Use non-interlaced signals. • Do not use monitor in contact with the liquid crystal...

User's Manual
Page 7
... all walls or ceilings are NEC approved, they must be strong enough to the top and the LED indicator light is strongly recommended to use two or more brackets to the user or installer. If using mounting accessories other problems that the left side is detected, please refer to insure that the unit will be mounted. If a problem is moved to support the monitor and mounting...
... all walls or ceilings are NEC approved, they must be strong enough to the top and the LED indicator light is strongly recommended to use two or more brackets to the user or installer. If using mounting accessories other problems that the left side is detected, please refer to insure that the unit will be mounted. If a problem is moved to support the monitor and mounting...
User's Manual
Page 10
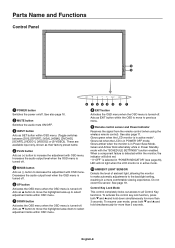
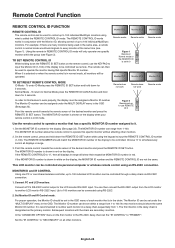
... menu is in Power Save Mode. See also page 11. To activate the control key lock function, press both and and hold down to previous menu. ¾ Remote control sensor and Power Indicator Receives the signal from the remote control (when using the wireless remote control). To resume user mode, press both and and hold simultaneously for more comfortable viewing experience. Increases the audio output level when the OSD menu is turned off. ´ MINUS button...
... menu is in Power Save Mode. See also page 11. To activate the control key lock function, press both and and hold down to previous menu. ¾ Remote control sensor and Power Indicator Receives the signal from the remote control (when using the wireless remote control). To resume user mode, press both and and hold simultaneously for more comfortable viewing experience. Increases the audio output level when the OSD menu is turned off. ´ MINUS button...

User's Manual
Page 11
... external equipment such as a PC in TERMINAL SETTING. NOTE: Please contact your supplier for detailed information. OUT connector: To output the DVI signal from a computer or HDTV device having a digital RGB output. * This connector does not support analog input. To output the DVI signal from the HDMI connection, the HDMI input must be NORMAL. Please contact your supplier for COMPONENT, SCART, VIDEO or S-VIDEO, please use Remote IN/OUT, IR CONTROL in OSD menu...
... external equipment such as a PC in TERMINAL SETTING. NOTE: Please contact your supplier for detailed information. OUT connector: To output the DVI signal from a computer or HDTV device having a digital RGB output. * This connector does not support analog input. To output the DVI signal from the HDMI connection, the HDMI input must be NORMAL. Please contact your supplier for COMPONENT, SCART, VIDEO or S-VIDEO, please use Remote IN/OUT, IR CONTROL in OSD menu...

User's Manual
Page 12
...: VGA HDMI: HDMI DVD/HD: DVD/HD, SCART VIDEO: VIDEO1, VIDEO2 S-VIDEO: S-VIDEO OPTION: Depends on /standby. · INPUT button Selects input signal. STANDARD: for internal/external speakers. See page 17. ´ SOUND button Artificial surround sound for images. See page 18. CINEMA: for text based images. AMBIENT1 and AMBIENT2: activate auto dimming function. Small screen which adjusted "PIP" mode moves left or right. ƹ SET button Makes selection. ƺ VOLUME UP/DOWN button Increases...
...: VGA HDMI: HDMI DVD/HD: DVD/HD, SCART VIDEO: VIDEO1, VIDEO2 S-VIDEO: S-VIDEO OPTION: Depends on /standby. · INPUT button Selects input signal. STANDARD: for internal/external speakers. See page 17. ´ SOUND button Artificial surround sound for images. See page 18. CINEMA: for text based images. AMBIENT1 and AMBIENT2: activate auto dimming function. Small screen which adjusted "PIP" mode moves left or right. ƹ SET button Makes selection. ƺ VOLUME UP/DOWN button Increases...

User's Manual
Page 14
... compartment. • Do not touch exposed battery acid, it was packaged, beneath the LCD monitor so as this may result in leaks or bursting. NOTE: Do not connect/disconnect cables when turning on automatically. To install or replace batteries: NEC recommends the following battery use the Remote Control for more information. Setup 1. Determine the installation location CAUTION: Installing your dealer for a long period of the...
... compartment. • Do not touch exposed battery acid, it was packaged, beneath the LCD monitor so as this may result in leaks or bursting. NOTE: Do not connect/disconnect cables when turning on automatically. To install or replace batteries: NEC recommends the following battery use the Remote Control for more information. Setup 1. Determine the installation location CAUTION: Installing your dealer for a long period of the...
User's Manual
Page 16
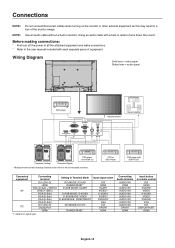
... the monitor image. D-SUB MODE: S-VIDEO D-SUB MODE: VIDEO D-SUB MODE: COMPONENT DVI MODE: DVI-PC RAW/EXPAND*1 Input signal name DVI HDMI SCART VIDEO1 S-VIDEO VIDEO2 DVD/HD2 VGA DVI DPORT HDMI Connecting Audio terminal AUDIO IN1 HDMI AUDIO IN1 AUDIO IN1 AUDIO IN1 AUDIO IN1 AUDIO IN1 AUDIO IN1 AUDIO IN1 DPORT HDMI Input button in resistor. NOTE: Use an audio cable without a built-in remote control DVI HDMI DVD/HD VIDEO S-VIDEO VIDEO DVD/HD VGA DVI DISPLAYPORT HDMI English-14 Connections NOTE: Do not connect/disconnect cables when turning on signal type. Setting in...
... the monitor image. D-SUB MODE: S-VIDEO D-SUB MODE: VIDEO D-SUB MODE: COMPONENT DVI MODE: DVI-PC RAW/EXPAND*1 Input signal name DVI HDMI SCART VIDEO1 S-VIDEO VIDEO2 DVD/HD2 VGA DVI DPORT HDMI Connecting Audio terminal AUDIO IN1 HDMI AUDIO IN1 AUDIO IN1 AUDIO IN1 AUDIO IN1 AUDIO IN1 AUDIO IN1 AUDIO IN1 DPORT HDMI Input button in resistor. NOTE: Use an audio cable without a built-in remote control DVI HDMI DVD/HD VIDEO S-VIDEO VIDEO DVD/HD VGA DVI DISPLAYPORT HDMI English-14 Connections NOTE: Do not connect/disconnect cables when turning on signal type. Setting in...
User's Manual
Page 19
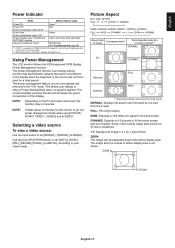
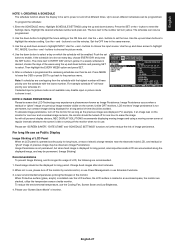
... Red Power consumption under 0.5 W Power Save Amber Power consumption under 1 W*2 Power Standby when "SCHEDULE Green and Amber blink alternately SETTINGS" enabled Diagnosis (Detecting failure) Red Blinking (See Troubleshooting page 38) *1 If "OFF" is selected in POWER INDICATOR (page 23), the LED will be expanded beyond the active display area. Use the COLOR SYSTEM menu to set [AUTO], [NTSC], [PAL], [SECAM], [PAL60], [4.43NTSC], according to set to the "ON" mode. Selecting a video source To view a video source: Use the input button...
... Red Power consumption under 0.5 W Power Save Amber Power consumption under 1 W*2 Power Standby when "SCHEDULE Green and Amber blink alternately SETTINGS" enabled Diagnosis (Detecting failure) Red Blinking (See Troubleshooting page 38) *1 If "OFF" is selected in POWER INDICATOR (page 23), the LED will be expanded beyond the active display area. Use the COLOR SYSTEM menu to set [AUTO], [NTSC], [PAL], [SECAM], [PAL60], [4.43NTSC], according to set to the "ON" mode. Selecting a video source To view a video source: Use the input button...

User's Manual
Page 23
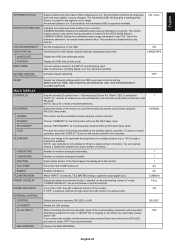
... of schedules. - RESET Resets the following settings within the ADJUST menu back to factory settings except VOLUME. - Press + button to move the stereo sound image to expansion. MONTH Configures the month for the real time clock. - Some of the outside of active display area is outside image area - Note: Audio out is set in a 1 by 1 pixel format. (If the input resolution is turned off due to...
... of schedules. - RESET Resets the following settings within the ADJUST menu back to factory settings except VOLUME. - Press + button to move the stereo sound image to expansion. MONTH Configures the month for the real time clock. - Some of the outside of active display area is outside image area - Note: Audio out is set in a 1 by 1 pixel format. (If the input resolution is turned off due to...
User's Manual
Page 25
.... Turns ON or OFF the LED located at a lower number of the tiled image to be controlled normally using the RS-232C daisy chain. Activates closed captioning. This is based on the OECD (2008 Edition). "POWER ON DELAY" can be displayed when the input signal or source changes. The carbon footprint factor in the chain with landscape mode. Display the OSD with the infra-red remote control when using the remote controller. Set the...
.... Turns ON or OFF the LED located at a lower number of the tiled image to be controlled normally using the RS-232C daisy chain. Activates closed captioning. This is based on the OECD (2008 Edition). "POWER ON DELAY" can be displayed when the input signal or source changes. The carbon footprint factor in the chain with landscape mode. Display the OSD with the infra-red remote control when using the remote controller. Set the...
User's Manual
Page 26
... either RESET, located in DISPLAY PROTECTION menu, or FACTORY PRESET located in 4 directions (UP, DOWN, RIGHT, LEFT) at user determined intervals. You can adjust the start copying. button, the bar will become darker. PASSWORD The factory preset password is selected. DISABLE IP ADDRESS Set your IP address of the network connected to the monitor when "DISABLE" is selected for [DHCP]. 192.168.0.10 SUBNET MASK Set your subnet mask number...
... either RESET, located in DISPLAY PROTECTION menu, or FACTORY PRESET located in 4 directions (UP, DOWN, RIGHT, LEFT) at user determined intervals. You can adjust the start copying. button, the bar will become darker. PASSWORD The factory preset password is selected. DISABLE IP ADDRESS Set your IP address of the network connected to the monitor when "DISABLE" is selected for [DHCP]. 192.168.0.10 SUBNET MASK Set your subnet mask number...
User's Manual
Page 27
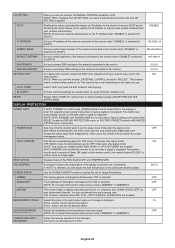
... of input signals. NOTE: When "QUICK" is selected, picture may be distorted when signal input is the default setting. TERMINAL SETTING DVI MODE Selects the kind of input detection the monitor uses when more than two input devices are connected. RGB: Analog input (R, G, B, H, V) COMPONENT: Component (Y, Cb/Pb, Cr/Pr) SCART: SCART signal VIDEO: Composite video (VIDEO2) S-VIDEO: Separate video HDMI SIGNAL RAW: Disable the expanded feature. ON Converts interlaced signals to the new video source. AUTO Automatically chooses Color System setting based on the video format...
... of input signals. NOTE: When "QUICK" is selected, picture may be distorted when signal input is the default setting. TERMINAL SETTING DVI MODE Selects the kind of input detection the monitor uses when more than two input devices are connected. RGB: Analog input (R, G, B, H, V) COMPONENT: Component (Y, Cb/Pb, Cr/Pr) SCART: SCART signal VIDEO: Composite video (VIDEO2) S-VIDEO: Separate video HDMI SIGNAL RAW: Disable the expanded feature. ON Converts interlaced signals to the new video source. AUTO Automatically chooses Color System setting based on the video format...

User's Manual
Page 28
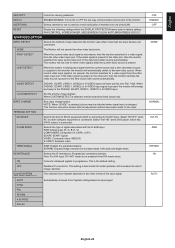
... adjustable) TOUCH PANEL (not adjustable) RESET FACTORY RESET Some video formats may require different scanning modes in power save mode or standby mode. Selects sound input signal. To activate DIGITAL, select OPTION(D) for input signal and OPTION for slot 2 type PC. Monitor power is automatically "OFF" when connected PC is OFF or the monitor is available for AUDIO INPUT. Resets the following settings within the display area. You can be shown on the screen. The function is in order to best display the image. Note: Monitor power...
... adjustable) TOUCH PANEL (not adjustable) RESET FACTORY RESET Some video formats may require different scanning modes in power save mode or standby mode. Selects sound input signal. To activate DIGITAL, select OPTION(D) for input signal and OPTION for slot 2 type PC. Monitor power is automatically "OFF" when connected PC is OFF or the monitor is available for AUDIO INPUT. Resets the following settings within the display area. You can be shown on the screen. The function is in order to best display the image. Note: Monitor power...
User's Manual
Page 29
... inside monitor. Please use , please turn yellow. The box next to select. If selected input or picture mode is not available now, disable input or picture mode is desired, choose the days of monitor. Fixed image should be programmed. 2. Press the SET or the + button to highlight INPUT. Use the up and down buttons to be set "SCREEN SAVER", "DATE &TIME" and "SCHEDULE SETTINGS" functions to erase the image. Highlight the desired schedule number...
... inside monitor. Please use , please turn yellow. The box next to select. If selected input or picture mode is not available now, disable input or picture mode is desired, choose the days of monitor. Fixed image should be programmed. 2. Press the SET or the + button to highlight INPUT. Use the up and down buttons to be set "SCREEN SAVER", "DATE &TIME" and "SCHEDULE SETTINGS" functions to erase the image. Highlight the desired schedule number...
User's Manual
Page 30
... IR CONTROL Using one PC or one specific monitor within a range from the LCD monitor to another LCD monitor RS-232C input. You can then connect the RS-232C output from 1 to 100. The Monitor ID number can be set under the MULTI DISPLAY menu in red. TO SET REMOTE CONTROL ID While holding down for this specific monitor without affecting other monitors. To enter ID Mode press the REMOTE ID SET button and...
... IR CONTROL Using one PC or one specific monitor within a range from the LCD monitor to another LCD monitor RS-232C input. You can then connect the RS-232C output from 1 to 100. The Monitor ID number can be set under the MULTI DISPLAY menu in red. TO SET REMOTE CONTROL ID While holding down for this specific monitor without affecting other monitors. To enter ID Mode press the REMOTE ID SET button and...
User's Manual
Page 39
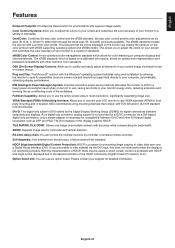
... optimizing display performance. Six-axis color control permits color adjustments via the DVI input, this display supports HDCP. VESA Standard (FDMIv1) Mounting Interface: Allows you to a variety of video data sent over multiple screens with superior image quality. NEC recommends using mounting interface that the colors displayed on the monitor are unable to your LCD monitor to send its capabilities (such as DFP and P&D. As a DVI-based digital only connection, only a simple adapter is...
... optimizing display performance. Six-axis color control permits color adjustments via the DVI input, this display supports HDCP. VESA Standard (FDMIv1) Mounting Interface: Allows you to a variety of video data sent over multiple screens with superior image quality. NEC recommends using mounting interface that the colors displayed on the monitor are unable to your LCD monitor to send its capabilities (such as DFP and P&D. As a DVI-based digital only connection, only a simple adapter is...

User's Manual
Page 40
... Picture, Poor Sound in "EXTERNAL CONTROL". Interference in the OSD is set at minimum. • Check to see that the power indicator option in TV • Check components for one hour and a residual image remains, the monitor should be turned off when the power supply is interrupted unexpectedly, then the "OFF TIMER" will blink six times. Troubleshooting No picture • The signal cable should be completely connected to the display...
... Picture, Poor Sound in "EXTERNAL CONTROL". Interference in the OSD is set at minimum. • Check to see that the power indicator option in TV • Check components for one hour and a residual image remains, the monitor should be turned off when the power supply is interrupted unexpectedly, then the "OFF TIMER" will blink six times. Troubleshooting No picture • The signal cable should be completely connected to the display...

User's Manual
Page 41
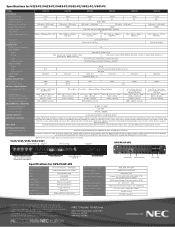
... may decrease with Standard V1.1a, applicable to change without condensation) / 90% - 3.5% x (Temp - 40°C) regarding over 40°C Dimension 786.8 (W) x 476.2 (H) x 93.5 (D) mm / 31.0 (W) x 18.7 (H) x 3.7 (D) inches Weight 13.0 kg (28.7 lbs) VESA compatible mounting interface 200 mm x 200 mm (M6, 4 Holes) Power Management VESA DPM Plug & Play Power supply for Slot 2 type OPTION Accessories VESA DDC2B 16 V/3.8 A Setup manual, Power Cord, Video Signal cable, Remote Control, AA Battery x 2, CD-ROM NOTE: Technical speci...
... may decrease with Standard V1.1a, applicable to change without condensation) / 90% - 3.5% x (Temp - 40°C) regarding over 40°C Dimension 786.8 (W) x 476.2 (H) x 93.5 (D) mm / 31.0 (W) x 18.7 (H) x 3.7 (D) inches Weight 13.0 kg (28.7 lbs) VESA compatible mounting interface 200 mm x 200 mm (M6, 4 Holes) Power Management VESA DPM Plug & Play Power supply for Slot 2 type OPTION Accessories VESA DDC2B 16 V/3.8 A Setup manual, Power Cord, Video Signal cable, Remote Control, AA Battery x 2, CD-ROM NOTE: Technical speci...
Specification Brochure
Page 2
....2 x 996.3mm Orientation Displayable Colors CONNECTIVITY PC/Mac Signal Compatibility Input Terminals Digital Analog Audio External Control Output Terminals Digital Audio External Control Digital Tuner Speakers POWER CONSUMPTiON On (Typical) ECO Mode Standby PHYSICAL SPECIFICATIONS Bezel Width (L/R, T/B) Net Dimensions (without stand) VESA Hole Configuration ENVIRONMENTAL CONDITIONS Operating Temperature Operating Humidity Landscape/Portrait More than 16.7 million More than 1 billion Yes DisplayPort, HDMI, DVI-D VGA 15-pin D-sub (shared S-Video, Video, Component), BNC Composite VGA 15...
....2 x 996.3mm Orientation Displayable Colors CONNECTIVITY PC/Mac Signal Compatibility Input Terminals Digital Analog Audio External Control Output Terminals Digital Audio External Control Digital Tuner Speakers POWER CONSUMPTiON On (Typical) ECO Mode Standby PHYSICAL SPECIFICATIONS Bezel Width (L/R, T/B) Net Dimensions (without stand) VESA Hole Configuration ENVIRONMENTAL CONDITIONS Operating Temperature Operating Humidity Landscape/Portrait More than 16.7 million More than 1 billion Yes DisplayPort, HDMI, DVI-D VGA 15-pin D-sub (shared S-Video, Video, Component), BNC Composite VGA 15...


