Users Manual
Page 2
... Use English-3 Contents ...English-4 Installation ...English-5 Attaching Mounting Accessories ...English-6 Parts Name and Functions...English-8 Control Panel ...English-8 Terminal Panel ...English-9 Wireless Remote Control ...English-11 Operating Range for the Remote Control English-12 Setup ...English-13 Connections ...English-15 Wiring Diagram ...English-15 Connecting a Personal Computer English-16 Connecting a DVD Player or Computer with HDMI out English-16 Connecting a Computer with DisplayPort English-16 Basic Operation...English-17 Power ON and OFF Modes ...English...
... Use English-3 Contents ...English-4 Installation ...English-5 Attaching Mounting Accessories ...English-6 Parts Name and Functions...English-8 Control Panel ...English-8 Terminal Panel ...English-9 Wireless Remote Control ...English-11 Operating Range for the Remote Control English-12 Setup ...English-13 Connections ...English-15 Wiring Diagram ...English-15 Connecting a Personal Computer English-16 Connecting a DVD Player or Computer with HDMI out English-16 Connecting a Computer with DisplayPort English-16 Basic Operation...English-17 Power ON and OFF Modes ...English...

Users Manual
Page 5
... sharpness controls to enhance readability. • Avoid displaying fixed patterns on an object at a 90° angle to windows and other light sources to qualified service personnel under the following operating instructions. Safety Precautions, Maintenance & Recommended Use English FOR OPTIMUM PERFORMANCE, PLEASE NOTE THE FOLLOWING WHEN SETTING UP AND USING THE MULTI-FUNCTION MONITOR: Immediately unplug your monitor from the power supply...
... sharpness controls to enhance readability. • Avoid displaying fixed patterns on an object at a 90° angle to windows and other light sources to qualified service personnel under the following operating instructions. Safety Precautions, Maintenance & Recommended Use English FOR OPTIMUM PERFORMANCE, PLEASE NOTE THE FOLLOWING WHEN SETTING UP AND USING THE MULTI-FUNCTION MONITOR: Immediately unplug your monitor from the power supply...
Users Manual
Page 6
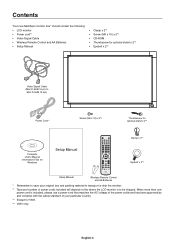
... new MultiSync monitor box* should contain the following: • LCD monitor • Power cord*1 • Video Signal Cable • Wireless Remote Control and AA Batteries • Setup Manual • Clamp x 2*2 • Screw (M4 x 10) x 2*2 • CD-ROM • Thumbscrew for optional stand x 2*2 • Eyebolt x 2*3 Video Signal Cable (Mini D-SUB 15 pin to Mini D-SUB 15 pin) Power Cord*1 Screw (M4 x 10) x 2*2 Thumbscrew for optional stand x 2*2 Complete User's Manual Information Files for Windows Setup Manual Clamp x 2*2 Eyebolt x 2*3 Setup Manual Wireless Remote Control and...
... new MultiSync monitor box* should contain the following: • LCD monitor • Power cord*1 • Video Signal Cable • Wireless Remote Control and AA Batteries • Setup Manual • Clamp x 2*2 • Screw (M4 x 10) x 2*2 • CD-ROM • Thumbscrew for optional stand x 2*2 • Eyebolt x 2*3 Video Signal Cable (Mini D-SUB 15 pin to Mini D-SUB 15 pin) Power Cord*1 Screw (M4 x 10) x 2*2 Thumbscrew for optional stand x 2*2 Complete User's Manual Information Files for Windows Setup Manual Clamp x 2*2 Eyebolt x 2*3 Setup Manual Wireless Remote Control and...
Users Manual
Page 7
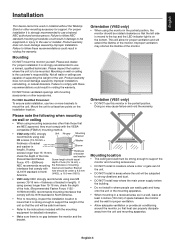
... (V462 only) • When using screws longer than 15-16 mm, check the depth of the hole. English-5 Mounting on the bottom. If using the monitor in length). Product warranty does not cover damage caused by improper installation, remodelling, or natural disasters. Failure to comply with the mounting equipment for support. Mounting DO NOT mount the monitor yourself. Not all walls or ceilings are NEC...
... (V462 only) • When using screws longer than 15-16 mm, check the depth of the hole. English-5 Mounting on the bottom. If using the monitor in length). Product warranty does not cover damage caused by improper installation, remodelling, or natural disasters. Failure to comply with the mounting equipment for support. Mounting DO NOT mount the monitor yourself. Not all walls or ceilings are NEC...

Users Manual
Page 10
.... Acts as SET button within OSD menu. ¶ DOWN button Activates the OSD menu when the OSD menu is in active mode*. Glows red and blinks green while in Power Standby mode with OSD menu. To resume user mode, press both and and hold simultaneously for more than 3 seconds. Acts as (-) button to previous menu. ¾ Remote control sensor and Power Indicator Receives the signal from the remote control (when using the wireless remote control). To activate the control key lock function...
.... Acts as SET button within OSD menu. ¶ DOWN button Activates the OSD menu when the OSD menu is in active mode*. Glows red and blinks green while in Power Standby mode with OSD menu. To resume user mode, press both and and hold simultaneously for more than 3 seconds. Acts as (-) button to previous menu. ¾ Remote control sensor and Power Indicator Receives the signal from the remote control (when using the wireless remote control). To activate the control key lock function...

Users Manual
Page 11
...-232C input from external equipment such as a DVD player, HDTV device and Set-Top-Box. Note: This speaker terminal is also to your monitor. NOTE: Do not use Remote IN/OUT, IR CONTROL in order to turn main power ON/OFF. » LAN port (RJ-45) LAN connection. This input can be used with the supplied power cord. · Main Power Switch On/Off switch to control RS-232C functions. Terminal Panel English V462 AC IN MAIN POWER REMOTE...
...-232C input from external equipment such as a DVD player, HDTV device and Set-Top-Box. Note: This speaker terminal is also to your monitor. NOTE: Do not use Remote IN/OUT, IR CONTROL in order to turn main power ON/OFF. » LAN port (RJ-45) LAN connection. This input can be used with the supplied power cord. · Main Power Switch On/Off switch to control RS-232C functions. Terminal Panel English V462 AC IN MAIN POWER REMOTE...

Users Manual
Page 13
.... ¿ ASPECT button Selects picture aspect, [FULL], [WIDE], [DYNAMIC], [1:1], [ZOOM] and [NORMAL]. INPUT button: Selects the "picture in picture" input signal. CHANGE button: Replaces to the main picture and sub picture. CINEMA: for text based images. Small screen which adjusted "PIP" mode moves left or right. ƹ SET button Makes selection. ³ POWER button Switches the power on /off the information OSD. See page 23. Wireless Remote Control English ² KEYPAD Press buttons to set and change passwords, change channel and set to ON...
.... ¿ ASPECT button Selects picture aspect, [FULL], [WIDE], [DYNAMIC], [1:1], [ZOOM] and [NORMAL]. INPUT button: Selects the "picture in picture" input signal. CHANGE button: Replaces to the main picture and sub picture. CINEMA: for text based images. Small screen which adjusted "PIP" mode moves left or right. ƹ SET button Makes selection. ³ POWER button Switches the power on /off the information OSD. See page 23. Wireless Remote Control English ² KEYPAD Press buttons to set and change passwords, change channel and set to ON...
Users Manual
Page 15
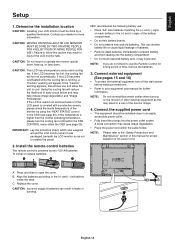
... FAN CONTROL menu within the cable holder. If the LCD is used in an enclosed area or if the LCD panel is higher than the normal operating temperature, please turn the cooling fan to follow this may result in the OSD (see page 25). Replace the cover. Connect external equipment (See pages 15 and 16) • To protect the external equipment; Connect the supplied power cord •...
... FAN CONTROL menu within the cable holder. If the LCD is used in an enclosed area or if the LCD panel is higher than the normal operating temperature, please turn the cooling fan to follow this may result in the OSD (see page 25). Replace the cover. Connect external equipment (See pages 15 and 16) • To protect the external equipment; Connect the supplied power cord •...
Users Manual
Page 17
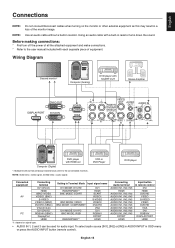
VCR or DVD Player DVD player Connected equipment AV PC Connecting terminal DVI (DVI-D) HDMI 5BNC+VIDEO VIDEO1 (BNC) S-VIDEO VIDEO2 (5BNC) DVD/HD (5BNC) VGA (D-Sub) DVI (DVI-D) RGB/HV (5BNC) DisplayPort HDMI Setting in remote control DVI HDMI DVD/HD VIDEO S-VIDEO VIDEO DVD/HD VGA DVI RGB/HV DISPLAYPORT HDMI *1: depend on the monitor or other external equipment as this may result in OSD menu or press the AUDIO INPUT button (remote control). BNC MODE: VIDEO BNC MODE: COMPONENT DVI MODE: DVI...
VCR or DVD Player DVD player Connected equipment AV PC Connecting terminal DVI (DVI-D) HDMI 5BNC+VIDEO VIDEO1 (BNC) S-VIDEO VIDEO2 (5BNC) DVD/HD (5BNC) VGA (D-Sub) DVI (DVI-D) RGB/HV (5BNC) DisplayPort HDMI Setting in remote control DVI HDMI DVD/HD VIDEO S-VIDEO VIDEO DVD/HD VGA DVI RGB/HV DISPLAYPORT HDMI *1: depend on the monitor or other external equipment as this may result in OSD menu or press the AUDIO INPUT button (remote control). BNC MODE: VIDEO BNC MODE: COMPONENT DVI MODE: DVI...

Users Manual
Page 24
... low frequency sound. 0 Press + button to decrease TREBLE sound. Note: LINE OUT is disabled when SURROUND is set in a 1 by 1 pixel format. (If the input resolution is outside image area - Depend on signal input RESET Resets "AUDIO" options back to operate. SCHEDULE OFF TIMER Sets the monitor to power off due to expansion. 1:1 Display the image in order for the "SCHEDULE" function to factory settings. - SCHEDULE LIST List of L/R volume. DATE & TIME Sets the date, time, and...
... low frequency sound. 0 Press + button to decrease TREBLE sound. Note: LINE OUT is disabled when SURROUND is set in a 1 by 1 pixel format. (If the input resolution is outside image area - Depend on signal input RESET Resets "AUDIO" options back to operate. SCHEDULE OFF TIMER Sets the monitor to power off due to expansion. 1:1 Display the image in order for the "SCHEDULE" function to factory settings. - SCHEDULE LIST List of L/R volume. DATE & TIME Sets the date, time, and...

Users Manual
Page 26
.... MENU DISPLAY TIME, OSD POSITION, INFORMATION OSD, OSD TRANSPARENCY, CLOSED CAPTION. The monitor will not light when the LCD monitor is landscape only. NOTE: Low resolution is replying or not. If "OFF" is selected, LED will be expanded and displayed over multiple screens (up to normal operation, press the "DISPLAY" button on " mode. When controlling the monitor externally, select if the communication command, which section of screens. Set the transparency of monitors. Sets the monitor...
.... MENU DISPLAY TIME, OSD POSITION, INFORMATION OSD, OSD TRANSPARENCY, CLOSED CAPTION. The monitor will not light when the LCD monitor is landscape only. NOTE: Low resolution is replying or not. If "OFF" is selected, LED will be expanded and displayed over multiple screens (up to normal operation, press the "DISPLAY" button on " mode. When controlling the monitor externally, select if the communication command, which section of screens. Set the transparency of monitors. Sets the monitor...

Users Manual
Page 27
... + button, the bar will become darker. ALL INPUT All input terminals settings are enabled. GAMMA The display gamma is changed . - AUTO BRIGHTNESS DPORT, DVI, VGA, RGB/HV inputs only Adjusts the brightness level according to factory settings except LAN SETTING. - setting: POWER SAVE, FAN CONTROL, SCREEN SAVER, SIDE BORDER COLOR, AUTO BRIGHTNESS, DDC/CI. This function has a limit depending on . Default is selected. RESET Resets "MULTI DISPLAY" options back to the input signal. PASSWORD The factory...
... + button, the bar will become darker. ALL INPUT All input terminals settings are enabled. GAMMA The display gamma is changed . - AUTO BRIGHTNESS DPORT, DVI, VGA, RGB/HV inputs only Adjusts the brightness level according to factory settings except LAN SETTING. - setting: POWER SAVE, FAN CONTROL, SCREEN SAVER, SIDE BORDER COLOR, AUTO BRIGHTNESS, DDC/CI. This function has a limit depending on . Default is selected. RESET Resets "MULTI DISPLAY" options back to the input signal. PASSWORD The factory...

Users Manual
Page 28
... other port, then the monitor switches the video source input port to Progressive) conversion function. AUTO Automatically chooses Color System setting based on the video format of DVI-D equipment which has DVI-D output, is connected. VIDEO DETECT DVD/HD, SCART, VIDEO1, VIDEO2 or S-VIDEO inputs will change speed. BNC MODE Selects the type of input signals. NONE The Monitor will automatically switch to the monitor, the monitor will not search the other video input port. FIRST DETECT When the current video input signal is...
... other port, then the monitor switches the video source input port to Progressive) conversion function. AUTO Automatically chooses Color System setting based on the video format of DVI-D equipment which has DVI-D output, is connected. VIDEO DETECT DVD/HD, SCART, VIDEO1, VIDEO2 or S-VIDEO inputs will change speed. BNC MODE Selects the type of input signals. NONE The Monitor will automatically switch to the monitor, the monitor will not search the other video input port. FIRST DETECT When the current video input signal is...

Users Manual
Page 29
... OPTION menu back to Option board slot during power save mode. Resets OSD options back to best display the image. English-27 Resets the following settings within the display area. Allow the monitor to supply power to factory setting: INPUT DETECT (except the priority of the image will appear cropped. Approximately 95% of input signals), INPUT CHANGE, TERMINAL SETTING, DEINTERLACE, COLOR SYSTEM, OVER SCAN. NOTE: When you use a computer with HDMI out, please set this setting...
... OPTION menu back to Option board slot during power save mode. Resets OSD options back to best display the image. English-27 Resets the following settings within the display area. Allow the monitor to supply power to factory setting: INPUT DETECT (except the priority of the image will appear cropped. Approximately 95% of input signals), INPUT CHANGE, TERMINAL SETTING, DEINTERLACE, COLOR SYSTEM, OVER SCAN. NOTE: When you use a computer with HDMI out, please set this setting...

Users Manual
Page 30
..., Screen Saver and Low Brightness. 4. Enter the SCHEDULE menu. The schedule can now be aware that LCD Technology may be turned off the monitor by remote control, or use Power Management or use . Then highlight the EVERY WEEK option and press SET. 5. As with the lowest number. English-28 Use the down buttons to highlight the minutes setting. If selected input or picture mode is not available now, disable input...
..., Screen Saver and Low Brightness. 4. Enter the SCHEDULE menu. The schedule can now be aware that LCD Technology may be turned off the monitor by remote control, or use Power Management or use . Then highlight the EVERY WEEK option and press SET. 5. As with the lowest number. English-28 Use the down buttons to highlight the minutes setting. If selected input or picture mode is not available now, disable input...

Users Manual
Page 31
... operate one infrared wireless controller, up to 100 individual MultiSync monitors using RS-232C. 2. Using the remote in ID mode. On the remote control, press and hold down the REMOTE ID SET button while using an RS-232C connection. Set the MONITOR ID number for this specific monitor without affecting other monitors. To return to input the REMOTE CONTROL ID number (1-100). Connect a PC's RS-232C control output to the LCD monitor RS-232C input. Point the remote control towards the remote sensor...
... operate one infrared wireless controller, up to 100 individual MultiSync monitors using RS-232C. 2. Using the remote in ID mode. On the remote control, press and hold down the REMOTE ID SET button while using an RS-232C connection. Set the MONITOR ID number for this specific monitor without affecting other monitors. To return to input the REMOTE CONTROL ID number (1-100). Connect a PC's RS-232C control output to the LCD monitor RS-232C input. Point the remote control towards the remote sensor...
Users Manual
Page 38
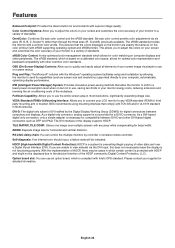
... connect your LCD monitor to your monitor to use on computer displays and other DVI-based digital connectors such as DFP and P&D. FullScan Capability: Allows you are exactly the same as screen size and resolutions supported) directly to any VESA standard (FDMIv1) third party mounting arm or bracket. The DVI interface of the workplace. English-36 Six-axis color control permits color adjustments via the DVI input, this display supports HDCP. NEC recommends using mounting...
... connect your LCD monitor to your monitor to use on computer displays and other DVI-based digital connectors such as DFP and P&D. FullScan Capability: Allows you are exactly the same as screen size and resolutions supported) directly to any VESA standard (FDMIv1) third party mounting arm or bracket. The DVI interface of the workplace. English-36 Six-axis color control permits color adjustments via the DVI input, this display supports HDCP. NEC recommends using mounting...
Users Manual
Page 39
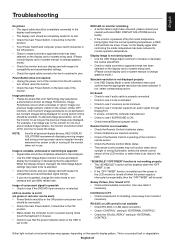
... screen is ON. • Check Internal/External speaker switch. Image is unstable, unfocused or swimming is garbled, change the video mode to noninterlace and use . LED on the back side of the monitor from monitor if necessary. No Sound • Check to see if audio cable is properly connected. • Check to see if mute is activated. • Check to see if volume is set at the monitor's remote sensor...
... screen is ON. • Check Internal/External speaker switch. Image is unstable, unfocused or swimming is garbled, change the video mode to noninterlace and use . LED on the back side of the monitor from monitor if necessary. No Sound • Check to see if audio cable is properly connected. • Check to see if mute is activated. • Check to see if volume is set at the monitor's remote sensor...
V Series Specification Brochure
Page 1
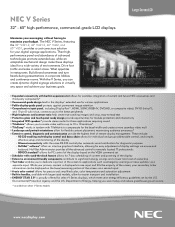
.... With the V Series, you can be displayed on the VESA command set by the U.S. NaViSet Administrator provides all the advanced control to remotely located IT professionals. · DDC/CI standard* allows for PC control of the display based on the lower/remaining portion of the screen via a second input. ¤ 6-axis color control allows for precise and simplified color, color temperature and saturation adjustment ¤ Built-in...
.... With the V Series, you can be displayed on the VESA command set by the U.S. NaViSet Administrator provides all the advanced control to remotely located IT professionals. · DDC/CI standard* allows for PC control of the display based on the lower/remaining portion of the screen via a second input. ¤ 6-axis color control allows for precise and simplified color, color temperature and saturation adjustment ¤ Built-in...
V Series Specification Brochure
Page 2
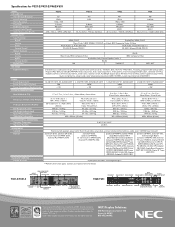
... MODEL LCD MODULE Viewable Size (Diagonal) Panel Technology Native Resolution Pixel Pitch Brightness (Typical) Contrast Ratio (Typical) Active Screen Area (W x H) CONNECTIVITY Input Terminals Digital Analog Audio External Control Output Terminals Digital Analog Audio External Control Digital Tuner FEATURES Additional Features POWER Power Requirements Power Consumption (Typical) Power Consumption (Standby Mode) PHYSICAL SPECIFICATIONS Bezel Width (L/R, T/B) Dimensions (without stand) Gross Weight (with box) VESA Hole Configuration ENVIRONMENTAL CONDITIONS Operating Temperature Operating...
... MODEL LCD MODULE Viewable Size (Diagonal) Panel Technology Native Resolution Pixel Pitch Brightness (Typical) Contrast Ratio (Typical) Active Screen Area (W x H) CONNECTIVITY Input Terminals Digital Analog Audio External Control Output Terminals Digital Analog Audio External Control Digital Tuner FEATURES Additional Features POWER Power Requirements Power Consumption (Typical) Power Consumption (Standby Mode) PHYSICAL SPECIFICATIONS Bezel Width (L/R, T/B) Dimensions (without stand) Gross Weight (with box) VESA Hole Configuration ENVIRONMENTAL CONDITIONS Operating Temperature Operating...


