Users Manual
Page 2
... Use English-3 Contents ...English-4 Installation ...English-5 Attaching Mounting Accessories ...English-6 Parts Name and Functions...English-8 Control Panel ...English-8 Terminal Panel ...English-9 Wireless Remote Control ...English-11 Operating Range for the Remote Control English-12 Setup ...English-13 Connections ...English-15 Wiring Diagram ...English-15 Connecting a Personal Computer English-16 Connecting a DVD Player or Computer with HDMI out English-16 Connecting a Computer with DisplayPort English-16 Basic Operation...English-17 Power ON and OFF Modes ...English...
... Use English-3 Contents ...English-4 Installation ...English-5 Attaching Mounting Accessories ...English-6 Parts Name and Functions...English-8 Control Panel ...English-8 Terminal Panel ...English-9 Wireless Remote Control ...English-11 Operating Range for the Remote Control English-12 Setup ...English-13 Connections ...English-15 Wiring Diagram ...English-15 Connecting a Personal Computer English-16 Connecting a DVD Player or Computer with HDMI out English-16 Connecting a Computer with DisplayPort English-16 Basic Operation...English-17 Power ON and OFF Modes ...English...
Users Manual
Page 5
... and sharpness controls to enhance readability. • Avoid displaying fixed patterns on the LCD surface. NOTE: DO NOT clean with a dry cloth. Safety Precautions, Maintenance & Recommended Use English FOR OPTIMUM PERFORMANCE, PLEASE NOTE THE FOLLOWING WHEN SETTING UP AND USING THE MULTI-FUNCTION MONITOR: Immediately unplug your monitor from the power supply. There are no user serviceable parts inside and opening or removing covers...
... and sharpness controls to enhance readability. • Avoid displaying fixed patterns on the LCD surface. NOTE: DO NOT clean with a dry cloth. Safety Precautions, Maintenance & Recommended Use English FOR OPTIMUM PERFORMANCE, PLEASE NOTE THE FOLLOWING WHEN SETTING UP AND USING THE MULTI-FUNCTION MONITOR: Immediately unplug your monitor from the power supply. There are no user serviceable parts inside and opening or removing covers...

Users Manual
Page 6
...; Thumbscrew for optional stand x 2*2 • Eyebolt x 2*3 Video Signal Cable (Mini D-SUB 15 pin to Mini D-SUB 15 pin) Power Cord*1 Screw (M4 x 10) x 2*2 Thumbscrew for optional stand x 2*2 Complete User's Manual Information Files for Windows Setup Manual Clamp x 2*2 Eyebolt x 2*3 Setup Manual Wireless Remote Control and AA Batteries * Remember to save your original box and packing material to be shipped. When more than one power cord is included, please use a power cord that matches the...
...; Thumbscrew for optional stand x 2*2 • Eyebolt x 2*3 Video Signal Cable (Mini D-SUB 15 pin to Mini D-SUB 15 pin) Power Cord*1 Screw (M4 x 10) x 2*2 Thumbscrew for optional stand x 2*2 Complete User's Manual Information Files for Windows Setup Manual Clamp x 2*2 Eyebolt x 2*3 Setup Manual Wireless Remote Control and AA Batteries * Remember to save your original box and packing material to be shipped. When more than one power cord is included, please use a power cord that matches the...
Users Manual
Page 10
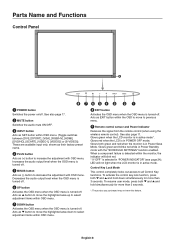
... to select adjustment items within OSD menu. (Toggle switches between [DVI], [DPORT], [VGA], [RGB/HV], [HDMI], [DVD/HD], [SCART], [VIDEO1], [VIDEO2] or [S-VIDEO]). To resume user mode, press both green and red when the monitor is in Power Standby mode with OSD menu. These are available input only, shown as their factory preset name. ¿ PLUS button Acts as SET button within OSD menu. º EXIT button Activates the OSD menu when the...
... to select adjustment items within OSD menu. (Toggle switches between [DVI], [DPORT], [VGA], [RGB/HV], [HDMI], [DVD/HD], [SCART], [VIDEO1], [VIDEO2] or [S-VIDEO]). To resume user mode, press both green and red when the monitor is in Power Standby mode with OSD menu. These are available input only, shown as their factory preset name. ¿ PLUS button Acts as SET button within OSD menu. º EXIT button Activates the OSD menu when the...

Users Manual
Page 11
... or DVD player. Ƽ EXTERNAL SPEAKER TERMINAL To output the audio signal from AUDIO 1, 2, 3, DPORT and HDMI. English-9 See page 32. ¿ REMOTE IN/OUT Use the optional wired remote control by connecting it to control RS-232C functions. NOTE: Do not use Remote IN/OUT, IR CONTROL in OSD menu should be connected to connect equipment such as a DVD player, HDTV device and Set-Top-Box. Sync-on-Green signal can be selected. ¾ HDMI connector To input digital HDMI signals. µ...
... or DVD player. Ƽ EXTERNAL SPEAKER TERMINAL To output the audio signal from AUDIO 1, 2, 3, DPORT and HDMI. English-9 See page 32. ¿ REMOTE IN/OUT Use the optional wired remote control by connecting it to control RS-232C functions. NOTE: Do not use Remote IN/OUT, IR CONTROL in OSD menu should be connected to connect equipment such as a DVD player, HDTV device and Set-Top-Box. Sync-on-Green signal can be selected. ¾ HDMI connector To input digital HDMI signals. µ...
Users Manual
Page 13
... sub picture. INPUT button: Selects the "picture in picture" input signal. CHANGE button: Replaces to select adjustment items within OSD menu settings. English-11 See page 19. ¾ MENU button Turns on /off mute function. ƾ STILL button ON/OFF button: Activates/deactivates still picture mode. HIGHBRIGHT: for text based images. Note: HDMI, DVD/HD, SCART, VIDEO1, VIDEO2, S-VIDEO inputs only. ´ SOUND button ON/OFF button: Toggle switches between PIP, POP, PICTURE BY PICTURE-ASPECT and PICTURE BY PICTURE-FULL. Small screen which adjusted "PIP" mode...
... sub picture. INPUT button: Selects the "picture in picture" input signal. CHANGE button: Replaces to select adjustment items within OSD menu settings. English-11 See page 19. ¾ MENU button Turns on /off mute function. ƾ STILL button ON/OFF button: Activates/deactivates still picture mode. HIGHBRIGHT: for text based images. Note: HDMI, DVD/HD, SCART, VIDEO1, VIDEO2, S-VIDEO inputs only. ´ SOUND button ON/OFF button: Toggle switches between PIP, POP, PICTURE BY PICTURE-ASPECT and PICTURE BY PICTURE-FULL. Small screen which adjusted "PIP" mode...

Users Manual
Page 15
... panel. 2. Press and slide to the (+) and (-) indications inside temperature of time, remove the batteries. 3. If the LCD becomes overheated while the cooling fan is covered with a protective screen, please check the inside the case. Install the remote control batteries The remote control is higher than the normal operating temperature, please turn off the main power before making connections. • Refer to an easily accessible power...
... panel. 2. Press and slide to the (+) and (-) indications inside temperature of time, remove the batteries. 3. If the LCD becomes overheated while the cooling fan is covered with a protective screen, please check the inside the case. Install the remote control batteries The remote control is higher than the normal operating temperature, please turn off the main power before making connections. • Refer to an easily accessible power...

Users Manual
Page 17
... HDMI Setting in resistor. Dotted lines = audio signal. Wiring Diagram Second monitor* Computer (Analog) DVD player with SCART OUT Stereo Amplifier DVD player with each separate piece of the monitor image. To select audio source [IN1], [IN2] or [IN3] in AUDIO INPUT in resistor turns down the sound. Using an audio cable with a built-in OSD menu or press the AUDIO INPUT button (remote control). BNC MODE: VIDEO BNC MODE: COMPONENT DVI MODE: DVI-PC BNC MODE: RGB RAW/EXPAND*1 DVI HDMI...
... HDMI Setting in resistor. Dotted lines = audio signal. Wiring Diagram Second monitor* Computer (Analog) DVD player with SCART OUT Stereo Amplifier DVD player with each separate piece of the monitor image. To select audio source [IN1], [IN2] or [IN3] in AUDIO INPUT in resistor turns down the sound. Using an audio cable with a built-in OSD menu or press the AUDIO INPUT button (remote control). BNC MODE: VIDEO BNC MODE: COMPONENT DVI MODE: DVI-PC BNC MODE: RGB RAW/EXPAND*1 DVI HDMI...
Users Manual
Page 24
... outside of PIP audio. AUDIO VOLUME Increases or decreases output volume level. - Press + button to move the stereo sound image to decrease BASS sound. button to factory setting: AUTO ADJUST, - MAIN AUDIO LINE OUT Selecting "VARIABLE" enables control of L/R volume. SCHEDULE OFF TIMER Sets the monitor to power off due to ON. VGA, RGB/HV inputs only INPUT RESOLUTION VGA, RGB/HV inputs only If there is a problem with the VOLUME button. H POS Horizontal position. Press - FIXED AUDIO INPUT Selects audio input source [IN1...
... outside of PIP audio. AUDIO VOLUME Increases or decreases output volume level. - Press + button to move the stereo sound image to decrease BASS sound. button to factory setting: AUTO ADJUST, - MAIN AUDIO LINE OUT Selecting "VARIABLE" enables control of L/R volume. SCHEDULE OFF TIMER Sets the monitor to power off due to ON. VGA, RGB/HV inputs only INPUT RESOLUTION VGA, RGB/HV inputs only If there is a problem with the VOLUME button. H POS Horizontal position. Press - FIXED AUDIO INPUT Selects audio input source [IN1...
Users Manual
Page 27
... TEMPERATURE. - HEAT STATUS Displays status of the network connected to the monitor. 0.0.0.0 SETTING COPY In a daisy chain scenario, select the OSD menu categories that you use this option allows you can set interval time and zooming ratio. SECURITY Locks the security password. Disabling this function, EXTERNAL CONTROL should be changed and fixed when "ON" is lost. ON Note: When connecting DVI, the video card might not...
... TEMPERATURE. - HEAT STATUS Displays status of the network connected to the monitor. 0.0.0.0 SETTING COPY In a daisy chain scenario, select the OSD menu categories that you use this option allows you can set interval time and zooming ratio. SECURITY Locks the security password. Disabling this function, EXTERNAL CONTROL should be changed and fixed when "ON" is lost. ON Note: When connecting DVI, the video card might not...

Users Manual
Page 28
..." when DVD player, which is present in the other video input port. OFF Disables IP conversion. AUTO Automatically chooses Color System setting based on the video format of input signals. ADVANCED OPTION INPUT DETECT Selects the method of signal associated with the BNC input. The monitor will change speed. When DVD/HD, SCART, VIDEO1, VIDEO2 or S-VIDEO input signal is present. When CUSTOM DETECT is present in the other video signals while the current video source is...
..." when DVD player, which is present in the other video input port. OFF Disables IP conversion. AUTO Automatically chooses Color System setting based on the video format of input signals. ADVANCED OPTION INPUT DETECT Selects the method of signal associated with the BNC input. The monitor will change speed. When DVD/HD, SCART, VIDEO1, VIDEO2 or S-VIDEO input signal is present. When CUSTOM DETECT is present in the other video signals while the current video source is...
Users Manual
Page 30
... was displayed. As with the highest number will turn off the monitor by remote control, or use Power Management or use Schedule Functions. 3. When Protective surface (glass, acrylic) is installed over schedule #1. English-28 The box next to choose the input source. Use the down arrows to highlight PIC. Use the + and - buttons to set . Then highlight the EVERY WEEK option and press SET. 5. If selected input or picture mode is...
... was displayed. As with the highest number will turn off the monitor by remote control, or use Power Management or use Schedule Functions. 3. When Protective surface (glass, acrylic) is installed over schedule #1. English-28 The box next to choose the input source. Use the down arrows to highlight PIC. Use the + and - buttons to set . Then highlight the EVERY WEEK option and press SET. 5. If selected input or picture mode is...

Users Manual
Page 31
... MultiSync monitors using what is in normal mode, all displays in the OSD menu of the desired monitor and press the REMOTE ID SET button. Connect PC and LCD monitors. Set Monitor ID and IR Control mode. The Monitor ID number can be set within the group (see Figure 1). Set the MONITOR ID number for 2 seconds. Set the "IR CONTROL" to 0 Monitor ID:1 Monitor ID:2 Monitor ID:3 Remote works Monitor ID:3 TO SET/RESET REMOTE CONTROL MODE ID Mode - Using the remote in REMOTE CONTROL ID mode will only operate one infrared wireless controller...
... MultiSync monitors using what is in normal mode, all displays in the OSD menu of the desired monitor and press the REMOTE ID SET button. Connect PC and LCD monitors. Set Monitor ID and IR Control mode. The Monitor ID number can be set within the group (see Figure 1). Set the MONITOR ID number for 2 seconds. Set the "IR CONTROL" to 0 Monitor ID:1 Monitor ID:2 Monitor ID:3 Remote works Monitor ID:3 TO SET/RESET REMOTE CONTROL MODE ID Mode - Using the remote in REMOTE CONTROL ID mode will only operate one infrared wireless controller...
Users Manual
Page 38
.... Color Control Systems: Allow you to use an option board. Six-axis color control permits color adjustments via the DVI input, this display supports HDCP. The sRGB standard provides the monitor with other DVI-based digital connectors such as screen size and resolutions supported) directly to your monitor to a variety of the workplace. This allows you to install it with the Windows® operating system facilitates setup and installation by allowing the monitor...
.... Color Control Systems: Allow you to use an option board. Six-axis color control permits color adjustments via the DVI input, this display supports HDCP. The sRGB standard provides the monitor with other DVI-based digital connectors such as screen size and resolutions supported) directly to your monitor to a variety of the workplace. This allows you to install it with the Windows® operating system facilitates setup and installation by allowing the monitor...
Users Manual
Page 39
..., please contact your nearest authorized NEC DISPLAY SOLUTIONS service facility. • If the monitor is garbled, change the video mode to compatibility and recommended signal timings. • If your display card with all personal display devices, NEC DISPLAY SOLUTIONS recommends displaying moving images and using a moving screen saver at regular intervals whenever the screen is set at the monitor's remote sensor. • Check the Remote Control Mode status. • The remote control system may experience a phenomenon known...
..., please contact your nearest authorized NEC DISPLAY SOLUTIONS service facility. • If the monitor is garbled, change the video mode to compatibility and recommended signal timings. • If your display card with all personal display devices, NEC DISPLAY SOLUTIONS recommends displaying moving images and using a moving screen saver at regular intervals whenever the screen is set at the monitor's remote sensor. • Check the Remote Control Mode status. • The remote control system may experience a phenomenon known...
V Touch Series Specification Brochure
Page 1
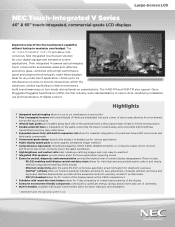
...-in use and maintenance of display settings via mouse and keyboard. These include: · RS-232-enabling multi-display control and daisy chain allows for individual and group-addressable control, and simple, effective setup and monitoring of remote display management. Their integrated 4-camera optical imaging touch components and double-sided anti-reflective protective glass, combined with larger-sized models, allow for those applications requiring sound...
...-in use and maintenance of display settings via mouse and keyboard. These include: · RS-232-enabling multi-display control and daisy chain allows for individual and group-addressable control, and simple, effective setup and monitoring of remote display management. Their integrated 4-camera optical imaging touch components and double-sided anti-reflective protective glass, combined with larger-sized models, allow for those applications requiring sound...

V Touch Series Specification Brochure
Page 2
Specifications for V462-TM/V651-TM MODEL V462-TM V651-TM LCD MODULE Panel Technology SPVA (B-DID) A-MVA Viewable Image Size 46" 65" Native Resolution 1920 x 1080 Brightness (Typical/Maximum) 330 cd/m2 / 430 cd/m2 360 cd/m2 / 480 cd/m2 Contrast Ratio (Typical) 3000:1 5000:1 Viewing Angle 178° Vert., 178° Hor. (89U/89D/89L/89R) @ CR>10 Response Time (G-to-G) 8ms...
Specifications for V462-TM/V651-TM MODEL V462-TM V651-TM LCD MODULE Panel Technology SPVA (B-DID) A-MVA Viewable Image Size 46" 65" Native Resolution 1920 x 1080 Brightness (Typical/Maximum) 330 cd/m2 / 430 cd/m2 360 cd/m2 / 480 cd/m2 Contrast Ratio (Typical) 3000:1 5000:1 Viewing Angle 178° Vert., 178° Hor. (89U/89D/89L/89R) @ CR>10 Response Time (G-to-G) 8ms...
Press Release
Page 2
.../digital-media-library. Touch-Integrated V Series models include the following features: 4-camera optical-imaging technology supports up to six simultaneous touches Integrated, double-sided anti-reflective glass protects the LCD panel, while minimizing reflectivity Commercial-grade LCD panel and components Full-HD native resolution with up to install." Each carries a 3-year limited parts and labor warranty, which includes the backlight. # # # About NEC Display...
.../digital-media-library. Touch-Integrated V Series models include the following features: 4-camera optical-imaging technology supports up to six simultaneous touches Integrated, double-sided anti-reflective glass protects the LCD panel, while minimizing reflectivity Commercial-grade LCD panel and components Full-HD native resolution with up to install." Each carries a 3-year limited parts and labor warranty, which includes the backlight. # # # About NEC Display...

External Controls
Page 34
... Read only sensor Carbon Temperature footprint (34/71) Momentary Momentary This operation requires supported option TV tuner. Please refer to section 6.2 0: | 999: 0: | 65535: Wide: A/V mode only This operation has limitation of selection. Refer to the monitor instruction manual. Item Aspect PIP ON/OFF Still ON/OFF PIP Input OP code page 02h OP code 70h 02h 72h 02h 73h Still Capture Signal Information Auto Setup TV-Channel UP...
... Read only sensor Carbon Temperature footprint (34/71) Momentary Momentary This operation requires supported option TV tuner. Please refer to section 6.2 0: | 999: 0: | 65535: Wide: A/V mode only This operation has limitation of selection. Refer to the monitor instruction manual. Item Aspect PIP ON/OFF Still ON/OFF PIP Input OP code page 02h OP code 70h 02h 72h 02h 73h Still Capture Signal Information Auto Setup TV-Channel UP...
KT-LFD-CC Spec Brochure
Page 1
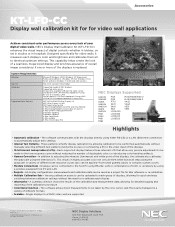
... Supported model of NEC displays Supported color sensor At least one or more RS-232 Ports (optional if using LAN) USB to the video input of the displays • 10-bit internal lookup tables (LUTs) - Each supported display features three internal LUTs that allow very precise adjustments to be made to the tone response curve without manually selecting different test patterns during the process or connecting a PC to RS-232 adapter...
... Supported model of NEC displays Supported color sensor At least one or more RS-232 Ports (optional if using LAN) USB to the video input of the displays • 10-bit internal lookup tables (LUTs) - Each supported display features three internal LUTs that allow very precise adjustments to be made to the tone response curve without manually selecting different test patterns during the process or connecting a PC to RS-232 adapter...


