Users Manual
Page 2
...-40 Specifications - V651...English-41 Pin Assignment...English-42 Manufacturer's Recycling and Energy Information English-43 www.necdisplaysolutions.com V462...English-39 Specifications - Index DECLARATION OF CONFORMITY ...English-1 Important Information ...English-2 WARNING...English-2 CAUTION...English-2 Declaration ...English-25 ADVANCED OPTION ...English-26 Remote Control Function ...English-29 Controlling the LCD monitor via RS-232C Remote Control English-31 Controlling the LCD monitor via LAN Control English-32 Connecting to a Network ...English-32 Network Setting by ...
...-40 Specifications - V651...English-41 Pin Assignment...English-42 Manufacturer's Recycling and Energy Information English-43 www.necdisplaysolutions.com V462...English-39 Specifications - Index DECLARATION OF CONFORMITY ...English-1 Important Information ...English-2 WARNING...English-2 CAUTION...English-2 Declaration ...English-25 ADVANCED OPTION ...English-26 Remote Control Function ...English-29 Controlling the LCD monitor via RS-232C Remote Control English-31 Controlling the LCD monitor via LAN Control English-32 Connecting to a Network ...English-32 Network Setting by ...

Users Manual
Page 3
...interference to provide reasonable protection against harmful interference in the FCC Rules. NEC is trademarks of Product: Display Monitor Equipment Classification: Class B Peripheral Model: MultiSync V422 (L420UA) MultiSync V462 (L460UB) MultiSync V551 (L550UC) MultiSync V651 (L650U9) We hereby... complies with the MultiSync V422 (L420UA)/MultiSync V462 (L460UB)/MultiSync V551 (L550UC)/ MultiSync V651 (L650U9) colour monitor so as speciÞed in a residential installation. Operation is a registered trademark of NEC Display Solutions Europe GmbH in the United States...
...interference to provide reasonable protection against harmful interference in the FCC Rules. NEC is trademarks of Product: Display Monitor Equipment Classification: Class B Peripheral Model: MultiSync V422 (L420UA) MultiSync V462 (L460UB) MultiSync V551 (L550UC) MultiSync V651 (L650U9) We hereby... complies with the MultiSync V422 (L420UA)/MultiSync V462 (L460UB)/MultiSync V551 (L550UC)/ MultiSync V651 (L650U9) colour monitor so as speciÞed in a residential installation. Operation is a registered trademark of NEC Display Solutions Europe GmbH in the United States...

Users Manual
Page 4
...is intended to be read carefully in accordance with this unit. Voltage 120* 230 230 China 220 Japan 100 * When operating the monitor with its AC 125-240V power supply, use the power cord provided with the table below. REFRAIN FROM OPENING THE CABINET AS ...THERE ARE HIGH VOLTAGE COMPONENTS INSIDE. REFER SERVICING TO QUALIFIED SERVICE PERSONNEL. Therefore, it should be connected to avoid any part inside this monitor in order to a computer and is dangerous to cause electric shock. Chinese Japanese Plug Shape Region U.S.A./Canada EU (except U.K.) U.K. ALSO, ...
...is intended to be read carefully in accordance with this unit. Voltage 120* 230 230 China 220 Japan 100 * When operating the monitor with its AC 125-240V power supply, use the power cord provided with the table below. REFRAIN FROM OPENING THE CABINET AS ...THERE ARE HIGH VOLTAGE COMPONENTS INSIDE. REFER SERVICING TO QUALIFIED SERVICE PERSONNEL. Therefore, it should be connected to avoid any part inside this monitor in order to a computer and is dangerous to cause electric shock. Chinese Japanese Plug Shape Region U.S.A./Canada EU (except U.K.) U.K. ALSO, ...
Users Manual
Page 5
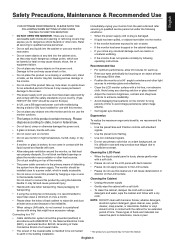
...due to a TV* • Cable distribution system should be grounded (earthed) in accordance with ANSI/NFPA 70, the National Electrical Code (NEC), in particular Section 820.93, Grounding of Outer Conductive Shield of any heavy objects on the power cord. Damage to the cord may ...Precautions, Maintenance & Recommended Use English FOR OPTIMUM PERFORMANCE, PLEASE NOTE THE FOLLOWING WHEN SETTING UP AND USING THE MULTI-FUNCTION MONITOR: Immediately unplug your monitor from the power supply. There are no user serviceable parts inside and opening or removing covers may expose you purchased may not...
...due to a TV* • Cable distribution system should be grounded (earthed) in accordance with ANSI/NFPA 70, the National Electrical Code (NEC), in particular Section 820.93, Grounding of Outer Conductive Shield of any heavy objects on the power cord. Damage to the cord may ...Precautions, Maintenance & Recommended Use English FOR OPTIMUM PERFORMANCE, PLEASE NOTE THE FOLLOWING WHEN SETTING UP AND USING THE MULTI-FUNCTION MONITOR: Immediately unplug your monitor from the power supply. There are no user serviceable parts inside and opening or removing covers may expose you purchased may not...

Users Manual
Page 6
...AA Batteries * Remember to save your original box and packing material to transport or ship the monitor. *1 Type and number of power cords included will depend on the where the LCD monitor is to Mini D-SUB 15 pin) Power Cord*1 Screw (M4 x 10) x 2*2 ...Thumbscrew for optional stand x 2*2 Complete User's Manual Information Files for V651. *3 V651 only. Contents Your new MultiSync monitor box* should contain the following: • LCD monitor • Power cord*1 • Video Signal Cable • Wireless Remote Control and AA Batteries • Setup Manual • Clamp ...
...AA Batteries * Remember to save your original box and packing material to transport or ship the monitor. *1 Type and number of power cords included will depend on the where the LCD monitor is to Mini D-SUB 15 pin) Power Cord*1 Screw (M4 x 10) x 2*2 ...Thumbscrew for optional stand x 2*2 Complete User's Manual Information Files for V651. *3 V651 only. Contents Your new MultiSync monitor box* should contain the following: • LCD monitor • Power cord*1 • Video Signal Cable • Wireless Remote Control and AA Batteries • Setup Manual • Clamp ...
Users Manual
Page 7
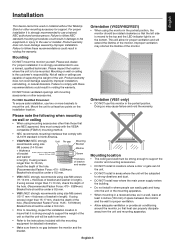
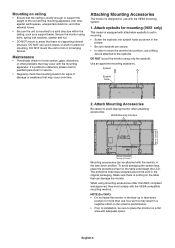
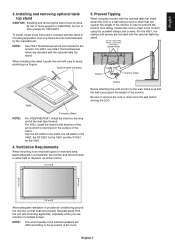
...the portrait position. Mounting location • The ceiling and wall must comply with UL1678 standard in North America. • V422/V462: NEC strongly recommends using the monitor in damage to the equipment or injury to follow these recommendations could result in voiding the warranty. Failure to the user or ... the hole. 11-13 mm (V551) 14-16 mm (V422/V462) 15-17 mm (V651) Thickness of bracket and washer in length). Not all walls or ceilings are NEC approved, they must be strong enough to support the monitor and mounting accessories. • DO NOT install in locations where a...
...the portrait position. Mounting location • The ceiling and wall must comply with UL1678 standard in North America. • V422/V462: NEC strongly recommends using the monitor in damage to the equipment or injury to follow these recommendations could result in voiding the warranty. Failure to the user or ... the hole. 11-13 mm (V551) 14-16 mm (V422/V462) 15-17 mm (V651) Thickness of bracket and washer in length). Not all walls or ceilings are NEC approved, they must be strong enough to support the monitor and mounting accessories. • DO NOT install in locations where a...
Users Manual
Page 8
...the VESA mounting system. 1. Eyebolt Eyebolt Hole 2. VESA Mounting Interface 300 mm (V422/V462) 400 mm (V551/V651) 300 mm (V422/V462) 400 mm (V551/V651) Mounting accessories can damage the monitor. Mounting on ceiling • Ensure that the ceiling is sturdy enough to support the...• DO NOT mount to hanging fixtures. Maintenance • Periodically check for more than NEC compliant and approved, they must comply with adequate space. DO NOT mount the monitor using mounting accessories other problems that can be sure to a solid structure within the ceiling, such as...
...the VESA mounting system. 1. Eyebolt Eyebolt Hole 2. VESA Mounting Interface 300 mm (V422/V462) 400 mm (V551/V651) 300 mm (V422/V462) 400 mm (V551/V651) Mounting accessories can damage the monitor. Mounting on ceiling • Ensure that the ceiling is sturdy enough to support the...• DO NOT mount to hanging fixtures. Maintenance • Periodically check for more than NEC compliant and approved, they must comply with adequate space. DO NOT mount the monitor using mounting accessories other problems that can be sure to a solid structure within the ceiling, such as...
Users Manual
Page 9
... the V651, the clamps and screws are included with the optional table top stand. 204 mm (V422/V462) 400 mm (V551/V651) Screw Holes Clamp Cord or chain Table Screw Before attaching the LCD monitor to remove the cord or chain from falling. Use the ST-4020 for the V422, the ST...-4620 for the V462, the ST-5220 for the V551 and the ST-651 for V551/V651. Optional table...
... the V651, the clamps and screws are included with the optional table top stand. 204 mm (V422/V462) 400 mm (V551/V651) Screw Holes Clamp Cord or chain Table Screw Before attaching the LCD monitor to remove the cord or chain from falling. Use the ST-4020 for the V422, the ST...-4620 for the V462, the ST-5220 for the V551 and the ST-651 for V551/V651. Optional table...
Users Manual
Page 10
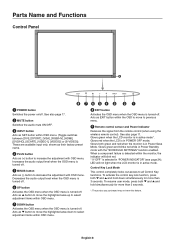
... OSD menu. (Toggle switches between [DVI], [DPORT], [VGA], [RGB/HV], [HDMI], [DVD/HD], [SCART], [VIDEO1], [VIDEO2] or [S-VIDEO]). Acts as SET button within the monitor, the indicator will blink red. * If "OFF" is selected in active mode*. Glows red when the LCD is in "POWER INDICATOR" (see page 24), LED... will not light when the LCD monitor is turned-off . Glows green when the LCD monitor is in Power Save Mode. To activate the control key lock function, press both green and red when the...
... OSD menu. (Toggle switches between [DVI], [DPORT], [VGA], [RGB/HV], [HDMI], [DVD/HD], [SCART], [VIDEO1], [VIDEO2] or [S-VIDEO]). Acts as SET button within the monitor, the indicator will blink red. * If "OFF" is selected in active mode*. Glows red when the LCD is in "POWER INDICATOR" (see page 24), LED... will not light when the LCD monitor is turned-off . Glows green when the LCD monitor is in Power Save Mode. To activate the control key lock function, press both green and red when the...

Users Manual
Page 11
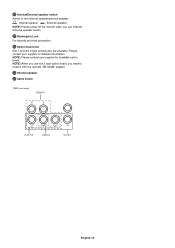
... with the supplied power cord. · Main Power Switch On/Off switch to the G connector. Note: This speaker terminal is also to your monitor. To connect multiple MultiSync monitors via RS-232C daisy Chain. ² DISPLAYPORT connector IN connector: To input DisplayPort signals. ¶ DVI IN (DVI-D) To input digital RGB signals...
... with the supplied power cord. · Main Power Switch On/Off switch to the G connector. Note: This speaker terminal is also to your monitor. To connect multiple MultiSync monitors via RS-232C daisy Chain. ² DISPLAYPORT connector IN connector: To input DisplayPort signals. ¶ DVI IN (DVI-D) To input digital RGB signals...
Users Manual
Page 12
... input signal English-10 Please contact your supplier for detailed information. NOTE: Please contact your supplier for available option board. NOTE: Please power off the monitor when you use slot 2 type option board, you use Internal/ External speaker switch. ƾ Kensington Lock For security and theft prevention. ƿ Option board slot...
... input signal English-10 Please contact your supplier for detailed information. NOTE: Please contact your supplier for available option board. NOTE: Please power off the monitor when you use slot 2 type option board, you use Internal/ External speaker switch. ƾ Kensington Lock For security and theft prevention. ƿ Option board slot...
Users Manual
Page 14
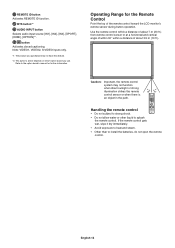
... 7 m (23 ft.) from remote control sensor or at a horizontal and vertical angle of within 30° within a distance of the remote control toward the LCD monitor's remote sensor during button operation. Handling the remote control • Do not subject to strong shock. • Do not allow water or other liquid to...
... 7 m (23 ft.) from remote control sensor or at a horizontal and vertical angle of within 30° within a distance of the remote control toward the LCD monitor's remote sensor during button operation. Handling the remote control • Do not subject to strong shock. • Do not allow water or other liquid to...

Users Manual
Page 15
...the main power before making connections. • Refer to your LCD monitor must be installed close to scratch the panel. 2. CAUTION: MOVING OR INSTALLING THE LCD MONITOR MUST BE DONE BY TWO OR MORE PEOPLE FOR V422/V462, BY FOUR OR MORE PEOPLE FOR V551/V651. If the LCD ...the cable holder. turn the cooling fan to the (+) and (-) signs of the monitor by a qualified technician. A loose connection may result in leaks or bursting. To install or replace batteries: NEC recommends the following battery use and allow the unit to use the Remote Control for ...
...the main power before making connections. • Refer to your LCD monitor must be installed close to scratch the panel. 2. CAUTION: MOVING OR INSTALLING THE LCD MONITOR MUST BE DONE BY TWO OR MORE PEOPLE FOR V422/V462, BY FOUR OR MORE PEOPLE FOR V551/V651. If the LCD ...the cable holder. turn the cooling fan to the (+) and (-) signs of the monitor by a qualified technician. A loose connection may result in leaks or bursting. To install or replace batteries: NEC recommends the following battery use and allow the unit to use the Remote Control for ...

Users Manual
Page 17
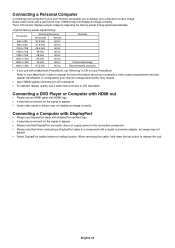
...lines = audio signal. English-15 Using an audio cable with each separate piece of all the attached equipment and make connections. * Refer to the connectable monitors. BNC MODE: VIDEO BNC MODE: COMPONENT DVI MODE: DVI-PC BNC MODE: RGB RAW/EXPAND*1 DVI HDMI SCART VIDEO1 S-VIDEO VIDEO2 DVD/HD VGA ...] in AUDIO INPUT in remote control DVI HDMI DVD/HD VIDEO S-VIDEO VIDEO DVD/HD VGA DVI RGB/HV DISPLAYPORT HDMI *1: depend on the monitor or other external equipment as this may result in resistor turns down the sound. Before making connections: * First turn off the power of equipment.
...lines = audio signal. English-15 Using an audio cable with each separate piece of all the attached equipment and make connections. * Refer to the connectable monitors. BNC MODE: VIDEO BNC MODE: COMPONENT DVI MODE: DVI-PC BNC MODE: RGB RAW/EXPAND*1 DVI HDMI SCART VIDEO1 S-VIDEO VIDEO2 DVD/HD VGA ...] in AUDIO INPUT in remote control DVI HDMI DVD/HD VIDEO S-VIDEO VIDEO DVD/HD VGA DVI RGB/HV DISPLAYPORT HDMI *1: depend on the monitor or other external equipment as this may result in resistor turns down the sound. Before making connections: * First turn off the power of equipment.
Users Manual
Page 18
... enable you use with a Macintosh PowerBook, set "Mirroring" to Off on your computer's screen image. Your LCD monitor displays proper image by adjusting the factory preset timing signal automatically. Resolution 640 x 480 800 x 600 1024 x 768 1280 x 768 1360 x 768 1280...may take a moment for more information about your computer's video output requirements and any special identification or configuration your monitor's image and monitor may not display an image correctly. Refer to your Macintosh's owner's manual for the signal to appear. • Please note that ...
... enable you use with a Macintosh PowerBook, set "Mirroring" to Off on your computer's screen image. Your LCD monitor displays proper image by adjusting the factory preset timing signal automatically. Resolution 640 x 480 800 x 600 1024 x 768 1280 x 768 1360 x 768 1280...may take a moment for more information about your computer's video output requirements and any special identification or configuration your monitor's image and monitor may not display an image correctly. Refer to your Macintosh's owner's manual for the signal to appear. • Please note that ...
Users Manual
Page 19
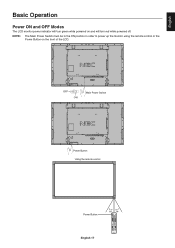
English Basic Operation Power ON and OFF Modes The LCD monitor power indicator will turn green while powered on the front of the LCD. NOTE: The Main Power Switch must be in the ON position in order to power up the monitor using the remote control or the Power Button on and will turn red while powered off. OFF ON Main Power Switch Power Button Using the remote control Power Button English-17
English Basic Operation Power ON and OFF Modes The LCD monitor power indicator will turn green while powered on the front of the LCD. NOTE: The Main Power Switch must be in the ON position in order to power up the monitor using the remote control or the Power Button on and will turn red while powered off. OFF ON Main Power Switch Power Button Using the remote control Power Button English-17
Users Manual
Page 20
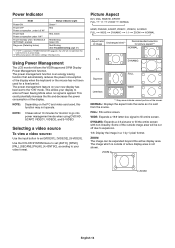
... 16:9 letter box signal to fill the entire screen with factory settings, VGA input only. Using Power Management The LCD monitor follows the VESA approved DPM Display Power Management function. FULL: Fills entire screen. Some of the display when the keyboard or the ... ZOOM NORMAL HDMI, DVD/HD, SCART, VIDEO1, VIDEO2, S-VIDEO FULL WIDE DYNAMIC 1:1 ZOOM NORMAL Aspect ratio of image Unchanged view*3 Recommended selection for monitor to set [VIDEO1], [VIDEO2], [S-VIDEO]. NOTE: Depending on your display to expansion. 1:1: Display the image in active mode. *2 Without any option,...
... 16:9 letter box signal to fill the entire screen with factory settings, VGA input only. Using Power Management The LCD monitor follows the VESA approved DPM Display Power Management function. FULL: Fills entire screen. Some of the display when the keyboard or the ... ZOOM NORMAL HDMI, DVD/HD, SCART, VIDEO1, VIDEO2, S-VIDEO FULL WIDE DYNAMIC 1:1 ZOOM NORMAL Aspect ratio of image Unchanged view*3 Recommended selection for monitor to set [VIDEO1], [VIDEO2], [S-VIDEO]. NOTE: Depending on your display to expansion. 1:1: Display the image in active mode. *2 Without any option,...
Users Manual
Page 21
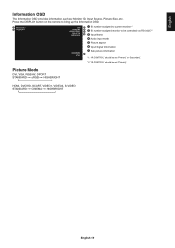
... CINEMA HIGHBRIGHT English-19 Press the DISPLAY button on the remote to bring up the Information OSD. ᕡ ID number assigned to current monitor*1 ᕢ ID number assigned monitor to be controlled via RS-232C*2 ᕣ Input Name ᕤ Audio input mode ᕥ Picture aspect ᕦ Input Signal Information ᕧ Sub picture... information *1: "IR CONTROL" should be set "Primary" or "Secondary". *2: "IR CONTROL" should be set "Primary". English Information OSD The Information OSD provides information such as: Monitor ID, Input Source, Picture Size, etc.
... CINEMA HIGHBRIGHT English-19 Press the DISPLAY button on the remote to bring up the Information OSD. ᕡ ID number assigned to current monitor*1 ᕢ ID number assigned monitor to be controlled via RS-232C*2 ᕣ Input Name ᕤ Audio input mode ᕥ Picture aspect ᕦ Input Signal Information ᕧ Sub picture... information *1: "IR CONTROL" should be set "Primary" or "Secondary". *2: "IR CONTROL" should be set "Primary". English Information OSD The Information OSD provides information such as: Monitor ID, Input Source, Picture Size, etc.
Users Manual
Page 24
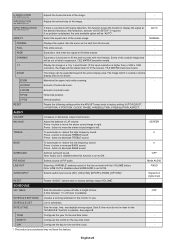
... - YEAR Configures the year for the real-time clock. - *: The product you purchased may not have this function forces the monitor to fill the entire screen with the VOLUME button. DAY Configures the day for the real time clock. - After selection,... following settings within the ADJUST menu back to decrease TREBLE sound. BALANCE Adjust the balance of the image. - SCHEDULE OFF TIMER Sets the monitor to increase BASS sound. H RESOLUTION Adjusts the horizontal size of L/R volume. VGA, RGB/HV inputs only INPUT RESOLUTION VGA, RGB/HV...
... - YEAR Configures the year for the real-time clock. - *: The product you purchased may not have this function forces the monitor to fill the entire screen with the VOLUME button. DAY Configures the day for the real time clock. - After selection,... following settings within the ADJUST menu back to decrease TREBLE sound. BALANCE Adjust the balance of the image. - SCHEDULE OFF TIMER Sets the monitor to increase BASS sound. H RESOLUTION Adjusts the horizontal size of L/R volume. VGA, RGB/HV inputs only INPUT RESOLUTION VGA, RGB/HV...
Users Manual
Page 25
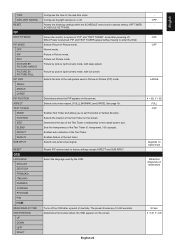
... the OSD after powering off. Picture by picture (split screen) mode, with keep aspect. Sets the transparency of the Text Ticker. X = 128, Y = 225 Allows the monitor to the overall screen size. Picture in "PIP" and "TEXT TICKER" mode after a period of the Text Ticker on destination) MENU DISPLAY TIME OSD POSITION...
... the OSD after powering off. Picture by picture (split screen) mode, with keep aspect. Sets the transparency of the Text Ticker. X = 128, Y = 225 Allows the monitor to the overall screen size. Picture in "PIP" and "TEXT TICKER" mode after a period of the Text Ticker on destination) MENU DISPLAY TIME OSD POSITION...


