
Specification Brochure
Page 1
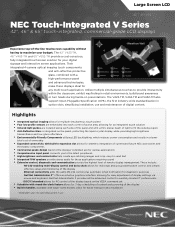
...-of display settings via mouse and keyboard. Their integrated 4-camera optical imaging touch components and anti-reflective protective glass, combined with larger-sized models, allow for easy adjustment of -the-line touchscreen capability without having to remotely located IT professionals. · DDC/CI standard allows for PC control of the display based on presentations. The V423-TM, V463-TM and V652-TM also support Open Pluggable Specification (OPS...
...-of display settings via mouse and keyboard. Their integrated 4-camera optical imaging touch components and anti-reflective protective glass, combined with larger-sized models, allow for easy adjustment of -the-line touchscreen capability without having to remotely located IT professionals. · DDC/CI standard allows for PC control of the display based on presentations. The V423-TM, V463-TM and V652-TM also support Open Pluggable Specification (OPS...
Specification Brochure
Page 2
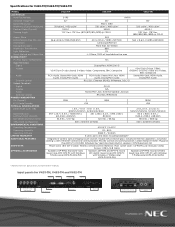
... for V423-TM/V463-TM/V652-TM MODEL LCD MODULE Panel Technology Viewable Image Size Native Resolution Brightness (Typical/Maximum) Contrast Ratio (Typical) Viewing Angle Aspect Ratio Active Screen Area (W x H) Orientation Displayable Colors Brightness Transmission Light Reflection Touch Method and Object Size CONNECTIVITY PC/Mac Signal Compatibility Input Terminals Digital Analog Audio External Control Output Terminals Digital Analog Audio External Control POWER CONSUMPTiON On (Typical) ECO Mode Standby PHYSICAL SPECIFICATIONS Bezel Width (L/R, T/B) Net Dimensions (without stand) VESA Hole...
... for V423-TM/V463-TM/V652-TM MODEL LCD MODULE Panel Technology Viewable Image Size Native Resolution Brightness (Typical/Maximum) Contrast Ratio (Typical) Viewing Angle Aspect Ratio Active Screen Area (W x H) Orientation Displayable Colors Brightness Transmission Light Reflection Touch Method and Object Size CONNECTIVITY PC/Mac Signal Compatibility Input Terminals Digital Analog Audio External Control Output Terminals Digital Analog Audio External Control POWER CONSUMPTiON On (Typical) ECO Mode Standby PHYSICAL SPECIFICATIONS Bezel Width (L/R, T/B) Net Dimensions (without stand) VESA Hole...
Launch Press Release
Page 2
... Four-camera optical-imaging technology, which supports up to four simultaneous touches Integrated, double-sided anti-reflective glass, which protects the LCD panels, while minimizing reflectivity Expanded connectivity with superior sound Optional accessories, which include stands, 3G/HD/SD-SDI card, DVI daisy chain, OPS devices, OPS adapter and external PCs The V463-TM display will be available...
... Four-camera optical-imaging technology, which supports up to four simultaneous touches Integrated, double-sided anti-reflective glass, which protects the LCD panels, while minimizing reflectivity Expanded connectivity with superior sound Optional accessories, which include stands, 3G/HD/SD-SDI card, DVI daisy chain, OPS devices, OPS adapter and external PCs The V463-TM display will be available...
User's Manual
Page 2
... Diagram ...English-14 Connecting a Personal Computer English-15 Connecting a DVD Player or Computer with HDMI out English-15 Connecting a Computer with DisplayPort English-15 Quick Start Connection for Touch Panel model English-15 Basic Operation...English-16 Power ON and OFF Modes ...English-16 Power Indicator...English-17 Using Power Management ...English-17 Selecting a video source...English-17 Picture Aspect...English-17 Information OSD ...English-18 Picture Mode...English-18 OSD (On-Screen-Display) Controls...
... Diagram ...English-14 Connecting a Personal Computer English-15 Connecting a DVD Player or Computer with HDMI out English-15 Connecting a Computer with DisplayPort English-15 Quick Start Connection for Touch Panel model English-15 Basic Operation...English-16 Power ON and OFF Modes ...English-16 Power Indicator...English-17 Using Power Management ...English-17 Selecting a video source...English-17 Picture Aspect...English-17 Information OSD ...English-18 Picture Mode...English-18 OSD (On-Screen-Display) Controls...
User's Manual
Page 5
... the following conditions: • When the power supply cord or plug is dusty, please gently wipe with a soft cloth. • Please do not connect to the screen. • The power supply cord you purchased may cause permanent damage to a peripheral device with standard signals. • Use the preset Color Setting. • Use non-interlaced signals. • Do not use your monitor from air-conditioning outlet directly, as...
... the following conditions: • When the power supply cord or plug is dusty, please gently wipe with a soft cloth. • Please do not connect to the screen. • The power supply cord you purchased may cause permanent damage to a peripheral device with standard signals. • Use the preset Color Setting. • Use non-interlaced signals. • Do not use your monitor from air-conditioning outlet directly, as...
User's Manual
Page 7
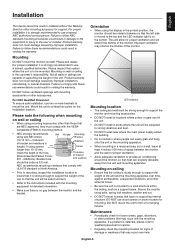
... standard in voiding the warranty. Orientation • When using screws under 8.5 mm. Secure the monitor using mounting accessories other accessories. Please note the following when mounting on wall or ceiling • When using bolts, spring lock washers, washer and nut. • DO NOT mount to the top and the LED indicator light is sturdy enough to support the weight of bracket and washers in a wall, leave at least...
... standard in voiding the warranty. Orientation • When using screws under 8.5 mm. Secure the monitor using mounting accessories other accessories. Please note the following when mounting on wall or ceiling • When using bolts, spring lock washers, washer and nut. • DO NOT mount to the top and the LED indicator light is sturdy enough to support the weight of bracket and washers in a wall, leave at least...
User's Manual
Page 10
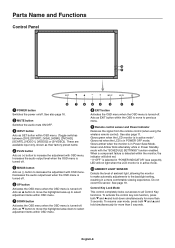
... OSD menu is in active mode. µ AMBIENT LIGHT SENSOR Detects the level of ambient light, allowing the monitor to make automatic adjustments to previous menu. ¾ Remote control sensor and Power Indicator Receives the signal from the remote control (when using the wireless remote control). Parts Name and Functions Control Panel ³ POWER button Switches the power on/off . Acts as (+) button to all Control Key functions. To resume user mode, press both and and hold simultaneously for more comfortable viewing...
... OSD menu is in active mode. µ AMBIENT LIGHT SENSOR Detects the level of ambient light, allowing the monitor to make automatic adjustments to previous menu. ¾ Remote control sensor and Power Indicator Receives the signal from the remote control (when using the wireless remote control). Parts Name and Functions Control Panel ³ POWER button Switches the power on/off . Acts as (+) button to all Control Key functions. To resume user mode, press both and and hold simultaneously for more comfortable viewing...
User's Manual
Page 11
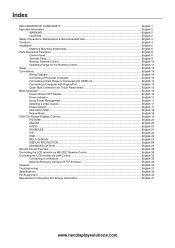
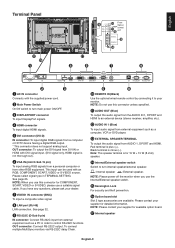
... (Black) Use the optional wired remote control by connecting it to turn main power ON/OFF. » DISPLAYPORT connector To input DisplayPort signals. ¿ HDMI connector To input digital HDMI signals. ´ DVI connector (DVI-D) IN connector: To input digital RGB signals from other RGB equipment. Note: This speaker terminal is minus (-). English Terminal Panel From Option control unit ³ AC IN connector Connects with the supplied power cord. · Main Power Switch On/Off switch to control...
... (Black) Use the optional wired remote control by connecting it to turn main power ON/OFF. » DISPLAYPORT connector To input DisplayPort signals. ¿ HDMI connector To input digital HDMI signals. ´ DVI connector (DVI-D) IN connector: To input digital RGB signals from other RGB equipment. Note: This speaker terminal is minus (-). English Terminal Panel From Option control unit ³ AC IN connector Connects with the supplied power cord. · Main Power Switch On/Off switch to control...
User's Manual
Page 12
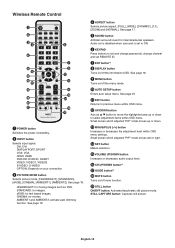
... select adjustment items within OSD menu settings. English-10 DVI: DVI DISPLAYPORT: DPORT VGA: VGA HDMI: HDMI DVD/HD: DVD/HD, SCART VIDEO: VIDEO1, VIDEO2 S-VIDEO: S-VIDEO OPTION: Depends on /standby. · INPUT button Selects input signal. CINEMA: for images. Wireless Remote Control ³ POWER button Switches the power on your connection » PICTURE MODE button Selects picture mode, [HIGHBRIGHT], [STANDARD], [sRGB], [CINEMA], [AMBIENT1], [AMBIENT2]. STANDARD: for movies. See page 17. ´ SOUND button Artificial surround sound for text based...
... select adjustment items within OSD menu settings. English-10 DVI: DVI DISPLAYPORT: DPORT VGA: VGA HDMI: HDMI DVD/HD: DVD/HD, SCART VIDEO: VIDEO1, VIDEO2 S-VIDEO: S-VIDEO OPTION: Depends on /standby. · INPUT button Selects input signal. CINEMA: for images. Wireless Remote Control ³ POWER button Switches the power on your connection » PICTURE MODE button Selects picture mode, [HIGHBRIGHT], [STANDARD], [sRGB], [CINEMA], [AMBIENT1], [AMBIENT2]. STANDARD: for movies. See page 17. ´ SOUND button Artificial surround sound for text based...
User's Manual
Page 14
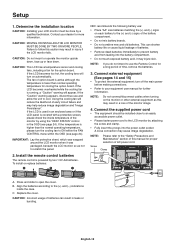
Setup 1. Determine the installation location CAUTION: Installing your LCD monitor must be installed close to an easily accessible power outlet. • Please fasten power cord to open the cover. CAUTION: Do not mount or operate the monitor upside down, face up or face down. If the LCD is used in an enclosed area or if the LCD panel is covered with a protective screen, please check the inside the case. IMPORTANT: Lay...
Setup 1. Determine the installation location CAUTION: Installing your LCD monitor must be installed close to an easily accessible power outlet. • Please fasten power cord to open the cover. CAUTION: Do not mount or operate the monitor upside down, face up or face down. If the LCD is used in an enclosed area or if the LCD panel is covered with a protective screen, please check the inside the case. IMPORTANT: Lay...
User's Manual
Page 16
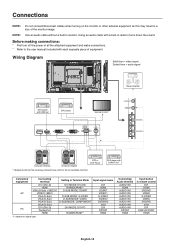
... the connectable monitors. Connections NOTE: Do not connect/disconnect cables when turning on signal type. Setting in resistor turns down the sound. Wiring Diagram Solid lines = video signal Dotted lines = audio signal Stereo Amplifier DVD player with HDMI out DVD player Second monitor* Computer (Analog) Computer (Digital) VCR or DVD Player *: Multiple monitors that are daisy-chained have a limit to the user manual included with a built-in Terminal Mode DVI MODE: DVI-HD RAW/EXPAND*1 D-SUB MODE: SCART - Using an audio cable with...
... the connectable monitors. Connections NOTE: Do not connect/disconnect cables when turning on signal type. Setting in resistor turns down the sound. Wiring Diagram Solid lines = video signal Dotted lines = audio signal Stereo Amplifier DVD player with HDMI out DVD player Second monitor* Computer (Analog) Computer (Digital) VCR or DVD Player *: Multiple monitors that are daisy-chained have a limit to the user manual included with a built-in Terminal Mode DVI MODE: DVI-HD RAW/EXPAND*1 D-SUB MODE: SCART - Using an audio cable with...
User's Manual
Page 17
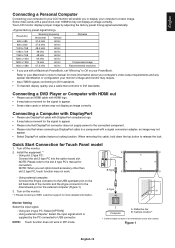
... Recommended resolution • If you to display your computer's screen image. Connecting a DVD Player or Computer with HDMI out • Please use an HDMI cable with HDMI logo. • It may take a moment for the signal to appear. • Some video cards or drivers may not display an image correctly. Quick Start Connection for connection. Turn off the monitor. 2. B Type - Using external computer: Select the input signal which is supplied by adjusting the factory preset timing signal automatically. Your LCD monitor displays proper...
... Recommended resolution • If you to display your computer's screen image. Connecting a DVD Player or Computer with HDMI out • Please use an HDMI cable with HDMI logo. • It may take a moment for the signal to appear. • Some video cards or drivers may not display an image correctly. Quick Start Connection for connection. Turn off the monitor. 2. B Type - Using external computer: Select the input signal which is supplied by adjusting the factory preset timing signal automatically. Your LCD monitor displays proper...
User's Manual
Page 26
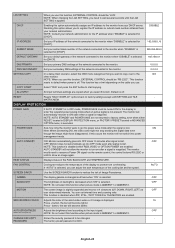
... network connected to default when power is not present. OFF SIDE BORDER COLOR Adjusts the color of the network connected to the monitor. 0.0.0.0 SETTING COPY In a daisy chain scenario, select the OSD menu categories that you want to copy over to turn on the cable you use. OFF MOTION The screen image is displayed. 15 Press + button, the bar will not allow the monitor to the NO other monitor. PASSWORD The factory...
... network connected to default when power is not present. OFF SIDE BORDER COLOR Adjusts the color of the network connected to the monitor. 0.0.0.0 SETTING COPY In a daisy chain scenario, select the OSD menu categories that you want to copy over to turn on the cable you use. OFF MOTION The screen image is displayed. 15 Press + button, the bar will not allow the monitor to the NO other monitor. PASSWORD The factory...
User's Manual
Page 27
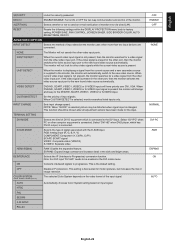
... S-VIDEO input. English SECURITY Locks the security password. When current video input signal is connected. When DVD/HD, SCART, VIDEO1, VIDEO2 or S-VIDEO input signal is changed. NOTE: When "QUICK" is selected, picture may be distorted when signal input is present the monitor will change speed. D-SUB MODE Selects the type of input detection the monitor uses when more than two input devices are connected. Note: For DVI input "DVI-HD" needs to factory setting: POWER SAVE, FAN CONTROL, SCREEN SAVER, SIDE BORDER COLOR, AUTO...
... S-VIDEO input. English SECURITY Locks the security password. When current video input signal is connected. When DVD/HD, SCART, VIDEO1, VIDEO2 or S-VIDEO input signal is changed. NOTE: When "QUICK" is selected, picture may be distorted when signal input is present the monitor will change speed. D-SUB MODE Selects the type of input detection the monitor uses when more than two input devices are connected. Note: For DVI input "DVI-HD" needs to factory setting: POWER SAVE, FAN CONTROL, SCREEN SAVER, SIDE BORDER COLOR, AUTO...
User's Manual
Page 28
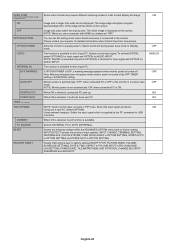
... adjustable) TOUCH PANEL STANDBY PC SOURCE RESET FACTORY RESET Some video formats may require different scanning modes in OPTION SETTING. Image size is displayed on the screen. The whole image is larger than what can set "OFF". NOTE: When you use a computer with HDMI out, please set this setting when option board accessory is selected for input signal and OPTION for AUDIO INPUT. Please contact your supplier for AUDIO INPUT. Allow the monitor to supply power to USB connector. Selects sound input signal...
... adjustable) TOUCH PANEL STANDBY PC SOURCE RESET FACTORY RESET Some video formats may require different scanning modes in OPTION SETTING. Image size is displayed on the screen. The whole image is larger than what can set "OFF". NOTE: When you use a computer with HDMI out, please set this setting when option board accessory is selected for input signal and OPTION for AUDIO INPUT. Please contact your supplier for AUDIO INPUT. Allow the monitor to supply power to USB connector. Selects sound input signal...
User's Manual
Page 29
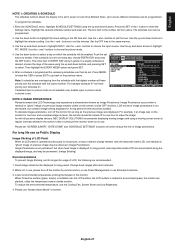
... and press the SET button. buttons to set button to the number will have priority over schedule #1. buttons to the previous menu. Then highlight the EVERY WEEK option and press SET. 5. To reduce the environmental temperature, use , please turn off the monitor by remote control, or use Power Management or use as Public Display Image Sticking of LCD Panel When an LCD panel is located in an enclosed space, the monitor are overlapping then...
... and press the SET button. buttons to set button to the number will have priority over schedule #1. buttons to the previous menu. Then highlight the EVERY WEEK option and press SET. 5. To reduce the environmental temperature, use , please turn off the monitor by remote control, or use Power Management or use as Public Display Image Sticking of LCD Panel When an LCD panel is located in an enclosed space, the monitor are overlapping then...
User's Manual
Page 30
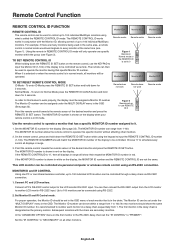
... chain set to 0 Monitor ID:1 Monitor ID:2 Monitor ID:3 Remote works Monitor ID:3 TO SET/RESET REMOTE CONTROL MODE ID Mode - The MONITOR ID number is shown in red on the display when your remote control is in the chain. Connect PC and LCD monitors. Connect a PC's RS-232C control output to input the REMOTE CONTROL ID number (1-100). Up to 100 monitors can be set in the OSD menu of up to use the KEYPAD to input the Monitor ID (1-100) of the display to...
... chain set to 0 Monitor ID:1 Monitor ID:2 Monitor ID:3 Remote works Monitor ID:3 TO SET/RESET REMOTE CONTROL MODE ID Mode - The MONITOR ID number is shown in red on the display when your remote control is in the chain. Connect PC and LCD monitors. Connect a PC's RS-232C control output to input the REMOTE CONTROL ID number (1-100). Up to 100 monitors can be set in the OSD menu of up to use the KEYPAD to input the Monitor ID (1-100) of the display to...
User's Manual
Page 38
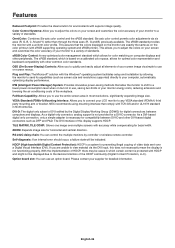
... your monitor to a variety of video data sent over multiple screens with a uniform color profile. NEC recommends using mounting interface that comply with the Windows® operating system facilitates setup and installation by controller or wireless remote controller. The DVI interface of standards. Self-diagnosis: If an internal error should occur, a failure state will be cases in most resolutions, significantly expanding image size...
... your monitor to a variety of video data sent over multiple screens with a uniform color profile. NEC recommends using mounting interface that comply with the Windows® operating system facilitates setup and installation by controller or wireless remote controller. The DVI interface of standards. Self-diagnosis: If an internal error should occur, a failure state will be cases in most resolutions, significantly expanding image size...
User's Manual
Page 39
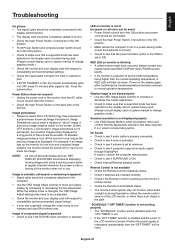
... using a moving screen saver at regular intervals whenever the screen is idle or turning off by increasing or decreasing the fine adjustment. When the display mode is changed, the OSD Image Adjust settings may not function when direct sunlight or strong illumination strikes the remote control sensor of time should be avoided. RED LED on the screen. English Troubleshooting No picture • The signal cable should be completely connected to the display...
... using a moving screen saver at regular intervals whenever the screen is idle or turning off by increasing or decreasing the fine adjustment. When the display mode is changed, the OSD Image Adjust settings may not function when direct sunlight or strong illumination strikes the remote control sensor of time should be avoided. RED LED on the screen. English Troubleshooting No picture • The signal cable should be completely connected to the display...
User's Manual
Page 41
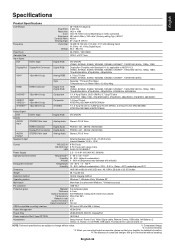
...) Transparency: More than 96% Reflection rate: ≤ 2% Surface hardness: 8 H Impact resistance*4: 130 cm 300 mm x 300 mm (M6, 4 Holes) Power Management VESA DPM Plug & Play Power supply for Slot 2 type OPTION VESA DDC2B, DDC/CI, DisplayPort 16V/3.8 A Accessories Setup manual, Power Cord, Video Signal cable, Remote Control, USB cable, AA Battery x 2, Clamp x 3, Screw x 3, CD-ROM, USB cable, Thumbscrew for optional stand x 2 NOTE: Technical specifications are subject to HDCP V1.3 VGA60...
...) Transparency: More than 96% Reflection rate: ≤ 2% Surface hardness: 8 H Impact resistance*4: 130 cm 300 mm x 300 mm (M6, 4 Holes) Power Management VESA DPM Plug & Play Power supply for Slot 2 type OPTION VESA DDC2B, DDC/CI, DisplayPort 16V/3.8 A Accessories Setup manual, Power Cord, Video Signal cable, Remote Control, USB cable, AA Battery x 2, Clamp x 3, Screw x 3, CD-ROM, USB cable, Thumbscrew for optional stand x 2 NOTE: Technical specifications are subject to HDCP V1.3 VGA60...


