

Users Manual
Page 5
... : • Use the preset Size and Position controls with care. • Do not cover vent on the LCD surface. Blink often. • Position the monitor at controlled luminous environments, to avoid disturbing reflections from the wall outlet and refer servicing to dangerous shock hazards or other risks. Immediately unplug your country. (Type H05VV-F 3G 1mm2 should be connected to...
... : • Use the preset Size and Position controls with care. • Do not cover vent on the LCD surface. Blink often. • Position the monitor at controlled luminous environments, to avoid disturbing reflections from the wall outlet and refer servicing to dangerous shock hazards or other risks. Immediately unplug your country. (Type H05VV-F 3G 1mm2 should be connected to...
Users Manual
Page 7
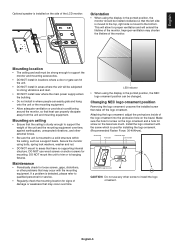
... the lifetime of the monitor. If a problem is detected, please refer to qualified personnel for service. • Regularly check the mounting location for mounting. LED Indicator • When using the display in the portrait position, the NEC logo ornament position can be subjected to strong vibrations and dust. • DO NOT install near where the main power supply enters the building...
... the lifetime of the monitor. If a problem is detected, please refer to qualified personnel for service. • Regularly check the mounting location for mounting. LED Indicator • When using the display in the portrait position, the NEC logo ornament position can be subjected to strong vibrations and dust. • DO NOT install near where the main power supply enters the building...
Users Manual
Page 10
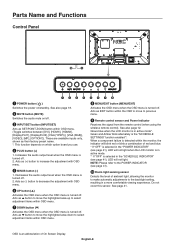
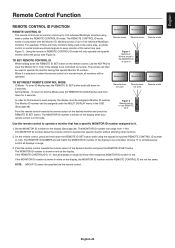
... On Screen Display. See also page 12. NOTE: Please refer to previous menu. ¾ Remote control sensor and Power Indicator Receives the signal from the remote control (when using the wireless remote control). English-8 These are available inputs only, shown as SET/POINT ZOOM button within OSD menu. (Toggle switches between [DVI], [HDMI1], [HDMI2], [DisplayPort1], [DisplayPort2], [VGA (YPbPr)], [VGA (RGB)], [VIDEO], [MP], [OPTION*]). Glows blue when the LCD monitor is turned off . 2. Green and Amber blink...
... On Screen Display. See also page 12. NOTE: Please refer to previous menu. ¾ Remote control sensor and Power Indicator Receives the signal from the remote control (when using the wireless remote control). English-8 These are available inputs only, shown as SET/POINT ZOOM button within OSD menu. (Toggle switches between [DVI], [HDMI1], [HDMI2], [DisplayPort1], [DisplayPort2], [VGA (YPbPr)], [VGA (RGB)], [VIDEO], [MP], [OPTION*]). Glows blue when the LCD monitor is turned off . 2. Green and Amber blink...

Users Manual
Page 11
...): Power supply port. This connector does not support Headphone terminal. ƻ Internal/External speaker switch : Internal speaker : External speaker. This input can be used with the supplied power cord. · Main Power Switch On/Off switch to turn off the monitor's main power when you use Media player, please connect a microSD memory card to an external device (stereo receiver, amplifier, etc.). NOTE: When you have any questions, please ask your monitor. NOTE: Do not use a suitable signal cable. To use...
...): Power supply port. This connector does not support Headphone terminal. ƻ Internal/External speaker switch : Internal speaker : External speaker. This input can be used with the supplied power cord. · Main Power Switch On/Off switch to turn off the monitor's main power when you use Media player, please connect a microSD memory card to an external device (stereo receiver, amplifier, etc.). NOTE: When you have any questions, please ask your monitor. NOTE: Do not use a suitable signal cable. To use...
Users Manual
Page 21
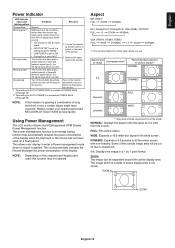
... and short in a 1 by remote control or button on the monitor by 1 pixel format. FULL: Fills entire screen. ZOOM ZOOM English-19 English Power Indicator LED indicator status and lighting pattern Condition Recovery Glowing blue Normal Blinking green*1 Meeting one of the conditions below when the monitor has been past a certain amount of time with [network signal input] + [no AV signal input which you set]. Turn on the back of the...
... and short in a 1 by remote control or button on the monitor by 1 pixel format. FULL: Fills entire screen. ZOOM ZOOM English-19 English Power Indicator LED indicator status and lighting pattern Condition Recovery Glowing blue Normal Blinking green*1 Meeting one of the conditions below when the monitor has been past a certain amount of time with [network signal input] + [no AV signal input which you set]. Turn on the back of the...

Users Manual
Page 24
...® instruction user's manual or Help file on the remote control, or "AUTO" in the Media Player. If using it may back to the file display screen. THUMBNAILS/ICON Switches between thumbnail display and icon display. Please set interval (PLAY MODE is "AUTO"). • The default factory setting is "MANUAL". Displays the setting screen. The icon of USB memory than we mentioned, please use a USB memory which is indicated by operating a button on how to work with all USB memories sold...
...® instruction user's manual or Help file on the remote control, or "AUTO" in the Media Player. If using it may back to the file display screen. THUMBNAILS/ICON Switches between thumbnail display and icon display. Please set interval (PLAY MODE is "AUTO"). • The default factory setting is "MANUAL". Displays the setting screen. The icon of USB memory than we mentioned, please use a USB memory which is indicated by operating a button on how to work with all USB memories sold...
Users Manual
Page 38
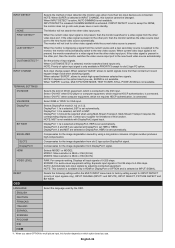
... video input ports. A higher number produces high compensation. Compensates for a video signal from slot 2 type option DisplayPort signal. Displays all input signals of input signals. Resets the following settings within the MULTI INPUT menu back to factory setting except for multi picture input, this function. When INPUT DETECT is active, AUTO DIMMING is connected. When current video input signal is not present, the monitor searches for the image degradation from the current source and a new secondary source is present in INPUT CHANGE...
... video input ports. A higher number produces high compensation. Compensates for a video signal from slot 2 type option DisplayPort signal. Displays all input signals of input signals. Resets the following settings within the MULTI INPUT menu back to factory setting except for multi picture input, this function. When INPUT DETECT is active, AUTO DIMMING is connected. When current video input signal is not present, the monitor searches for the image degradation from the current source and a new secondary source is present in INPUT CHANGE...
Users Manual
Page 42
.... INPUT: When UNLOCK is selected, the INPUT/SET button is 0000. ENABLE/DISABLE: Turns ON or OFF the two way communication and control of the monitor. When ACTIVATE is selected, all the settings are activated. Selects the mode UNLOCK, ALL LOCK or CUSTOM LOCK. When LOCK is on, or the remote control button or control button on the remote control are only available from DVI, HDMI1, HDMI2, DisplayPort1, DisplayPort2, VGA (RGB/YPbPr), VIDEO, MEDIA PLAYER...
.... INPUT: When UNLOCK is selected, the INPUT/SET button is 0000. ENABLE/DISABLE: Turns ON or OFF the two way communication and control of the monitor. When ACTIVATE is selected, all the settings are activated. Selects the mode UNLOCK, ALL LOCK or CUSTOM LOCK. When LOCK is on, or the remote control button or control button on the remote control are only available from DVI, HDMI1, HDMI2, DisplayPort1, DisplayPort2, VGA (RGB/YPbPr), VIDEO, MEDIA PLAYER...

Users Manual
Page 44
... connected HDMI CEC device receives play command, input signal is displayed in power save mode. RESET Resets all the settings within the OPTION menu. *1: This function depends on the monitor, connected HDMI CEC device go into full entire screen. FORCE QUIT When ON is connected, set to control the HDMI CEC compliant device connected via remote control or the power button on which option board you do not have either of USB CM1 (2A). NOTE: When a HDMI CEC audio...
... connected HDMI CEC device receives play command, input signal is displayed in power save mode. RESET Resets all the settings within the OPTION menu. *1: This function depends on the monitor, connected HDMI CEC device go into full entire screen. FORCE QUIT When ON is connected, set to control the HDMI CEC compliant device connected via remote control or the power button on which option board you do not have either of USB CM1 (2A). NOTE: When a HDMI CEC audio...
Users Manual
Page 47
... DISPLAY menu in normal mode would send signals to 0 Monitor ID:1 Monitor ID:2 Monitor ID:3 Remote works Monitor ID:3 TO SET/RESET REMOTE CONTROL MODE ID Mode - English-45 The Monitor ID number can be specified via remote. On the remote control, press and hold down the REMOTE ID SET button while using what is set up to use the KEYPAD to input the Monitor ID (1-100) of up to 100 individual MultiSync monitors. Point the remote control towards the remote sensor...
... DISPLAY menu in normal mode would send signals to 0 Monitor ID:1 Monitor ID:2 Monitor ID:3 Remote works Monitor ID:3 TO SET/RESET REMOTE CONTROL MODE ID Mode - English-45 The Monitor ID number can be specified via remote. On the remote control, press and hold down the REMOTE ID SET button while using what is set up to use the KEYPAD to input the Monitor ID (1-100) of up to 100 individual MultiSync monitors. Point the remote control towards the remote sensor...

Users Manual
Page 49
... LCD monitor via RS-232C Remote Control This LCD monitor can be controlled by a personal computer are: • Power ON or standby. • Switching between input signals. • Sound Mute ON or OFF. Functions that can be controlled by connecting a personal computer with the monitor. The file is required. To control a monitor, please use the control command. Instructions for details. If you turn on the CD included with a RS-232C (reverse type...
... LCD monitor via RS-232C Remote Control This LCD monitor can be controlled by a personal computer are: • Power ON or standby. • Switching between input signals. • Sound Mute ON or OFF. Functions that can be controlled by connecting a personal computer with the monitor. The file is required. To control a monitor, please use the control command. Instructions for details. If you turn on the CD included with a RS-232C (reverse type...

Users Manual
Page 58
... into standby at the monitor. By using + - buttons select ON then press SET/POINT ZOOM button on the wireless remote control is also controlling volume of a connected HDMI CEC supporting device (CEC version, Physical Address). Please refer to the user's manual supplied with "Change Language function". The function sends digital audio signal through HDMI cable. By using buttons select SEARCH DEVICE then press SET/POINT ZOOM. By using + - If the monitor is put to standby by HDMI cable is also turned on...
... into standby at the monitor. By using + - buttons select ON then press SET/POINT ZOOM button on the wireless remote control is also controlling volume of a connected HDMI CEC supporting device (CEC version, Physical Address). Please refer to the user's manual supplied with "Change Language function". The function sends digital audio signal through HDMI cable. By using buttons select SEARCH DEVICE then press SET/POINT ZOOM. By using + - If the monitor is put to standby by HDMI cable is also turned on...
Users Manual
Page 63
...-Screen-Display) Controls: Allow you are unable to a variety of your monitor to view material via the digital input, this display supports HDCP. As a DVI-based digital only connection, only a simple adapter is designed for professionals with a uniform color profile. If you to quickly and easily adjust all elements of standards. SPECTRAVIEW ENGINE: This system is necessary for compatibility between computers and displays. Six-axis color control permits color adjustments...
...-Screen-Display) Controls: Allow you are unable to a variety of your monitor to view material via the digital input, this display supports HDCP. As a DVI-based digital only connection, only a simple adapter is designed for professionals with a uniform color profile. If you to quickly and easily adjust all elements of standards. SPECTRAVIEW ENGINE: This system is necessary for compatibility between computers and displays. Six-axis color control permits color adjustments...

Users Manual
Page 66
...) DisplayPort Connector Digital Audio PCM 32, 44.1, 48 KHz (16/20/24bit) AUDIO Output Stereo Mini Jack Analog Audio Stereo L/R 0.5 Vrms Speaker Output External Speaker Jack 15 W + 15 W (8 ohm) Internal Speaker 10 W + 10 W (Stereo) Control RS-232C In: 9 Pin D-sub LAN: RJ-45 10 BASE-T/100 BASE-TX x 2 Remote IN: Stereo Mini Jack 3.5 ɸ SD card Hub USB Hub Port: microSD card. HDMI HDMI Connector Digital YUV Digital RGB HDMI VGA60, SVGA60...
...) DisplayPort Connector Digital Audio PCM 32, 44.1, 48 KHz (16/20/24bit) AUDIO Output Stereo Mini Jack Analog Audio Stereo L/R 0.5 Vrms Speaker Output External Speaker Jack 15 W + 15 W (8 ohm) Internal Speaker 10 W + 10 W (Stereo) Control RS-232C In: 9 Pin D-sub LAN: RJ-45 10 BASE-T/100 BASE-TX x 2 Remote IN: Stereo Mini Jack 3.5 ɸ SD card Hub USB Hub Port: microSD card. HDMI HDMI Connector Digital YUV Digital RGB HDMI VGA60, SVGA60...

Users Manual
Page 67
... Input Signal DVI DVI-D 24pin Digital RGB DVI (HDCP) VGA60, SVGA60, XGA60, WXGA60, SXGA60, UXGA60*1, 1920X1080 (60Hz), 1080p, 1080i DisplayPort DisplayPort Connector Digital RGB DisplayPort Complies with Standard V1.2, applicable to 32GB microSDHC is supported. USB1: USB 2.0 Downstream port USB2: USB 2.0 Upstream port USB CM1 (2A): Power supply port, 5V/2A USB CM2: USB service port for maintenance USB MP: Media Player/Firmware update port Power Supply 2.7 - 1.1 A @ 100-240V AC, 50/60Hz Power Consumption Operational Environment Normal operation...
... Input Signal DVI DVI-D 24pin Digital RGB DVI (HDCP) VGA60, SVGA60, XGA60, WXGA60, SXGA60, UXGA60*1, 1920X1080 (60Hz), 1080p, 1080i DisplayPort DisplayPort Connector Digital RGB DisplayPort Complies with Standard V1.2, applicable to 32GB microSDHC is supported. USB1: USB 2.0 Downstream port USB2: USB 2.0 Upstream port USB CM1 (2A): Power supply port, 5V/2A USB CM2: USB service port for maintenance USB MP: Media Player/Firmware update port Power Supply 2.7 - 1.1 A @ 100-240V AC, 50/60Hz Power Consumption Operational Environment Normal operation...

Users Manual
Page 68
....6 (H) x 2.2 (D) inches (w/o Deco Dimension) Weight 17.6 kg (38.8 lbs) VESA compatible mounting interface 300 mm x 300 mm (M6, 4 Holes) Power Management VESA DPM Plug & Play VESA DDC2Bi, DDC/CI, DisplayPort Power supply for detailed information. *3: Displayed text may be blurred. *4: Common terminal. P484 Product Specifications LCD Module 48"/120.94 cm diagonal Pixel Pitch: 0.549 mm Resolution: 1920 x 1080 Color: Over 1073 million colors (depending on Green Video: 0.3 Vp...
....6 (H) x 2.2 (D) inches (w/o Deco Dimension) Weight 17.6 kg (38.8 lbs) VESA compatible mounting interface 300 mm x 300 mm (M6, 4 Holes) Power Management VESA DPM Plug & Play VESA DDC2Bi, DDC/CI, DisplayPort Power supply for detailed information. *3: Displayed text may be blurred. *4: Common terminal. P484 Product Specifications LCD Module 48"/120.94 cm diagonal Pixel Pitch: 0.549 mm Resolution: 1920 x 1080 Color: Over 1073 million colors (depending on Green Video: 0.3 Vp...

External Control Codes
Page 42
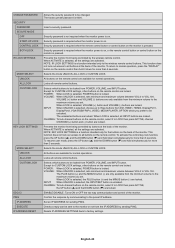
This operation requires supported option TV tuner. SYSTEM MONITOR INFORMATION POWER Item SLOT2 CH SELECT RESET (OPTION) MODEL NAME SERIAL CARBON SAVINGS CARBON USAGE FIRMWARE MAC ADDRESS FACTORY RESET POWER SUPPLY AUTO POWER ON SETTING LOCK USB BOOT MODE IR SIGNAL MONITOR CONTROL SHUTDOWN SIGNAL POWER OFF DELAY CHANGE PASSWORD MUTE SCREEN MUTE MTS SOUND OP code OP code Parameter page 11h 63h 0: No mean 1: TDMS 2: DisplayPort 02h CBh 0: No mean 10(0Ah): Option Category Refer to chapter 11 Refer to...
This operation requires supported option TV tuner. SYSTEM MONITOR INFORMATION POWER Item SLOT2 CH SELECT RESET (OPTION) MODEL NAME SERIAL CARBON SAVINGS CARBON USAGE FIRMWARE MAC ADDRESS FACTORY RESET POWER SUPPLY AUTO POWER ON SETTING LOCK USB BOOT MODE IR SIGNAL MONITOR CONTROL SHUTDOWN SIGNAL POWER OFF DELAY CHANGE PASSWORD MUTE SCREEN MUTE MTS SOUND OP code OP code Parameter page 11h 63h 0: No mean 1: TDMS 2: DisplayPort 02h CBh 0: No mean 10(0Ah): Option Category Refer to chapter 11 Refer to...

Raspberry Pi Compute Module Setup Guide
Page 43
... video input is switched using the following setting. 8.13 Control menu USB PC Source Available options: Auto / Internal PC / External PC / C Module Selects the routing of 62 The USB CM1 and CM2 connections are changed . 8.12 Control menu USB External Control Available options: Enable / Disable Enables or Disables monitor control via USB. Software such as video inputs on the currently selected video input. Page 43 of the USB1 input on display models with an integrated touch-screen, the internal USB connection...
... video input is switched using the following setting. 8.13 Control menu USB PC Source Available options: Auto / Internal PC / External PC / C Module Selects the routing of 62 The USB CM1 and CM2 connections are changed . 8.12 Control menu USB External Control Available options: Enable / Disable Enables or Disables monitor control via USB. Software such as video inputs on the currently selected video input. Page 43 of the USB1 input on display models with an integrated touch-screen, the internal USB connection...

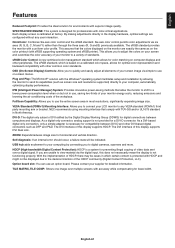
Specification Brochure
Page 3
... portrait modes. Auto IP Address simplifies control setup by adding a graphic on , audio source and more can be pulled through the ambient light sensor allowing for the brightness to change with NaViSet Administrator 2. These displays also have Auto TileMatrix and Auto ID that the IP Addresses of installation. Auto dimming of the LED backlights can , in the case of a video wall, automatically scale up to buttons when manually controlling the...
... portrait modes. Auto IP Address simplifies control setup by adding a graphic on , audio source and more can be pulled through the ambient light sensor allowing for the brightness to change with NaViSet Administrator 2. These displays also have Auto TileMatrix and Auto ID that the IP Addresses of installation. Auto dimming of the LED backlights can , in the case of a video wall, automatically scale up to buttons when manually controlling the...

Specification Brochure
Page 4
... Image Size Native Resolution Brightness (Typical/Minimum) Contrast Ratio (Typical) Viewing Angle Aspect Ratio Displayable Colors Orientation Panel Haze (%) CONNECTIVITY Digital Analog Input Terminals Audio External Control Data Output Terminals Digital Audio External Control POWER CONSUMPTION On (Typ/Max) Network Standby Normal Standby Current Rating Speaker Rating PHYSICAL SPECIFICATIONS Bezel Width (L/R, T/B) Net Dimensions (Without stand; W x H x D) Net Weight (Without Stand) VESA Hole Configuration SENSORS Ambient Light Sensor Human Sensor Temperature Sensor NFC Sensor...
... Image Size Native Resolution Brightness (Typical/Minimum) Contrast Ratio (Typical) Viewing Angle Aspect Ratio Displayable Colors Orientation Panel Haze (%) CONNECTIVITY Digital Analog Input Terminals Audio External Control Data Output Terminals Digital Audio External Control POWER CONSUMPTION On (Typ/Max) Network Standby Normal Standby Current Rating Speaker Rating PHYSICAL SPECIFICATIONS Bezel Width (L/R, T/B) Net Dimensions (Without stand; W x H x D) Net Weight (Without Stand) VESA Hole Configuration SENSORS Ambient Light Sensor Human Sensor Temperature Sensor NFC Sensor...


