User Manual
Page 1
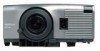
MultiSync VT440/VT540 LCD Projector User's Manual English
MultiSync VT440/VT540 LCD Projector User's Manual English
User Manual
Page 2
...carefully to remove the plug from that important information concerning the operation and maintenance of this government regulation could void your MultiSync VT440/VT540. Your serial number is located under the name plate label on the right side of the following measures: •.... This equipment generates, uses, and can be read this manual carefully before using your NEC MultiSync VT440/VT540 Projector and keep the manual handy for help. REFER SERVICING TO QUALIFIED NEC SERVICE PERSONNEL. DO NOT OPEN THE CABINET. Failure to comply with the instructions, may cause...
...carefully to remove the plug from that important information concerning the operation and maintenance of this government regulation could void your MultiSync VT440/VT540. Your serial number is located under the name plate label on the right side of the following measures: •.... This equipment generates, uses, and can be read this manual carefully before using your NEC MultiSync VT440/VT540 Projector and keep the manual handy for help. REFER SERVICING TO QUALIFIED NEC SERVICE PERSONNEL. DO NOT OPEN THE CABINET. Failure to comply with the instructions, may cause...
User Manual
Page 3
... wall outlet under any local building codes. Use a blower or lens paper to clean the lens, and be displayed after the projector is turned off. * Immediately after the power cable is plugged into the wall outlet (the POWER indicator has not changed to ...order to be in a darkened room. 2. Clean the cabinet periodically with any one of the projector. 7. Installation 1. E-3 ternal components. 5. d. If the projector is designed to have the projector installed on top of the following circumstances. If heavily soiled, use strong detergents or solvents such as...
... wall outlet under any local building codes. Use a blower or lens paper to clean the lens, and be displayed after the projector is turned off. * Immediately after the power cable is plugged into the wall outlet (the POWER indicator has not changed to ...order to be in a darkened room. 2. Clean the cabinet periodically with any one of the projector. 7. Installation 1. E-3 ternal components. 5. d. If the projector is designed to have the projector installed on top of the following circumstances. If heavily soiled, use strong detergents or solvents such as...

User Manual
Page 4
...-up of glass may shatter, and pieces of heat inside your projector, disconnect it immediately and have the object removed by a qualified NEC service personnel. 3. If this happens, contact your NEC dealer for lamp replacement. • Allow a minimum of space between your projector. Do not insert any metal objects such as the pieces of...
...-up of glass may shatter, and pieces of heat inside your projector, disconnect it immediately and have the object removed by a qualified NEC service personnel. 3. If this happens, contact your NEC dealer for lamp replacement. • Allow a minimum of space between your projector. Do not insert any metal objects such as the pieces of...

User Manual
Page 5
...Battery Installation E-34 Cleaning or Replacing the Filters E-34 5. INTRODUCTION Introduction to the MultiSync VT440/VT540 Projector E-6 Getting Started E-6 What's in the Box E-7 Getting to Know Your MultiSync VT440/VT540 Projector E-8 Front / Side Features E-8 Rear / Side Features E-9 Top Features E-10 ... Information E-32 4. TROUBLESHOOTING Power / Status Light Messages E-35 Common Problems & Solutions E-35 6. INSTALLATION Setting Up Your Projector E-14 Selecting a Location E-14 Using a Tabletop or Cart E-14 Distance Chart E-15 Ceiling Installation E-16 Reflecting the Image...
...Battery Installation E-34 Cleaning or Replacing the Filters E-34 5. INTRODUCTION Introduction to the MultiSync VT440/VT540 Projector E-6 Getting Started E-6 What's in the Box E-7 Getting to Know Your MultiSync VT440/VT540 Projector E-8 Front / Side Features E-8 Rear / Side Features E-9 Top Features E-10 ... Information E-32 4. TROUBLESHOOTING Power / Status Light Messages E-35 Common Problems & Solutions E-35 6. INSTALLATION Setting Up Your Projector E-14 Selecting a Location E-14 Using a Tabletop or Cart E-14 Distance Chart E-15 Ceiling Installation E-16 Reflecting the Image...
User Manual
Page 6
...is converted into an 800ן600 crisp image with NEC technology's Advanced AccuBlend on VT440. *3 An SXGA image (1280ן1024) is one of The MultiSync VT440/ VT540 Projector The MultiSync VT440/VT540 is converted into a 1024ן768 crisp image... PAL TVs. If the section doesn't apply, you can be permanently mounted on your new MultiSync VT440 (SVGA)/ VT540 (XGA) Projector and describes the features and controls. E-6 1. The MultiSync VT440/VT540 enables you to adjust the image between video modes depending on a ceiling*1. The remote...
...is converted into an 800ן600 crisp image with NEC technology's Advanced AccuBlend on VT440. *3 An SXGA image (1280ן1024) is one of The MultiSync VT440/ VT540 Projector The MultiSync VT440/VT540 is converted into a 1024ן768 crisp image... PAL TVs. If the section doesn't apply, you can be permanently mounted on your new MultiSync VT440 (SVGA)/ VT540 (XGA) Projector and describes the features and controls. E-6 1. The MultiSync VT440/VT540 enables you to adjust the image between video modes depending on a ceiling*1. The remote...
User Manual
Page 7
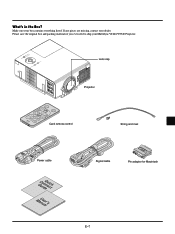
If any pieces are missing, contact your MultiSync VT440/VT540 Projector. Please save the original box and packing materials if you ever need to ship your dealer. CANCEL ADAJU. What's in the Box? STATPUOSWER ENTER ON/...OFF ENTER CANCEL Lens cap SELECT SOURCE MENU AUTO ADJUST INRPGUBT AUD OUTPUT IN PC-CONTROL S-VIDEO OUT VID Projector MAGNIFY HELP RD-366E SOURCE MENU Vol. TO Card remote control String and rivet Power cable GCuoidneQnuecictk MaUnusaelr's Signal cable ON 1 2 3 4 DIP 5 6 Pin adapter for...
If any pieces are missing, contact your MultiSync VT440/VT540 Projector. Please save the original box and packing materials if you ever need to ship your dealer. CANCEL ADAJU. What's in the Box? STATPUOSWER ENTER ON/...OFF ENTER CANCEL Lens cap SELECT SOURCE MENU AUTO ADJUST INRPGUBT AUD OUTPUT IN PC-CONTROL S-VIDEO OUT VID Projector MAGNIFY HELP RD-366E SOURCE MENU Vol. TO Card remote control String and rivet Power cable GCuoidneQnuecictk MaUnusaelr's Signal cable ON 1 2 3 4 DIP 5 6 Pin adapter for...

User Manual
Page 8
... SELECT AUTO ADJUST MENU CEL OUTPUT PC-CONTROL S-VIDEO VIDEO R IGNBPUT OUT SOURCE IN IN OUT AUD E-8 Always carry your projector by Kensington Microware Inc. STATPUOSWER Getting to Know Your MultiSync VT440/VT540 Projector Front/ Side Features Controls Remote Sensor AC Input Connect the supplied power cable's three-pin plug here. Remote Sensor ENTER...Adjustable Tilt Foot Button Adjustable Tilt Foot Lens Ventilation (outlet) NOTE: Built-in use, cover the lens with the lens cap. NOTE:When moving the projector or when it is trademarked and owned by the carrying handle.
... SELECT AUTO ADJUST MENU CEL OUTPUT PC-CONTROL S-VIDEO VIDEO R IGNBPUT OUT SOURCE IN IN OUT AUD E-8 Always carry your projector by Kensington Microware Inc. STATPUOSWER Getting to Know Your MultiSync VT440/VT540 Projector Front/ Side Features Controls Remote Sensor AC Input Connect the supplied power cable's three-pin plug here. Remote Sensor ENTER...Adjustable Tilt Foot Button Adjustable Tilt Foot Lens Ventilation (outlet) NOTE: Built-in use, cover the lens with the lens cap. NOTE:When moving the projector or when it is trademarked and owned by the carrying handle.

User Manual
Page 10
... level of a selected menu item. A press of its usable life. When the pointer is advisable to turn off when the power is supplied and the projector is replaced. If this light blinks red rapidly, it indicates that the lamp cover or filter cover is not attached properly or the... projector is lit red (orange in Eco mode) continually, it is in standby mode. 9 Power Button (ON / STAND BY) Use this button to replace the projection ...
... level of a selected menu item. A press of its usable life. When the pointer is advisable to turn off when the power is supplied and the projector is replaced. If this light blinks red rapidly, it indicates that the lamp cover or filter cover is not attached properly or the... projector is lit red (orange in Eco mode) continually, it is in standby mode. 9 Power Button (ON / STAND BY) Use this button to replace the projection ...
User Manual
Page 11
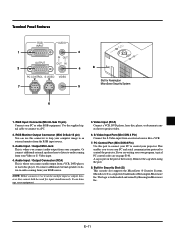
... to listen to control your equipment. 5. PC Control Port (Mini DIN 8 Pin) Use this connector to loop your computer image to control the projector. Built-in Security Slot ( ) This security slot supports the MicroSaver ® Security System. SOURCE Terminal Panel Features RGB INPUT AUDIO 1 3 IN... (Mini D-Sub 15 pin) You can use your RGB source. Video input. 4. NOTE: Either connector 3 or 4 can damage your projector. It can be used for input or output, however they cannot both be used for Kensington MicroSaver Security System CANCEL STATPUOSWER AUTO ADJUST SELECT ENTER...
... to listen to control your equipment. 5. PC Control Port (Mini DIN 8 Pin) Use this connector to loop your computer image to control the projector. Built-in Security Slot ( ) This security slot supports the MicroSaver ® Security System. SOURCE Terminal Panel Features RGB INPUT AUDIO 1 3 IN... (Mini D-Sub 15 pin) You can use your RGB source. Video input. 4. NOTE: Either connector 3 or 4 can damage your projector. It can be used for input or output, however they cannot both be used for Kensington MicroSaver Security System CANCEL STATPUOSWER AUTO ADJUST SELECT ENTER...
User Manual
Page 12
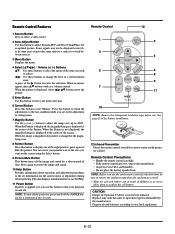
... of two seconds. MnO2-LiCELCLR2302V5OL TS JAPANH 12 Infrared Transmitter Direct the remote control toward the remote sensor on the projector cabinet. Replace only with the same or equivalent type recommended by the manufacturer. When no menus appear, these buttons to turn ...of used batteries according to exit "Menus". When the Pointer is displayed, the magnified image is displayed, these ᮤ ᮣ vw buttons move your projector on and off. You can use . ENT 5 ER CAN 6 8 POINTER PIC. Remote Control Precautions • Handle the remote control carefully. &#...
... of two seconds. MnO2-LiCELCLR2302V5OL TS JAPANH 12 Infrared Transmitter Direct the remote control toward the remote sensor on the projector cabinet. Replace only with the same or equivalent type recommended by the manufacturer. When no menus appear, these buttons to turn ...of used batteries according to exit "Menus". When the Pointer is displayed, the magnified image is displayed, these ᮤ ᮣ vw buttons move your projector on and off. You can use . ENT 5 ER CAN 6 8 POINTER PIC. Remote Control Precautions • Handle the remote control carefully. &#...
User Manual
Page 14
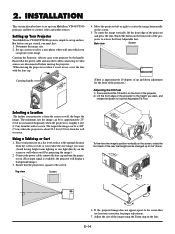
... up Your Projector Your MultiSync VT440/VT540 Projector is simple to set up your MultiSync VT440/VT540 projector and how to connect video and audio sources. Move the projector left or right to set up and down adjustment for proper adjustment. 7. STATPUOSWER Selecting a Location The further your projector on a flat...does not appear square to lock the Adjustable Tilt Foot. jector to 0.6" (4mm). The minimum size the image can project your projector by the handle. E-14 Top view Screen ON/OFF CANCEL EL AUTO ADJUST SELECT ENTER MENU SOURCE INRPGUBT AUD OUTPUT IN PC...
... up Your Projector Your MultiSync VT440/VT540 Projector is simple to set up your MultiSync VT440/VT540 projector and how to connect video and audio sources. Move the projector left or right to set up and down adjustment for proper adjustment. 7. STATPUOSWER Selecting a Location The further your projector on a flat...does not appear square to lock the Adjustable Tilt Foot. jector to 0.6" (4mm). The minimum size the image can project your projector by the handle. E-14 Top view Screen ON/OFF CANCEL EL AUTO ADJUST SELECT ENTER MENU SOURCE INRPGUBT AUD OUTPUT IN PC...
User Manual
Page 15
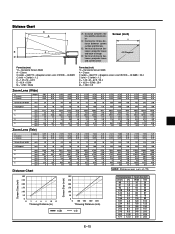
... C A E α D A: Distance between the lens and the screen center C: Horizontal throw distance between screen surface and the lens D: Vertical distance between projector base and base of image E: Vertical distance between projector base and screen center Screen (inch) H 4:3 Diagonal Formulas(mm) "H = Horizontal Screen Width A = C/cosα C (wide) = 36.8712 × (diagonal screen size...
... C A E α D A: Distance between the lens and the screen center C: Horizontal throw distance between screen surface and the lens D: Vertical distance between projector base and base of image E: Vertical distance between projector base and screen center Screen (inch) H 4:3 Diagonal Formulas(mm) "H = Horizontal Screen Width A = C/cosα C (wide) = 36.8712 × (diagonal screen size...
User Manual
Page 16
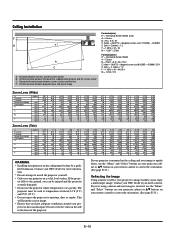
... is inverted, use the projector where temperatures vary greatly. Contact your NEC dealer for more information. * Do not attempt to install the projector yourself. • Only use your projector on your projector cabinet or vw buttons on the ceiling must be injured and the projector severely damaged. • ...correct the orientation. (See page E-31.) Reflecting the Image Using a mirror to enjoy a much larger image. Contact your NEC dealer if you to reflect your projector so heat can be used at temperatures between 32˚F (0˚C) and 95˚F (35˚C). • Do not...
... is inverted, use the projector where temperatures vary greatly. Contact your NEC dealer for more information. * Do not attempt to install the projector yourself. • Only use your projector on your projector cabinet or vw buttons on the ceiling must be injured and the projector severely damaged. • ...correct the orientation. (See page E-31.) Reflecting the Image Using a mirror to enjoy a much larger image. Contact your NEC dealer if you to reflect your projector so heat can be used at temperatures between 32˚F (0˚C) and 95˚F (35˚C). • Do not...
User Manual
Page 17
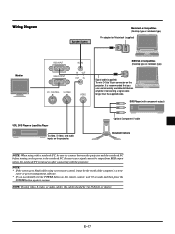
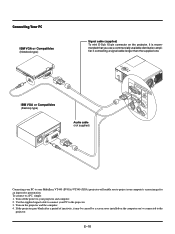
... Player (with a notebook PC, be output from RGB output unless the notebook PC is recommended that you accidentally hit the POWER button on the projector. NOTE: If using video, S-video, or audio cables, the cables should be the result of the computer's screen- Optional Component V cable Document... on the remote control, wait 30 seconds and then press the POWER button again to the notebook PC. It is turned on the projector. Wiring Diagram Speaker System Macintosh or Compatibles (Desktop type or notebook type) Pin adapter for Macintosh (supplied) Monitor RGB INPUT RGB OUTPUT...
... Player (with a notebook PC, be output from RGB output unless the notebook PC is recommended that you accidentally hit the POWER button on the projector. NOTE: If using video, S-video, or audio cables, the cables should be the result of the computer's screen- Optional Component V cable Document... on the remote control, wait 30 seconds and then press the POWER button again to the notebook PC. It is turned on the projector. Wiring Diagram Speaker System Macintosh or Compatibles (Desktop type or notebook type) Pin adapter for Macintosh (supplied) Monitor RGB INPUT RGB OUTPUT...
User Manual
Page 18
To connect to project your MultiSync VT440 (SVGA)/ VT540 (XGA) projector will enable you to a PC, simply: 1. Turn on the projector. IBM VGA or Compatibles (Desktop type) Audio cable (not supplied) INRPGRUBTGB INPUATUDIOAUDIO OUTPUT IN PC-CONTROL S-VIDEO OUT OUT IN VIDEO ...Connecting your PC to your computer's screen image for an impressive presentation. E-18 Turn off the power to the projector. If the projector goes blank after a period of inactivity, it may be caused by a screen saver installed on the computer you use a commercially available ...
To connect to project your MultiSync VT440 (SVGA)/ VT540 (XGA) projector will enable you to a PC, simply: 1. Turn on the projector. IBM VGA or Compatibles (Desktop type) Audio cable (not supplied) INRPGRUBTGB INPUATUDIOAUDIO OUTPUT IN PC-CONTROL S-VIDEO OUT OUT IN VIDEO ...Connecting your PC to your computer's screen image for an impressive presentation. E-18 Turn off the power to the projector. If the projector goes blank after a period of inactivity, it may be caused by a screen saver installed on the computer you use a commercially available ...
User Manual
Page 19
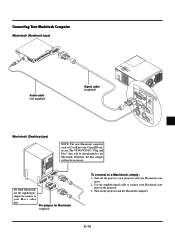
The VT440/VT540's "Plug and Play" data will be necessary. puter. 2. Use the supplied signal cable to connect your Mac's video port. Turn on the projector and the Macintosh computer. DIP 6 5 ON 4 3 2 1 For older Macintosh, use the supplied pin adapter to connect to your Macintosh ...com- puter to a Macintosh, simply: 1. Pin adapter for Macintosh (supplied) To connect to the projector. 3. E-19 Turn off the power to your projector and your Macintosh com- Therefore, the Mac adapter will have the 15 pin HD connector. Connecting Your Macintosh Computer...
The VT440/VT540's "Plug and Play" data will be necessary. puter. 2. Use the supplied signal cable to connect your Mac's video port. Turn on the projector and the Macintosh computer. DIP 6 5 ON 4 3 2 1 For older Macintosh, use the supplied pin adapter to connect to your Macintosh ...com- puter to a Macintosh, simply: 1. Pin adapter for Macintosh (supplied) To connect to the projector. 3. E-19 Turn off the power to your projector and your Macintosh com- Therefore, the Mac adapter will have the 15 pin HD connector. Connecting Your Macintosh Computer...

User Manual
Page 20
See the following pages for setting of the DIP switches. • When using with a Macintosh, SVGA(800ן600 :VT440)/ XGA(1024ן768 : VT540) is recommended if your Macintosh supports this happens, set the DIP switch to the 13... owner's manual for more information about your computer's video output requirements and any special identification or configuring your Macintosh computer. After setting, restart your projector's image and monitor may require. Examples of DIP switch Resolution 1 13" multi-scan mode /16"-13" ON 17" multi-scan mode /19"-...
See the following pages for setting of the DIP switches. • When using with a Macintosh, SVGA(800ן600 :VT440)/ XGA(1024ן768 : VT540) is recommended if your Macintosh supports this happens, set the DIP switch to the 13... owner's manual for more information about your computer's video output requirements and any special identification or configuring your Macintosh computer. After setting, restart your projector's image and monitor may require. Examples of DIP switch Resolution 1 13" multi-scan mode /16"-13" ON 17" multi-scan mode /19"-...
User Manual
Page 21
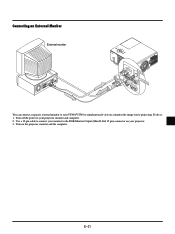
Turn off the power to your VT440/VT540 to simultaneously view on a monitor the image you're projecting. Use a 15-pin cable to connect your projector. 3. To do so: 1. Turn on your monitor to the RGB Monitor Output (Mini D-Sub 15 pin) connector on the projector, monitor and the computer. E-21 Connecting an External Monitor External monitor INRPGUBT OUTPUT AUDIOAUDIO IN IN RGB OUTPUT PC-CONTROL S-VIDEO OUT OUT IN VIDEO AUDIO OUT You can connect a separate, external monitor to your projector, monitor and computer. 2.
Turn off the power to your VT440/VT540 to simultaneously view on a monitor the image you're projecting. Use a 15-pin cable to connect your projector. 3. To do so: 1. Turn on your monitor to the RGB Monitor Output (Mini D-Sub 15 pin) connector on the projector, monitor and the computer. E-21 Connecting an External Monitor External monitor INRPGUBT OUTPUT AUDIOAUDIO IN IN RGB OUTPUT PC-CONTROL S-VIDEO OUT OUT IN VIDEO AUDIO OUT You can connect a separate, external monitor to your projector, monitor and computer. 2.
User Manual
Page 22
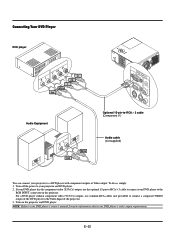
...-to-RCAן3 cable to connect your DVD player to the RGB INPUT connector on the projector and DVD player. NOTE: Refer to the Video Input of the projector. 3. Turn on the projector. Connecting Your DVD Player DVD player L R Cr Cb Y Cr Cb Y White Red Audio Equipment L R Red White ...CONTROL S-VIDEO OUT OUT IN VIDEO Optional 15-pin-to-RCAן3 cable (Component V ) Audio cable (not supplied) You can connect your projector to your projector and DVD player. 2. Turn off the power to a DVD player with component outputs or Video output.
...-to-RCAן3 cable to connect your DVD player to the RGB INPUT connector on the projector and DVD player. NOTE: Refer to the Video Input of the projector. 3. Turn on the projector. Connecting Your DVD Player DVD player L R Cr Cb Y Cr Cb Y White Red Audio Equipment L R Red White ...CONTROL S-VIDEO OUT OUT IN VIDEO Optional 15-pin-to-RCAן3 cable (Component V ) Audio cable (not supplied) You can connect your projector to your projector and DVD player. 2. Turn off the power to a DVD player with component outputs or Video output.


