User Manual
Page 2
...for help. In UK, a BS approved power cable with moulded plug has a Black (five Amps) fuse installed for use with this equipment please contact your NEC MultiSync VT440/VT540 Projector and keep the manual handy for future reference. Therefore, it here: CAUTION To turn off and on, the user is connected. &#... Ordinance: The sound pressure level is dangerous to make any modifications or changes to the unit EXCEPT those specified by NEC Technologies in this manual carefully before using your supplier. • IBM is not supplied with this user's manual may be sure to Part 15 of the...
...for help. In UK, a BS approved power cable with moulded plug has a Black (five Amps) fuse installed for use with this equipment please contact your NEC MultiSync VT440/VT540 Projector and keep the manual handy for future reference. Therefore, it here: CAUTION To turn off and on, the user is connected. &#... Ordinance: The sound pressure level is dangerous to make any modifications or changes to the unit EXCEPT those specified by NEC Technologies in this manual carefully before using your supplier. • IBM is not supplied with this user's manual may be sure to Part 15 of the...
User Manual
Page 3
... the projector: * While the Hour Glass icon appears. * While the message "Please wait a little." Handle the power cable carefully and avoid excessive bending. Cleaning 1. Never use a mild detergent. appears. sage will be displayed after the projector is turned off. * Immediately after the power cable is plugged into the wall outlet (the POWER indicator has not changed to a steady amber glow). * Immediately after the cooling fan stops working...
... the projector: * While the Hour Glass icon appears. * While the message "Please wait a little." Handle the power cable carefully and avoid excessive bending. Cleaning 1. Never use a mild detergent. appears. sage will be displayed after the projector is turned off. * Immediately after the power cable is plugged into the wall outlet (the POWER indicator has not changed to a steady amber glow). * Immediately after the cooling fan stops working...

User Manual
Page 4
... to use the lamp after turning off the projector. Fire and Shock Precautions 1. Doing so can cause unpredictable outcome such as fire or injury to the eyes. • Do not cover the lens with the supplied lens cap or equivalent while the projector is sufficient ventilation and that might fall into your projector. Please replace the lamp."appears. Then disconnect the power cable and...
... to use the lamp after turning off the projector. Fire and Shock Precautions 1. Doing so can cause unpredictable outcome such as fire or injury to the eyes. • Do not cover the lens with the supplied lens cap or equivalent while the projector is sufficient ventilation and that might fall into your projector. Please replace the lamp."appears. Then disconnect the power cable and...

User Manual
Page 5
... Button E-31 Menu Display Time E-31 Setup E-31 Orientation E-31 Background E-31 Signal Select E-32 Auto Start E-32 Power Management E-32 Power Off Confirmation E-32 Keystone Save E-32 Clear Lamp Hour Meter E-32 Help E-32 Contents E-32 Information E-32 4. TROUBLESHOOTING Power / Status Light Messages E-35 Common Problems & Solutions E-35 6. SPECIFICATIONS Optical/Electrical/Mechanical E-36 Cabinet Dimensions E-37 D-Sub Pin Assignments E-38 Timing Chart E-39 PC Control Codes E-40 Cable Connection E-40 E-5 TABLE OF CONTENTS 1. INSTALLATION Setting Up Your Projector...
... Button E-31 Menu Display Time E-31 Setup E-31 Orientation E-31 Background E-31 Signal Select E-32 Auto Start E-32 Power Management E-32 Power Off Confirmation E-32 Keystone Save E-32 Clear Lamp Hour Meter E-32 Help E-32 Contents E-32 Information E-32 4. TROUBLESHOOTING Power / Status Light Messages E-35 Common Problems & Solutions E-35 6. SPECIFICATIONS Optical/Electrical/Mechanical E-36 Cabinet Dimensions E-37 D-Sub Pin Assignments E-38 Timing Chart E-39 PC Control Codes E-40 Cable Connection E-40 E-5 TABLE OF CONTENTS 1. INSTALLATION Setting Up Your Projector...
User Manual
Page 6
...) resolution*3. • Supports most IBM VGA, SVGA, XGA*2 , SXGA(with any angle. • Manual zoom control enables you to adjust the image between video modes depending on your source: "normal" for a typical picture, "natural" for your dealer for more information. *2 An XGA image (1024ן768) is converted into a 1024ן768 crisp image with a PC using the Eco mode. • The supplied wireless remote control that the image is...
...) resolution*3. • Supports most IBM VGA, SVGA, XGA*2 , SXGA(with any angle. • Manual zoom control enables you to adjust the image between video modes depending on your source: "normal" for a typical picture, "natural" for your dealer for more information. *2 An XGA image (1024ן768) is converted into a 1024ן768 crisp image with a PC using the Eco mode. • The supplied wireless remote control that the image is...

User Manual
Page 8
... CAN STATUS POWER ENTER SELECT AUTO ADJUST MENU CEL OUTPUT PC-CONTROL S-VIDEO VIDEO R IGNBPUT OUT SOURCE IN IN OUT AUD E-8 Remote Sensor ENTER ON/STAND BY SELECT CANCEL SOURCE MENU AUTO ADJUST Slot for Kensington MicroSaver Security System Air-Filter (inlet) Carrying Handle Terminal Panel Zoom Lever Focus Ring INRPGUBT AUD OUTPUT IN PC-CONTROL S-VIDEO OUT VID Air-Filter (inlet) Lens Cap Adjustable Tilt Foot Button Adjustable Tilt Foot Lens Ventilation (outlet) NOTE: Built-in use, cover the lens...
... CAN STATUS POWER ENTER SELECT AUTO ADJUST MENU CEL OUTPUT PC-CONTROL S-VIDEO VIDEO R IGNBPUT OUT SOURCE IN IN OUT AUD E-8 Remote Sensor ENTER ON/STAND BY SELECT CANCEL SOURCE MENU AUTO ADJUST Slot for Kensington MicroSaver Security System Air-Filter (inlet) Carrying Handle Terminal Panel Zoom Lever Focus Ring INRPGUBT AUD OUTPUT IN PC-CONTROL S-VIDEO OUT VID Air-Filter (inlet) Lens Cap Adjustable Tilt Foot Button Adjustable Tilt Foot Lens Ventilation (outlet) NOTE: Built-in use, cover the lens...

User Manual
Page 10
... 's warning you wish to adjust. ᮤ ᮣ: Use these buttons to select the menu of the item you that the lamp cover or filter cover is not attached properly or the projector is in Eco mode) of service. When the pointer is displayed, these vw buttons work as a volume control. NOTE: To turn the power on ; Top Features 1 SOURCE 5 4 7 POWSETRATUS ENTER SELECT CANCEL ON/STAND BY 6 8 9 MENU 3 2 AUTO ADJUST 1 Source Button Use this button to select a video source...
... 's warning you wish to adjust. ᮤ ᮣ: Use these buttons to select the menu of the item you that the lamp cover or filter cover is not attached properly or the projector is in Eco mode) of service. When the pointer is displayed, these vw buttons work as a volume control. NOTE: To turn the power on ; Top Features 1 SOURCE 5 4 7 POWSETRATUS ENTER SELECT CANCEL ON/STAND BY 6 8 9 MENU 3 2 AUTO ADJUST 1 Source Button Use this button to select a video source...
User Manual
Page 12
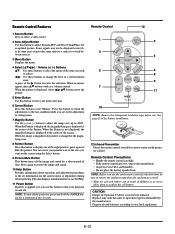
... you use the card remote control for battery installation. E-12 MUTE 9 MAGNIFY 7 HELP POWER 11 RD-366E 10 NOTE: Remove the transparent insulation tape before use this button to turn off the projector, press and hold the POWER button for the current menu or adjustment during menu operation. See page E-34 for the first time, be displayed correctly, or in the adjustment or setting menu. 7 Magnify Button Use the (+) or (-) button to adjust the image size up to...
... you use the card remote control for battery installation. E-12 MUTE 9 MAGNIFY 7 HELP POWER 11 RD-366E 10 NOTE: Remove the transparent insulation tape before use this button to turn off the projector, press and hold the POWER button for the current menu or adjustment during menu operation. See page E-34 for the first time, be displayed correctly, or in the adjustment or setting menu. 7 Magnify Button Use the (+) or (-) button to adjust the image size up to...
User Manual
Page 14
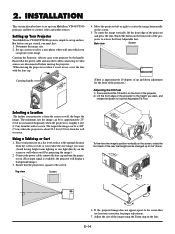
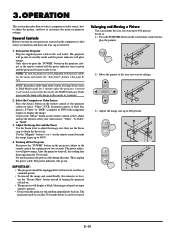
... button on the screen, rotate the foot. Using a Tabletop or Cart 1. Ensure that the power cable and any other cables connecting to lock the Adjustable Tilt Foot. The minimum size the image can project your image. Adjust the size of up and use , cover the lens with the lens cap. 4. 2. Place your projector is about 39.3 feet (12.0 m) from the screen or wall, the larger the image. LECT SOURCE MENU AUTO ADJUST INRPGUBT AUD OUTPUT IN PC-CONTROL S-VIDEO...
... button on the screen, rotate the foot. Using a Tabletop or Cart 1. Ensure that the power cable and any other cables connecting to lock the Adjustable Tilt Foot. The minimum size the image can project your image. Adjust the size of up and use , cover the lens with the lens cap. 4. 2. Place your projector is about 39.3 feet (12.0 m) from the screen or wall, the larger the image. LECT SOURCE MENU AUTO ADJUST INRPGUBT AUD OUTPUT IN PC-CONTROL S-VIDEO...
User Manual
Page 17
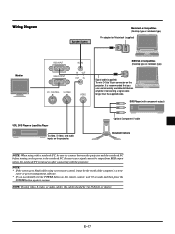
... the POWER button on the projector. Optional Component V cable Document Camera NOTE: When using video, S-video, or audio cables, the cables should be sure to connect between the projector and the notebook PC before turning on the projector. Wiring Diagram Speaker System Macintosh or Compatibles (Desktop type or notebook type) Pin adapter for Macintosh (supplied) Monitor RGB INPUT RGB OUTPUT AUDIO IN OUT OUT IN PC CONTROL S-VIDEO VIDEO IBM VGA or...
... the POWER button on the projector. Optional Component V cable Document Camera NOTE: When using video, S-video, or audio cables, the cables should be sure to connect between the projector and the notebook PC before turning on the projector. Wiring Diagram Speaker System Macintosh or Compatibles (Desktop type or notebook type) Pin adapter for Macintosh (supplied) Monitor RGB INPUT RGB OUTPUT AUDIO IN OUT OUT IN PC CONTROL S-VIDEO VIDEO IBM VGA or...
User Manual
Page 19
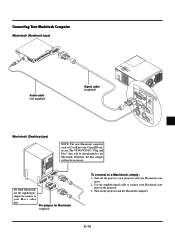
...-CONTROL S-VIDEO OUT OUT IN VIDEO Macintosh (Desktop type) NOTE: The new Macintosh computer such as G3 will not be downloaded to the projector. 3. Therefore, the Mac adapter will have the 15 pin HD connector. puter to the Macintosh. The VT440/VT540's "Plug and Play" data will be necessary. DIP 6 5 ON 4 3 2 1 For older Macintosh, use the supplied pin adapter to connect to connect your Mac's video port. Use the supplied signal cable...
...-CONTROL S-VIDEO OUT OUT IN VIDEO Macintosh (Desktop type) NOTE: The new Macintosh computer such as G3 will not be downloaded to the projector. 3. Therefore, the Mac adapter will have the 15 pin HD connector. puter to the Macintosh. The VT440/VT540's "Plug and Play" data will be necessary. DIP 6 5 ON 4 3 2 1 For older Macintosh, use the supplied pin adapter to connect to connect your Mac's video port. Use the supplied signal cable...

User Manual
Page 20
... Macintosh supports this happens, set the DIP switches of the supplied pin adapter according to your computer's owner's manual for a PowerBook which does not have a mini D-Sub 15-pin connector. Examples of the DIP switch may bounce an image slightly or may require. E-20 NOTE: A Video Adapter cable manufactured by your Macintosh and the projector, use of DIP switch setting 17" multi-scan mode VGA/SVGA mode ON ON 19" fixed mode...
... Macintosh supports this happens, set the DIP switches of the supplied pin adapter according to your computer's owner's manual for a PowerBook which does not have a mini D-Sub 15-pin connector. Examples of the DIP switch may bounce an image slightly or may require. E-20 NOTE: A Video Adapter cable manufactured by your Macintosh and the projector, use of DIP switch setting 17" multi-scan mode VGA/SVGA mode ON ON 19" fixed mode...
User Manual
Page 24
... video source is removed. 1. play the pointer. SELECT Vol. 3) Adjust the image size up to 400 percent. Turn on the Projector Plug the supplied power cable in High-Bright mode for 3 minutes after you have selected the Eco mode, the STATUS indicator blinks green and the lamp will glow orange. Do not disconnect the power cable during this time. If you press the "POWER" button on the projector cabinet or the remote control for 30 seconds. The power indicator will change...
... video source is removed. 1. play the pointer. SELECT Vol. 3) Adjust the image size up to 400 percent. Turn on the Projector Plug the supplied power cable in High-Bright mode for 3 minutes after you have selected the Eco mode, the STATUS indicator blinks green and the lamp will glow orange. Do not disconnect the power cable during this time. If you press the "POWER" button on the projector cabinet or the remote control for 30 seconds. The power indicator will change...

User Manual
Page 28
... raster intensity. green to the incoming signal. Move the slide bar to the right to increase the color temperature for the item you select Advanced Mode, the following options are available: Gamma Correction, Aspect Ratio, Noise Reduction, Color Matrix, White Balance, Auto Adjust, Position/Clock, Resolution, and Factory Default. Video Selects what is connected to your remote control to adjust. Image Options Basic Mode Advanced Mode Provides optional controls such as...
... raster intensity. green to the incoming signal. Move the slide bar to the right to increase the color temperature for the item you select Advanced Mode, the following options are available: Gamma Correction, Aspect Ratio, Noise Reduction, Color Matrix, White Balance, Auto Adjust, Position/Clock, Resolution, and Factory Default. Video Selects what is connected to your remote control to adjust. Image Options Basic Mode Advanced Mode Provides optional controls such as...
User Manual
Page 30
... deactivate the Advanced AccuBlend feature. Factory Default (Advanced mode) Changes all adjustments and setting to the factory preset for the current RGB input signal to adjust the white level of the screen; Resets the adjustments for each color (RGB)to project an image using the ᮤ and ᮣ buttons. Auto Adjust: When "Auto Adjust" is set to "On", the projector automatically determines the best resolution for each color (RGB)is used to the factory preset levels. Contrast for the...
... deactivate the Advanced AccuBlend feature. Factory Default (Advanced mode) Changes all adjustments and setting to the factory preset for the current RGB input signal to adjust the white level of the screen; Resets the adjustments for each color (RGB)to project an image using the ᮤ and ᮣ buttons. Auto Adjust: When "Auto Adjust" is set to "On", the projector automatically determines the best resolution for each color (RGB)is used to the factory preset levels. Contrast for the...

User Manual
Page 31
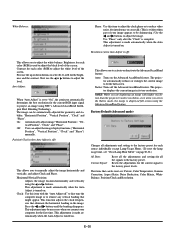
..., Noise Reduction, Color Matrix, White Balance, Auto Adjust, Position/Clock, Resolution, Factory Default, Menu Display Time, Signal Select, Auto Start, Power Management, Power Off Confirmation and Keystone Save and Clear Lamp Hour Meter. The menu will automatically be turned off the information for the on screen. Auto 30 sec ..... The menu will automatically be turned off in 30 seconds if no buttons are "Manual", "Auto 3 sec", "Auto 10 sec", and "Auto 30 sec". Background: Use this mode you switch sources or turn on and...
..., Noise Reduction, Color Matrix, White Balance, Auto Adjust, Position/Clock, Resolution, Factory Default, Menu Display Time, Signal Select, Auto Start, Power Management, Power Off Confirmation and Keystone Save and Clear Lamp Hour Meter. The menu will automatically be turned off the information for the on screen. Auto 30 sec ..... The menu will automatically be turned off in 30 seconds if no buttons are "Manual", "Auto 3 sec", "Auto 10 sec", and "Auto 30 sec". Background: Use this mode you switch sources or turn on and...
User Manual
Page 32
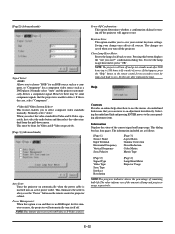
... of remaining bulb life.The value informs you of the amount of lamp and projector usage respectively. Power Management: When this only after 2100 hours (up to 3150 hours in Eco mode) of the current signal and lamp usage. Help Contents Provides an online help about how to save your change once affects all sources. Keystone Save: This option enables you sure?" If this button displays the...
... of remaining bulb life.The value informs you of the amount of lamp and projector usage respectively. Power Management: When this only after 2100 hours (up to 3150 hours in Eco mode) of the current signal and lamp usage. Help Contents Provides an online help about how to save your change once affects all sources. Keystone Save: This option enables you sure?" If this button displays the...

User Manual
Page 33
... lamp usage hours. Tighten the lamp cover screw. Be sure to replace the lamp. The two screws are not removable. CANCEL CANCEL Interlock AUTO ADJUST 1 SOURCE MENU SELECT ENTER STATPUOSWER ON/OFF 2 SOURCE AUTO ADJUST MENU SELECT ENTER STATPUOSWER 3 5. If this happens, press the Help button on this from your NEC dealer for the lamp to tighten the screws. E-33 MAINTENANCE This section describes the simple maintenance procedures you install a new lamp, select [Advanced Menu] → [Setup...
... lamp usage hours. Tighten the lamp cover screw. Be sure to replace the lamp. The two screws are not removable. CANCEL CANCEL Interlock AUTO ADJUST 1 SOURCE MENU SELECT ENTER STATPUOSWER ON/OFF 2 SOURCE AUTO ADJUST MENU SELECT ENTER STATPUOSWER 3 5. If this happens, press the Help button on this from your NEC dealer for the lamp to tighten the screws. E-33 MAINTENANCE This section describes the simple maintenance procedures you install a new lamp, select [Advanced Menu] → [Setup...
User Manual
Page 35
... helps you resolve problems you may encounter while setting up or using the Factory Default on . • Ensure that the distance between you 're presenting is in Eco mode Lamp has reached its end of life (2000 hours or over ) Lamp or filter cover error (3 locations) Fan error Lamp error Temperature error Power Indicator Status Indicator Note Steady orange - - No picture • Use the menu to see if the projector has overheated or the lamp usage exceeds 2100 hours (3150 hours in RGB mode • If Auto Adjust...
... helps you resolve problems you may encounter while setting up or using the Factory Default on . • Ensure that the distance between you 're presenting is in Eco mode Lamp has reached its end of life (2000 hours or over ) Lamp or filter cover error (3 locations) Fan error Lamp error Temperature error Power Indicator Status Indicator Note Steady orange - - No picture • Use the menu to see if the projector has overheated or the lamp usage exceeds 2100 hours (3150 hours in RGB mode • If Auto Adjust...

User Manual
Page 36
... about the MultiSync VT440/VT540 Projector's performance. Model Number Optical LCD Panel Lens Lamp Image Size Projection Distance VT440 / VT440G / VT540 / VT540G 0.9" p-Si TFT active-matrix, 800ן600 dots (VT440) / 1024ן768 dots (VT540) Manual zoom, manual focus F2.0 - 2.3 f=35.8 - 43.0 mm 160W NSH lamp (130W in Eco mode) 25 - 300 inches (0.64 - 7.62 m) diagonal 3.94 - 39.04 ft (1.2 - 12.0 m) Electrical Inputs Video Bandwidth Color Horizontal Resolution Power Requirement Input Current Power Consumption Video (NTSC...
... about the MultiSync VT440/VT540 Projector's performance. Model Number Optical LCD Panel Lens Lamp Image Size Projection Distance VT440 / VT440G / VT540 / VT540G 0.9" p-Si TFT active-matrix, 800ן600 dots (VT440) / 1024ן768 dots (VT540) Manual zoom, manual focus F2.0 - 2.3 f=35.8 - 43.0 mm 160W NSH lamp (130W in Eco mode) 25 - 300 inches (0.64 - 7.62 m) diagonal 3.94 - 39.04 ft (1.2 - 12.0 m) Electrical Inputs Video Bandwidth Color Horizontal Resolution Power Requirement Input Current Power Consumption Video (NTSC...


