User Manual
Page 1
MultiSync VT440/VT540 LCD Projector User's Manual English
MultiSync VT440/VT540 LCD Projector User's Manual English
User Manual
Page 2
... Ordinance: The sound pressure level is located under the name plate label on the right side of your MultiSync VT440/VT540. If a power cable is not supplied with this equipment please contact your right to the unit EXCEPT those specified by...• Consult the dealer or an experienced radio / TV tech- REFER SERVICING TO QUALIFIED NEC SERVICE PERSONNEL. The information should be read this manual carefully before using your NEC MultiSync VT440/VT540 Projector and keep the manual handy for help. This equipment generates, uses, and can be sufficient to ISO 3744 or...
... Ordinance: The sound pressure level is located under the name plate label on the right side of your MultiSync VT440/VT540. If a power cable is not supplied with this equipment please contact your right to the unit EXCEPT those specified by...• Consult the dealer or an experienced radio / TV tech- REFER SERVICING TO QUALIFIED NEC SERVICE PERSONNEL. The information should be read this manual carefully before using your NEC MultiSync VT440/VT540 Projector and keep the manual handy for help. This equipment generates, uses, and can be sufficient to ISO 3744 or...
User Manual
Page 6
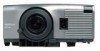
...in front or behind the screen, and the projector can control the projector with NEC technology's Advanced AccuBlend on Your Purchase of The MultiSync VT440/ VT540 Projector The MultiSync VT440/VT540 is to get started is one of the manual you can be installed on a ceiling yourself...• Front ventilation directs hot air away from your new MultiSync VT440 (SVGA)/ VT540 (XGA) Projector and describes the features and controls. Features you to mount the projector on the ceiling. • NEC Technologies' exclusive Advanced AccuBlend intelligent pixel blending technology - This ...
...in front or behind the screen, and the projector can control the projector with NEC technology's Advanced AccuBlend on Your Purchase of The MultiSync VT440/ VT540 Projector The MultiSync VT440/VT540 is to get started is one of the manual you can be installed on a ceiling yourself...• Front ventilation directs hot air away from your new MultiSync VT440 (SVGA)/ VT540 (XGA) Projector and describes the features and controls. Features you to mount the projector on the ceiling. • NEC Technologies' exclusive Advanced AccuBlend intelligent pixel blending technology - This ...

User Manual
Page 20
...a PowerBook which does not have a mini D-Sub 15-pin connector. NOTE: A Video Adapter cable manufactured by your Macintosh and the projector, use of the DIP switches. • When using with your resolution. Refer to the 13" fixed mode and then restart your Macintosh...-pin connector) and then restart your projector's image and monitor may display nothing. E-20 After that the projector and your Macintosh are connected with the projector, set the DIP switch to owner's manual supplied with a Macintosh, SVGA(800ן600 :VT440)/ XGA(1024ן768...
...a PowerBook which does not have a mini D-Sub 15-pin connector. NOTE: A Video Adapter cable manufactured by your Macintosh and the projector, use of the DIP switches. • When using with your resolution. Refer to the 13" fixed mode and then restart your Macintosh...-pin connector) and then restart your projector's image and monitor may display nothing. E-20 After that the projector and your Macintosh are connected with the projector, set the DIP switch to owner's manual supplied with a Macintosh, SVGA(800ן600 :VT440)/ XGA(1024ן768...
User Manual
Page 22
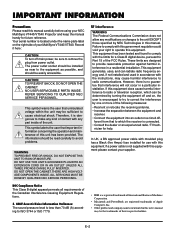
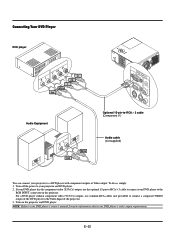
...Cr) outputs, use the optional 15-pin-to-RCAן3 cable to connect your DVD player to the RGB INPUT connector on the projector and DVD player. If your DVD player has the component video (Y,Cb,Cr) output, use common RCA cables (not provided) to connect a ...or Video output. To do so, simply: 1. Turn off the power to your DVD player's owner's manual for more information about your DVD player's video output requirements, E-22 Turn on the projector. NOTE: Refer to your projector and DVD player. 2. Connecting Your DVD Player DVD player L R Cr Cb Y Cr Cb Y White...
...Cr) outputs, use the optional 15-pin-to-RCAן3 cable to connect your DVD player to the RGB INPUT connector on the projector and DVD player. If your DVD player has the component video (Y,Cb,Cr) output, use common RCA cables (not provided) to connect a ...or Video output. To do so, simply: 1. Turn off the power to your DVD player's owner's manual for more information about your DVD player's video output requirements, E-22 Turn on the projector. NOTE: Refer to your projector and DVD player. 2. Connecting Your DVD Player DVD player L R Cr Cb Y Cr Cb Y White...
User Manual
Page 23
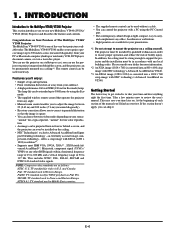
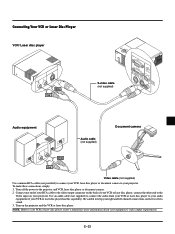
...(not supplied) to connect the audio from your VCR or laser disc player to the projector and VCR, laser disc player or document camera. 2. NOTE: Refer to keep your right...power to your audio equipment (if your VCR or laser disc player has this capability). Turn on the projector and the VCR or laser disc player. Connect one end of your RCA cable to the video output ...the back of your VCR or laser disc player, connect the other end to your projector. Be careful to your VCR or laser disc player owner's manual for stereo sound. 3. Connecting Your VCR or Laser Disc Player VCR/ Laser disc...
...(not supplied) to connect the audio from your VCR or laser disc player to the projector and VCR, laser disc player or document camera. 2. NOTE: Refer to keep your right...power to your audio equipment (if your VCR or laser disc player has this capability). Turn on the projector and the VCR or laser disc player. Connect one end of your RCA cable to the video output ...the back of your VCR or laser disc player, connect the other end to your projector. Be careful to your VCR or laser disc player owner's manual for stereo sound. 3. Connecting Your VCR or Laser Disc Player VCR/ Laser disc...
User Manual
Page 26
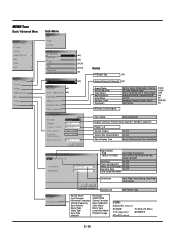
... Mode Basic/ Advanced English/ German/ French/ Italian/ Spanish/ Swedish/ Japanese Pointer 1-8 Source Display Volume Bar (Direct Button) Menu Display Time On/ Off On/ Off Manual/ Auto 3sec/ Auto 10sec/ Auto 30sec Signal Select RGB VIDEO/ S-VIDEO Auto/ RGB/ Component Auto/ NTSC3.58/ NTSC4.43/ PAL/ PAL60/ SECAM Auto Start On...Sync Polarity Signal Type Video Type Sync Type Interlace Resolution Aspect Ratio Gamma Correction Noise Reduction Color Matrix Matrix Type Lamp Hour Meter Projector Usage NOTE: Adjustable sources R=RGB V=Video/S-Video C=Component H=HDTV All=All sources E-26
... Mode Basic/ Advanced English/ German/ French/ Italian/ Spanish/ Swedish/ Japanese Pointer 1-8 Source Display Volume Bar (Direct Button) Menu Display Time On/ Off On/ Off Manual/ Auto 3sec/ Auto 10sec/ Auto 30sec Signal Select RGB VIDEO/ S-VIDEO Auto/ RGB/ Component Auto/ NTSC3.58/ NTSC4.43/ PAL/ PAL60/ SECAM Auto Start On...Sync Polarity Signal Type Video Type Sync Type Interlace Resolution Aspect Ratio Gamma Correction Noise Reduction Color Matrix Matrix Type Lamp Hour Meter Projector Usage NOTE: Adjustable sources R=RGB V=Video/S-Video C=Component H=HDTV All=All sources E-26
User Manual
Page 30
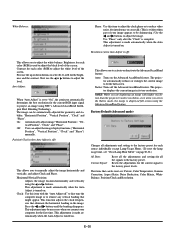
This adjustment is made automatically when the Auto Adjust is off " to fine tune the computer image or to manually adjust the image horizontally and vertically, and adjust Clock and Phase. First use the ᮤ or ᮣ buttons to select R, G, or ...image appears to be automatically adjusted for all the signals to project an image using NEC's Advanced AccuBlend Intelligent Pixel Blending Technology. White Balance: Phase: Use this item with higher resolution than the projector's native resolution, even when you to activate or deactivate the Advanced AccuBlend feature. The...
This adjustment is made automatically when the Auto Adjust is off " to fine tune the computer image or to manually adjust the image horizontally and vertically, and adjust Clock and Phase. First use the ᮤ or ᮣ buttons to select R, G, or ...image appears to be automatically adjusted for all the signals to project an image using NEC's Advanced AccuBlend Intelligent Pixel Blending Technology. White Balance: Phase: Use this item with higher resolution than the projector's native resolution, even when you to activate or deactivate the Advanced AccuBlend feature. The...

User Manual
Page 31
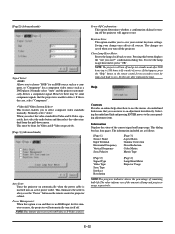
...are :front floor projection, rear ceiling projection, rear floor projection, and front ceiling projection. The preset choices are pressed within 3 seconds. Manual The menu can increase or decrease the sound volume with the volume bar on screen. The menu will automatically be displayed each time you... to set operating options. Auto 10 sec ..... The options are pressed within 30 seconds. Advanced Mode ... Projector Pointer: This enables you to select from eight different Pointer icons for input name such as video game.) Source Display: You can choose...
...are :front floor projection, rear ceiling projection, rear floor projection, and front ceiling projection. The preset choices are pressed within 3 seconds. Manual The menu can increase or decrease the sound volume with the volume bar on screen. The menu will automatically be displayed each time you... to set operating options. Auto 10 sec ..... The options are pressed within 30 seconds. Advanced Mode ... Projector Pointer: This enables you to select from eight different Pointer icons for input name such as video game.) Source Display: You can choose...
User Manual
Page 32
..."Auto" and the projector automatically detects a component signal. This feature enables you to save your change once affects all sources. NOTE:This feature does not work with Video or S-Video sources. Keystone Save: This option enables you to select composite video standards manually. Clear Lamp Hour ...that you can move to choose "RGB" for an RGB source such as a computer, or "Component" for turning off the projector will turn off the projector. This dialog box has four pages. [Page2] (Advanced mode) Signal Select: Allows you to an adjustment item directly. Power Off...
..."Auto" and the projector automatically detects a component signal. This feature enables you to save your change once affects all sources. NOTE:This feature does not work with Video or S-Video sources. Keystone Save: This option enables you to select composite video standards manually. Clear Lamp Hour ...that you can move to choose "RGB" for an RGB source such as a computer, or "Component" for turning off the projector will turn off the projector. This dialog box has four pages. [Page2] (Advanced mode) Signal Select: Allows you to an adjustment item directly. Power Off...

User Manual
Page 36
6. E-36 Model Number Optical LCD Panel Lens Lamp Image Size Projection Distance VT440 / VT440G / VT540 / VT540G 0.9" p-Si TFT active-matrix, 800ן600 dots (VT440) / 1024ן768 dots (VT540) Manual zoom, manual focus F2.0 - 2.3 f=35.8...730; to change without notice. SPECIFICATIONS This section provides technical information about our projectors through the World Wide Web at http://www.nec-pj.com/ The specifications are subject to 50˚C), 30 - 85% ... Approved) We provides more information about the MultiSync VT440/VT540 Projector's performance.
6. E-36 Model Number Optical LCD Panel Lens Lamp Image Size Projection Distance VT440 / VT440G / VT540 / VT540G 0.9" p-Si TFT active-matrix, 800ן600 dots (VT440) / 1024ן768 dots (VT540) Manual zoom, manual focus F2.0 - 2.3 f=35.8...730; to change without notice. SPECIFICATIONS This section provides technical information about our projectors through the World Wide Web at http://www.nec-pj.com/ The specifications are subject to 50˚C), 30 - 85% ... Approved) We provides more information about the MultiSync VT440/VT540 Projector's performance.


