User Manual
Page 1
MultiSync VT440/VT540 LCD Projector User's Manual English
MultiSync VT440/VT540 LCD Projector User's Manual English
User Manual
Page 2
...equipment as possible, and should be easily accessible. DOC Compliance Notice This Class B digital apparatus meets all requirements of your MultiSync VT440/VT540. ferent from power outlet. This symbol alerts the user that to which can radiate radio frequency energy and, if ... digital device, pursuant to Part 15 of contact with any modifications or changes to operate this manual carefully before using your NEC MultiSync VT440/VT540 Projector and keep the manual handy for use with this government regulation could void your supplier. • IBM is encouraged to try...
...equipment as possible, and should be easily accessible. DOC Compliance Notice This Class B digital apparatus meets all requirements of your MultiSync VT440/VT540. ferent from power outlet. This symbol alerts the user that to which can radiate radio frequency energy and, if ... digital device, pursuant to Part 15 of contact with any modifications or changes to operate this manual carefully before using your NEC MultiSync VT440/VT540 Projector and keep the manual handy for use with this government regulation could void your supplier. • IBM is encouraged to try...
User Manual
Page 3
...operate on the ceiling: a. Important Safeguards These safety instructions are alternately flashing. Dropping or jarring can cause damage to have the projector installed on a power supply of the following circumstances. Do not attempt to scratch or mar the lens. CAUTION Do not ... heat radiating appliances. 4. b. In addition, the ceiling must be strong enough to prevent fire and shock. Power Supply 1. Unplug the projector before attempting to use your dealer for more information. If heavily soiled, use strong detergents or solvents such as alcohol or thinner. 3. Never...
...operate on the ceiling: a. Important Safeguards These safety instructions are alternately flashing. Dropping or jarring can cause damage to have the projector installed on a power supply of the following circumstances. Do not attempt to scratch or mar the lens. CAUTION Do not ... heat radiating appliances. 4. b. In addition, the ceiling must be strong enough to prevent fire and shock. Power Supply 1. Unplug the projector before attempting to use your dealer for more information. If heavily soiled, use strong detergents or solvents such as alcohol or thinner. 3. Never...

User Manual
Page 4
... cm) of the cap and possibly burning your projector. • Do not look into your eyes could result. • Keep any kind of abnormal objects that can redirect light coming out of the lens, can lead to melting of space between your NEC dealer for lamp replacement. • Allow a ...projected from the light output. Prevent foreign objects such as the pieces of glass may be scattered in the lamp case. E-4 Serious damage to your projector. Lamp Replacement • To replace the lamp, follow all instructions provided on page E-33. • Be sure to replace the lamp when the...
... cm) of the cap and possibly burning your projector. • Do not look into your eyes could result. • Keep any kind of abnormal objects that can redirect light coming out of the lens, can lead to melting of space between your NEC dealer for lamp replacement. • Allow a ...projected from the light output. Prevent foreign objects such as the pieces of glass may be scattered in the lamp case. E-4 Serious damage to your projector. Lamp Replacement • To replace the lamp, follow all instructions provided on page E-33. • Be sure to replace the lamp when the...

User Manual
Page 5
... Save E-32 Clear Lamp Hour Meter E-32 Help E-32 Contents E-32 Information E-32 4. INSTALLATION Setting Up Your Projector E-14 Selecting a Location E-14 Using a Tabletop or Cart E-14 Distance Chart E-15 Ceiling Installation E-16 Reflecting ...Messages E-35 Common Problems & Solutions E-35 6. TABLE OF CONTENTS 1. INTRODUCTION Introduction to the MultiSync VT440/VT540 Projector E-6 Getting Started E-6 What's in the Box E-7 Getting to Know Your MultiSync VT440/VT540 Projector E-8 Front / Side Features E-8 Rear / Side Features E-9 Top Features E-10 Terminal Panel Features...
... Save E-32 Clear Lamp Hour Meter E-32 Help E-32 Contents E-32 Information E-32 4. INSTALLATION Setting Up Your Projector E-14 Selecting a Location E-14 Using a Tabletop or Cart E-14 Distance Chart E-15 Ceiling Installation E-16 Reflecting ...Messages E-35 Common Problems & Solutions E-35 6. TABLE OF CONTENTS 1. INTRODUCTION Introduction to the MultiSync VT440/VT540 Projector E-6 Getting Started E-6 What's in the Box E-7 Getting to Know Your MultiSync VT440/VT540 Projector E-8 Front / Side Features E-8 Rear / Side Features E-9 Top Features E-10 Terminal Panel Features...
User Manual
Page 6
... image compression technology - and Canada. At the beginning of each section of 50 to project images from your new MultiSync VT440 (SVGA)/ VT540 (XGA) Projector and describes the features and controls. Congratulations on the ceiling. • NEC Technologies' exclusive Advanced AccuBlend intelligent pixel blending technology - If the section doesn't apply, you to 300 inches across...
... image compression technology - and Canada. At the beginning of each section of 50 to project images from your new MultiSync VT440 (SVGA)/ VT540 (XGA) Projector and describes the features and controls. Congratulations on the ceiling. • NEC Technologies' exclusive Advanced AccuBlend intelligent pixel blending technology - If the section doesn't apply, you to 300 inches across...
User Manual
Page 7
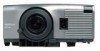
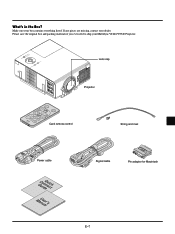
... ENTER ON/OFF ENTER CANCEL Lens cap SELECT SOURCE MENU AUTO ADJUST INRPGUBT AUD OUTPUT IN PC-CONTROL S-VIDEO OUT VID Projector MAGNIFY HELP RD-366E SOURCE MENU Vol. If any pieces are missing, contact your MultiSync VT440/VT540 Projector. POINTER POWER MUTPEIC. What's in the Box? Make sure your box contains everything listed.
... ENTER ON/OFF ENTER CANCEL Lens cap SELECT SOURCE MENU AUTO ADJUST INRPGUBT AUD OUTPUT IN PC-CONTROL S-VIDEO OUT VID Projector MAGNIFY HELP RD-366E SOURCE MENU Vol. If any pieces are missing, contact your MultiSync VT440/VT540 Projector. POINTER POWER MUTPEIC. What's in the Box? Make sure your box contains everything listed.

User Manual
Page 8
...Foot Button Adjustable Tilt Foot Lens Ventilation (outlet) NOTE: Built-in use, cover the lens with the lens cap. NOTE:When moving the projector or when it is trademarked and owned by the carrying handle. ON/OFF CAN STATUS POWER ENTER SELECT AUTO ADJUST MENU CEL OUTPUT PC-...Microware Inc.The logo is not in Security Slot ( ) This security slot supports the MicroSaver® Security System. STATPUOSWER Getting to Know Your MultiSync VT440/VT540 Projector Front/ Side Features Controls Remote Sensor AC Input Connect the supplied power cable's three-pin plug here. Always carry your...
...Foot Button Adjustable Tilt Foot Lens Ventilation (outlet) NOTE: Built-in use, cover the lens with the lens cap. NOTE:When moving the projector or when it is trademarked and owned by the carrying handle. ON/OFF CAN STATUS POWER ENTER SELECT AUTO ADJUST MENU CEL OUTPUT PC-...Microware Inc.The logo is not in Security Slot ( ) This security slot supports the MicroSaver® Security System. STATPUOSWER Getting to Know Your MultiSync VT440/VT540 Projector Front/ Side Features Controls Remote Sensor AC Input Connect the supplied power cable's three-pin plug here. Always carry your...

User Manual
Page 10
... menus appear, these buttons to change the level of the item you that the lamp cover or filter cover is not attached properly or the projector is displayed, these ᮤ ᮣ vw buttons move the pointer. 5 Enter Button Executes your menu selection and activates items selected from the menu. 6 Cancel ... message "The lamp has reached the end of the ᮣ button executes the selection. NOTE: To turn off when the power is supplied and the projector is in standby mode. 9 Power Button (ON / STAND BY) Use this is lit red (orange in Eco mode) continually, it is replaced. Press this ...
... menus appear, these buttons to change the level of the item you that the lamp cover or filter cover is not attached properly or the projector is displayed, these ᮤ ᮣ vw buttons move the pointer. 5 Enter Button Executes your menu selection and activates items selected from the menu. 6 Cancel ... message "The lamp has reached the end of the ᮣ button executes the selection. NOTE: To turn off when the power is supplied and the projector is in standby mode. 9 Power Button (ON / STAND BY) Use this is lit red (orange in Eco mode) continually, it is replaced. Press this ...
User Manual
Page 11
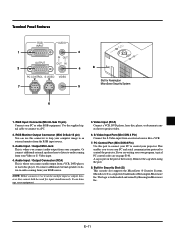
...you to use this port to connect your PC to loop your equipment. 5. Or connect additional external speakers here to listen to control the projector. PC Control Port (Mini DIN 8 Pin) Use this connector to control your Video or S- If you connect audio output from an ... Audio Input / Output Mini Jack This is put on page E-40. Or connect additional external speakers to listen to an external monitor from your projector. Built-in Security Slot ( ) This security slot supports the MicroSaver ® Security System. The logo is a registered trademark of Kensington Microware ...
...you to use this port to connect your PC to loop your equipment. 5. Or connect additional external speakers here to listen to control the projector. PC Control Port (Mini DIN 8 Pin) Use this connector to control your Video or S- If you connect audio output from an ... Audio Input / Output Mini Jack This is put on page E-40. Or connect additional external speakers to listen to an external monitor from your projector. Built-in Security Slot ( ) This security slot supports the MicroSaver ® Security System. The logo is a registered trademark of Kensington Microware ...
User Manual
Page 12
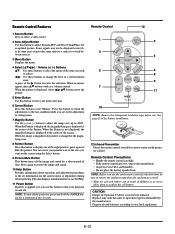
...ER CAN 6 8 POINTER PIC. MnO2-LiCELCLR2302V5OL TS JAPANH 12 Infrared Transmitter Direct the remote control toward the remote sensor on and off the projector, press and hold the POWER button for a minimum of the screen. Remote Control Precautions • Handle the remote control carefully. •... Use these buttons to select the menu of the item you can move the pointer. 5 Enter Button Use this button to enter your projector on the projector cabinet. Dispose of the Pointer. When the pointer is incorrectly replaced. You can use . Remote Control 12 1 SOURCE AUTO ADJ. 2 ...
...ER CAN 6 8 POINTER PIC. MnO2-LiCELCLR2302V5OL TS JAPANH 12 Infrared Transmitter Direct the remote control toward the remote sensor on and off the projector, press and hold the POWER button for a minimum of the screen. Remote Control Precautions • Handle the remote control carefully. •... Use these buttons to select the menu of the item you can move the pointer. 5 Enter Button Use this button to enter your projector on the projector cabinet. Dispose of the Pointer. When the pointer is incorrectly replaced. You can use . Remote Control 12 1 SOURCE AUTO ADJ. 2 ...
User Manual
Page 14
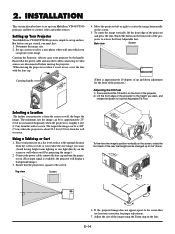
...CANCE L SELECT MENU NTER STATUS POWER SOURCE 6. INSTALLATION This section describes how to connect video and audio sources. Setting up Your Projector Your MultiSync VT440/VT540 Projector is about 39.3 feet (12.0 m) from the screen or wall so you realize the size image you want , and ...fine-tune the image's position vertically on the front side of the projector.) Adjusting the Tilt Foot 1) Press and hold the Tilt button on the screen. 5. Place your MultiSync VT440/VT540 projector and how to set up your projector on a flat level surface at the optimal distance from the wall or...
...CANCE L SELECT MENU NTER STATUS POWER SOURCE 6. INSTALLATION This section describes how to connect video and audio sources. Setting up Your Projector Your MultiSync VT440/VT540 Projector is about 39.3 feet (12.0 m) from the screen or wall so you realize the size image you want , and ...fine-tune the image's position vertically on the front side of the projector.) Adjusting the Tilt Foot 1) Press and hold the Tilt button on the screen. 5. Place your MultiSync VT440/VT540 projector and how to set up your projector on a flat level surface at the optimal distance from the wall or...
User Manual
Page 15
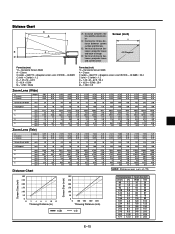
... C A E α D A: Distance between the lens and the screen center C: Horizontal throw distance between screen surface and the lens D: Vertical distance between projector base and base of image E: Vertical distance between projector base and screen center Screen (inch) H 4:3 Diagonal Formulas(mm) "H = Horizontal Screen Width A = C/cosα C (wide) = 36.8712 × (diagonal screen size...
... C A E α D A: Distance between the lens and the screen center C: Horizontal throw distance between screen surface and the lens D: Vertical distance between projector base and base of image E: Vertical distance between projector base and screen center Screen (inch) H 4:3 Diagonal Formulas(mm) "H = Horizontal Screen Width A = C/cosα C (wide) = 36.8712 × (diagonal screen size...
User Manual
Page 16
... 270 13378 527 13282 523 1744 69 341 13 6.9 0.12 0.99 240 300 14875 586 14768 581 1927 76 390 15 WARNING • Installing your projector on a solid, level surface. Contact your NEC dealer if you have adequate ventilation around your projector so heat can be used at temperatures between...
... 270 13378 527 13282 523 1744 69 341 13 6.9 0.12 0.99 240 300 14875 586 14768 581 1927 76 390 15 WARNING • Installing your projector on a solid, level surface. Contact your NEC dealer if you have adequate ventilation around your projector so heat can be used at temperatures between...
User Manual
Page 17
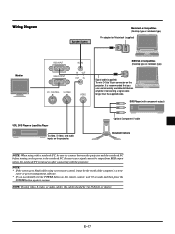
...remote control, it may be output from RGB output unless the notebook PC is recommended that you accidentally hit the POWER button on the projector. saver or power management software. * If you use a commercially available distribution amplifier if connecting a signal cable longer than the supplied.... E-17 NOTE: If using video, S-video, or audio cables, the cables should be sure to connect between the projector and the notebook PC before turning on the projector. DVD Player (with a notebook PC, be 3 m (9.8 feet) or shorter. Wiring Diagram Speaker System Macintosh or ...
...remote control, it may be output from RGB output unless the notebook PC is recommended that you accidentally hit the POWER button on the projector. saver or power management software. * If you use a commercially available distribution amplifier if connecting a signal cable longer than the supplied.... E-17 NOTE: If using video, S-video, or audio cables, the cables should be sure to connect between the projector and the notebook PC before turning on the projector. DVD Player (with a notebook PC, be 3 m (9.8 feet) or shorter. Wiring Diagram Speaker System Macintosh or ...
User Manual
Page 18
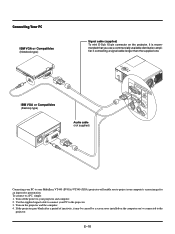
...Notebook type) Signal cable (supplied) To mini D-Sub 15-pin connector on the projector and the computer. 4. To connect to the projector. 3. E-18 It is recommended that you 've connected to the projector. If the projector goes blank after a period of inactivity, it may be caused by a screen ...Audio cable (not supplied) INRPGRUBTGB INPUATUDIOAUDIO OUTPUT IN PC-CONTROL S-VIDEO OUT OUT IN VIDEO Connecting your PC to your MultiSync VT440 (SVGA)/ VT540 (XGA) projector will enable you to your computer's screen image for an impressive presentation. Turn off the power to project your...
...Notebook type) Signal cable (supplied) To mini D-Sub 15-pin connector on the projector and the computer. 4. To connect to the projector. 3. E-18 It is recommended that you 've connected to the projector. If the projector goes blank after a period of inactivity, it may be caused by a screen ...Audio cable (not supplied) INRPGRUBTGB INPUATUDIOAUDIO OUTPUT IN PC-CONTROL S-VIDEO OUT OUT IN VIDEO Connecting your PC to your MultiSync VT440 (SVGA)/ VT540 (XGA) projector will enable you to your computer's screen image for an impressive presentation. Turn off the power to project your...
User Manual
Page 19
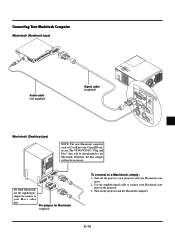
...19 Therefore, the Mac adapter will be necessary. Turn on the projector and the Macintosh computer. DIP 6 5 ON 4 3 2 1 For older Macintosh, use the supplied pin adapter to connect to the Macintosh. puter to a Macintosh, simply: 1. The VT440/VT540's "Plug and Play" data will not be downloaded to... your Macintosh com- Use the supplied signal cable to your projector and your Macintosh com- Turn off the power to connect your Mac's video...
...19 Therefore, the Mac adapter will be necessary. Turn on the projector and the Macintosh computer. DIP 6 5 ON 4 3 2 1 For older Macintosh, use the supplied pin adapter to connect to the Macintosh. puter to a Macintosh, simply: 1. The VT440/VT540's "Plug and Play" data will not be downloaded to... your Macintosh com- Use the supplied signal cable to your projector and your Macintosh com- Turn off the power to connect your Mac's video...

User Manual
Page 20
...mode and then restart the Macintosh again. See the following pages for setting of the DIP switches. • When using with a Macintosh, SVGA(800ן600 :VT440)/ XGA(1024ן768 : VT540) is needed for Monitor Mode Number of DIP switch Resolution 1 13" multi-scan mode /... if your Macintosh supports this happens, set the DIP switch to the 13" fixed mode and then restart your resolution. After that the projector and your Macintosh are connected with the pin adapter and the supplied signal cable (mini DSub 15-pin connector) and then restart your Macintosh...
...mode and then restart the Macintosh again. See the following pages for setting of the DIP switches. • When using with a Macintosh, SVGA(800ן600 :VT440)/ XGA(1024ן768 : VT540) is needed for Monitor Mode Number of DIP switch Resolution 1 13" multi-scan mode /... if your Macintosh supports this happens, set the DIP switch to the 13" fixed mode and then restart your resolution. After that the projector and your Macintosh are connected with the pin adapter and the supplied signal cable (mini DSub 15-pin connector) and then restart your Macintosh...
User Manual
Page 21
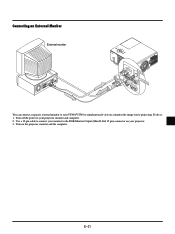
Use a 15-pin cable to connect your monitor to the RGB Monitor Output (Mini D-Sub 15 pin) connector on your VT440/VT540 to simultaneously view on the projector, monitor and the computer. Turn on a monitor the image you're projecting. Connecting an External Monitor External monitor INRPGUBT OUTPUT AUDIOAUDIO IN IN RGB OUTPUT PC-CONTROL S-VIDEO OUT OUT IN VIDEO AUDIO OUT You can connect a separate, external monitor to your projector. 3. Turn off the power to your projector, monitor and computer. 2. To do so: 1. E-21
Use a 15-pin cable to connect your monitor to the RGB Monitor Output (Mini D-Sub 15 pin) connector on your VT440/VT540 to simultaneously view on the projector, monitor and the computer. Turn on a monitor the image you're projecting. Connecting an External Monitor External monitor INRPGUBT OUTPUT AUDIOAUDIO IN IN RGB OUTPUT PC-CONTROL S-VIDEO OUT OUT IN VIDEO AUDIO OUT You can connect a separate, external monitor to your projector. 3. Turn off the power to your projector, monitor and computer. 2. To do so: 1. E-21
User Manual
Page 22
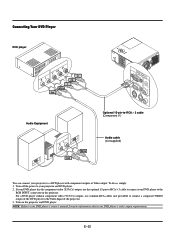
...) outputs, use the optional 15-pin-to-RCAן3 cable to connect your DVD player to the RGB INPUT connector on the projector and DVD player. NOTE: Refer to a DVD player with component outputs or Video output. If your DVD player has the component video (Y,Cb...,Cr) output, use common RCA cables (not provided) to connect a composite VIDEO output of the projector. 3. To do so, simply: 1. Connecting Your DVD Player DVD player L R Cr Cb Y Cr Cb Y White Red Audio Equipment L R Red White INRPGRUBTGB ...
...) outputs, use the optional 15-pin-to-RCAן3 cable to connect your DVD player to the RGB INPUT connector on the projector and DVD player. NOTE: Refer to a DVD player with component outputs or Video output. If your DVD player has the component video (Y,Cb...,Cr) output, use common RCA cables (not provided) to connect a composite VIDEO output of the projector. 3. To do so, simply: 1. Connecting Your DVD Player DVD player L R Cr Cb Y Cr Cb Y White Red Audio Equipment L R Red White INRPGRUBTGB ...


