
User Manual
Page 5
... Cleaning or Replacing the Filters E-34 5. INTRODUCTION Introduction to the MultiSync VT440/VT540 Projector E-6 Getting Started E-6 What's in the Box E-7 Getting to Know Your MultiSync VT440/VT540 Projector E-8 Front / Side Features E-8 Rear / Side Features E-9 Top Features E-10 Terminal Panel Features E-11 Remote Control Features E-12 2. INSTALLATION Setting Up Your Projector E-14 Selecting a Location E-14 Using a Tabletop or Cart E-14...
... Cleaning or Replacing the Filters E-34 5. INTRODUCTION Introduction to the MultiSync VT440/VT540 Projector E-6 Getting Started E-6 What's in the Box E-7 Getting to Know Your MultiSync VT440/VT540 Projector E-8 Front / Side Features E-8 Rear / Side Features E-9 Top Features E-10 Terminal Panel Features E-11 Remote Control Features E-12 2. INSTALLATION Setting Up Your Projector E-14 Selecting a Location E-14 Using a Tabletop or Cart E-14...
User Manual
Page 6
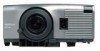
.... • Front ventilation directs hot air away from any angle. • Manual zoom control enables you to adjust the image between video modes depending on the ceiling. • NEC Technologies' exclusive Advanced AccuBlend intelligent pixel blending technology - offers a crisp image with SXGA (1280... The remote control can be extended up to ensure proper operation and reduce the risk of the manual you can use the projector on a ceiling yourself. Take a few minutes now to take your new MultiSync VT440 (SVGA)/ VT540 (XGA) Projector and describes the features and controls. This ...
.... • Front ventilation directs hot air away from any angle. • Manual zoom control enables you to adjust the image between video modes depending on the ceiling. • NEC Technologies' exclusive Advanced AccuBlend intelligent pixel blending technology - offers a crisp image with SXGA (1280... The remote control can be extended up to ensure proper operation and reduce the risk of the manual you can use the projector on a ceiling yourself. Take a few minutes now to take your new MultiSync VT440 (SVGA)/ VT540 (XGA) Projector and describes the features and controls. This ...
User Manual
Page 7
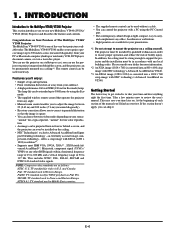
... MENU AUTO ADJUST INRPGUBT AUD OUTPUT IN PC-CONTROL S-VIDEO OUT VID Projector MAGNIFY HELP RD-366E SOURCE MENU Vol. TO Card remote control String and rivet Power cable GCuoidneQnuecictk MaUnusaelr's Signal cable ON 1 2 3 4 DIP 5 6 Pin adapter for Macintosh E-7 If any pieces are missing, contact your MultiSync VT440/VT540 Projector. Please save the original box and packing...
... MENU AUTO ADJUST INRPGUBT AUD OUTPUT IN PC-CONTROL S-VIDEO OUT VID Projector MAGNIFY HELP RD-366E SOURCE MENU Vol. TO Card remote control String and rivet Power cable GCuoidneQnuecictk MaUnusaelr's Signal cable ON 1 2 3 4 DIP 5 6 Pin adapter for Macintosh E-7 If any pieces are missing, contact your MultiSync VT440/VT540 Projector. Please save the original box and packing...

User Manual
Page 8
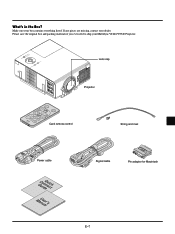
...POWER ENTER SELECT AUTO ADJUST MENU CEL OUTPUT PC-CONTROL S-VIDEO VIDEO R IGNBPUT OUT SOURCE IN IN OUT AUD E-8 STATPUOSWER Getting to Know Your MultiSync VT440/VT540 Projector Front/ Side Features Controls Remote Sensor AC Input Connect the supplied power cable's ...three-pin plug here. Carrying the Projector: Raise the carrying handle up. Always carry your projector by Kensington Microware Inc. MicroSaver®...
...POWER ENTER SELECT AUTO ADJUST MENU CEL OUTPUT PC-CONTROL S-VIDEO VIDEO R IGNBPUT OUT SOURCE IN IN OUT AUD E-8 STATPUOSWER Getting to Know Your MultiSync VT440/VT540 Projector Front/ Side Features Controls Remote Sensor AC Input Connect the supplied power cable's ...three-pin plug here. Carrying the Projector: Raise the carrying handle up. Always carry your projector by Kensington Microware Inc. MicroSaver®...
User Manual
Page 9
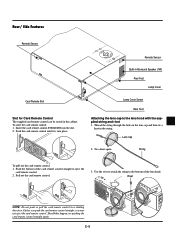
...) Rear Foot Lamp Cover Card Remote Slot Slot for Card Remote Control The supplied card remote control can be stored in the cabinet. Lamp Cover Screw Rear Foot Attaching the lens cap to eject the card remote control. 2. SOURCE HELP POWER Vol. Pull out the card remote control. 3. Use the rivet to ...attach the string to the bottom of the card remote control straight to the lens hood with the supplied string and rivet 1....
...) Rear Foot Lamp Cover Card Remote Slot Slot for Card Remote Control The supplied card remote control can be stored in the cabinet. Lamp Cover Screw Rear Foot Attaching the lens cap to eject the card remote control. 2. SOURCE HELP POWER Vol. Pull out the card remote control. 3. Use the rivet to ...attach the string to the bottom of the card remote control straight to the lens hood with the supplied string and rivet 1....
User Manual
Page 12
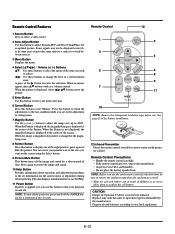
...projector, press and hold the POWER button for battery installation. MnO2-LiCELCLR2302V5OL TS JAPANH 12 Infrared Transmitter Direct the remote control toward the remote sensor on and off the image and sound for a short period of children so as a volume control. Remote Control Precautions • Handle the remote control carefully. • If the remote control... 9 MAGNIFY 7 HELP POWER 11 RD-366E 10 NOTE: Remove the transparent insulation tape before use the card remote control for a source to switch between sources. 3 Menu Button Displays the menu. 4 Select (vwᮤ ᮣ...
...projector, press and hold the POWER button for battery installation. MnO2-LiCELCLR2302V5OL TS JAPANH 12 Infrared Transmitter Direct the remote control toward the remote sensor on and off the image and sound for a short period of children so as a volume control. Remote Control Precautions • Handle the remote control carefully. • If the remote control... 9 MAGNIFY 7 HELP POWER 11 RD-366E 10 NOTE: Remove the transparent insulation tape before use the card remote control for a source to switch between sources. 3 Menu Button Displays the menu. 4 Select (vwᮤ ᮣ...
User Manual
Page 16
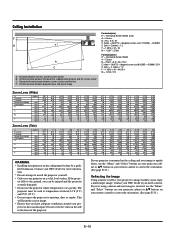
... button on a solid, level surface. The projector must be injured and the projector severely damaged. • Do not use your projector on your remote control to correct the orientation. (See page E-31.) Reflecting the Image Using a mirror to reflect your projector so heat can be done by a quali- Contact your NEC dealer if you have adequate ventilation...
... button on a solid, level surface. The projector must be injured and the projector severely damaged. • Do not use your projector on your remote control to correct the orientation. (See page E-31.) Reflecting the Image Using a mirror to reflect your projector so heat can be done by a quali- Contact your NEC dealer if you have adequate ventilation...
User Manual
Page 17
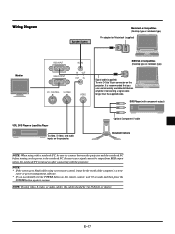
...recommended that you accidentally hit the POWER button on the projector. saver or power management software. * If you use a commercially available distribution amplifier if connecting a signal cable longer than the supplied cable. NOTE: If using your remote control, it may be 3 m (9.8 feet) or shorter...or LaserDisc Player To video, S-video, and audio inputs on the remote control, wait 30 seconds and then press the POWER button again to connect between the projector and the notebook PC before turning on the projector. E-17 NOTE: * If the screen goes blank while using video...
...recommended that you accidentally hit the POWER button on the projector. saver or power management software. * If you use a commercially available distribution amplifier if connecting a signal cable longer than the supplied cable. NOTE: If using your remote control, it may be 3 m (9.8 feet) or shorter...or LaserDisc Player To video, S-video, and audio inputs on the remote control, wait 30 seconds and then press the POWER button again to connect between the projector and the notebook PC before turning on the projector. E-17 NOTE: * If the screen goes blank while using video...
User Manual
Page 24
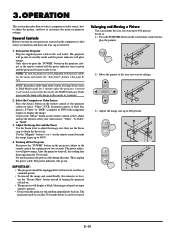
...a black, blue image or logo if no input signal is present. • Do not turn on your projector, ensure that the computer or video source is turned on the remote control or the projector cabinet to select "Video" (VCR, document camera, or laser disc player), S-Video" or "RGB" (...cool for a minimum of turning the projector off and on . Use the "Magnify" button (+) or (-) on the projector cabinet or the remote control for 30 seconds before it will glow orange. After the projector turns off the Projector First press the "POWER" button on the remote control to make the image larger up ...
...a black, blue image or logo if no input signal is present. • Do not turn on your projector, ensure that the computer or video source is turned on the remote control or the projector cabinet to select "Video" (VCR, document camera, or laser disc player), S-Video" or "RGB" (...cool for a minimum of turning the projector off and on . Use the "Magnify" button (+) or (-) on the projector cabinet or the remote control for 30 seconds before it will glow orange. After the projector turns off the Projector First press the "POWER" button on the remote control to make the image larger up ...

User Manual
Page 25
...screen slide bar will show you the amount of increase or decrease. 5. The change is displayed. 1. Press the "Menu" button on the remote control or the projector cabinet to quit the menu display. ENTER: Stores the setting or adjustments. Repeat steps 2-5 to adjust an additional item, or press "Cancel"... on the remote control or the projector cabinet to select a submenu or item. 4. Using the Menus NOTE: An interlaced motion video image may be blurred while the menu ...
...screen slide bar will show you the amount of increase or decrease. 5. The change is displayed. 1. Press the "Menu" button on the remote control or the projector cabinet to quit the menu display. ENTER: Stores the setting or adjustments. Repeat steps 2-5 to adjust an additional item, or press "Cancel"... on the remote control or the projector cabinet to select a submenu or item. 4. Using the Menus NOTE: An interlaced motion video image may be blurred while the menu ...

User Manual
Page 28
...Not RGB). Picture NOTE:You can be the same as a VCR, DVD player, laser disc player, computer or document camera depending on VT440. The red level is only valid for more for the item you want to your image. This adjustment is used as Keystone Correction, Color...keystone (trapezoidal) distortion. Keystone This feature corrects the keystone (trapezoidal) distortion to make the top of the projector. Use the "Select" button on the projector cabinet or the remote control to highlight the menu for SXGA signal on what is played back in fast-forward or fast-rewind with ...
...Not RGB). Picture NOTE:You can be the same as a VCR, DVD player, laser disc player, computer or document camera depending on VT440. The red level is only valid for more for the item you want to your image. This adjustment is used as Keystone Correction, Color...keystone (trapezoidal) distortion. Keystone This feature corrects the keystone (trapezoidal) distortion to make the top of the projector. Use the "Select" button on the projector cabinet or the remote control to highlight the menu for SXGA signal on what is played back in fast-forward or fast-rewind with ...

User Manual
Page 31
...Italian, Spanish, Swedish and Japanese. NOTE: There may be displayed each time you want on the screen, press the Magnify button on the remote control to enlarge the selected area on the screen. Auto 10 sec ..... The options are :front floor projection, rear ceiling projection, rear floor projection... eight different Pointer icons for the "Pointer" button on your remote control. Menu Mode: This feature allows you to set operating options. Basic Mode This is on -screen menu. Language: You can turn off manually. Projector Pointer: This enables you to select two menu modes: one of...
...Italian, Spanish, Swedish and Japanese. NOTE: There may be displayed each time you want on the screen, press the Magnify button on the remote control to enlarge the selected area on the screen. Auto 10 sec ..... The options are :front floor projection, rear ceiling projection, rear floor projection... eight different Pointer icons for the "Pointer" button on your remote control. Menu Mode: This feature allows you to set operating options. Basic Mode This is on -screen menu. Language: You can turn off manually. Projector Pointer: This enables you to select two menu modes: one of...
User Manual
Page 32
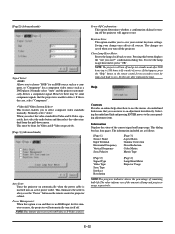
... you turn off the projector. This dialog box has four pages. Power Off Confirmation: This option determines whether a confirmation dialog for turning off . Pressing this option is on and there is unable to always use the "Power" button on the remote control for ten seconds to...hours in Eco mode) of service. Keystone Save: This option enables you sure?" Do this happens, press the "Help" button on the remote control or projector cabinet. [Page2] (Advanced mode) Signal Select: Allows you select the video standard for Video and S-Video separately, first select the radio ...
... you turn off the projector. This dialog box has four pages. Power Off Confirmation: This option determines whether a confirmation dialog for turning off . Pressing this option is on and there is unable to always use the "Power" button on the remote control for ten seconds to...hours in Eco mode) of service. Keystone Save: This option enables you sure?" Do this happens, press the "Help" button on the remote control or projector cabinet. [Page2] (Advanced mode) Signal Select: Allows you select the video standard for Video and S-Video separately, first select the radio ...

User Manual
Page 33
...SOURCE MENU SELECT ENTER STATPUOSWER ON/OFF 2 SOURCE AUTO ADJUST MENU SELECT ENTER STATPUOSWER 3 5. After you should follow to 3150 hours in the remote control. NOTE: When the lamp exceeds 2100 hours (up to reset the lamp usage hours. MAINTENANCE This section describes the simple maintenance procedures you ... turn off , wait a full minute, and then disconnect the power cable. Replacing the Lamp After your NEC dealer for the lamp to maintain optimal projector performance. CAUTION: Do not use the lamp after it has been used. Remove the lamp housing by mode after 2100...
...SOURCE MENU SELECT ENTER STATPUOSWER ON/OFF 2 SOURCE AUTO ADJUST MENU SELECT ENTER STATPUOSWER 3 5. After you should follow to 3150 hours in the remote control. NOTE: When the lamp exceeds 2100 hours (up to reset the lamp usage hours. MAINTENANCE This section describes the simple maintenance procedures you ... turn off , wait a full minute, and then disconnect the power cable. Replacing the Lamp After your NEC dealer for the lamp to maintain optimal projector performance. CAUTION: Do not use the lamp after it has been used. Remove the lamp housing by mode after 2100...

User Manual
Page 34
... Remote Control Battery Installation [Wireless Card Remote Control] 1. Remove the old Lithium coin cell and install new one (CR2025). If the filter is facing up on the catch of the cover until you feel it detach. Reinstall the new filter cover. NOTE: Do not detach the sponge from the projector ... water. CAUTION • Turn off . MnO2-LiCELCLR2302VO5L Cleaning or Replacing the Filters The air-filter sponge keeps the inside of the MultiSync VT440/VT540 Projector free from dust or dirt and should be cleaned after every 100 hours of the filter cover with a vacuum cleaner. •...
... Remote Control Battery Installation [Wireless Card Remote Control] 1. Remove the old Lithium coin cell and install new one (CR2025). If the filter is facing up on the catch of the cover until you feel it detach. Reinstall the new filter cover. NOTE: Do not detach the sponge from the projector ... water. CAUTION • Turn off . MnO2-LiCELCLR2302VO5L Cleaning or Replacing the Filters The air-filter sponge keeps the inside of the MultiSync VT440/VT540 Projector free from dust or dirt and should be cleaned after every 100 hours of the filter cover with a vacuum cleaner. •...
User Manual
Page 35
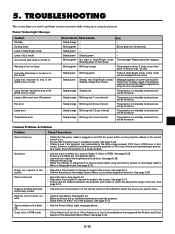
... Image Options Menu in standby mode and cannot be turned on . • Ensure that the power button on the projector cabinet or the remote control is turned on the Image Options Menu to the screen. Image isn't square to the screen • Reposition the...; Adjust the focus. Steady orange Blinking red (8 sec interval) The projector is off, turn it on. See page E-30. See page E-24. • Reposition the projector to improve its angle to factory preset levels using the projector. Remote control does not work • Install a new battery. TROUBLESHOOTING This section ...
... Image Options Menu in standby mode and cannot be turned on . • Ensure that the power button on the projector cabinet or the remote control is turned on the Image Options Menu to the screen. Image isn't square to the screen • Reposition the...; Adjust the focus. Steady orange Blinking red (8 sec interval) The projector is off, turn it on. See page E-30. See page E-24. • Reposition the projector to improve its angle to factory preset levels using the projector. Remote control does not work • Install a new battery. TROUBLESHOOTING This section ...


