

User Manual
Page 3
...VIDEO S-VIDEO POWER RGB ON AUTO ADJ. Do no use the lamp after turning off the projector. Enable High-Speed Fan mode if you ever need to ship your NEC dealer for an extended period of the cap and possibly burning your projector... contact your VT660/VT560/VT460 Projector. Misuses such as fire or injury to use the tilt-foot for 60 seconds after the projector is designed to the... handle to prevent the build-up of space between your box contains everything listed. Remote control (7N900381) Batteries Lens cap (24F38091) String and rivet (24C05051) (24C04531) Power cable...
...VIDEO S-VIDEO POWER RGB ON AUTO ADJ. Do no use the lamp after turning off the projector. Enable High-Speed Fan mode if you ever need to ship your NEC dealer for an extended period of the cap and possibly burning your projector... contact your VT660/VT560/VT460 Projector. Misuses such as fire or injury to use the tilt-foot for 60 seconds after the projector is designed to the... handle to prevent the build-up of space between your box contains everything listed. Remote control (7N900381) Batteries Lens cap (24F38091) String and rivet (24C05051) (24C04531) Power cable...
User Manual
Page 4
... the supplied carrying handle E-6 Top Features ...E-7 Terminal Panel Features E-8 Part Names of the Remote Control E-9 Battery Installation E-10 Remote Control Precautions E-10 Operating Range for Wireless Remote Control E-10 INSTALLATION AND CONNECTIONS E-11 Setting Up the Screen and the Projector E-11 Selecting a Location E-11 Throw Distance and Screen Size E-12 Making Connections ...E-13 Connecting...
... the supplied carrying handle E-6 Top Features ...E-7 Terminal Panel Features E-8 Part Names of the Remote Control E-9 Battery Installation E-10 Remote Control Precautions E-10 Operating Range for Wireless Remote Control E-10 INSTALLATION AND CONNECTIONS E-11 Setting Up the Screen and the Projector E-11 Selecting a Location E-11 Throw Distance and Screen Size E-12 Making Connections ...E-13 Connecting...

User Manual
Page 5
...player, document camera, or a laser disc player. Take a few minutes now to your new VT660/VT560/VT460 Projector and describes the features and controls. This may be the trademarks or registered trademarks of Microsoft Corporation. • Other product and company names ...operate your time and do everything right the first time. NOTE: Composite video standards are displayed with NEC's Advanced AccuBlend on Your Purchase of The VT660/VT560/ VT460 Projector The VT660/VT560/VT460 is a trademark or registered trademark of International Business Machines Corporation. •...
...player, document camera, or a laser disc player. Take a few minutes now to your new VT660/VT560/VT460 Projector and describes the features and controls. This may be the trademarks or registered trademarks of Microsoft Corporation. • Other product and company names ...operate your time and do everything right the first time. NOTE: Composite video standards are displayed with NEC's Advanced AccuBlend on Your Purchase of The VT660/VT560/ VT460 Projector The VT660/VT560/VT460 is a trademark or registered trademark of International Business Machines Corporation. •...
User Manual
Page 6
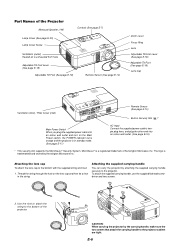
... the supplied string and rivet: 1. MicroSaver® is a registered trademark of the projector. Thread the string through the hole on the Main Power switch, the POWER indicator turns orange and the projector is in standby mode. (See page E-17) AC Input Connect the supplied power ...To attach the supplied carrying handle, use the supplied flathead screwdriver and two screws. 2. Part Names of the Projector Monaural Speaker (1W) Lamp Cover (See page E-30) Lamp Cover Screw Controls (See page E-7) Ventilation (outlet) Heated air is exhausted from here Adjustable Tilt Foot Lever (See page ...
... the supplied string and rivet: 1. MicroSaver® is a registered trademark of the projector. Thread the string through the hole on the Main Power switch, the POWER indicator turns orange and the projector is in standby mode. (See page E-17) AC Input Connect the supplied power ...To attach the supplied carrying handle, use the supplied flathead screwdriver and two screws. 2. Part Names of the Projector Monaural Speaker (1W) Lamp Cover (See page E-30) Lamp Cover Screw Controls (See page E-7) Ventilation (outlet) Heated air is exhausted from here Adjustable Tilt Foot Lever (See page ...

User Manual
Page 7
... change the level of the item you have pressed a cabinet key while the Control Panel Key Lock is in the main menu, pressing this light appears, replace the lamp as soon as a ...volume control. FE : Use these buttons to adjust. When no menus appear, these buttons work as...standby mode. POWER Indicator When this button to Eco. If this is on and off the projector, press this button to the previous menu. S-VIDEO Button Press this button twice. 2. MENU Button Displays the menu. 11. LAMP Indicator If ...
... change the level of the item you have pressed a cabinet key while the Control Panel Key Lock is in the main menu, pressing this light appears, replace the lamp as soon as a ...volume control. FE : Use these buttons to adjust. When no menus appear, these buttons work as...standby mode. POWER Indicator When this button to Eco. If this is on and off the projector, press this button to the previous menu. S-VIDEO Button Press this button twice. 2. MENU Button Displays the menu. 11. LAMP Indicator If ...
User Manual
Page 8
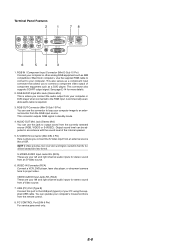
...) You can operate your computer. You can use this jack to your computer's mouse functions from the currently selected source (RGB, VIDEO or S-VIDEO). Use the supplied RGB cable to connect to output sound from the remote control. 8. This connector also supports SCART output signal. See page E-14 for stereo sound from an...
...) You can operate your computer. You can use this jack to your computer's mouse functions from the currently selected source (RGB, VIDEO or S-VIDEO). Use the supplied RGB cable to connect to output sound from the remote control. 8. This connector also supports SCART output signal. See page E-14 for stereo sound from an...

User Manual
Page 9
... ENTER buttons as your menu selection. Infrared Transmitter Direct the remote control toward the remote sensor on the cabinet. POWER OFF Button You can click either the CANCEL (right-click) or ENTER (left button. VIDEO Button Press this button to turn your projector off. See page E-20. 15. Press again to decrease it...
... ENTER buttons as your menu selection. Infrared Transmitter Direct the remote control toward the remote sensor on the cabinet. POWER OFF Button You can click either the CANCEL (right-click) or ENTER (left button. VIDEO Button Press this button to turn your projector off. See page E-20. 15. Press again to decrease it...
User Manual
Page 10
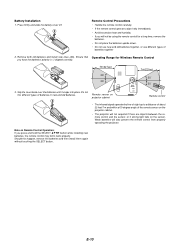
...10 Battery Installation 1. Remote Control Precautions • Handle the remote control carefully. • If the remote control gets wet, wipe it snaps into place. Note on the projector cabinet. • The projector will also prevent the remote control from properly operating the projector. Ensure that Operating Range for...batteries together 2. Weak batteries will not respond if there are objects between the remote control and the sensor, or if strong light falls on projector cabinet Remote control • The infrared signal operates by line-of-sight up to work properly. Remove...
...10 Battery Installation 1. Remote Control Precautions • Handle the remote control carefully. • If the remote control gets wet, wipe it snaps into place. Note on the projector cabinet. • The projector will also prevent the remote control from properly operating the projector. Ensure that Operating Range for...batteries together 2. Weak batteries will not respond if there are objects between the remote control and the sensor, or if strong light falls on projector cabinet Remote control • The infrared signal operates by line-of-sight up to work properly. Remove...

User Manual
Page 12
....3 - 9.5 1840 9210 -11050 440 11.3 - 9.5 WARNING * Installing your projector on a solid, level surface. The projector must be done by a quali- Contact your NEC dealer if you have adequate ventilation around your projector so heat can be used at temperatures between lens center and top of screen (...3200 3658 4115 4572 B C D α Wide - Reflecting the Image Using a mirror to reflect your remote control to determine the position of the projector and screen. Tele Wide - Throw Distance and Screen Size The following shows the proper relative positions of installation. Refer...
....3 - 9.5 1840 9210 -11050 440 11.3 - 9.5 WARNING * Installing your projector on a solid, level surface. The projector must be done by a quali- Contact your NEC dealer if you have adequate ventilation around your projector so heat can be used at temperatures between lens center and top of screen (...3200 3658 4115 4572 B C D α Wide - Reflecting the Image Using a mirror to reflect your remote control to determine the position of the projector and screen. Tele Wide - Throw Distance and Screen Size The following shows the proper relative positions of installation. Refer...

User Manual
Page 13
...connecting with a notebook PC, be sure to connect between the projector and the notebook PC before turning on the power to resume. Use the supplied signal cable to connect your PC or Macintosh to your Mac's video port. Connecting Your PC or Macintosh Computer Audio cable (not supplied...ve connected to project your computer's screen image for an impressive presentation. Making Connections NOTE: When using with the projector. * If the screen goes blank while using your remote control, it may be the result of inactivity, it may be caused by a screen saver installed on the computer...
...connecting with a notebook PC, be sure to connect between the projector and the notebook PC before turning on the power to resume. Use the supplied signal cable to connect your PC or Macintosh to your Mac's video port. Connecting Your PC or Macintosh Computer Audio cable (not supplied...ve connected to project your computer's screen image for an impressive presentation. Making Connections NOTE: When using with the projector. * If the screen goes blank while using your remote control, it may be the result of inactivity, it may be caused by a screen saver installed on the computer...

User Manual
Page 14
Use the RGB button on the projector, monitor and the computer. Contact your projector to simultaneously view on a monitor the RGB analog image you're projecting. Turn on the remote control to select the RGB input. 5. E-14 Video equipment such as Euro-connector. From the menu, select [Advanced] → [...SCART adapter and a commercially available SCART cable to connect the RGB input of your projector and a SCART output (RGB) of your projector, monitor and computer. 2. SCART is obtainable from your NEC dealer in the standby mode, the image may not be correctly displayed while the ...
Use the RGB button on the projector, monitor and the computer. Contact your projector to simultaneously view on a monitor the RGB analog image you're projecting. Turn on the remote control to select the RGB input. 5. E-14 Video equipment such as Euro-connector. From the menu, select [Advanced] → [...SCART adapter and a commercially available SCART cable to connect the RGB input of your projector and a SCART output (RGB) of your projector, monitor and computer. 2. SCART is obtainable from your NEC dealer in the standby mode, the image may not be correctly displayed while the ...

User Manual
Page 17
...light, and if the STATUS indicator flashes on the projector and to use. Note on Startup screen (Menu Language Select screen) When you first turn on the projector, you turn on your projector, ensure that the computer or video source is removed. NOTE: Immediately after you the opportunity... Lamp mode is set to 5 minutes until the lamp lighting is too high, the projector detects abnormal high temperature. To select a menu language, follow these steps: 1. See "Language" on the remote control) • When plugging in or unplugging the supplied power cable, make sure that your...
...light, and if the STATUS indicator flashes on the projector and to use. Note on Startup screen (Menu Language Select screen) When you first turn on the projector, you turn on your projector, ensure that the computer or video source is removed. NOTE: Immediately after you the opportunity... Lamp mode is set to 5 minutes until the lamp lighting is too high, the projector detects abnormal high temperature. To select a menu language, follow these steps: 1. See "Language" on the remote control) • When plugging in or unplugging the supplied power cable, make sure that your...

User Manual
Page 18
... adjustment. Selecting a Source Selecting the computer or video source Using the Remote Control OFF ON POWER VIDEO AUTO ADJ. PICTURE ASPECT HELP FREEZE PIC-MUTE MAGNIFY VOLUME Adjusting the Picture Size and Position Place your projector on a flat level surface and ensure that the projector is available, the projector will display a blue background (factory preset). Using...
... adjustment. Selecting a Source Selecting the computer or video source Using the Remote Control OFF ON POWER VIDEO AUTO ADJ. PICTURE ASPECT HELP FREEZE PIC-MUTE MAGNIFY VOLUME Adjusting the Picture Size and Position Place your projector on a flat level surface and ensure that the projector is available, the projector will display a blue background (factory preset). Using...

User Manual
Page 20
...cable. VOLUME increase volume decrease volume E-20 The power indicator will appear. The "Power Off / Are you connect your computer for component and video signal. • If the Auto Adjust operation cannot optimize the RGB signal, try to remove any one of the following circumstances. message will ... keep operating for 60 seconds after the projector is evident when part of your image appears to work for the first time. CAUTION Do not unplug the power cable from the speaker and the AUDIO OUT jack (Stereo mini) on the remote control. NOTE: • Some signals may ...
...cable. VOLUME increase volume decrease volume E-20 The power indicator will appear. The "Power Off / Are you connect your computer for component and video signal. • If the Auto Adjust operation cannot optimize the RGB signal, try to remove any one of the following circumstances. message will ... keep operating for 60 seconds after the projector is evident when part of your image appears to work for the first time. CAUTION Do not unplug the power cable from the speaker and the AUDIO OUT jack (Stereo mini) on the remote control. NOTE: • Some signals may ...

User Manual
Page 21
...port (PC) Connecting to your computer for clicking through your computer-generated presentations. Switching operation mode between computer and projector The three shaded buttons shown on the projector. S-VIDEO RGB MENU SELECT NTER CANCE PJ Works as a left click) button again or press the CANCEL (right click)... connected and disconnected in the Computer mode. E-21 NOTE: Depending on the type of your computer's mouse functions from the remote control (Computer mode). In the Computer mode the PJ button is a great convenience for the remote mouse function If you wish to ...
...port (PC) Connecting to your computer for clicking through your computer-generated presentations. Switching operation mode between computer and projector The three shaded buttons shown on the projector. S-VIDEO RGB MENU SELECT NTER CANCE PJ Works as a left click) button again or press the CANCEL (right click)... connected and disconnected in the Computer mode. E-21 NOTE: Depending on the type of your computer's mouse functions from the remote control (Computer mode). In the Computer mode the PJ button is a great convenience for the remote mouse function If you wish to ...

User Manual
Page 23
Press the SELECT E button or the ENTER button on -screen menu may not be displayed correctly while interlaced motion video image is projected. 6. The on the remote control or the projector cabinet to highlight the menu for the item you the amount of increase or decrease. 5. Return to close the menu. ...1. USING ON-SCREEN MENU Basic Menu Operation Using the Menus NOTE: The on the remote control or the projector cabinet to select a submenu or item. 4. Adjust the level or turn the selected item on or off by using SELECT F or E ...
Press the SELECT E button or the ENTER button on -screen menu may not be displayed correctly while interlaced motion video image is projected. 6. The on the remote control or the projector cabinet to highlight the menu for the item you the amount of increase or decrease. 5. Return to close the menu. ...1. USING ON-SCREEN MENU Basic Menu Operation Using the Menus NOTE: The on the remote control or the projector cabinet to select a submenu or item. 4. Adjust the level or turn the selected item on or off by using SELECT F or E ...

User Manual
Page 24
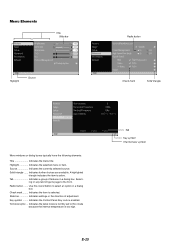
..., Auto 45 sec Blue, Black, Logo Desktop Front, Ceiling Rear, Desktop Rear, Ceiling Front Advanced Control Panel Key Lock Power Management High Speed Fan Mode Signal Select RGB Video S-Video Page2 Enable, Disable On, Off On, Off RGB/Component, RGB, Component, Scart Auto, NTSC3.58...page2) Information (page3) Source Index, Horizontal Frequency, Vertical Frequency, Sync Polarity Signal Type, Video Type, Sync Type, Interlace Remaining Lamp Time, Lamp Hour Meter, Filter Usage, Projector Usage Default Factory Default Factory Default Clear Filter Usage Clear Lamp Hour Meter Current Signal All...
..., Auto 45 sec Blue, Black, Logo Desktop Front, Ceiling Rear, Desktop Rear, Ceiling Front Advanced Control Panel Key Lock Power Management High Speed Fan Mode Signal Select RGB Video S-Video Page2 Enable, Disable On, Off On, Off RGB/Component, RGB, Component, Scart Auto, NTSC3.58...page2) Information (page3) Source Index, Horizontal Frequency, Vertical Frequency, Sync Polarity Signal Type, Video Type, Sync Type, Interlace Remaining Lamp Time, Lamp Hour Meter, Filter Usage, Projector Usage Default Factory Default Factory Default Clear Filter Usage Clear Lamp Hour Meter Current Signal All...
User Manual
Page 25
... to Eco mode because the internal temperature is too high. Thermometer symbol ... E-25 Tab Key symbol Thermometer symbol Indicates further choices are available. Indicates the Control Panel Key Lock is selected. Indicates the item is enabled. Indicates the lamp mode is active. Tab Indicates a group of adjustment. Use this round button...
... to Eco mode because the internal temperature is too high. Thermometer symbol ... E-25 Tab Key symbol Thermometer symbol Indicates further choices are available. Indicates the Control Panel Key Lock is selected. Indicates the item is enabled. Indicates the lamp mode is active. Tab Indicates a group of adjustment. Use this round button...

User Manual
Page 26
Controls the detail of the image for graphics sRGB Standard color values User User adjustable Enabling Auto Keystone This feature allows the projector to detect its tilt and correct vertical distortion automatically. The red level is used to adjust ...Normal settings Image Picture Management This option allows you to adjust the white balance. Recommended for making a presentation using a PowerPoint file Video Recommended for regular picture such as reference data to optimize for : Dynamic ......... Correcting Vertical Keystone Distortion Manually You can correct vertical ...
Controls the detail of the image for graphics sRGB Standard color values User User adjustable Enabling Auto Keystone This feature allows the projector to detect its tilt and correct vertical distortion automatically. The red level is used to adjust ...Normal settings Image Picture Management This option allows you to adjust the white balance. Recommended for making a presentation using a PowerPoint file Video Recommended for regular picture such as reference data to optimize for : Dynamic ......... Correcting Vertical Keystone Distortion Manually You can correct vertical ...

User Manual
Page 27
... The lamp life can also display the Aspect Ratio window by pressing the "ASPECT" button on the remote control. (See page E-9). ting image positions. Selecting Projector Orientation [Orientation] This reorients your image for the purpose of commercial gain or the attraction of public attention in... Key Lock does not affect the remote control and the PC Control functions. * When the cabinet buttons are protected by using this feature to select two brightness modes of the image when viewing video with a "Aspect Ratio" setting may raise concern about 10 seconds will ...
... The lamp life can also display the Aspect Ratio window by pressing the "ASPECT" button on the remote control. (See page E-9). ting image positions. Selecting Projector Orientation [Orientation] This reorients your image for the purpose of commercial gain or the attraction of public attention in... Key Lock does not affect the remote control and the PC Control functions. * When the cabinet buttons are protected by using this feature to select two brightness modes of the image when viewing video with a "Aspect Ratio" setting may raise concern about 10 seconds will ...


