
User Manual
Page 2
...FCC Rules. DO NOT OPEN THE CABINET. The static background from that uninsulated voltage within the unit may cause damage to the projector. Place the projector on the ceiling: a. Do not attempt to provide reasonable protection against harmful interference in a darkened room. 2. CAUTION TO PREVENT... PLUG WITH AN EXTENSION CORD OR IN AN OUTLET UNLESS ALL TWO PRONGS CAN BE FULLY INSERTED. Do not place your NEC VT660/VT560/ VT460 Projector and keep the manual handy for a prolonged pe- Dropping or jarring can radiate radio frequency energy and, if not installed...
...FCC Rules. DO NOT OPEN THE CABINET. The static background from that uninsulated voltage within the unit may cause damage to the projector. Place the projector on the ceiling: a. Do not attempt to provide reasonable protection against harmful interference in a darkened room. 2. CAUTION TO PREVENT... PLUG WITH AN EXTENSION CORD OR IN AN OUTLET UNLESS ALL TWO PRONGS CAN BE FULLY INSERTED. Do not place your NEC VT660/VT560/ VT460 Projector and keep the manual handy for a prolonged pe- Dropping or jarring can radiate radio frequency energy and, if not installed...

User Manual
Page 3
...work for 60 seconds after the projector is turned on . Projector VOLUME PJ PICTURE HELP FREEZE ASPECT MAGNIFY PIC-MUTE SELECT OFF VIDEO S-VIDEO POWER RGB ON AUTO ADJ. Do... Doing so can cause damage to use the projector for an extended period of the projector. When carrying the projector by a qualified NEC service personnel. 3. Please replace the lamp." ...projector. 8. Do no use your VT660/VT560/VT460 Projector. Enable High-Speed Fan mode if you ever need to the projector cabinet are missing, contact your power supply fits this happens, contact your projector...
...work for 60 seconds after the projector is turned on . Projector VOLUME PJ PICTURE HELP FREEZE ASPECT MAGNIFY PIC-MUTE SELECT OFF VIDEO S-VIDEO POWER RGB ON AUTO ADJ. Do... Doing so can cause damage to use the projector for an extended period of the projector. When carrying the projector by a qualified NEC service personnel. 3. Please replace the lamp." ...projector. 8. Do no use your VT660/VT560/VT460 Projector. Enable High-Speed Fan mode if you ever need to the projector cabinet are missing, contact your power supply fits this happens, contact your projector...
User Manual
Page 4
...E-10 Remote Control Precautions E-10 Operating Range for Wireless Remote Control E-10 INSTALLATION AND CONNECTIONS E-11 Setting Up the Screen and the Projector E-11 Selecting a Location E-11 Throw Distance and Screen Size E-12 Making Connections ...E-13 Connecting Your PC or Macintosh Computer E-13 ... VCR or Laser Disc Player E-16 Connecting the Supplied Power Cable E-16 PROJECTING AN IMAGE (BASIC OPERATION E-17 Turning on the Projector E-17 Selecting a Source ...E-18 Adjusting the Picture Size and Position E-18 Correcting the Vertical Keystone Distortion E-19 Optimizing RGB Picture...
...E-10 Remote Control Precautions E-10 Operating Range for Wireless Remote Control E-10 INSTALLATION AND CONNECTIONS E-11 Setting Up the Screen and the Projector E-11 Selecting a Location E-11 Throw Distance and Screen Size E-12 Making Connections ...E-13 Connecting Your PC or Macintosh Computer E-13 ... VCR or Laser Disc Player E-16 Connecting the Supplied Power Cable E-16 PROJECTING AN IMAGE (BASIC OPERATION E-17 Turning on the Projector E-17 Selecting a Source ...E-18 Adjusting the Picture Size and Position E-18 Correcting the Vertical Keystone Distortion E-19 Optimizing RGB Picture...

User Manual
Page 5
...*2. • Supports most IBM VGA, SVGA, XGA , SXGA/UXGA(with NEC's Advanced AccuBlend on a ceiling*1. NOTE: Composite video standards are trademarks or registered trademarks of the manual you can control the projector with NEC's Advanced AccuBlend on . PAL-N: TV standard used in the U.S. E-5 Take...keys for NTSC playback on Your Purchase of The VT660/VT560/ VT460 Projector The VT660/VT560/VT460 is to take your dealer for video in Brazil. This includes NTSC, PAL, PAL-N, PAL-M, PAL60, SECAM and NTSC4.43 standard video signals. *2 A UXGA (1600ן1200) ...
...*2. • Supports most IBM VGA, SVGA, XGA , SXGA/UXGA(with NEC's Advanced AccuBlend on a ceiling*1. NOTE: Composite video standards are trademarks or registered trademarks of the manual you can control the projector with NEC's Advanced AccuBlend on . PAL-N: TV standard used in the U.S. E-5 Take...keys for NTSC playback on Your Purchase of The VT660/VT560/ VT460 Projector The VT660/VT560/VT460 is to take your dealer for video in Brazil. This includes NTSC, PAL, PAL-N, PAL-M, PAL60, SECAM and NTSC4.43 standard video signals. *2 A UXGA (1600ן1200) ...
User Manual
Page 6
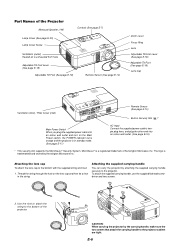
... screws that attach the carrying handle to the bottom of Kensington Microware Inc. Attaching the supplied carrying handle You can carry the projector by attaching the supplied carrying handle securely to the bottom with the supplied string and rivet: 1. Attaching the lens cap To ...attach the lens cap to the projector. CAUTION: When carrying the projector by Kensington Microware Inc. E-6 MicroSaver® is a registered trademark of the projector. Thread the string through the hole on the Main Power switch, the POWER indicator turns...
... screws that attach the carrying handle to the bottom of Kensington Microware Inc. Attaching the supplied carrying handle You can carry the projector by attaching the supplied carrying handle securely to the bottom with the supplied string and rivet: 1. Attaching the lens cap To ...attach the lens cap to the projector. CAUTION: When carrying the projector by Kensington Microware Inc. E-6 MicroSaver® is a registered trademark of the projector. Thread the string through the hole on the Main Power switch, the POWER indicator turns...

User Manual
Page 7
... If this button to select the menu of its usable life. Button Use this light blinks red rapidly, it is not attached properly or the projector has overheated. FE : Use these buttons to adjust Position-H/V and Pixel Clock/Phase for an optimal picture (See page E-20). 9. When no menus .... 11. E-7 Top Features 5 6 78 234 10 11 12. To turn off when the main power is supplied and the projector is orange, it 's warning you wish to select a video source from the menu. 13. CANCEL Button Pressing this button will return to Eco. While you have pressed a cabinet key while...
... If this button to select the menu of its usable life. Button Use this light blinks red rapidly, it is not attached properly or the projector has overheated. FE : Use these buttons to adjust Position-H/V and Pixel Clock/Phase for an optimal picture (See page E-20). 9. When no menus .... 11. E-7 Top Features 5 6 78 234 10 11 12. To turn off when the main power is supplied and the projector is orange, it 's warning you wish to select a video source from the menu. 13. CANCEL Button Pressing this button will return to Eco. While you have pressed a cabinet key while...

User Manual
Page 9
... a VCR, DVD player, laser disc player or document camera. 6. Press again to decrease it. E-9 See page E-21. S-VIDEO Button Press this button to turn on the projector, press and hold the POWER ON button for a short period of two seconds. 4. See page E22. 20. MENU Button Displays... GHFE (Mouse) Button When you are in the Computer mode, this button to select a video source from a VCR. 7. When no buttons are pressed within 60 seconds, the light goes out and the Projector mode is canceled. RGB Button Press this button to change the level of a selected menu ...
... a VCR, DVD player, laser disc player or document camera. 6. Press again to decrease it. E-9 See page E-21. S-VIDEO Button Press this button to turn on the projector, press and hold the POWER ON button for a short period of two seconds. 4. See page E22. 20. MENU Button Displays... GHFE (Mouse) Button When you are in the Computer mode, this button to select a video source from a VCR. 7. When no buttons are pressed within 60 seconds, the light goes out and the Projector mode is canceled. RGB Button Press this button to change the level of a selected menu ...
User Manual
Page 10
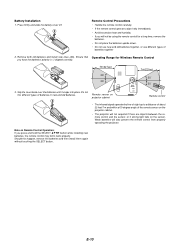
...the remote control gets wet, wipe it snaps into place. Do not mix different types of the remote sensor on the projector cabinet. • The projector will not respond if there are objects between the remote control and the sensor, or if strong light falls on Remote Control...on the sensor. Ensure that Operating Range for Wireless Remote Control you will also prevent the remote control from properly operating the projector. Remote sensor on projector cabinet Remote control • The infrared signal operates by line-of-sight up to work properly. Should this happen, remove ...
...the remote control gets wet, wipe it snaps into place. Do not mix different types of the remote sensor on the projector cabinet. • The projector will not respond if there are objects between the remote control and the sensor, or if strong light falls on Remote Control...on the sensor. Ensure that Operating Range for Wireless Remote Control you will also prevent the remote control from properly operating the projector. Remote sensor on projector cabinet Remote control • The infrared signal operates by line-of-sight up to work properly. Should this happen, remove ...

User Manual
Page 11
... To the wall outlet. 3 Setting Up the Screen and the Projector Selecting a Location The further your computer or video equipment to set up and use , cover the lens with the lens cap. When moving the projector. The minimum size the image can be is approximately 21" ...first: 1 Set up a screen and the projector. 2 Connect your projector is from the wall or screen. INSTALLATION AND CONNECTIONS This section describes how to set up your projector and how to connect video and audio sources. 1 Your projector is simple to the projector. The largest the image can be is 300...
... To the wall outlet. 3 Setting Up the Screen and the Projector Selecting a Location The further your computer or video equipment to set up and use , cover the lens with the lens cap. When moving the projector. The minimum size the image can be is approximately 21" ...first: 1 Set up a screen and the projector. 2 Connect your projector is from the wall or screen. INSTALLATION AND CONNECTIONS This section describes how to set up your projector and how to connect video and audio sources. 1 Your projector is simple to the projector. The largest the image can be is 300...

User Manual
Page 12
... 9.5 1660 8290 - 9940 400 11.3 - 9.5 1840 9210 -11050 440 11.3 - 9.5 WARNING * Installing your NEC dealer if you can dissipate. Do not cover the vents on your projector cabinet or your projector's image enables you to the ground, you need a mirror. If you have adequate ventilation around your... NEC dealer for desktop) α = Throw angle NOTE: Distances may vary +/-5%. (B) (D) Screen...
... 9.5 1660 8290 - 9940 400 11.3 - 9.5 1840 9210 -11050 440 11.3 - 9.5 WARNING * Installing your NEC dealer if you can dissipate. Do not cover the vents on your projector cabinet or your projector's image enables you to the ground, you need a mirror. If you have adequate ventilation around your... NEC dealer for desktop) α = Throw angle NOTE: Distances may vary +/-5%. (B) (D) Screen...

User Manual
Page 13
... press the POWER button again to resume. Turn off the power to your Mac's video port. If the projector goes blank after connecting with a notebook PC, be sure to connect between the projector and the notebook PC before turning on the power to the notebook PC. NOTE: ...older Macintosh, use a commercially available distribution amplifier if connecting a signal cable longer than the supplied one. Making Connections NOTE: When using with the projector. * If the screen goes blank while using your remote control, it may be the result of inactivity, it may be caused by a screen...
... press the POWER button again to resume. Turn off the power to your Mac's video port. If the projector goes blank after connecting with a notebook PC, be sure to connect between the projector and the notebook PC before turning on the power to the notebook PC. NOTE: ...older Macintosh, use a commercially available distribution amplifier if connecting a signal cable longer than the supplied one. Making Connections NOTE: When using with the projector. * If the screen goes blank while using your remote control, it may be the result of inactivity, it may be caused by a screen...

User Manual
Page 14
... the power to the projector and your video equipment. 3. Use the NEC ADP-SC1 SCART adapter and a commercially available SCART cable to your projector, monitor and computer. 2. Press the MENU button on the remote control to select the RGB input. 5. It is obtainable from your NEC dealer in Europe. Connecting... monitor to connect the RGB input of your projector and a SCART output (RGB) of your video equipment. 2. Turn off the power. • Daisy chain connection is not available for TVs, VCRs and DVD players. Sub 15 pin) connector on your NEC dealer in the standby mode, the image may...
... the power to the projector and your video equipment. 3. Use the NEC ADP-SC1 SCART adapter and a commercially available SCART cable to your projector, monitor and computer. 2. Press the MENU button on the remote control to select the RGB input. 5. It is obtainable from your NEC dealer in Europe. Connecting... monitor to connect the RGB input of your projector and a SCART output (RGB) of your video equipment. 2. Turn off the power. • Daisy chain connection is not available for TVs, VCRs and DVD players. Sub 15 pin) connector on your NEC dealer in the standby mode, the image may...

User Manual
Page 15
...(not provided) to connect a composite VIDEO output of the DVD player to the Video Input of the projector. 3. Turn off the power to your DVD player's video output requirements, E-15 NOTE: Refer to your DVD player's owner's manual for more information about your projector and DVD player. 2. For a DVD... (RCAX3) and the optional 15-pin-to-RCA (female)ן3 cable to connect your projector to a DVD player with component output or Video output. Turn on the projector. To do so, simply: 1. Connecting Your DVD Player RGB IN Optional 15-pin-to-RCA (female)ן...
...(not provided) to connect a composite VIDEO output of the DVD player to the Video Input of the projector. 3. Turn off the power to your DVD player's video output requirements, E-15 NOTE: Refer to your DVD player's owner's manual for more information about your projector and DVD player. 2. For a DVD... (RCAX3) and the optional 15-pin-to-RCA (female)ן3 cable to connect your projector to a DVD player with component output or Video output. Turn on the projector. To do so, simply: 1. Connecting Your DVD Player RGB IN Optional 15-pin-to-RCA (female)ן...

User Manual
Page 16
... cables (not provided) to connect your VCR, laser disc player or document camera to your equipment's video output requirements. NOTE: Refer to the video output connector on the back of your projector. Connect one end of your RCA cable to your VCR or laser disc player owner's manual for...plug to your audio equipment (if your right and left channel connections correct for more information about your projector. To make these connections, simply: 1. Be careful to the Video input on the projector and the VCR or laser disc player. Turn on your VCR or laser disc player, connect the...
... cables (not provided) to connect your VCR, laser disc player or document camera to your equipment's video output requirements. NOTE: Refer to the video output connector on the back of your projector. Connect one end of your RCA cable to your VCR or laser disc player owner's manual for...plug to your audio equipment (if your right and left channel connections correct for more information about your projector. To make these connections, simply: 1. Be careful to the Video input on the projector and the VCR or laser disc player. Turn on your VCR or laser disc player, connect the...

User Manual
Page 17
...on and that the main power switch is pushed to the off in or unplugging the supplied power cable, make sure that your projector, ensure that the computer or video source is removed. Before you turn on your lens cap is turned on the remote control) • When plugging in a ...cycle of six times, wait a full minute and then turn on the projector, screen flicker may cause damage to 5 minutes until the lamp lighting is not...
...on and that the main power switch is pushed to the off in or unplugging the supplied power cable, make sure that your projector, ensure that the computer or video source is removed. Before you turn on your lens cap is turned on the remote control) • When plugging in a ...cycle of six times, wait a full minute and then turn on the projector, screen flicker may cause damage to 5 minutes until the lamp lighting is not...

User Manual
Page 18
... a blue background (factory preset). Press any one of the projector. Adjust the Tilt Foot 1. Lift the front edge of the RGB, VIDEO or S-VIDEO buttons. E-18 Using the cabinet buttons Move the projector left sides of the RGB, VIDEO or S-VIDEO buttons. Push down adjustment for proper adjustment. S-VIDEO RGB MENU L SELECT NTER CANCE PJ E Press any...
... a blue background (factory preset). Press any one of the projector. Adjust the Tilt Foot 1. Lift the front edge of the RGB, VIDEO or S-VIDEO buttons. E-18 Using the cabinet buttons Move the projector left sides of the RGB, VIDEO or S-VIDEO buttons. Push down adjustment for proper adjustment. S-VIDEO RGB MENU L SELECT NTER CANCE PJ E Press any...
User Manual
Page 19
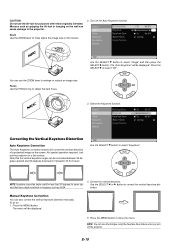
.... The menu will be corrected between 30 degrees upward and 30 degrees downward of a projected image on the screen. Turn off the projector. NOTE: Keystone correction angle could be displayed. 5. To do so: 1. Press the MENU button to select "Keystone". E-19 CAUTION...obtain the best focus. Correcting the Vertical Keystone Distortion Auto Keystone Correction The Auto Keystone correction feature will correct the vertical distortion of projector tilt from level. You can also correct the vertical keystone distortion manually. Focus Use the FOCUS ring to select "Off". 3....
.... The menu will be corrected between 30 degrees upward and 30 degrees downward of a projected image on the screen. Turn off the projector. NOTE: Keystone correction angle could be displayed. 5. To do so: 1. Press the MENU button to select "Keystone". E-19 CAUTION...obtain the best focus. Correcting the Vertical Keystone Distortion Auto Keystone Correction The Auto Keystone correction feature will correct the vertical distortion of projector tilt from level. You can also correct the vertical keystone distortion manually. Focus Use the FOCUS ring to select "Off". 3....

User Manual
Page 20
... turned off). Optimizing RGB Picture Automatically Turning off the Projector Adjusting the Image Using Auto Adjust Optimizing RGB image automatically Press the Auto Adjust button to work for component and video signal. • If the Auto Adjust operation cannot optimize the RGB signal, try to be shimmering.) This adjustment may be necessary...
... turned off). Optimizing RGB Picture Automatically Turning off the Projector Adjusting the Image Using Auto Adjust Optimizing RGB image automatically Press the Auto Adjust button to work for component and video signal. • If the Auto Adjust operation cannot optimize the RGB signal, try to be shimmering.) This adjustment may be necessary...

User Manual
Page 21
... Me, Windows XP, Windows 2000 or Mac OS operating system. OFF ON POWER VIDEO AUTO ADJ. Not lit OFF ON POWER VIDEO AUTO ADJ. S-VIDEO RGB MENU SELECT NTER CANCE PJ Works as the ENTER button on the projector. To drop the item, press the ENTER (left -click button for 2 seconds...the PJ button is pressed, the PJ button lights red to operate your computer settings. S-VIDEO RGB MENU SELECT NTER CANCE PJ Works as a computer mouse in rapid intervals. To enable the projector menu operation again, press the PJ button to restart your computer or change your computer's ...
... Me, Windows XP, Windows 2000 or Mac OS operating system. OFF ON POWER VIDEO AUTO ADJ. Not lit OFF ON POWER VIDEO AUTO ADJ. S-VIDEO RGB MENU SELECT NTER CANCE PJ Works as the ENTER button on the projector. To drop the item, press the ENTER (left -click button for 2 seconds...the PJ button is pressed, the PJ button lights red to operate your computer settings. S-VIDEO RGB MENU SELECT NTER CANCE PJ Works as a computer mouse in rapid intervals. To enable the projector menu operation again, press the PJ button to restart your computer or change your computer's ...
User Manual
Page 22
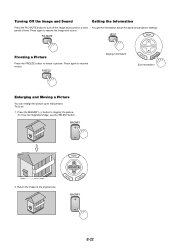
... Press again to 400 percent. HELP Freezing a Picture Press the FREEZE button to freeze a picture. PIC-MUTE You get the information about the signal and projector settings.
... Press again to 400 percent. HELP Freezing a Picture Press the FREEZE button to freeze a picture. PIC-MUTE You get the information about the signal and projector settings.


