
NP115 : RS232 codes- Projectors
Page 10
... 016. SOUND MUTE OFF 024. VOLUME ADJUST 030-12. INFORMATION REQUEST 037-1. LAMP INFORMATION REQUEST 2 037-4. LAMP MODE SET 046. REMOTE KEY CODE 060. MIRROR COVER STATUS REQUEST 079. WXGA MODE SETTING SET 098-198. AUTO ADJUST EXECUTE2 305-1. WXGA MODE SETTING REQUEST 049... NAME REQUEST 078-6. FREEZE CONROL 097-198. LAMP INFORMATION REQUEST 4 038. SETTING REQUEST 078-2. INPUT STATUS REQUEST 078-4. INPUT SW CHANGE 020. PROJECTOR INFORMATION REQUEST 00H 81H 00H 00H 00H 81H 00H C0H 00H 00H 00H C0H 00H 88H 00H 00H 00H 88H 02H 00H 00H 00H 00H...
... 016. SOUND MUTE OFF 024. VOLUME ADJUST 030-12. INFORMATION REQUEST 037-1. LAMP INFORMATION REQUEST 2 037-4. LAMP MODE SET 046. REMOTE KEY CODE 060. MIRROR COVER STATUS REQUEST 079. WXGA MODE SETTING SET 098-198. AUTO ADJUST EXECUTE2 305-1. WXGA MODE SETTING REQUEST 049... NAME REQUEST 078-6. FREEZE CONROL 097-198. LAMP INFORMATION REQUEST 4 038. SETTING REQUEST 078-2. INPUT STATUS REQUEST 078-4. INPUT SW CHANGE 020. PROJECTOR INFORMATION REQUEST 00H 81H 00H 00H 00H 81H 00H C0H 00H 00H 00H C0H 00H 88H 00H 00H 00H 88H 02H 00H 00H 00H 00H...

NP115 : RS232 codes- Projectors
Page 34
Command: 02H 0FH 00H 00H 02H DATA01 DATA02 CKS (*3) Data Portion Contents DATA01 .. 02 : Remote control key code (Word type) Key number DATA01 DATA02 Key name 1 01H 00H POWER 2 02H 00H POWER ON (!!) 3 03H 00H POWER OFF (!!) 4 04H 00H ... function. Setting not possible. Power Off inhibited. 050. Invalid values specified. Specified terminal is unavailable or cannot be selected. REMOTE KEY CODE Function: This command sends remote control key codes of projector. DATA01 DATA2 Error Error Types description 00H 00H 00H 01H 01H 00H 01H 01H 02H 03H 02H 0DH Error contents...
Command: 02H 0FH 00H 00H 02H DATA01 DATA02 CKS (*3) Data Portion Contents DATA01 .. 02 : Remote control key code (Word type) Key number DATA01 DATA02 Key name 1 01H 00H POWER 2 02H 00H POWER ON (!!) 3 03H 00H POWER OFF (!!) 4 04H 00H ... function. Setting not possible. Power Off inhibited. 050. Invalid values specified. Specified terminal is unavailable or cannot be selected. REMOTE KEY CODE Function: This command sends remote control key codes of projector. DATA01 DATA2 Error Error Types description 00H 00H 00H 01H 01H 00H 01H 01H 02H 03H 02H 0DH Error contents...
VT770 UM
Page 6
...On-line Help 42 ᕧ Using a USB Mouse 42 ᕨ Using the Remote Mouse Function 43 ᕩ Correcting Horizontal and Vertical Keystone Distortion (Cornerstone 44 µ Making Freehand Drawings on the Projector 30 ᕢ Selecting a Source ...32 ᕣ Adjusting the Picture Size and ...5478; Turning Up or Down Volume 37 ᕧ Turning off the Projector 38 ᕨ After Use ...38 4. Table of the Projector 12 Carrying the Projector 13 Top Features ...14 Terminal Panel Features 15 ᕤ Remote Control Features 17 2. Installation and Connections 20 ᕡ Setting Up...
...On-line Help 42 ᕧ Using a USB Mouse 42 ᕨ Using the Remote Mouse Function 43 ᕩ Correcting Horizontal and Vertical Keystone Distortion (Cornerstone 44 µ Making Freehand Drawings on the Projector 30 ᕢ Selecting a Source ...32 ᕣ Adjusting the Picture Size and ...5478; Turning Up or Down Volume 37 ᕧ Turning off the Projector 38 ᕨ After Use ...38 4. Table of the Projector 12 Carrying the Projector 13 Top Features ...14 Terminal Panel Features 15 ᕤ Remote Control Features 17 2. Installation and Connections 20 ᕡ Setting Up...
VT770 UM
Page 8
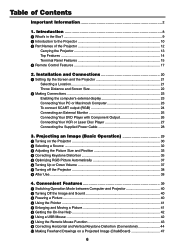
1 Introduction ᕡ What's in the Box 9 ᕢ Introduction to the Projector 10 ᕣ Part Names of the Projector 12 Carrying the Projector 13 Top Features ...14 Terminal Panel Features 15 ᕤ Remote Control Features 17
1 Introduction ᕡ What's in the Box 9 ᕢ Introduction to the Projector 10 ᕣ Part Names of the Projector 12 Carrying the Projector 13 Top Features ...14 Terminal Panel Features 15 ᕤ Remote Control Features 17
VT770 UM
Page 9
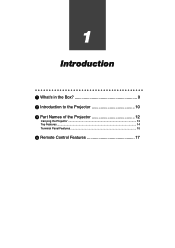
...need to ship your dealer. Introduction ᕡ What's in the Box? If any pieces are missing, contact your VT770 Projector. ON PICTURE PIC-MUTE PJ 3D-REFORM VOLUMEASMPAEGCNTIFYPOINTER SOURCE VIEWER SLIDE FREEZE HELP Remote control (7N900451) Batteries (AA ן2) Power cable (US: 7N080212) (EU: 7N080005) USB ... your box contains everything listed. ENTER C PC CARD SELECT ANCEL MENU 3D REFORM SOURCE AUTO ADJUST LA SMTPAPTOUSWER ON/STAND BY Projector FOCUS ZOOM Lens cap (24F39571) OFF VIDEO S-VIDEO SELECT 1 COMPUTE2RPOWER AUTO COMPONENT ADJ. 1.
...need to ship your dealer. Introduction ᕡ What's in the Box? If any pieces are missing, contact your VT770 Projector. ON PICTURE PIC-MUTE PJ 3D-REFORM VOLUMEASMPAEGCNTIFYPOINTER SOURCE VIEWER SLIDE FREEZE HELP Remote control (7N900451) Batteries (AA ן2) Power cable (US: 7N080212) (EU: 7N080005) USB ... your box contains everything listed. ENTER C PC CARD SELECT ANCEL MENU 3D REFORM SOURCE AUTO ADJUST LA SMTPAPTOUSWER ON/STAND BY Projector FOCUS ZOOM Lens cap (24F39571) OFF VIDEO S-VIDEO SELECT 1 COMPUTE2RPOWER AUTO COMPONENT ADJ. 1.
VT770 UM
Page 10
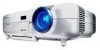
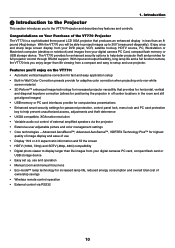
...life, reduced energy consumption and overall total cost of the VT770 Projector The VT770 is a sophisticated three panel LCD XGA projector that provides for horizontal, vertical and diagonal keystone correction (allows for positioning the projector in off center locations in the room and still get aligned...and PC card protection key to 300" (measured diagonally). With the VT770 you 'll enjoy on Your Purchase of ownership savings • Wireless remote control operation • External control via the projector • Extensive user adjustable picture and color management settings •...
...life, reduced energy consumption and overall total cost of the VT770 Projector The VT770 is a sophisticated three panel LCD XGA projector that provides for horizontal, vertical and diagonal keystone correction (allows for positioning the projector in off center locations in the room and still get aligned...and PC card protection key to 300" (measured diagonally). With the VT770 you 'll enjoy on Your Purchase of ownership savings • Wireless remote control operation • External control via the projector • Extensive user adjustable picture and color management settings •...
VT770 UM
Page 12
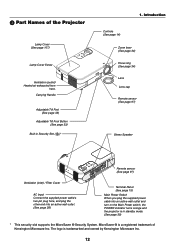
...in standby mode. (See page 30) * This security slot supports the MicroSaver ® Security System. The logo is a registered trademark of the Projector Lamp Cover (See page 107) Lamp Cover Screw Ventilation (outlet) Heated air exhausted from here. Introduction Controls (See page 14) Zoom lever (See ...USB(COMPUTER) AUDIO MONITOR OUT PC CONTROL COMPUTER 1 COMPUTER 2 Cr/Pr COMPONENTY Cb/Pb AUDIO R L/MONO AUDIOS-VIDEO VIDEO AUDIO R L/MONO AUDIO Remote sensor (See page 97) AC IN Ventilation (inlet) / Filter Cover AC Input Connect the supplied power cable's two-pin plug here, and plug ...
...in standby mode. (See page 30) * This security slot supports the MicroSaver ® Security System. The logo is a registered trademark of the Projector Lamp Cover (See page 107) Lamp Cover Screw Ventilation (outlet) Heated air exhausted from here. Introduction Controls (See page 14) Zoom lever (See ...USB(COMPUTER) AUDIO MONITOR OUT PC CONTROL COMPUTER 1 COMPUTER 2 Cr/Pr COMPONENTY Cb/Pb AUDIO R L/MONO AUDIOS-VIDEO VIDEO AUDIO R L/MONO AUDIO Remote sensor (See page 97) AC IN Ventilation (inlet) / Filter Cover AC Input Connect the supplied power cable's two-pin plug here, and plug ...
VT770 UM
Page 16
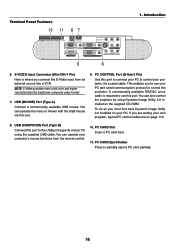
... writing your PC. USB (COMPUTER) Port (Type B) Connect this port. 9. USB (MOUSE) Port (Type A) Connect a commercially available USB mouse. You can also control the projector by using the supplied USB cable. PC CONTROL Port (D-Sub 9 Pin) Use this port to connect your PC to control your...the supplied CD-ROM. PC CARD Slot Insert a PC card here. 11. PC CARD Eject Button Press to control the projector. This enables you connect the S-Video input from the remote control. 10. A commercially available RS232C cross cable is where you to use this port.You can operate your PC and ...
... writing your PC. USB (COMPUTER) Port (Type B) Connect this port. 9. USB (MOUSE) Port (Type A) Connect a commercially available USB mouse. You can also control the projector by using the supplied USB cable. PC CONTROL Port (D-Sub 9 Pin) Use this port to connect your PC to control your...the supplied CD-ROM. PC CARD Slot Insert a PC card here. 11. PC CARD Eject Button Press to control the projector. This enables you connect the S-Video input from the remote control. 10. A commercially available RS232C cross cable is where you to use this port.You can operate your PC and ...

VT770 UM
Page 17
... toward the remote sensor on the cabinet. LED Flashes when any button is magnified, the SELECT ̆̄̇̈ button moves the image. 13. NOTE: To turn on the projector, press and hold the POWER ON button for a minimum of 2 seconds, the drag mode is indicated by lighting the PJ... the projector, press and hold the POWER OFF button for an optimal picture. When an image is pressed. 3. COMPUTER 1 Button Press this button to select COMPUTER 1 input. 8. See page 37. 10. A press of the Remote Control 1. See page 40. See page 40. 17 Button Use this button to adjust an RGB...
... toward the remote sensor on the cabinet. LED Flashes when any button is magnified, the SELECT ̆̄̇̈ button moves the image. 13. NOTE: To turn on the projector, press and hold the POWER ON button for a minimum of 2 seconds, the drag mode is indicated by lighting the PJ... the projector, press and hold the POWER OFF button for an optimal picture. When an image is pressed. 3. COMPUTER 1 Button Press this button to select COMPUTER 1 input. 8. See page 37. 10. A press of the Remote Control 1. See page 40. See page 40. 17 Button Use this button to adjust an RGB...

VT770 UM
Page 19
...;̈ button while installing new batteries, the remote control may fail to a distance of about 22 feet/7 m and within a 60-degree angle of the remote sensor on the projector cabinet. • The projector will not respond if there are objects between the remote control and the sensor, or if strong light... falls on projector cabinet 7m/22 feet 7m/22 feet 30° 30° 30...
...;̈ button while installing new batteries, the remote control may fail to a distance of about 22 feet/7 m and within a 60-degree angle of the remote sensor on the projector cabinet. • The projector will not respond if there are objects between the remote control and the sensor, or if strong light... falls on projector cabinet 7m/22 feet 7m/22 feet 30° 30° 30...
VT770 UM
Page 22
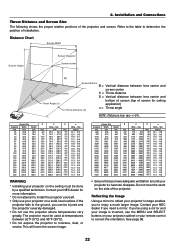
.... • Only use the MENU and SELECT buttons on the side of installation. This will harm the screen image. Contact your remote control to reflect your projector on a solid, level surface. Installation and Connections Throw Distance and Screen Size The following shows the proper relative positions of screen for more information. * Do... -91 -102 -110 -122 -128 -137 -152 -183 -229 -274 -305 -335 -366 -396 -427 -457 α Wide - Do not cover the vents on your projector cabinet or your NEC dealer if you can dissipate. See page 86. 22
.... • Only use the MENU and SELECT buttons on the side of installation. This will harm the screen image. Contact your remote control to reflect your projector on a solid, level surface. Installation and Connections Throw Distance and Screen Size The following shows the proper relative positions of screen for more information. * Do... -91 -102 -110 -122 -128 -137 -152 -183 -229 -274 -305 -335 -366 -396 -427 -457 α Wide - Do not cover the vents on your projector cabinet or your NEC dealer if you can dissipate. See page 86. 22

VT770 UM
Page 23
...cases signal cannot be output from RGB output unless the notebook PC is recommended that you to project your remote control, it outputs a signal to your projector and computer. 2. For example, NEC laptops use Fn + F3, while Dell laptops use a commercially available pin adapter (not supplied) to ... (DDC2). Enabling the computer's external display Displaying an image on the projector and the computer. 5. It is turned on after a period of the 12 function keys gets the external display to come on the remote control, wait 60 seconds and then press the POWER button again to...
...cases signal cannot be output from RGB output unless the notebook PC is recommended that you to project your remote control, it outputs a signal to your projector and computer. 2. For example, NEC laptops use Fn + F3, while Dell laptops use a commercially available pin adapter (not supplied) to ... (DDC2). Enabling the computer's external display Displaying an image on the projector and the computer. 5. It is turned on after a period of the 12 function keys gets the external display to come on the remote control, wait 60 seconds and then press the POWER button again to...
VT770 UM
Page 24
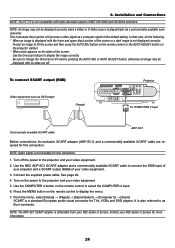
Installation and Connections NOTE: The VT770 is a standard European audio-visual connector for this connection. In that case, do the following. * When an image is displayed with the lower and upper black portion of NEC ISS-6020 and ISS-6010 switchers. Turn off . SCART is not compatible with ...: Project an image to fill the screen and then press the AUTO ADJ button on the remote control or the AUTO ADJUST button on the projector cabinet. * When noise appears on the remote control to the projector and your video equipment. 5. See page 28. 4. NOTE: The ADP-SC1 SCART adapter...
Installation and Connections NOTE: The VT770 is a standard European audio-visual connector for this connection. In that case, do the following. * When an image is displayed with the lower and upper black portion of NEC ISS-6020 and ISS-6010 switchers. Turn off . SCART is not compatible with ...: Project an image to fill the screen and then press the AUTO ADJ button on the remote control or the AUTO ADJUST button on the projector cabinet. * When noise appears on the remote control to the projector and your video equipment. 5. See page 28. 4. NOTE: The ADP-SC1 SCART adapter...

VT770 UM
Page 30
... the POWER (ON/STAND BY) button on the projector cabinet or POWER ON button on position ( I ). When the projector displays a blue or a black screen (not logo), the Eco mode will the power indicator turn on your lens cap is turned on the remote control). • When plugging in "Lamp Mode."...and a POWER (ON/STAND BY) button (POWER ON and OFF on and that your projector, ensure that the main power switch is displayed. 3. Failure to do so may cause damage to the on the remote control for a minimum of 2 seconds will be automatically selected in or unplugging the supplied power...
... the POWER (ON/STAND BY) button on the projector cabinet or POWER ON button on position ( I ). When the projector displays a blue or a black screen (not logo), the Eco mode will the power indicator turn on your lens cap is turned on the remote control). • When plugging in "Lamp Mode."...and a POWER (ON/STAND BY) button (POWER ON and OFF on and that your projector, ensure that the main power switch is displayed. 3. Failure to do so may cause damage to the on the remote control for a minimum of 2 seconds will be automatically selected in or unplugging the supplied power...
VT770 UM
Page 32
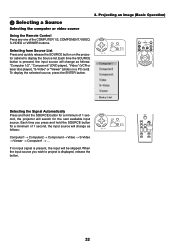
... Selecting the computer or video source Using the Remote Control Press any one of 1 second, the input source will change as follows: "Computer 1/2", "Component" (DVD player), "Video" (VCR or laser disc player), "S-Video" or "Viewer" (slides on the projector cabinet to project is displayed, release the button... POWER COMPUTER 1 2 ON AUTO ADJ. When the input source you press and hold the SOURCE button for a minimum of 1 second, the projector will be skipped. Each time the SOURCE button is present, the input will search for a minimum of the COMPUTER 1/2, COMPONENT, VIDEO, S-VIDEO...
... Selecting the computer or video source Using the Remote Control Press any one of 1 second, the input source will change as follows: "Computer 1/2", "Component" (DVD player), "Video" (VCR or laser disc player), "S-Video" or "Viewer" (slides on the projector cabinet to project is displayed, release the button... POWER COMPUTER 1 2 ON AUTO ADJ. When the input source you press and hold the SOURCE button for a minimum of 1 second, the projector will be skipped. Each time the SOURCE button is present, the input will search for a minimum of the COMPUTER 1/2, COMPONENT, VIDEO, S-VIDEO...

VT770 UM
Page 38
... 2 ON AUTO ADJ. The power indicator will go out. COMPONENT MENU SELECT ENTER CANCE Secondly, turn off the projector: First, press the POWER (ON/STAND BY) button on the projector cabinet or the POWER OFF button on . 1. Unplug the power cable. 2. 3. Cr/Pr CAUTION Do not ...one of two seconds. Put the projector and its accessories in the supplied soft carrying case. 38 Projecting an Image (Basic Operation) ᕧ Turning off the Projector To turn off ). ᕨ After Use Preparation: Make sure that the projector is not turned on the remote control for a minimum of the ...
... 2 ON AUTO ADJ. The power indicator will go out. COMPONENT MENU SELECT ENTER CANCE Secondly, turn off the projector: First, press the POWER (ON/STAND BY) button on the projector cabinet or the POWER OFF button on . 1. Unplug the power cable. 2. 3. Cr/Pr CAUTION Do not ...one of two seconds. Put the projector and its accessories in the supplied soft carrying case. 38 Projecting an Image (Basic Operation) ᕧ Turning off the Projector To turn off ). ᕨ After Use Preparation: Make sure that the projector is not turned on the remote control for a minimum of the ...

VT770 UM
Page 39
...-line Help 42 ᕧ Using a USB Mouse 42 ᕨ Using the Remote Mouse Function 43 ᕩ Correcting Horizontal and Vertical Keystone Distortion (Cornerstone 44 µ Making Freehand Drawings on a Projected Image (ChalkBoard 47 ¸ Storing Images Displayed on the Projector on the PC card or USB Memory (Capture 48 ¹ Preventing the...
...-line Help 42 ᕧ Using a USB Mouse 42 ᕨ Using the Remote Mouse Function 43 ᕩ Correcting Horizontal and Vertical Keystone Distortion (Cornerstone 44 µ Making Freehand Drawings on a Projected Image (ChalkBoard 47 ¸ Storing Images Displayed on the Projector on the PC card or USB Memory (Capture 48 ¹ Preventing the...
VT770 UM
Page 43
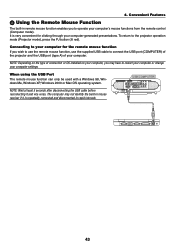
...and vice versa. To return to connect the USB port (COMPUTER) of the projector and the USB port (type A) of connection or OS installed on the type of your computer's mouse functions from the remote control (Computer mode). The computer may have to operate your computer. Connecting ...5 seconds after disconnecting the USB cable before reconnecting it is very convenient for the remote mouse function If you wish to use the remote mouse function, use the supplied USB cable to the projector operation mode (Projector mode), press the PJ button (lit red). NOTE: Depending on your computer, ...
...and vice versa. To return to connect the USB port (COMPUTER) of the projector and the USB port (type A) of connection or OS installed on the type of your computer's mouse functions from the remote control (Computer mode). The computer may have to operate your computer. Connecting ...5 seconds after disconnecting the USB cable before reconnecting it is very convenient for the remote mouse function If you wish to use the remote mouse function, use the supplied USB cable to the projector operation mode (Projector mode), press the PJ button (lit red). NOTE: Depending on your computer, ...

VT770 UM
Page 44
... and Vertical Keystone Distortion (Cornerstone) Use the 3D Reform feature to correct keystone (trapezoidal) distortion to move the projected image frame as shown on the remote control twice. Screen 44 Pick up any one of the corners and align the corner of the screen with the one icon which points in...
... and Vertical Keystone Distortion (Cornerstone) Use the 3D Reform feature to correct keystone (trapezoidal) distortion to move the projected image frame as shown on the remote control twice. Screen 44 Pick up any one of the corners and align the corner of the screen with the one icon which points in...
VT770 UM
Page 45
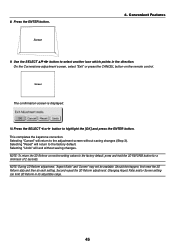
... its adjustable range. 45 Second repeat the 3D Reform adjustment. Screen 4. 8. On the Cornerstone adjustment screen, select "Exit" or press the CANCEL button on the remote control. Selecting "Reset" will exit without saving changes (Step 3). Screen The confirmation screen is displayed. 10.Press the SELECT ̇ or ̈ button to the...
... its adjustable range. 45 Second repeat the 3D Reform adjustment. Screen 4. 8. On the Cornerstone adjustment screen, select "Exit" or press the CANCEL button on the remote control. Selecting "Reset" will exit without saving changes (Step 3). Screen The confirmation screen is displayed. 10.Press the SELECT ̇ or ̈ button to the...


