

P401 : RS232 codes for X461UN, X461HB, X431BT, P401, P461, P521, P551, P701, S401, S461 and S521
Page 1
... /M461 /M521 when using an external controller. 2. External Control NEC LCD Monitor 1. Connectors and wiring 2.1 RS-232C Remote control Connector: 9-pin D-Sub Cable: Cross (reversed) cable or null modem cable (Please refer "Controlling the LCD monitor via RS-232C Remote control" on User's manual.) 2.2 LAN control Connector: RJ-45 10/100 BASE-T Cable: Category 5 or higher LAN cable (Please refer "Controlling the LCD monitor via LAN control" on User's manual. 7142 (Fixed) (Note) The monitor will disconnect the connection if no packet data...
... /M461 /M521 when using an external controller. 2. External Control NEC LCD Monitor 1. Connectors and wiring 2.1 RS-232C Remote control Connector: 9-pin D-Sub Cable: Cross (reversed) cable or null modem cable (Please refer "Controlling the LCD monitor via RS-232C Remote control" on User's manual.) 2.2 LAN control Connector: RJ-45 10/100 BASE-T Cable: Category 5 or higher LAN cable (Please refer "Controlling the LCD monitor via LAN control" on User's manual. 7142 (Fixed) (Note) The monitor will disconnect the connection if no packet data...

P401 : RS232 codes for X461UN, X461HB, X431BT, P401, P461, P521, P551, P701, S401, S461 and S521
Page 49
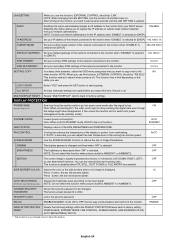
... 3: DVI 4: HDMI (Set only) 5: Video1 6: Video2 7: S-Video 10: TV 12: DVD/HD1 13: Option 14: DVD/HD2 15: Display Port 17: HDMI 0: Off 1: Capture 0: No Action 1: Off (No indication) 2: On (Indication 1: Execute 0: No Action 1: Up 2: Down 1: Sensor #1 2: Sensor #2 3: Sensor #3 Returned value is 2's complement. Refer to the monitor instruction manual. Wide: A/V mode only This operation has limitation of selection. Item Picture Mode OP code page 02h OP code 1Ah Aspect PIP ON...
... 3: DVI 4: HDMI (Set only) 5: Video1 6: Video2 7: S-Video 10: TV 12: DVD/HD1 13: Option 14: DVD/HD2 15: Display Port 17: HDMI 0: Off 1: Capture 0: No Action 1: Off (No indication) 2: On (Indication 1: Execute 0: No Action 1: Up 2: Down 1: Sensor #1 2: Sensor #2 3: Sensor #3 Returned value is 2's complement. Refer to the monitor instruction manual. Wide: A/V mode only This operation has limitation of selection. Item Picture Mode OP code page 02h OP code 1Ah Aspect PIP ON...

KT-LFD-CC Spec Brochure
Page 1
... NEC displays Supported color sensor At least one or more RS-232 Ports (optional if using LAN) USB to complex custom curves. • Flexible Connections - Displays can be uploaded to the video input of displayable colors or introducing color banding artifacts • Gamma Correction - All display configurations, measurements and calibration data can be made to change. 12/11 ver. 1. ©2011 NEC Display Solutions of your digital video walls. Accessories KT-LFD-CC Display wall calibration...
... NEC displays Supported color sensor At least one or more RS-232 Ports (optional if using LAN) USB to complex custom curves. • Flexible Connections - Displays can be uploaded to the video input of displayable colors or introducing color banding artifacts • Gamma Correction - All display configurations, measurements and calibration data can be made to change. 12/11 ver. 1. ©2011 NEC Display Solutions of your digital video walls. Accessories KT-LFD-CC Display wall calibration...
User Manual
Page 2
... Use English-3 Contents ...English-4 Installation ...English-5 Parts Name and Functions ...English-7 Control Panel ...English-7 Terminal Panel ...English-8 Wireless Remote Control (Optional English-10 Operating Range for the Option Remote Control English-11 Handling the remote control ...English-11 Setup ...English-12 Connections ...English-14 Wiring Diagram ...English-14 Connecting a Personal Computer ...English-15 Connecting a DVD Player with HDMI out English-15 Connecting a Computer with DisplayPort English-15 Basic Operation ...English-16 Power ON and OFF Modes...
... Use English-3 Contents ...English-4 Installation ...English-5 Parts Name and Functions ...English-7 Control Panel ...English-7 Terminal Panel ...English-8 Wireless Remote Control (Optional English-10 Operating Range for the Option Remote Control English-11 Handling the remote control ...English-11 Setup ...English-12 Connections ...English-14 Wiring Diagram ...English-14 Connecting a Personal Computer ...English-15 Connecting a DVD Player with HDMI out English-15 Connecting a Computer with DisplayPort English-15 Basic Operation ...English-16 Power ON and OFF Modes...
User Manual
Page 5
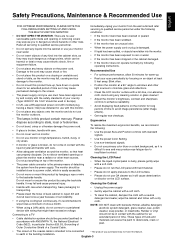
... : • Use the preset Size and Position controls with wiring that heat can properly dissipate. There are no user serviceable parts inside and opening or removing covers may cause electric shock, fire or equipment failure. • Do not place any liquids into the cabinet slots, as they may cause permanent damage to the screen. • The power supply cord you to...
... : • Use the preset Size and Position controls with wiring that heat can properly dissipate. There are no user serviceable parts inside and opening or removing covers may cause electric shock, fire or equipment failure. • Do not place any liquids into the cabinet slots, as they may cause permanent damage to the screen. • The power supply cord you to...
User Manual
Page 9
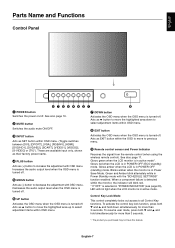
... the audio output level when the OSD menu is in POWER OFF (standby) mode. Acts as SET button within the monitor, the indicator will blink red. * If "OFF" is selected in Power Standby mode with OSD menu. Blinks amber when the monitor is turned off . Green and Amber blink alternately while in "POWER INDICATOR" (see page 23), LED will not light when the LCD monitor is turned-off . Control Key Lock Mode This control completely locks out access to decrease the adjustment with...
... the audio output level when the OSD menu is in POWER OFF (standby) mode. Acts as SET button within the monitor, the indicator will blink red. * If "OFF" is selected in Power Standby mode with OSD menu. Blinks amber when the monitor is turned off . Green and Amber blink alternately while in "POWER INDICATOR" (see page 23), LED will not light when the LCD monitor is turned-off . Control Key Lock Mode This control completely locks out access to decrease the adjustment with...
User Manual
Page 12
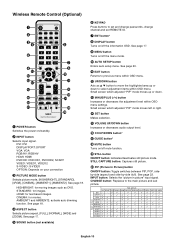
...- - - SOUND button (not available) KEYPAD Press buttons to the main picture and sub picture. Small screen which adjusted "PIP" mode moves left or right. See page 22. HDMI - - S-VIDEO - - - - ENT button* DISPLAY button Turns on /off mute function. EXIT button Returns to select adjustment items within OSD menu. CHANGE button: Replaces to set and change passwords, change channel and set REMOTE ID. RGB/HV - - - - AUTO SETUP button Enters auto setup menu. STILL button ON/OFF button: Activates/deactivates still picture mode. STANDARD: for moving...
...- - - SOUND button (not available) KEYPAD Press buttons to the main picture and sub picture. Small screen which adjusted "PIP" mode moves left or right. See page 22. HDMI - - S-VIDEO - - - - ENT button* DISPLAY button Turns on /off mute function. EXIT button Returns to select adjustment items within OSD menu. CHANGE button: Replaces to set and change passwords, change channel and set REMOTE ID. RGB/HV - - - - AUTO SETUP button Enters auto setup menu. STILL button ON/OFF button: Activates/deactivates still picture mode. STANDARD: for moving...
User Manual
Page 14
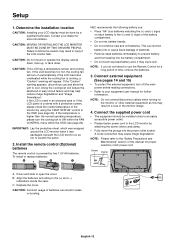
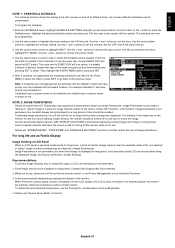
... and "Image Persistance". Setup 1. Connect external equipment (See pages 14 and 15) • To protect the external equipment; NOTE: Please refer to ON within the FAN CONTROL menu within the OSD (see page 24). Determine the installation location CAUTION: Installing your LCD display must be installed close to an easily accessible power outlet. • Please fasten power cord to the LCD monitor by using the "HEAT STATUS" control in a loss of...
... and "Image Persistance". Setup 1. Connect external equipment (See pages 14 and 15) • To protect the external equipment; NOTE: Please refer to ON within the FAN CONTROL menu within the OSD (see page 24). Determine the installation location CAUTION: Installing your LCD display must be installed close to an easily accessible power outlet. • Please fasten power cord to the LCD monitor by using the "HEAT STATUS" control in a loss of...
User Manual
Page 16
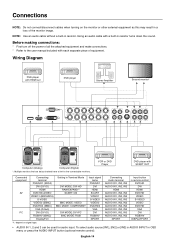
... monitors that are daisy-chained have a limit to the user manual included with SCART OUT Connected equipment AV PC Connecting terminal DVD/HD1 (3RCA) DVI (DVI-D) HDMI DVD/HD+VIDEO VIDEO1 (BNC&RCA) S-VIDEO VIDEO2 (5BNC) DVD/HD2 (5BNC) VGA (D-Sub) DVI (DVI-D) RGB/HV (5BNC) DisplayPort Setting in OSD menu or press the AUDIO INPUT button (optional remote control). English-14 Connections NOTE: Do not connect/disconnect cables when turning on signal type...
... monitors that are daisy-chained have a limit to the user manual included with SCART OUT Connected equipment AV PC Connecting terminal DVD/HD1 (3RCA) DVI (DVI-D) HDMI DVD/HD+VIDEO VIDEO1 (BNC&RCA) S-VIDEO VIDEO2 (5BNC) DVD/HD2 (5BNC) VGA (D-Sub) DVI (DVI-D) RGB/HV (5BNC) DisplayPort Setting in OSD menu or press the AUDIO INPUT button (optional remote control). English-14 Connections NOTE: Do not connect/disconnect cables when turning on signal type...
User Manual
Page 19
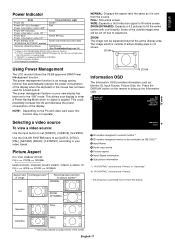
... Eco Standby Mode DDC/CI control does not function. *2 If "OFF" is selected in EXTERNAL CONTROL. *4 DDC/CI should be set [VIDEO1], [VIDEO2], [S-VIDEO]. ZOOM The image can be expanded beyond the active display area. Press the DISPLAY button on your video format. FULL: Fills entire screen. The power management feature on the remote to the "ON" mode. NORMAL: Displays the aspect ratio the same as : Monitor ID, Input Source, Picture Size...
... Eco Standby Mode DDC/CI control does not function. *2 If "OFF" is selected in EXTERNAL CONTROL. *4 DDC/CI should be set [VIDEO1], [VIDEO2], [S-VIDEO]. ZOOM The image can be expanded beyond the active display area. Press the DISPLAY button on your video format. FULL: Fills entire screen. The power management feature on the remote to the "ON" mode. NORMAL: Displays the aspect ratio the same as : Monitor ID, Input Source, Picture Size...
User Manual
Page 23
... "AUTO SETUP" if required. HDMI, DVD/HD1, DVD/HD2, SCART, VIDEO1, VIDEO2, S-VIDEO inputs only 14:9 For input sources that have a 14:9 aspect ratio. FIXED SURROUND (Not available) Artificial surround sound. - SCHEDULE OFF TIMER Sets the monitor to use. - Can be adjusted for each BASE ZOOM setting. 0% ASPECT Selects picture aspect, [FULL], [NORMAL], [WIDE] and [ZOOM]. VGA, RGB/HV inputs only INPUT RESOLUTION VGA, RGB/HV inputs only If there is a problem with the VOLUME button...
... "AUTO SETUP" if required. HDMI, DVD/HD1, DVD/HD2, SCART, VIDEO1, VIDEO2, S-VIDEO inputs only 14:9 For input sources that have a 14:9 aspect ratio. FIXED SURROUND (Not available) Artificial surround sound. - SCHEDULE OFF TIMER Sets the monitor to use. - Can be adjusted for each BASE ZOOM setting. 0% ASPECT Selects picture aspect, [FULL], [NORMAL], [WIDE] and [ZOOM]. VGA, RGB/HV inputs only INPUT RESOLUTION VGA, RGB/HV inputs only If there is a problem with the VOLUME button...
User Manual
Page 26
... display gamma is changed . - You can adjust the start copying. button, the bar will become lighter. RESET POWER SAVE, STANDBY MODE, FAN CONTROL, SCREEN SAVER, SIDE BORDER COLOR, AUTO BRIGHTNESS, DDC/CI. *: The product you purchased may not have disappeared. DISABLE IP ADDRESS Set your IP address of the network connected to the monitor when "DISABLE" is selected for [DHCP]. 192.168.0.10 SUBNET MASK Set your subnet mask number...
... display gamma is changed . - You can adjust the start copying. button, the bar will become lighter. RESET POWER SAVE, STANDBY MODE, FAN CONTROL, SCREEN SAVER, SIDE BORDER COLOR, AUTO BRIGHTNESS, DDC/CI. *: The product you purchased may not have disappeared. DISABLE IP ADDRESS Set your IP address of the network connected to the monitor when "DISABLE" is selected for [DHCP]. 192.168.0.10 SUBNET MASK Set your subnet mask number...
User Manual
Page 29
.... Lower environmental temperatures prolong the lifespan of monitor. English-27 The box next to highlight PIC. Set the OFF time in use . Use the up and down button to highlight INPUT. If selected input or picture mode is not available now, disable input or picture mode is located in use , please turn yellow. For example, if an image was displayed. Enter the SCHEDULE menu. Use the down arrows to select a day...
.... Lower environmental temperatures prolong the lifespan of monitor. English-27 The box next to highlight PIC. Set the OFF time in use . Use the up and down button to highlight INPUT. If selected input or picture mode is not available now, disable input or picture mode is located in use , please turn yellow. For example, if an image was displayed. Enter the SCHEDULE menu. Use the down arrows to select a day...
User Manual
Page 30
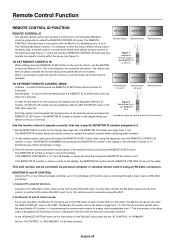
... this specific monitor without affecting other monitors. The Monitor ID can be assigned under the "MULTI DISPLAY" menu in REMOTE CONTROL ID mode will only operate one infrared wireless controller, up to use the KEYPAD to input the Monitor ID (1-100) of the display to be set up to "PRIMARY". Subsequent monitors with the Monitor ID, allowing control of the desired monitor and press the REMOTE ID SET button. Monitor ID:1 Monitor ID:2 Remote works Remote works Figure 1 Remote in Normal mode...
... this specific monitor without affecting other monitors. The Monitor ID can be assigned under the "MULTI DISPLAY" menu in REMOTE CONTROL ID mode will only operate one infrared wireless controller, up to use the KEYPAD to input the Monitor ID (1-100) of the display to be set up to "PRIMARY". Subsequent monitors with the Monitor ID, allowing control of the desired monitor and press the REMOTE ID SET button. Monitor ID:1 Monitor ID:2 Remote works Remote works Figure 1 Remote in Normal mode...
User Manual
Page 36
... color control permits color adjustments via simple to connect your computer, automatically optimizing display performance. The sRGB standard provides the monitor with the Windows® operating system facilitates setup and installation by long cable lengths. This assures that comply with other peripherals. OSD (On-Screen-Display) Controls: Allow you to a lower power consumption level when on -screen menus. NEC recommends using mounting interface that the colors displayed on a calibrated color space, allows for compatibility...
... color control permits color adjustments via simple to connect your computer, automatically optimizing display performance. The sRGB standard provides the monitor with the Windows® operating system facilitates setup and installation by long cable lengths. This assures that comply with other peripherals. OSD (On-Screen-Display) Controls: Allow you to a lower power consumption level when on -screen menus. NEC recommends using mounting interface that the colors displayed on a calibrated color space, allows for compatibility...
User Manual
Page 38
... manual to change graphics mode.) • Check the monitor and your display card with respect to compatibility and recommended settings. • Check the signal cable connector for as long as Image Persistence. No Sound • Check to see if audio cable is properly connected. • Check to see if mute is activated. • Check to see if volume is set at the monitor's remote sensor. • Check the Remote Control Mode...
... manual to change graphics mode.) • Check the monitor and your display card with respect to compatibility and recommended settings. • Check the signal cable connector for as long as Image Persistence. No Sound • Check to see if audio cable is properly connected. • Check to see if mute is activated. • Check to see if volume is set at the monitor's remote sensor. • Check the Remote Control Mode...
User Manual
Page 39
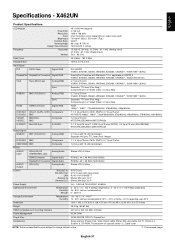
...°C 1025.7 (W) x 579.8 (H) x 128.1 (D) mm / 40.38 (W) x 22.83 (H) x 5.0 (D) inches Weight 29.3 Kg (64.61 lbs) VESA compatible arm mounting interface 300 mm x 300 mm (M6, 4 Holes) Power Management Plug & Play VESA DPM VESA DDC2B, DDC/CI, DisplayPort Accessories Setup manual, Power Cord, Video Signal cable, Stereo Mini plug cable (3.5 ), Clamp x 3, Screw x 9, CD-ROM, Thumbscrew for optional stand x 2, Cable cover NOTE: Technical specifications are subject to HDCP1.3 VGA60, SVGA60, XGA60, WXGA60, SXGA60, UXGA60...
...°C 1025.7 (W) x 579.8 (H) x 128.1 (D) mm / 40.38 (W) x 22.83 (H) x 5.0 (D) inches Weight 29.3 Kg (64.61 lbs) VESA compatible arm mounting interface 300 mm x 300 mm (M6, 4 Holes) Power Management Plug & Play VESA DPM VESA DDC2B, DDC/CI, DisplayPort Accessories Setup manual, Power Cord, Video Signal cable, Stereo Mini plug cable (3.5 ), Clamp x 3, Screw x 9, CD-ROM, Thumbscrew for optional stand x 2, Cable cover NOTE: Technical specifications are subject to HDCP1.3 VGA60, SVGA60, XGA60, WXGA60, SXGA60, UXGA60...
User Manual
Page 40
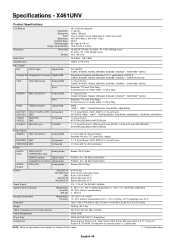
... 40°C 1025.7 (W) x 579.8 (H) x 128.1 (D) mm / 40.38 (W) x 22.83 (H) x 5.0 (D) inches Weight 26.8 Kg (59.1 lbs) VESA compatible arm mounting interface 300 mm x 300 mm (M6, 4 Holes) Power Management Plug & Play VESA DPM VESA DDC2B, DDC/CI, DisplayPort Accessories Setup manual, Power Cord, Video Signal cable, Stereo Mini plug cable (3.5 ), Clamp x 3, Screw x 9, CD-ROM, Thumbscrew for optional stand x 2, Cable cover NOTE: Technical specifications are subject to HDCP1.3 VGA60, SVGA60, XGA60, WXGA60, SXGA60, UXGA60...
... 40°C 1025.7 (W) x 579.8 (H) x 128.1 (D) mm / 40.38 (W) x 22.83 (H) x 5.0 (D) inches Weight 26.8 Kg (59.1 lbs) VESA compatible arm mounting interface 300 mm x 300 mm (M6, 4 Holes) Power Management Plug & Play VESA DPM VESA DDC2B, DDC/CI, DisplayPort Accessories Setup manual, Power Cord, Video Signal cable, Stereo Mini plug cable (3.5 ), Clamp x 3, Screw x 9, CD-ROM, Thumbscrew for optional stand x 2, Cable cover NOTE: Technical specifications are subject to HDCP1.3 VGA60, SVGA60, XGA60, WXGA60, SXGA60, UXGA60...
Video Wall Solutions Specification Brochure
Page 1
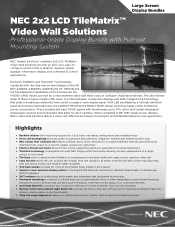
... due to professional grade panels and integrated heat dissipation technologies • Fan-based technology connected to internal heat sensors automatically turns on or controlled remotely. • Overframe Bezel Kit completes your application. Designed to work in brightness uniformity from screen-to-screen for greater overall color uniformity • Peerless-AV pull-out mount allows for full service capabilities and 6-axis adjustment for perfect alignment...
... due to professional grade panels and integrated heat dissipation technologies • Fan-based technology connected to internal heat sensors automatically turns on or controlled remotely. • Overframe Bezel Kit completes your application. Designed to work in brightness uniformity from screen-to-screen for greater overall color uniformity • Peerless-AV pull-out mount allows for full service capabilities and 6-axis adjustment for perfect alignment...
Video Wall Solutions Specification Brochure
Page 2
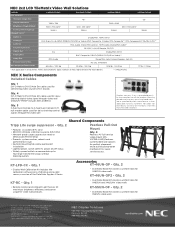
... the video wall Product warranty, if any warranty on a USB drive and a color sensor, a version of their applicable warranty statement. Contact an NEC representative for more details. ** X462UN only NEC X Series Components Included Cables Qty. 1 DVI-D Male to DVI-D Male 5m cable used for connecting video source to first display Qty. 4 DVI-D Male to change. ©2013 NEC Display Solutions of the product. Qty. 1 • Remote Control and Ambient Light Sensor Kit maximizes brightness efficiency and power...
... the video wall Product warranty, if any warranty on a USB drive and a color sensor, a version of their applicable warranty statement. Contact an NEC representative for more details. ** X462UN only NEC X Series Components Included Cables Qty. 1 DVI-D Male to DVI-D Male 5m cable used for connecting video source to first display Qty. 4 DVI-D Male to change. ©2013 NEC Display Solutions of the product. Qty. 1 • Remote Control and Ambient Light Sensor Kit maximizes brightness efficiency and power...


