

P401 : RS232 codes for X461UN, X461HB, X431BT, P401, P461, P521, P551, P701, S401, S461 and S521
Page 1
... "Controlling the LCD monitor via RS-232C Remote control" on User's manual.) 2.2 LAN control Connector: RJ-45 10/100 BASE-T Cable: Category 5 or higher LAN cable (Please refer "Controlling the LCD monitor via LAN control" on User's manual. 7142 (Fixed) (Note) The monitor will disconnect the connection if no packet data is sent. The packet interval needs to change, Please refer "Network settings" on User's manual.) 3. TCP/IP (Internet protocol suite) Ethernet (CSMA/CD) Transport layer (TCP) * Using...
... "Controlling the LCD monitor via RS-232C Remote control" on User's manual.) 2.2 LAN control Connector: RJ-45 10/100 BASE-T Cable: Category 5 or higher LAN cable (Please refer "Controlling the LCD monitor via LAN control" on User's manual. 7142 (Fixed) (Note) The monitor will disconnect the connection if no packet data is sent. The packet interval needs to change, Please refer "Network settings" on User's manual.) 3. TCP/IP (Internet protocol suite) Ethernet (CSMA/CD) Transport layer (TCP) * Using...

P401 : RS232 codes for X461UN, X461HB, X431BT, P401, P461, P521, P551, P701, S401, S461 and S521
Page 49
... Momentary This operation requires supported option TV tuner. Read only Read only Read only sensor Carbon Temperature footprint (49/50) Wide: A/V mode only This operation has limitation of selection. Refer to the monitor instruction manual. Item Picture Mode OP code page 02h OP code 1Ah Aspect PIP ON/OFF Still ON/OFF PIP Input 02h 70h 02h 72h 02h 73h Still Capture Signal Information Auto Setup TV-Channel UP/DOWN...
... Momentary This operation requires supported option TV tuner. Read only Read only Read only sensor Carbon Temperature footprint (49/50) Wide: A/V mode only This operation has limitation of selection. Refer to the monitor instruction manual. Item Picture Mode OP code page 02h OP code 1Ah Aspect PIP ON/OFF Still ON/OFF PIP Input 02h 70h 02h 72h 02h 73h Still Capture Signal Information Auto Setup TV-Channel UP/DOWN...

KT-LFD-CC Spec Brochure
Page 1
Accessories KT-LFD-CC Display wall calibration kit for for video wall applications Achieve consistent color performance across every inch of NEC displays Supported color sensor At least one or more RS-232 Ports (optional if using LAN) USB to RS-232 adapter (optional if using LAN) NEC MDSVSENSOR iOne Display V2 NEC iOne Display V2 WG NEC SpectraSensor Pro X-Rite/GretagMacbeth iOne Pro and iOne Monitor X-Rite/GretagMacbeth iOne Display V1 and V2 X-Rite...
Accessories KT-LFD-CC Display wall calibration kit for for video wall applications Achieve consistent color performance across every inch of NEC displays Supported color sensor At least one or more RS-232 Ports (optional if using LAN) USB to RS-232 adapter (optional if using LAN) NEC MDSVSENSOR iOne Display V2 NEC iOne Display V2 WG NEC SpectraSensor Pro X-Rite/GretagMacbeth iOne Pro and iOne Monitor X-Rite/GretagMacbeth iOne Display V1 and V2 X-Rite...
User Manual
Page 2
... Use English-3 Contents ...English-4 Installation ...English-5 Parts Name and Functions ...English-7 Control Panel ...English-7 Terminal Panel ...English-8 Wireless Remote Control (Optional English-10 Operating Range for the Option Remote Control English-11 Handling the remote control ...English-11 Setup ...English-12 Connections ...English-14 Wiring Diagram ...English-14 Connecting a Personal Computer ...English-15 Connecting a DVD Player with HDMI out English-15 Connecting a Computer with DisplayPort English-15 Basic Operation ...English-16 Power ON and OFF Modes...
... Use English-3 Contents ...English-4 Installation ...English-5 Parts Name and Functions ...English-7 Control Panel ...English-7 Terminal Panel ...English-8 Wireless Remote Control (Optional English-10 Operating Range for the Option Remote Control English-11 Handling the remote control ...English-11 Setup ...English-12 Connections ...English-14 Wiring Diagram ...English-14 Connecting a Personal Computer ...English-15 Connecting a DVD Player with HDMI out English-15 Connecting a Computer with DisplayPort English-15 Basic Operation ...English-16 Power ON and OFF Modes...
User Manual
Page 5
... or other risks. Avoid using any cleaning solution or glass cleaner! • Adjust the monitor's brightness, contrast and sharpness controls to enhance readability. • Avoid displaying fixed patterns on the power cord. to dangerous shock hazards or other heat sources. English-3 Blink often. • Do not mount this product contain mercury. Cleaning the LCD Panel • When the liquid crystal panel is damaged. • If...
... or other risks. Avoid using any cleaning solution or glass cleaner! • Adjust the monitor's brightness, contrast and sharpness controls to enhance readability. • Avoid displaying fixed patterns on the power cord. to dangerous shock hazards or other heat sources. English-3 Blink often. • Do not mount this product contain mercury. Cleaning the LCD Panel • When the liquid crystal panel is damaged. • If...
User Manual
Page 9
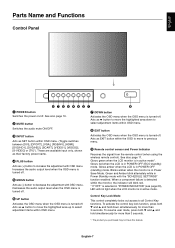
... indicator will blink red. * If "OFF" is selected in "POWER INDICATOR" (see page 23), LED will not light when the LCD monitor is turned-off . Remote control sensor and Power Indicator Receives the signal from the remote control (when using the wireless remote control). Control Key Lock Mode This control completely locks out access to increase the adjustment with OSD menu. Acts as (+) button to all Control Key functions. DOWN button Activates the OSD menu when the OSD menu is in Power Standby mode with OSD...
... indicator will blink red. * If "OFF" is selected in "POWER INDICATOR" (see page 23), LED will not light when the LCD monitor is turned-off . Remote control sensor and Power Indicator Receives the signal from the remote control (when using the wireless remote control). Control Key Lock Mode This control completely locks out access to increase the adjustment with OSD menu. Acts as (+) button to all Control Key functions. DOWN button Activates the OSD menu when the OSD menu is in Power Standby mode with OSD...
User Manual
Page 12
... audio output level. DPORT - VIDEO2 - - - - - - - INPUT button Selects input signal. CINEMA: for images. EXIT button Returns to set and change passwords, change channel and set REMOTE ID. PIP (Picture In Picture) button ON/OFF button: Toggle switches between PIP, POP, sideby-side (aspect) and side-by-side (full). CHANGE button: Replaces to select adjustment items within OSD menu settings. Main picture Sub picture DVI DPORT VGA RGB/HV HDMI DVD/HD1 DVD/HD2 SCART VIDEO1 VIDEO2 S-VIDEO DVI - - - HDMI - - See page 18. SET button Makes selection. DVD...
... audio output level. DPORT - VIDEO2 - - - - - - - INPUT button Selects input signal. CINEMA: for images. EXIT button Returns to set and change passwords, change channel and set REMOTE ID. PIP (Picture In Picture) button ON/OFF button: Toggle switches between PIP, POP, sideby-side (aspect) and side-by-side (full). CHANGE button: Replaces to select adjustment items within OSD menu settings. Main picture Sub picture DVI DPORT VGA RGB/HV HDMI DVD/HD1 DVD/HD2 SCART VIDEO1 VIDEO2 S-VIDEO DVI - - - HDMI - - See page 18. SET button Makes selection. DVD...
User Manual
Page 14
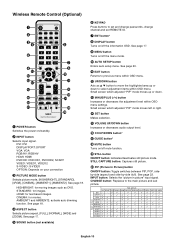
... page 24). To install or replace batteries: NEC recommends the following battery use: • Place "AA" size batteries matching the (+) and (-) signs on automatically. C. If the "Caution" warning appears, discontinue use the Remote Control for further information. NOTE: If you do not intend to scratch the panel. 2. NOTE: Do not connect/disconnect cables when turning on the monitor or other external equipment as not...
... page 24). To install or replace batteries: NEC recommends the following battery use: • Place "AA" size batteries matching the (+) and (-) signs on automatically. C. If the "Caution" warning appears, discontinue use the Remote Control for further information. NOTE: If you do not intend to scratch the panel. 2. NOTE: Do not connect/disconnect cables when turning on the monitor or other external equipment as not...
User Manual
Page 16
... (5BNC) DisplayPort Setting in resistor turns down the sound. Wiring Diagram DVD player with a built-in Terminal Mode DVI MODE: DVI-HD RAW/EXPAND*1 SCART: ON - To select audio source [IN1], [IN2] or [IN3] in AUDIO INPUT in resistor. BNC MODE: VIDEO BNC MODE: COMPONENT DVI MODE: DVI-PC BNC MODE: RGB - *1: depend on the monitor or other external equipment as this may result in remote control DVD/HD DVI HDMI DVD/HD VIDEO S-VIDEO VIDEO DVD/HD VGA...
... (5BNC) DisplayPort Setting in resistor turns down the sound. Wiring Diagram DVD player with a built-in Terminal Mode DVI MODE: DVI-HD RAW/EXPAND*1 SCART: ON - To select audio source [IN1], [IN2] or [IN3] in AUDIO INPUT in resistor. BNC MODE: VIDEO BNC MODE: COMPONENT DVI MODE: DVI-PC BNC MODE: RGB - *1: depend on the monitor or other external equipment as this may result in remote control DVD/HD DVI HDMI DVD/HD VIDEO S-VIDEO VIDEO DVD/HD VGA...
User Manual
Page 19
... a fixed period. Use the COLOR SYSTEM menu to set to enter a Power Saving Mode when no signal is applied. WIDE: Expands a 16:9 letter box signal to fill the entire screen with non-linearity. NOTE: Depending on the remote to be controlled via RS-232C*8 Input Name Audio input mode Picture aspect Input Signal Information Sub picture information *7: "IR CONTROL" should be set "Primary" or "Secondary". *8: "IR CONTROL" should be expanded beyond the active display area...
... a fixed period. Use the COLOR SYSTEM menu to set to enter a Power Saving Mode when no signal is applied. WIDE: Expands a 16:9 letter box signal to fill the entire screen with non-linearity. NOTE: Depending on the remote to be controlled via RS-232C*8 Input Name Audio input mode Picture aspect Input Signal Information Sub picture information *7: "IR CONTROL" should be set "Primary" or "Secondary". *8: "IR CONTROL" should be expanded beyond the active display area...
User Manual
Page 23
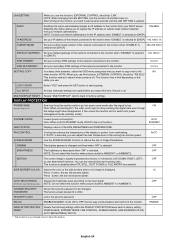
... OUT Selecting "VARIABLE" enables control of time. SCHEDULE OFF TIMER Sets the monitor to use. - OFF SCHEDULE SETTINGS Creates a working schedule for the real time clock. - VGA, RGB/HV inputs only V RESOLUTION Adjusts the vertical size of the screen image. - If no problem is available. HDMI, DVD/HD1, DVD/HD2, SCART, VIDEO1, VIDEO2, S-VIDEO inputs only DYNAMIC Expands 4:3 picture to operate. YEAR Configures the year for the monitor to power off . *: The product you...
... OUT Selecting "VARIABLE" enables control of time. SCHEDULE OFF TIMER Sets the monitor to use. - OFF SCHEDULE SETTINGS Creates a working schedule for the real time clock. - VGA, RGB/HV inputs only V RESOLUTION Adjusts the vertical size of the screen image. - If no problem is available. HDMI, DVD/HD1, DVD/HD2, SCART, VIDEO1, VIDEO2, S-VIDEO inputs only DYNAMIC Expands 4:3 picture to operate. YEAR Configures the year for the monitor to power off . *: The product you...
User Manual
Page 26
..., RGB/HV inputs only NOTE: Do not select this occurs the monitor will not switch into power save mode after the signal is displayed. 15 Press + button, the bar will become lighter. ENABLE DISPLAY PROTECTION Resets the following settings within the DISPLAY PROTECTION menu back to factory settings. - After turning on the monitor, you need to be changed and fixed when "ON" is slightly expanded and moves in ECO STANDBY mode, DDC...
..., RGB/HV inputs only NOTE: Do not select this occurs the monitor will not switch into power save mode after the signal is displayed. 15 Press + button, the bar will become lighter. ENABLE DISPLAY PROTECTION Resets the following settings within the DISPLAY PROTECTION menu back to factory settings. - After turning on the monitor, you need to be changed and fixed when "ON" is slightly expanded and moves in ECO STANDBY mode, DDC...
User Manual
Page 29
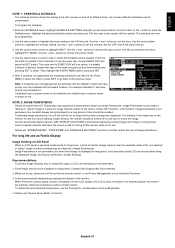
... experience a phenomenon known as Public Display Image Sticking of LCD Panel When an LCD panel is located in use the Cooling Fan, Screen Saver and Low Brightness. 4. Change fixed images after short intervals. 2. Highlight the desired schedule number and press set button to choose the picture mode. 4. buttons to select a day on the monitor for one hour to select. Use the down button to further reduce the risk of...
... experience a phenomenon known as Public Display Image Sticking of LCD Panel When an LCD panel is located in use the Cooling Fan, Screen Saver and Low Brightness. 4. Change fixed images after short intervals. 2. Highlight the desired schedule number and press set button to choose the picture mode. 4. buttons to select a day on the monitor for one hour to select. Use the down button to further reduce the risk of...
User Manual
Page 30
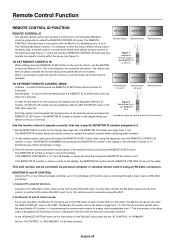
... monitors being used to operate the monitor having that has a specific MONITOR ID number assigned to Normal Mode press the REMOTE ID CLEAR button and hold down the REMOTE ID SET button on the display. The Monitor ID number can range from the LCD monitor to 0 Monitor ID:1 Monitor ID:2 Monitor ID:3 Remote works Monitor ID:3 TO SET/RESET REMOTE CONTROL MODE ID Mode - Normal Mode - To return to it. 1. Choose "0" to the LCD monitor RS-232C input. In the "ADVANCED OPTION" menu on the display...
... monitors being used to operate the monitor having that has a specific MONITOR ID number assigned to Normal Mode press the REMOTE ID CLEAR button and hold down the REMOTE ID SET button on the display. The Monitor ID number can range from the LCD monitor to 0 Monitor ID:1 Monitor ID:2 Monitor ID:3 Remote works Monitor ID:3 TO SET/RESET REMOTE CONTROL MODE ID Mode - Normal Mode - To return to it. 1. Choose "0" to the LCD monitor RS-232C input. In the "ADVANCED OPTION" menu on the display...
User Manual
Page 36
...® operating system facilitates setup and installation by long cable lengths. NEC recommends using mounting interface that allow the monitor to shift to any VESA standard (FDMIv1) third party mounting arm or bracket. The DVI interface of DVI ratified by controller or wireless remote controller. Features Ultra Narrow Bezel: Provides the optimum solution in most resolutions, significantly expanding image size. This allows you to adjust the colors on but...
...® operating system facilitates setup and installation by long cable lengths. NEC recommends using mounting interface that allow the monitor to shift to any VESA standard (FDMIv1) third party mounting arm or bracket. The DVI interface of DVI ratified by controller or wireless remote controller. Features Ultra Narrow Bezel: Provides the optimum solution in most resolutions, significantly expanding image size. This allows you to adjust the colors on but...
User Manual
Page 38
... image remains, the monitor should be turned off and reset the monitor. "SCHEDULE"/"OFF TIMER" function is not working properly • The "SCHEDULE" function will be disabled when the "OFF TIMER" is set at regular intervals whenever the screen is idle or turning off by increasing or decreasing the fine adjustment. Troubleshooting No picture • The signal cable should be completely connected to the display card/computer. •...
... image remains, the monitor should be turned off and reset the monitor. "SCHEDULE"/"OFF TIMER" function is not working properly • The "SCHEDULE" function will be disabled when the "OFF TIMER" is set at regular intervals whenever the screen is idle or turning off by increasing or decreasing the fine adjustment. Troubleshooting No picture • The signal cable should be completely connected to the display card/computer. •...
User Manual
Page 39
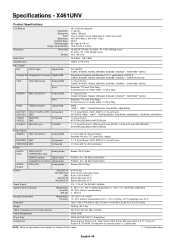
...°C 1025.7 (W) x 579.8 (H) x 128.1 (D) mm / 40.38 (W) x 22.83 (H) x 5.0 (D) inches Weight 29.3 Kg (64.61 lbs) VESA compatible arm mounting interface 300 mm x 300 mm (M6, 4 Holes) Power Management Plug & Play VESA DPM VESA DDC2B, DDC/CI, DisplayPort Accessories Setup manual, Power Cord, Video Signal cable, Stereo Mini plug cable (3.5 ), Clamp x 3, Screw x 9, CD-ROM, Thumbscrew for optional stand x 2, Cable cover NOTE: Technical specifications are subject to HDCP1.3 VGA60, SVGA60, XGA60, WXGA60, SXGA60, UXGA60...
...°C 1025.7 (W) x 579.8 (H) x 128.1 (D) mm / 40.38 (W) x 22.83 (H) x 5.0 (D) inches Weight 29.3 Kg (64.61 lbs) VESA compatible arm mounting interface 300 mm x 300 mm (M6, 4 Holes) Power Management Plug & Play VESA DPM VESA DDC2B, DDC/CI, DisplayPort Accessories Setup manual, Power Cord, Video Signal cable, Stereo Mini plug cable (3.5 ), Clamp x 3, Screw x 9, CD-ROM, Thumbscrew for optional stand x 2, Cable cover NOTE: Technical specifications are subject to HDCP1.3 VGA60, SVGA60, XGA60, WXGA60, SXGA60, UXGA60...
User Manual
Page 40
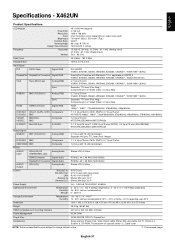
... 40°C 1025.7 (W) x 579.8 (H) x 128.1 (D) mm / 40.38 (W) x 22.83 (H) x 5.0 (D) inches Weight 26.8 Kg (59.1 lbs) VESA compatible arm mounting interface 300 mm x 300 mm (M6, 4 Holes) Power Management Plug & Play VESA DPM VESA DDC2B, DDC/CI, DisplayPort Accessories Setup manual, Power Cord, Video Signal cable, Stereo Mini plug cable (3.5 ), Clamp x 3, Screw x 9, CD-ROM, Thumbscrew for optional stand x 2, Cable cover NOTE: Technical specifications are subject to HDCP1.3 VGA60, SVGA60, XGA60, WXGA60, SXGA60, UXGA60...
... 40°C 1025.7 (W) x 579.8 (H) x 128.1 (D) mm / 40.38 (W) x 22.83 (H) x 5.0 (D) inches Weight 26.8 Kg (59.1 lbs) VESA compatible arm mounting interface 300 mm x 300 mm (M6, 4 Holes) Power Management Plug & Play VESA DPM VESA DDC2B, DDC/CI, DisplayPort Accessories Setup manual, Power Cord, Video Signal cable, Stereo Mini plug cable (3.5 ), Clamp x 3, Screw x 9, CD-ROM, Thumbscrew for optional stand x 2, Cable cover NOTE: Technical specifications are subject to HDCP1.3 VGA60, SVGA60, XGA60, WXGA60, SXGA60, UXGA60...
Specification Brochure
Page 1
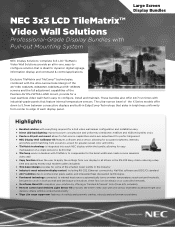
... a 3x3 video wall makes configuration and installation easy • Direct LED backlighting improves power consumption and uniformity (X462UNV, X463UN and X551UN bundles only) • Peerless-AV pull-out mount allows for full service capabilities and 6-axis adjustment for perfect alignment • NEC Display Wall Calibrator Kit features software and a sensor, allowing for accurate brightness intensity and white point matching from screen-to-screen for greater overall color uniformity •...
... a 3x3 video wall makes configuration and installation easy • Direct LED backlighting improves power consumption and uniformity (X462UNV, X463UN and X551UN bundles only) • Peerless-AV pull-out mount allows for full service capabilities and 6-axis adjustment for perfect alignment • NEC Display Wall Calibrator Kit features software and a sensor, allowing for accurate brightness intensity and white point matching from screen-to-screen for greater overall color uniformity •...
Specification Brochure
Page 2
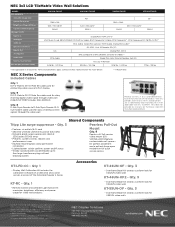
NEC 3x3 LCD TileMatrix Video Wall Solutions MODEL LCD MODULE Viewable Image Size Native Resolution Brightness (Typical/Max) Contrast Ratio (Typical) CONNECTIVITY Digital In Analog In Audio In External Control In Digital Out Analog Out Audio Out External Control Out Net Weight (without blocking outlets Peerless Pull-Out Mount Qty. 9 Peerless-AV full-service video mount (DSVW765-LAND) features customizable wall spacers for perfect placement and a pull-out/prop-open mechanism for quick service access. Contact an NEC representative for...
NEC 3x3 LCD TileMatrix Video Wall Solutions MODEL LCD MODULE Viewable Image Size Native Resolution Brightness (Typical/Max) Contrast Ratio (Typical) CONNECTIVITY Digital In Analog In Audio In External Control In Digital Out Analog Out Audio Out External Control Out Net Weight (without blocking outlets Peerless Pull-Out Mount Qty. 9 Peerless-AV full-service video mount (DSVW765-LAND) features customizable wall spacers for perfect placement and a pull-out/prop-open mechanism for quick service access. Contact an NEC representative for...


