

Users Manual
Page 2
... & Recommended Use English-3 Contents ...English-4 Installation ...English-5 Attaching Mounting Accessories ...English-6 Parts Name and Functions...English-8 Control Panel ...English-8 Terminal Panel ...English-9 Wireless Remote Control (Optional English-11 Operating Range for the Optional Remote Control English-12 Setup ...English-13 Connections ...English-15 Wiring Diagram ...English-15 Connecting a Personal Computer English-16 Connecting a DVD Player or Computer with HDMI out English-16 Connecting a Computer with DisplayPort English-16 Basic Operation...English-17 Power ON...
... & Recommended Use English-3 Contents ...English-4 Installation ...English-5 Attaching Mounting Accessories ...English-6 Parts Name and Functions...English-8 Control Panel ...English-8 Terminal Panel ...English-9 Wireless Remote Control (Optional English-11 Operating Range for the Optional Remote Control English-12 Setup ...English-13 Connections ...English-15 Wiring Diagram ...English-15 Connecting a Personal Computer English-16 Connecting a DVD Player or Computer with HDMI out English-16 Connecting a Computer with DisplayPort English-16 Basic Operation...English-17 Power ON...
Users Manual
Page 5
... readability. • Avoid displaying fixed patterns on monitor. • Do not use your monitor from the power supply. There are no user serviceable parts inside and opening or removing covers may cause permanent damage to insufficient contrast. Do not put anything on a dark background, as they may produce eye fatigue due to the screen. • The power supply cord you purchased may...
... readability. • Avoid displaying fixed patterns on monitor. • Do not use your monitor from the power supply. There are no user serviceable parts inside and opening or removing covers may cause permanent damage to insufficient contrast. Do not put anything on a dark background, as they may produce eye fatigue due to the screen. • The power supply cord you purchased may...
Users Manual
Page 7
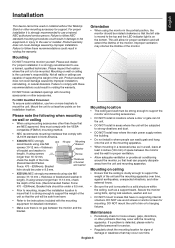
... the following when mounting on the installation location. DO NOT use a trained, qualified technician. If a problem is detected, please refer to the top and the LED indicator light is the customer's responsibility. Bracket 10-12 mm (X463UN) 11-13 mm (X551UN) Screw Thickness of the monitor. Bracket hole should be under ø 8.5 mm. • X551UN: NEC strongly recommends using bolts, spring lock washers, washer and...
... the following when mounting on the installation location. DO NOT use a trained, qualified technician. If a problem is detected, please refer to the top and the LED indicator light is the customer's responsibility. Bracket 10-12 mm (X463UN) 11-13 mm (X551UN) Screw Thickness of the monitor. Bracket hole should be under ø 8.5 mm. • X551UN: NEC strongly recommends using bolts, spring lock washers, washer and...
Users Manual
Page 10
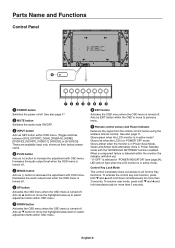
... the LCD monitor is in Power Save Mode. Green and Amber blink alternately while in active mode*. See also page 17. · MUTE button Switches the audio mute ON/OFF. » INPUT button Acts as (+) button to select adjustment items within OSD menu. (Toggle switches between [DVI], [DPORT], [VGA], [RGB/HV], [HDMI], [DVD/HD], [SCART], [VIDEO1], [VIDEO2] or [S-VIDEO]). Glows amber when the monitor is in Power Standby mode with OSD menu. Increases the audio output...
... the LCD monitor is in Power Save Mode. Green and Amber blink alternately while in active mode*. See also page 17. · MUTE button Switches the audio mute ON/OFF. » INPUT button Acts as (+) button to select adjustment items within OSD menu. (Toggle switches between [DVI], [DPORT], [VGA], [RGB/HV], [HDMI], [DVD/HD], [SCART], [VIDEO1], [VIDEO2] or [S-VIDEO]). Glows amber when the monitor is in Power Standby mode with OSD menu. Increases the audio output...

Users Manual
Page 11
...: Do not use Remote IN/OUT, IR CONTROL in OSD menu should be used with the supplied power cord. · Main Power Switch On/Off switch to turn main power ON/OFF. » LAN port (RJ-45) LAN connection. NOTE: DisplayPort connectors are for 15W + 15W (8 ohm) speaker. OUT connector: To output the DVI signal from a computer or HDTV device having a digital RGB output. * This connector does not support analog input. Black terminal is for...
...: Do not use Remote IN/OUT, IR CONTROL in OSD menu should be used with the supplied power cord. · Main Power Switch On/Off switch to turn main power ON/OFF. » LAN port (RJ-45) LAN connection. NOTE: DisplayPort connectors are for 15W + 15W (8 ohm) speaker. OUT connector: To output the DVI signal from a computer or HDTV device having a digital RGB output. * This connector does not support analog input. Black terminal is for...
Users Manual
Page 13
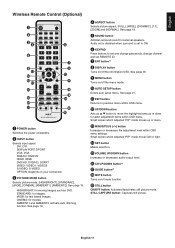
... sound for text based images. STANDARD: for movies. CINEMA: for images. English Wireless Remote Control (Optional) ³ POWER button Switches the power on /off mute function. ƾ STILL button ON/OFF button: Activates/deactivates still picture mode. Small screen which adjusted "PIP" mode moves left or right. ƹ SET button Makes selection. ƺ VOLUME UP/DOWN button Increases or decreases audio output level. ƻ CH UP/DOWN button*2 Ƽ GUIDE button*2 ƽ MUTE button Turns on /standby. · INPUT button Selects input signal...
... sound for text based images. STANDARD: for movies. CINEMA: for images. English Wireless Remote Control (Optional) ³ POWER button Switches the power on /off mute function. ƾ STILL button ON/OFF button: Activates/deactivates still picture mode. Small screen which adjusted "PIP" mode moves left or right. ƹ SET button Makes selection. ƺ VOLUME UP/DOWN button Increases or decreases audio output level. ƻ CH UP/DOWN button*2 Ƽ GUIDE button*2 ƽ MUTE button Turns on /standby. · INPUT button Selects input signal...

Users Manual
Page 15
... leaking into the power outlet socket. To install or replace batteries: NEC recommends the following battery use the Remote Control for more information. C. English Setup 1. Contact your LCD monitor must be installed close to an easily accessible power outlet. • Please fasten power cord to scratch the panel. 2. CAUTION: MOVING OR INSTALLING THE LCD MONITOR MUST BE DONE BY TWO OR MORE PEOPLE. CAUTION: Do not mount or operate the monitor upside down...
... leaking into the power outlet socket. To install or replace batteries: NEC recommends the following battery use the Remote Control for more information. C. English Setup 1. Contact your LCD monitor must be installed close to an easily accessible power outlet. • Please fasten power cord to scratch the panel. 2. CAUTION: MOVING OR INSTALLING THE LCD MONITOR MUST BE DONE BY TWO OR MORE PEOPLE. CAUTION: Do not mount or operate the monitor upside down...
Users Manual
Page 24
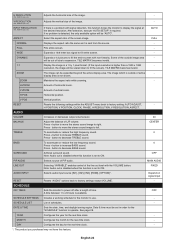
... 1 pixel format. (If the input resolution is sent from the source. - CENTER TREBLE To accentuate or reduce the high frequency sound. 0 Press + button to factory settings except VOLUME. - button to fill the entire screen with the VOLUME button. Press - Note: Audio out is disabled when this function is not shown. TILE MATRIX becomes invalid. 1:1 Display the image in order for the monitor to left. SCHEDULE LIST List of...
... 1 pixel format. (If the input resolution is sent from the source. - CENTER TREBLE To accentuate or reduce the high frequency sound. 0 Press + button to factory settings except VOLUME. - button to fill the entire screen with the VOLUME button. Press - Note: Audio out is disabled when this function is not shown. TILE MATRIX becomes invalid. 1:1 Display the image in order for the monitor to left. SCHEDULE LIST List of...
Users Manual
Page 27
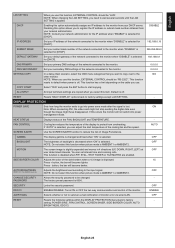
... when you use this function, EXTERNAL CONTROL should be "RS-232C". You can adjust the start copying. SECURITY Locks the security password. NOTE: When you need to go into power management mode. ALL INPUT All input terminals settings are enabled. GAMMA The display gamma is changed . - Press - PASSWORD The factory preset password is selected. OFF RESET Resets the following settings within the DISPLAY PROTECTION menu back to factory settings except LAN SETTING. - This function resets to...
... when you use this function, EXTERNAL CONTROL should be "RS-232C". You can adjust the start copying. SECURITY Locks the security password. NOTE: When you need to go into power management mode. ALL INPUT All input terminals settings are enabled. GAMMA The display gamma is changed . - Press - PASSWORD The factory preset password is selected. OFF RESET Resets the following settings within the DISPLAY PROTECTION menu back to factory settings except LAN SETTING. - This function resets to...

Users Manual
Page 30
... of LCD Panel When an LCD panel is displayed for long period. If selected input or picture mode is not available now, disable input or picture mode is installed over the schedule with the lowest number. English-28 To program the schedule: 1. Use the up and down arrows to erase the image. Push the set . If a weekly schedule is programmed the remaining schedules can be programmed. MODE. Unlike CRT monitors, LCD monitors' image...
... of LCD Panel When an LCD panel is displayed for long period. If selected input or picture mode is not available now, disable input or picture mode is installed over the schedule with the lowest number. English-28 To program the schedule: 1. Use the up and down arrows to erase the image. Push the set . If a weekly schedule is programmed the remaining schedules can be programmed. MODE. Unlike CRT monitors, LCD monitors' image...

Users Manual
Page 31
...). This LCD monitor can be set the "IR CONTROL" to Normal Mode press the REMOTE ID CLEAR button and hold down the REMOTE ID SET button while using an RS-232C connection. You can then connect the RS-232C output from 1-100. Monitor ID:1 Monitor ID:2 Remote works Remote works Figure 1 Remote in normal mode, all other monitors. 2. Normal Mode - The MONITOR ID number can range from the LCD monitor to 0 Monitor ID:1 Monitor ID:2 Monitor ID:3 Remote works Monitor ID:3 TO SET/RESET REMOTE CONTROL MODE ID Mode - MONITOR ID...
...). This LCD monitor can be set the "IR CONTROL" to Normal Mode press the REMOTE ID CLEAR button and hold down the REMOTE ID SET button while using an RS-232C connection. You can then connect the RS-232C output from 1-100. Monitor ID:1 Monitor ID:2 Remote works Remote works Figure 1 Remote in normal mode, all other monitors. 2. Normal Mode - The MONITOR ID number can range from the LCD monitor to 0 Monitor ID:1 Monitor ID:2 Monitor ID:3 Remote works Monitor ID:3 TO SET/RESET REMOTE CONTROL MODE ID Mode - MONITOR ID...
Users Manual
Page 39
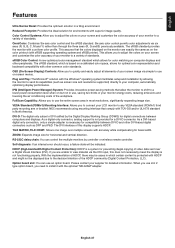
.... NEC recommends using mounting interface that comply with a uniform color profile. As a DVI-based digital only connection, only a simple adapter is based on your screen and customise the color accuracy of your monitor energy costs, reducing emissions and lowering the air conditioning costs of video data sent over multiple screens with the Windows® operating system facilitates setup and installation by allowing the monitor to use slot 2 type...
.... NEC recommends using mounting interface that comply with a uniform color profile. As a DVI-based digital only connection, only a simple adapter is based on your screen and customise the color accuracy of your monitor energy costs, reducing emissions and lowering the air conditioning costs of video data sent over multiple screens with the Windows® operating system facilitates setup and installation by allowing the monitor to use slot 2 type...
Users Manual
Page 40
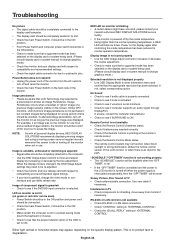
... displayed. When the display mode is changed, the OSD Image Adjust settings may not function when direct sunlight or strong illumination strikes the remote control sensor of time should be in use 60Hz refresh rate. Image of the monitor from monitor if necessary. Power on the screen. Snowy Picture, Poor Sound in the path. Use new cable if necessary. This is not working properly • The "SCHEDULE" function will be reset. Troubleshooting...
... displayed. When the display mode is changed, the OSD Image Adjust settings may not function when direct sunlight or strong illumination strikes the remote control sensor of time should be in use 60Hz refresh rate. Image of the monitor from monitor if necessary. Power on the screen. Snowy Picture, Poor Sound in the path. Use new cable if necessary. This is not working properly • The "SCHEDULE" function will be reset. Troubleshooting...

Users Manual
Page 41
... Dimension Temperature: -20 - 60°C / -4 - 140°F Humidity: 10 - 90% (without condensation) / 90% - 3.5% x (Temp - 40°C) regarding over 40°C 1024.0 (W) x 578.6 (H) x 118.1 (D) mm / 40.3 (W) x 22.8 (H) x 4.6 (D) inches Weight VESA compatible mounting interface 24.3 kg (53.6 lbs) 300 mm x 300 mm (M6, 4 Holes) Power Management VESA DPM Plug & Play VESA DDC2B, DDC/CI, DisplayPort Accessories Setup manual, Power Cord, Video Signal cable, Clamp x 3, Screw x 5, CD-ROM, Thumbscrew for optional stand x 2, Cable cover, Remote Control cable...
... Dimension Temperature: -20 - 60°C / -4 - 140°F Humidity: 10 - 90% (without condensation) / 90% - 3.5% x (Temp - 40°C) regarding over 40°C 1024.0 (W) x 578.6 (H) x 118.1 (D) mm / 40.3 (W) x 22.8 (H) x 4.6 (D) inches Weight VESA compatible mounting interface 24.3 kg (53.6 lbs) 300 mm x 300 mm (M6, 4 Holes) Power Management VESA DPM Plug & Play VESA DDC2B, DDC/CI, DisplayPort Accessories Setup manual, Power Cord, Video Signal cable, Clamp x 3, Screw x 5, CD-ROM, Thumbscrew for optional stand x 2, Cable cover, Remote Control cable...

Users Manual
Page 42
... Dimension Temperature: -20 - 60°C / -4 - 140°F Humidity: 10 - 90% (without condensation) / 90% - 3.5% x (Temp - 40°C) regarding over 40°C 1215.3 (W) x 686.1 (H) x 128.1 (D) mm / 47.8 (W) x 27.0 (H) x 5.0 (D) inches Weight VESA compatible mounting interface 36.4 kg (80.3 lbs) 400 mm x 400 mm (M6, 4 Holes) Power Management VESA DPM Plug & Play VESA DDC2B, DDC/CI, DisplayPort Accessories Setup manual, Power Cord, Video Signal cable, Clamp x 3, Screw x 5, CD-ROM, Thumbscrew for optional stand x 2, Cable cover, Remote Control cable...
... Dimension Temperature: -20 - 60°C / -4 - 140°F Humidity: 10 - 90% (without condensation) / 90% - 3.5% x (Temp - 40°C) regarding over 40°C 1215.3 (W) x 686.1 (H) x 128.1 (D) mm / 47.8 (W) x 27.0 (H) x 5.0 (D) inches Weight VESA compatible mounting interface 36.4 kg (80.3 lbs) 400 mm x 400 mm (M6, 4 Holes) Power Management VESA DPM Plug & Play VESA DDC2B, DDC/CI, DisplayPort Accessories Setup manual, Power Cord, Video Signal cable, Clamp x 3, Screw x 5, CD-ROM, Thumbscrew for optional stand x 2, Cable cover, Remote Control cable...

External Controls
Page 34
... 4: HDMI (Set only) 5: Video1 6: Video2 7: S-Video 12(0Ch): DVD/HD1 13(0Dh): Option 14(0Eh): DVD/HD2 15(0Fh): Display Port 17(11h): HDMI 0: Off 1: Capture 0: No Action 1: Off (No indication) 2: On (Indication 1: Execute 0: No Action 1: Up 2: Down 1: Sensor #1 2: Sensor #2 3: Sensor #3 Returned value is 2's complement. Momentary Momentary This operation requires supported option TV tuner. Please refer to section 6.2 0: | 999: 0: | 65535: Wide: A/V mode only This operation has...
... 4: HDMI (Set only) 5: Video1 6: Video2 7: S-Video 12(0Ch): DVD/HD1 13(0Dh): Option 14(0Eh): DVD/HD2 15(0Fh): Display Port 17(11h): HDMI 0: Off 1: Capture 0: No Action 1: Off (No indication) 2: On (Indication 1: Execute 0: No Action 1: Up 2: Down 1: Sensor #1 2: Sensor #2 3: Sensor #3 Returned value is 2's complement. Momentary Momentary This operation requires supported option TV tuner. Please refer to section 6.2 0: | 999: 0: | 65535: Wide: A/V mode only This operation has...

KT-LFD-CC Spec Brochure
Page 1
... Supported model of NEC displays Supported color sensor At least one or more RS-232 Ports (optional if using either RS-232 or a LAN (Ethernet) connection to identical optimum settings. Each supported display features three internal LUTs that allow very precise adjustments to be applied-from small gamma values to the tone response curve without the need to RS-232 adapter (optional if using RS-232 or a wireless...
... Supported model of NEC displays Supported color sensor At least one or more RS-232 Ports (optional if using either RS-232 or a LAN (Ethernet) connection to identical optimum settings. Each supported display features three internal LUTs that allow very precise adjustments to be applied-from small gamma values to the tone response curve without the need to RS-232 adapter (optional if using RS-232 or a wireless...
Video Wall Solutions Specification Brochure
Page 1
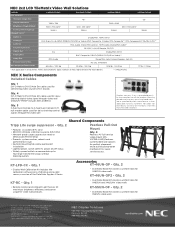
... seamless video wall • Copy function allows the user to apply the settings from one sensor that detects ambient light and delivers simple remote control functionality • Tripp Lite surge suppressor features six outlets and prevents crashes, reboots and performance problems Designed to edge of each NEC display within the bundle, allowing for easy manipulation of a single picture to 2x2 format • TileComp works...
... seamless video wall • Copy function allows the user to apply the settings from one sensor that detects ambient light and delivers simple remote control functionality • Tripp Lite surge suppressor features six outlets and prevents crashes, reboots and performance problems Designed to edge of each NEC display within the bundle, allowing for easy manipulation of a single picture to 2x2 format • TileComp works...
Video Wall Solutions Specification Brochure
Page 2
.../6-ft. Qty. 1 • Display Wall Calibration Kit includes the calibration software on third party (non-NEC manufactured) products. null modem cable used for daisy chaining control signals through video wall (X462UN-TMX4P includes SB-L008WU) Qty. 3 D-Sub 9-pin Female to four large transformer plugs without stand) DisplayPort, HDMI, DVI-D VGA 15-pin D-sub, 5BNC (RGBHV, DVD/HD or Video), BNC Composite, S-Video, RCA Composite**, RCA Component (Y, Cb/Pb, Cr/Pr...
.../6-ft. Qty. 1 • Display Wall Calibration Kit includes the calibration software on third party (non-NEC manufactured) products. null modem cable used for daisy chaining control signals through video wall (X462UN-TMX4P includes SB-L008WU) Qty. 3 D-Sub 9-pin Female to four large transformer plugs without stand) DisplayPort, HDMI, DVI-D VGA 15-pin D-sub, 5BNC (RGBHV, DVD/HD or Video), BNC Composite, S-Video, RCA Composite**, RCA Component (Y, Cb/Pb, Cr/Pr...

X463UN/X551UN Specification Brochure
Page 2
WxHxD) Net Weight (without stand; Specifications for X463UN and X551UN MODEL LCD MODULE Panel Technology Viewable Image Size Native Resolution Brightness (Typical/Max) Contrast Ratio (Typical) Viewing Angle Response Time (white to black) Aspect Ratio Active Screen Area (W x H) Orientation Displayable Colors CONNECTIVITY PC/Mac Signal Compatibility Input Terminals Digital Analog Audio External Control Output Terminals Digital Analog Audio External Control POWER CONSUMPTiON On (Typical) ECO Mode Standby PHYSICAL SPECIFICATIONS Bezel Width (L/R, T/B) Net Dimensions (without stand) VESA Hole ...
WxHxD) Net Weight (without stand; Specifications for X463UN and X551UN MODEL LCD MODULE Panel Technology Viewable Image Size Native Resolution Brightness (Typical/Max) Contrast Ratio (Typical) Viewing Angle Response Time (white to black) Aspect Ratio Active Screen Area (W x H) Orientation Displayable Colors CONNECTIVITY PC/Mac Signal Compatibility Input Terminals Digital Analog Audio External Control Output Terminals Digital Analog Audio External Control POWER CONSUMPTiON On (Typical) ECO Mode Standby PHYSICAL SPECIFICATIONS Bezel Width (L/R, T/B) Net Dimensions (without stand) VESA Hole ...


