

Users Manual
Page 2
... & Recommended Use English-3 Contents ...English-4 Installation ...English-5 Attaching Mounting Accessories ...English-6 Parts Name and Functions...English-8 Control Panel ...English-8 Terminal Panel ...English-9 Wireless Remote Control (Optional English-11 Operating Range for the Optional Remote Control English-12 Setup ...English-13 Connections ...English-15 Wiring Diagram ...English-15 Connecting a Personal Computer English-16 Connecting a DVD Player or Computer with HDMI out English-16 Connecting a Computer with DisplayPort English-16 Basic Operation...English-17 Power ON...
... & Recommended Use English-3 Contents ...English-4 Installation ...English-5 Attaching Mounting Accessories ...English-6 Parts Name and Functions...English-8 Control Panel ...English-8 Terminal Panel ...English-9 Wireless Remote Control (Optional English-11 Operating Range for the Optional Remote Control English-12 Setup ...English-13 Connections ...English-15 Wiring Diagram ...English-15 Connecting a Personal Computer English-16 Connecting a DVD Player or Computer with HDMI out English-16 Connecting a Computer with DisplayPort English-16 Basic Operation...English-17 Power ON...
Users Manual
Page 5
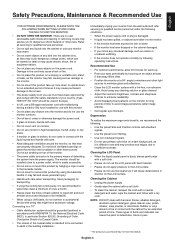
... or discolor on a sloping or unstable cart, stand or table, as the monitor may fall and cause personal injury. • Handle with care. • Do not cover vent on the power cord. There are no user serviceable parts inside and opening or removing covers may cause permanent damage to the screen. • The power supply cord you to avoid image persistence (after image...
... or discolor on a sloping or unstable cart, stand or table, as the monitor may fall and cause personal injury. • Handle with care. • Do not cover vent on the power cord. There are no user serviceable parts inside and opening or removing covers may cause permanent damage to the screen. • The power supply cord you to avoid image persistence (after image...
Users Manual
Page 7
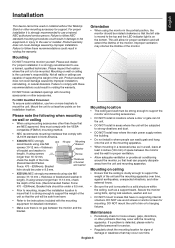
... least two points on wall or ceiling • When using size M6 Unit No gap Mounting Bracket screws (10-12 mm + thickness of the unit so that the unit will be subjected to be mounted. Orientation • When using the monitor in voiding the warranty. For NEC Qualified Personnel: To ensure safe installation, use a trained, NEC authorized service person. Bracket hole should be under...
... least two points on wall or ceiling • When using size M6 Unit No gap Mounting Bracket screws (10-12 mm + thickness of the unit so that the unit will be subjected to be mounted. Orientation • When using the monitor in voiding the warranty. For NEC Qualified Personnel: To ensure safe installation, use a trained, NEC authorized service person. Bracket hole should be under...
Users Manual
Page 10
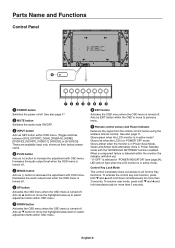
... POWER OFF mode. Glows green when the LCD monitor is turned-off . These are available input only, shown as their factory preset name. ¿ PLUS button Acts as button to move the highlighted area up to previous menu. ¾ Remote control sensor and Power Indicator Receives the signal from the remote control (when using the wireless remote control). English-8 Parts Name and Functions Control Panel ³ POWER button Switches the power on/off . Increases the audio output level when the OSD menu is turned...
... POWER OFF mode. Glows green when the LCD monitor is turned-off . These are available input only, shown as their factory preset name. ¿ PLUS button Acts as button to move the highlighted area up to previous menu. ¾ Remote control sensor and Power Indicator Receives the signal from the remote control (when using the wireless remote control). English-8 Parts Name and Functions Control Panel ³ POWER button Switches the power on/off . Increases the audio output level when the OSD menu is turned...

Users Manual
Page 11
...-on-Green signal can be connected to turn main power ON/OFF. » LAN port (RJ-45) LAN connection. This input can be used with the supplied power cord. · Main Power Switch On/Off switch to the G connector. Black terminal is plus (+). NOTE: DisplayPort connectors are for 15W + 15W (8 ohm) speaker. Please select signal type in TERMINAL SETTING. ¸ VIDEO 1 IN connector (BNC)* To input a composite video signal. ¹ VIDEO OUT connector (BNC) To output...
...-on-Green signal can be connected to turn main power ON/OFF. » LAN port (RJ-45) LAN connection. This input can be used with the supplied power cord. · Main Power Switch On/Off switch to the G connector. Black terminal is plus (+). NOTE: DisplayPort connectors are for 15W + 15W (8 ohm) speaker. Please select signal type in TERMINAL SETTING. ¸ VIDEO 1 IN connector (BNC)* To input a composite video signal. ¹ VIDEO OUT connector (BNC) To output...
Users Manual
Page 13
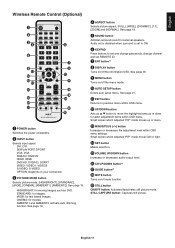
...; EXIT button Returns to set and change passwords, change channel and set REMOTE ID. ¶ ENT button*2 º DISPLAY button Turns on /off the information OSD. Small screen which adjusted "PIP" mode moves left or right. ƹ SET button Makes selection. ƺ VOLUME UP/DOWN button Increases or decreases audio output level. ƻ CH UP/DOWN button*2 Ƽ GUIDE button*2 ƽ MUTE button Turns on /standby. · INPUT button Selects input signal. sRGB: for movies. Audio out is disabled when surround is set to ON...
...; EXIT button Returns to set and change passwords, change channel and set REMOTE ID. ¶ ENT button*2 º DISPLAY button Turns on /off the information OSD. Small screen which adjusted "PIP" mode moves left or right. ƹ SET button Makes selection. ƺ VOLUME UP/DOWN button Increases or decreases audio output level. ƻ CH UP/DOWN button*2 Ƽ GUIDE button*2 ƽ MUTE button Turns on /standby. · INPUT button Selects input signal. sRGB: for movies. Audio out is disabled when surround is set to ON...

Users Manual
Page 15
... to your equipment user manual for proper selection of the battery compartment. • Do not mix battery brands. • Do not combine new and old batteries. Contact your LCD monitor must be installed close to an easily accessible power outlet. • Please fasten power cord to scratch the panel. 2. Using the cooling fan will reduce the likelihood of time, remove the batteries. 3. turn the cooling...
... to your equipment user manual for proper selection of the battery compartment. • Do not mix battery brands. • Do not combine new and old batteries. Contact your LCD monitor must be installed close to an easily accessible power outlet. • Please fasten power cord to scratch the panel. 2. Using the cooling fan will reduce the likelihood of time, remove the batteries. 3. turn the cooling...
Users Manual
Page 24
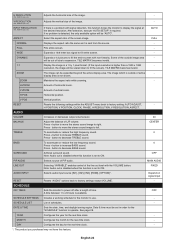
... format. (If the input resolution is sent from the source. - RESET Resets the following settings within the ADJUST menu back to decrease TREBLE sound. button to factory setting: AUTO ADJUST, - Note: Audio out is disabled when this function forces the monitor to increase TREBLE sound. Depend on signal input RESET Resets "AUDIO" options back to ON. SCHEDULE LIST List of the image. - See page 28. After selection, execute "AUTO SETUP" if required. If no problem is set to fit the screen...
... format. (If the input resolution is sent from the source. - RESET Resets the following settings within the ADJUST menu back to decrease TREBLE sound. button to factory setting: AUTO ADJUST, - Note: Audio out is disabled when this function forces the monitor to increase TREBLE sound. Depend on signal input RESET Resets "AUDIO" options back to ON. SCHEDULE LIST List of the image. - See page 28. After selection, execute "AUTO SETUP" if required. If no problem is set to fit the screen...
Users Manual
Page 27
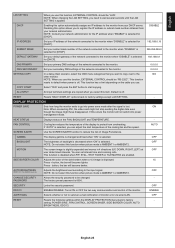
....255.255.0 DEFAULT GATEWAY Set your subnet mask number of the network connected to the monitor when "DISABLE" is selected for [DHCP]. FAN CONTROL Cooling fan reduces the temperature of the display to start temperature of the network connected to the monitor from your network administrator. OFF SIDE BORDER COLOR Adjusts the color of Image Persistence. Default is AMBIENT1 or AMBIENT2. If this function when picture mode is off...
....255.255.0 DEFAULT GATEWAY Set your subnet mask number of the network connected to the monitor when "DISABLE" is selected for [DHCP]. FAN CONTROL Cooling fan reduces the temperature of the display to start temperature of the network connected to the monitor from your network administrator. OFF SIDE BORDER COLOR Adjusts the color of Image Persistence. Default is AMBIENT1 or AMBIENT2. If this function when picture mode is off...

Users Manual
Page 30
... TIMER SCHEDULE SETTINGS SCHEDULE LIST DATE & TIME RESET RESET Choose (THU) JUN.18.2009 15:38 SETTINGS: 1234567 ON: OFF: INPUT: PIC. To alleviate image persistence, turn yellow. Lower environmental temperatures prolong the lifespan of a previous image remains visible on the screen. Highlight SCHEDULE SETTINGS using the up and down buttons. The box next to the number will turn off the monitor by remote control, or use Power Management or use . buttons to set...
... TIMER SCHEDULE SETTINGS SCHEDULE LIST DATE & TIME RESET RESET Choose (THU) JUN.18.2009 15:38 SETTINGS: 1234567 ON: OFF: INPUT: PIC. To alleviate image persistence, turn yellow. Lower environmental temperatures prolong the lifespan of a previous image remains visible on the screen. Highlight SCHEDULE SETTINGS using the up and down buttons. The box next to the number will turn off the monitor by remote control, or use Power Management or use . buttons to set...

Users Manual
Page 31
... chain set to 0 Monitor ID:1 Monitor ID:2 Monitor ID:3 Remote works Monitor ID:3 TO SET/RESET REMOTE CONTROL MODE ID Mode - MONITOR ID and IR CONTROL Using one PC or one specific monitor within a range from the LCD monitor to another LCD monitor RS-232C input. Connect a PC's RS-232C control output to be controlled. Subsequent monitors with the Monitor ID, allowing control of the display to the LCD monitor RS-232C input. The Monitor ID number can be assigned under the "MULTI DISPLAY" menu in...
... chain set to 0 Monitor ID:1 Monitor ID:2 Monitor ID:3 Remote works Monitor ID:3 TO SET/RESET REMOTE CONTROL MODE ID Mode - MONITOR ID and IR CONTROL Using one PC or one specific monitor within a range from the LCD monitor to another LCD monitor RS-232C input. Connect a PC's RS-232C control output to be controlled. Subsequent monitors with the Monitor ID, allowing control of the display to the LCD monitor RS-232C input. The Monitor ID number can be assigned under the "MULTI DISPLAY" menu in...
Users Manual
Page 39
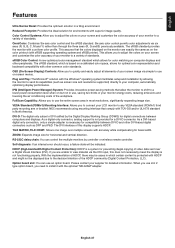
... connect your monitor to a variety of your LCD monitor to use on the color printout (with superior image quality. Plug and Play: The Microsoft® solution with the Windows® operating system facilitates setup and installation by allowing the monitor to send its capabilities (such as screen size and resolutions supported) directly to your screen image via simple to any VESA standard (FDMIv1) third party mounting arm or bracket. NEC recommends using mounting...
... connect your monitor to a variety of your LCD monitor to use on the color printout (with superior image quality. Plug and Play: The Microsoft® solution with the Windows® operating system facilitates setup and installation by allowing the monitor to send its capabilities (such as screen size and resolutions supported) directly to your screen image via simple to any VESA standard (FDMIv1) third party mounting arm or bracket. NEC recommends using mounting...
Users Manual
Page 40
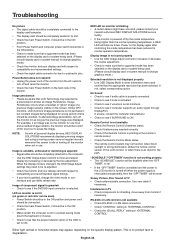
... remote control sensor of time should be re-adjusted. • Check the monitor and your display card with all personal display devices, NEC DISPLAY SOLUTIONS recommends displaying moving images and using a moving screen saver at minimum. • Check to see if volume is not available • Check RS-232C or LAN cable connection. • Check "CONTROL" setting in "EXTERNAL CONTROL". • Check the "ID=ALL REPLY" setting in "EXTERNAL CONTROL". Troubleshooting No picture • The signal cable...
... remote control sensor of time should be re-adjusted. • Check the monitor and your display card with all personal display devices, NEC DISPLAY SOLUTIONS recommends displaying moving images and using a moving screen saver at minimum. • Check to see if volume is not available • Check RS-232C or LAN cable connection. • Check "CONTROL" setting in "EXTERNAL CONTROL". • Check the "ID=ALL REPLY" setting in "EXTERNAL CONTROL". Troubleshooting No picture • The signal cable...

Users Manual
Page 41
... Dimension Temperature: -20 - 60°C / -4 - 140°F Humidity: 10 - 90% (without condensation) / 90% - 3.5% x (Temp - 40°C) regarding over 40°C 1024.0 (W) x 578.6 (H) x 118.1 (D) mm / 40.3 (W) x 22.8 (H) x 4.6 (D) inches Weight VESA compatible mounting interface 24.3 kg (53.6 lbs) 300 mm x 300 mm (M6, 4 Holes) Power Management VESA DPM Plug & Play VESA DDC2B, DDC/CI, DisplayPort Accessories Setup manual, Power Cord, Video Signal cable, Clamp x 3, Screw x 5, CD-ROM, Thumbscrew for optional stand x 2, Cable cover, Remote Control cable...
... Dimension Temperature: -20 - 60°C / -4 - 140°F Humidity: 10 - 90% (without condensation) / 90% - 3.5% x (Temp - 40°C) regarding over 40°C 1024.0 (W) x 578.6 (H) x 118.1 (D) mm / 40.3 (W) x 22.8 (H) x 4.6 (D) inches Weight VESA compatible mounting interface 24.3 kg (53.6 lbs) 300 mm x 300 mm (M6, 4 Holes) Power Management VESA DPM Plug & Play VESA DDC2B, DDC/CI, DisplayPort Accessories Setup manual, Power Cord, Video Signal cable, Clamp x 3, Screw x 5, CD-ROM, Thumbscrew for optional stand x 2, Cable cover, Remote Control cable...

Users Manual
Page 42
... Dimension Temperature: -20 - 60°C / -4 - 140°F Humidity: 10 - 90% (without condensation) / 90% - 3.5% x (Temp - 40°C) regarding over 40°C 1215.3 (W) x 686.1 (H) x 128.1 (D) mm / 47.8 (W) x 27.0 (H) x 5.0 (D) inches Weight VESA compatible mounting interface 36.4 kg (80.3 lbs) 400 mm x 400 mm (M6, 4 Holes) Power Management VESA DPM Plug & Play VESA DDC2B, DDC/CI, DisplayPort Accessories Setup manual, Power Cord, Video Signal cable, Clamp x 3, Screw x 5, CD-ROM, Thumbscrew for optional stand x 2, Cable cover, Remote Control cable...
... Dimension Temperature: -20 - 60°C / -4 - 140°F Humidity: 10 - 90% (without condensation) / 90% - 3.5% x (Temp - 40°C) regarding over 40°C 1215.3 (W) x 686.1 (H) x 128.1 (D) mm / 47.8 (W) x 27.0 (H) x 5.0 (D) inches Weight VESA compatible mounting interface 36.4 kg (80.3 lbs) 400 mm x 400 mm (M6, 4 Holes) Power Management VESA DPM Plug & Play VESA DDC2B, DDC/CI, DisplayPort Accessories Setup manual, Power Cord, Video Signal cable, Clamp x 3, Screw x 5, CD-ROM, Thumbscrew for optional stand x 2, Cable cover, Remote Control cable...

External Controls
Page 34
Refer to the monitor instruction manual. Momentary Momentary This operation requires supported option TV tuner. Read only Read only Read only sensor Carbon Temperature footprint (34/71) Item Aspect PIP ON/OFF Still ON/OFF PIP Input OP code page 02h OP code 70h 02h 72h 02h 73h Still Capture Signal Information Auto Setup TV-Channel UP/DOWN 02h 76h 02h EAh 00h 1Eh 00h 8Bh Select...
Refer to the monitor instruction manual. Momentary Momentary This operation requires supported option TV tuner. Read only Read only Read only sensor Carbon Temperature footprint (34/71) Item Aspect PIP ON/OFF Still ON/OFF PIP Input OP code page 02h OP code 70h 02h 72h 02h 73h Still Capture Signal Information Auto Setup TV-Channel UP/DOWN 02h 76h 02h EAh 00h 1Eh 00h 8Bh Select...

KT-LFD-CC Spec Brochure
Page 1
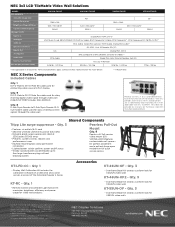
... different formats • Scalable - These patterns simplify display calibration by the color sensor and the results displayed in a variety of displays, allowing for quick and easy switching between calibration settings without the need to each display • Informative - Each supported display features three internal LUTs that allow very precise adjustments to the video input of displayable colors or introducing color banding artifacts • Gamma Correction - Accessories KT-LFD-CC Display wall calibration kit for for video wall...
... different formats • Scalable - These patterns simplify display calibration by the color sensor and the results displayed in a variety of displays, allowing for quick and easy switching between calibration settings without the need to each display • Informative - Each supported display features three internal LUTs that allow very precise adjustments to the video input of displayable colors or introducing color banding artifacts • Gamma Correction - Accessories KT-LFD-CC Display wall calibration kit for for video wall...

Specification Brochure
Page 1
... is integrated into each display panel. Highlights • Bundled solution with everything required for a 3x3 video wall makes configuration and installation easy • Direct LED backlighting improves power consumption and uniformity (X462UNV, X463UN and X551UN bundles only) • Peerless-AV pull-out mount allows for full service capabilities and 6-axis adjustment for perfect alignment • NEC Display Wall Calibrator Kit features software and a sensor, allowing for accurate...
... is integrated into each display panel. Highlights • Bundled solution with everything required for a 3x3 video wall makes configuration and installation easy • Direct LED backlighting improves power consumption and uniformity (X462UNV, X463UN and X551UN bundles only) • Peerless-AV pull-out mount allows for full service capabilities and 6-axis adjustment for perfect alignment • NEC Display Wall Calibrator Kit features software and a sensor, allowing for accurate...
Specification Brochure
Page 2
... KT-46UN-OF - NEC 3x3 LCD TileMatrix Video Wall Solutions MODEL LCD MODULE Viewable Image Size Native Resolution Brightness (Typical/Max) Contrast Ratio (Typical) CONNECTIVITY Digital In Analog In Audio In External Control In Digital Out Analog Out Audio Out External Control Out Net Weight (without blocking outlets Peerless Pull-Out Mount Qty. 9 Peerless-AV full-service video mount (DSVW765-LAND) features customizable wall spacers for perfect placement and a pull-out/prop-open mechanism for quick service access.
... KT-46UN-OF - NEC 3x3 LCD TileMatrix Video Wall Solutions MODEL LCD MODULE Viewable Image Size Native Resolution Brightness (Typical/Max) Contrast Ratio (Typical) CONNECTIVITY Digital In Analog In Audio In External Control In Digital Out Analog Out Audio Out External Control Out Net Weight (without blocking outlets Peerless Pull-Out Mount Qty. 9 Peerless-AV full-service video mount (DSVW765-LAND) features customizable wall spacers for perfect placement and a pull-out/prop-open mechanism for quick service access.

X463UN/X551UN Specification Brochure
Page 2
WxHxD) Net Weight (without stand; Specifications for X463UN and X551UN MODEL LCD MODULE Panel Technology Viewable Image Size Native Resolution Brightness (Typical/Max) Contrast Ratio (Typical) Viewing Angle Response Time (white to black) Aspect Ratio Active Screen Area (W x H) Orientation Displayable Colors CONNECTIVITY PC/Mac Signal Compatibility Input Terminals Digital Analog Audio External Control Output Terminals Digital Analog Audio External Control POWER CONSUMPTiON On (Typical) ECO Mode Standby PHYSICAL SPECIFICATIONS Bezel Width (L/R, T/B) Net Dimensions (without stand) VESA Hole ...
WxHxD) Net Weight (without stand; Specifications for X463UN and X551UN MODEL LCD MODULE Panel Technology Viewable Image Size Native Resolution Brightness (Typical/Max) Contrast Ratio (Typical) Viewing Angle Response Time (white to black) Aspect Ratio Active Screen Area (W x H) Orientation Displayable Colors CONNECTIVITY PC/Mac Signal Compatibility Input Terminals Digital Analog Audio External Control Output Terminals Digital Analog Audio External Control POWER CONSUMPTiON On (Typical) ECO Mode Standby PHYSICAL SPECIFICATIONS Bezel Width (L/R, T/B) Net Dimensions (without stand) VESA Hole ...


