

Specification Brochure
Page 3
... synchronization when content is extremely useful for dynamic control of Play This function provides accurate proof that runs from an external location. No motion detected BACKLIGHT : 40 VOLUME : 30 INPUT SELECT : DP Motion detected BACKLIGHT : 60 VOLUME : 70 INPUT SELECT: HDMI Dedicated Color Calibration Software As the brightness and color temperature of ambient light. Information regarding video source, time on the amount of the LCD change with NaViSet Administrator 2. OPS...
... synchronization when content is extremely useful for dynamic control of Play This function provides accurate proof that runs from an external location. No motion detected BACKLIGHT : 40 VOLUME : 30 INPUT SELECT : DP Motion detected BACKLIGHT : 60 VOLUME : 70 INPUT SELECT: HDMI Dedicated Color Calibration Software As the brightness and color temperature of ambient light. Information regarding video source, time on the amount of the LCD change with NaViSet Administrator 2. OPS...

Specification Brochure
Page 4
... Weight (without stand; MODEL LCD MODULE Panel Technology Viewable Image Size Native Resolution Brightness (Typical/Max) Contrast Ratio (Typical) Viewing Angle Aspect Ratio Displayable Colors Orientation Displayable Colors CONNECTIVITY PC/Mac Signal Compatibility Input Terminals Digital Analog Audio External Control Output Terminals Digital Analog Audio External Control POWER CONSUMPTiON On (Typical) Power Management Current Rating PHYSICAL SPECIFICATIONS Bezel Width (L/R, T/B) Net Dimensions (without stand) VESA Hole Configuration ENVIRONMENTAL CONDITIONS Operating Temperature Operating...
... Weight (without stand; MODEL LCD MODULE Panel Technology Viewable Image Size Native Resolution Brightness (Typical/Max) Contrast Ratio (Typical) Viewing Angle Aspect Ratio Displayable Colors Orientation Displayable Colors CONNECTIVITY PC/Mac Signal Compatibility Input Terminals Digital Analog Audio External Control Output Terminals Digital Analog Audio External Control POWER CONSUMPTiON On (Typical) Power Management Current Rating PHYSICAL SPECIFICATIONS Bezel Width (L/R, T/B) Net Dimensions (without stand) VESA Hole Configuration ENVIRONMENTAL CONDITIONS Operating Temperature Operating...
Launch Press Release
Page 2
... enable easier installation, use and maintenance. Auto TileMatrix allows a user to simply set up the size of the displays' key features is FrameComp, which compensates for up to the displays. Audio, video, power and control are all internal to 2160p, allowing 4x the resolution across the video walls • Panel brightness of a few buttons, the entire video wall is possible with horizontal moving objects. One of the video wall on the...
... enable easier installation, use and maintenance. Auto TileMatrix allows a user to simply set up the size of the displays' key features is FrameComp, which compensates for up to the displays. Audio, video, power and control are all internal to 2160p, allowing 4x the resolution across the video walls • Panel brightness of a few buttons, the entire video wall is possible with horizontal moving objects. One of the video wall on the...
Launch Press Release
Page 3
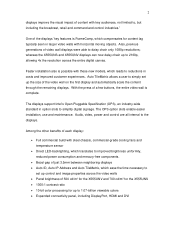
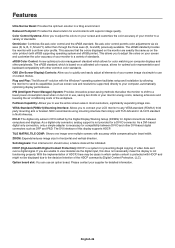
... 4K resolution across entire wall Carbon footprint meter, which calculates and tracks carbon savings NaViSet Administrator 2 software compatible, which allows asset management capabilities of the products as well as full control and task management Optional color calibration software, which stores information within the LUT (Look Up Tables) of the display, and ensures color uniformity and fidelity across multiple screens...
... 4K resolution across entire wall Carbon footprint meter, which calculates and tracks carbon savings NaViSet Administrator 2 software compatible, which allows asset management capabilities of the products as well as full control and task management Optional color calibration software, which stores information within the LUT (Look Up Tables) of the display, and ensures color uniformity and fidelity across multiple screens...
Users Manual
Page 2
......English-8 Control Panel ...English-8 Terminal Panel ...English-9 Wireless Remote Control (Optional English-10 Operating Range for the Optional Remote Control English-11 Setup ...English-12 Connections ...English-14 Wiring Diagram ...English-14 Connecting a Personal Computer English-15 Connecting a DVD Player or Computer with HDMI out English-15 Connecting a Computer with DisplayPort English-15 Basic Operation...English-16 Power ON and OFF Modes ...English-16 Power Indicator...English-17 Initial settings ...English-17 Using Power Management...
......English-8 Control Panel ...English-8 Terminal Panel ...English-9 Wireless Remote Control (Optional English-10 Operating Range for the Optional Remote Control English-11 Setup ...English-12 Connections ...English-14 Wiring Diagram ...English-14 Connecting a Personal Computer English-15 Connecting a DVD Player or Computer with HDMI out English-15 Connecting a Computer with DisplayPort English-15 Basic Operation...English-16 Power ON and OFF Modes ...English-16 Power Indicator...English-17 Initial settings ...English-17 Using Power Management...
Users Manual
Page 5
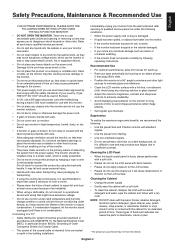
...; When the power supply cord or plug is broken, do not come in the building installation. NOTE: DO NOT clean with a dry cloth. The monitor should be used in Europe) • In UK, use a BS-approved power cord with molded plug having a black (13A) fuse installed for use with standard signals. • Use the preset Color Setting. • Use non-interlaced signals. • Do not use primary color blue on monitor. • Do...
...; When the power supply cord or plug is broken, do not come in the building installation. NOTE: DO NOT clean with a dry cloth. The monitor should be used in Europe) • In UK, use a BS-approved power cord with molded plug having a black (13A) fuse installed for use with standard signals. • Use the preset Color Setting. • Use non-interlaced signals. • Do not use primary color blue on monitor. • Do...
Users Manual
Page 7
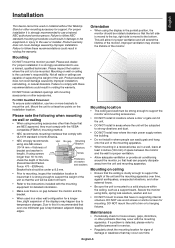
... the bracket. • When used or installed without the Tabletop Stand or other accessories. Orientation • When using bolts, spring lock washers, washer and nut. • DO NOT mount to the instructions included with UL1678 standard in North America. • NEC strongly recommends using screws under 8.5 mm. • Prior to mounting, inspect the installation location to insure that have no gap between the monitor and the wall...
... the bracket. • When used or installed without the Tabletop Stand or other accessories. Orientation • When using bolts, spring lock washers, washer and nut. • DO NOT mount to the instructions included with UL1678 standard in North America. • NEC strongly recommends using screws under 8.5 mm. • Prior to mounting, inspect the installation location to insure that have no gap between the monitor and the wall...

Users Manual
Page 10
... menu. ¶ DOWN button ( ) Activates the OSD menu when the OSD menu is in POWER OFF mode. When a component failure is in Power Standby mode with the "SCHEDULE SETTINGS" function enabled. To activate the control key lock function, press both and and hold down to select adjustment items within the OSD to previous menu. ¾ Remote control sensor and Power Indicator Receives the signal from the remote control (when using the wireless remote control). These are available input...
... menu. ¶ DOWN button ( ) Activates the OSD menu when the OSD menu is in POWER OFF mode. When a component failure is in Power Standby mode with the "SCHEDULE SETTINGS" function enabled. To activate the control key lock function, press both and and hold down to select adjustment items within the OSD to previous menu. ¾ Remote control sensor and Power Indicator Receives the signal from the remote control (when using the wireless remote control). These are available input...
Users Manual
Page 11
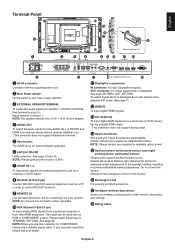
... connector Connects with an RGB or COMPONENT source. See page 11. ¹ HDMI IN To input digital HDMI signals. Ƹ DVI IN (DVI-D) To input digital RGB signals from the AUDIO IN 1, 2, DPORT and HDMI to turn main power ON/OFF. » EXTERNAL SPEAKER TERMINAL To output the audio signal from external equipment such as a main picture when selected PIP mode. This input can be used with the supplied power cord. · Main Power Switch On/Off switch to an external device (stereo receiver...
... connector Connects with an RGB or COMPONENT source. See page 11. ¹ HDMI IN To input digital HDMI signals. Ƹ DVI IN (DVI-D) To input digital RGB signals from the AUDIO IN 1, 2, DPORT and HDMI to turn main power ON/OFF. » EXTERNAL SPEAKER TERMINAL To output the audio signal from external equipment such as a main picture when selected PIP mode. This input can be used with the supplied power cord. · Main Power Switch On/Off switch to an external device (stereo receiver...
Users Manual
Page 12
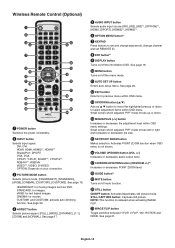
... set and change passwords, change channel and set REMOTE ID. º ENT button*1 ¾ DISPLAY button Turns on/off mute function. ƿ STILL button ON/OFF button: Activates/deactivates still picture mode. English-10 Wireless Remote Control (Optional) ³ POWER button Switches the power on /off the information OSD. CUSTOM1 and CUSTOM2: activate auto dimming function. HIGHBRIGHT: for movies. Small screen which adjusted "PIP" mode moves left or right and increases or decreases the size. ƺ SET/POINT ZOOM button...
... set and change passwords, change channel and set REMOTE ID. º ENT button*1 ¾ DISPLAY button Turns on/off mute function. ƿ STILL button ON/OFF button: Activates/deactivates still picture mode. English-10 Wireless Remote Control (Optional) ³ POWER button Switches the power on /off the information OSD. CUSTOM1 and CUSTOM2: activate auto dimming function. HIGHBRIGHT: for movies. Small screen which adjusted "PIP" mode moves left or right and increases or decreases the size. ƺ SET/POINT ZOOM button...
Users Manual
Page 14
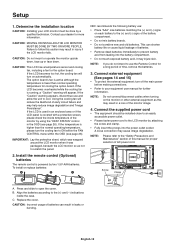
... ON within the FAN CONTROL menu within the OSD (see page 26). Setup 1. Determine the installation location CAUTION: Installing your LCD monitor must be installed close to an easily accessible power outlet. • Please fasten power cord to prevent battery acid from leaking into the power outlet socket. Contact your equipment user manual for proper selection of time, remove the batteries. 3. CAUTION: MOVING OR INSTALLING THE LCD MONITOR MUST BE DONE BY...
... ON within the FAN CONTROL menu within the OSD (see page 26). Setup 1. Determine the installation location CAUTION: Installing your LCD monitor must be installed close to an easily accessible power outlet. • Please fasten power cord to prevent battery acid from leaking into the power outlet socket. Contact your equipment user manual for proper selection of time, remove the batteries. 3. CAUTION: MOVING OR INSTALLING THE LCD MONITOR MUST BE DONE BY...
Users Manual
Page 16
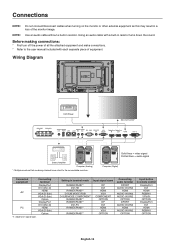
Wiring Diagram DVD Player Second monitor* Stereo Amplifier Computer (Analog) *: Multiple monitors that are daisy-chained have a limit to the user manual included with a built-in a loss of equipment. Connections NOTE: Do not connect/disconnect cables when turning on signal type. NOTE: Use an audio cable without a built-in remote control DisplayPort DVI HDMI RGB/HV Y/Pb/Pr OPTION DisplayPort DVI HDMI RGB/HV OPTION English-14 Setting in terminal mode Input signal name...
Wiring Diagram DVD Player Second monitor* Stereo Amplifier Computer (Analog) *: Multiple monitors that are daisy-chained have a limit to the user manual included with a built-in a loss of equipment. Connections NOTE: Do not connect/disconnect cables when turning on signal type. NOTE: Use an audio cable without a built-in remote control DisplayPort DVI HDMI RGB/HV Y/Pb/Pr OPTION DisplayPort DVI HDMI RGB/HV OPTION English-14 Setting in terminal mode Input signal name...
Users Manual
Page 28
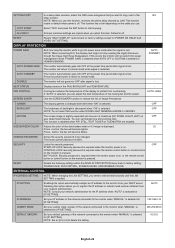
... SET button to factory setting: - AUTO STANDBY The monitor automatically goes into OFF at user determined intervals. HEAT STATUS Displays status of Image Persistence. If "AUTO" is selected, you can set interval time and zooming ratio. OFF RESET Resets the following settings within the DISPLAY PROTECTION menu back to start temperature of the cooling fan and fan speed. POWER SAVE, FAN CONTROL, SCREEN SAVER, SIDE BORDER COLOR. NOTE: Consult your network administrator. VIDEO...
... SET button to factory setting: - AUTO STANDBY The monitor automatically goes into OFF at user determined intervals. HEAT STATUS Displays status of Image Persistence. If "AUTO" is selected, you can set interval time and zooming ratio. OFF RESET Resets the following settings within the DISPLAY PROTECTION menu back to start temperature of the cooling fan and fan speed. POWER SAVE, FAN CONTROL, SCREEN SAVER, SIDE BORDER COLOR. NOTE: Consult your network administrator. VIDEO...
Users Manual
Page 29
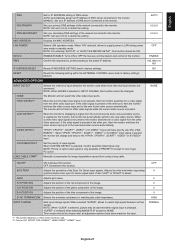
... RESET Resets the following setting within the EXTERNAL CONTROL menu back to select. ADVANCED OPTION1 INPUT DETECT Selects the method of DNS server connected to the new found video source automatically. FIRST DETECT*2 When the current video input signal is not present, then the monitor searches for image degradation caused from the other video input port. LAST DETECT*2 When the monitor is displaying a signal from sync On Green signal input. If the video signal is supplied...
... RESET Resets the following setting within the EXTERNAL CONTROL menu back to select. ADVANCED OPTION1 INPUT DETECT Selects the method of DNS server connected to the new found video source automatically. FIRST DETECT*2 When the current video input signal is not present, then the monitor searches for image degradation caused from the other video input port. LAST DETECT*2 When the monitor is displaying a signal from sync On Green signal input. If the video signal is supplied...
Users Manual
Page 32
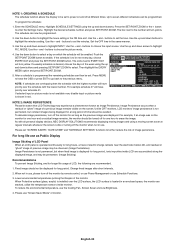
... buttons and pressing SET/POINT ZOOM to the number will have priority over the LCD surface, the LCD surface is operated continuously for long hours, a trace of electric charge remains near the electrode inside monitor. Use the down arrows to select a day on the screen. If selected input or picture mode is not available now, disable input or picture mode is idle or turning off the monitor by remote control...
... buttons and pressing SET/POINT ZOOM to the number will have priority over the LCD surface, the LCD surface is operated continuously for long hours, a trace of electric charge remains near the electrode inside monitor. Use the down arrows to select a day on the screen. If selected input or picture mode is not available now, disable input or picture mode is idle or turning off the monitor by remote control...
Users Manual
Page 33
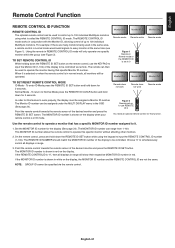
... simultaneously control all displays in red. If the REMOTE CONTROLID is shown in REMOTE CONTROL ID mode will only operate one specific monitor within the group (see Figure 1). Using the remote in white on the display when your remote control is shown in ID mode. TO SET REMOTE CONTROL ID While holding down for 2 seconds. Point the remote control towards the remote sensor of the desired monitor and press the REMOTE ID SET button. The MONITOR ID number...
... simultaneously control all displays in red. If the REMOTE CONTROLID is shown in REMOTE CONTROL ID mode will only operate one specific monitor within the group (see Figure 1). Using the remote in white on the display when your remote control is shown in ID mode. TO SET REMOTE CONTROL ID While holding down for 2 seconds. Point the remote control towards the remote sensor of the desired monitor and press the REMOTE ID SET button. The MONITOR ID number...
Users Manual
Page 48
... setup and installation by the Digital Display Working Group (DDWG) for optimal color representation and backward compatibility with TÜV-GS and/or UL1678 standard in a tiling environment. As a DVI-based digital only connection, only a simple adapter is protected with HDCP and might not be displayed due to the decision/intention of video data sent over multiple screens with a uniform color profile. OSD (On-Screen-Display) Controls...
... setup and installation by the Digital Display Working Group (DDWG) for optimal color representation and backward compatibility with TÜV-GS and/or UL1678 standard in a tiling environment. As a DVI-based digital only connection, only a simple adapter is protected with HDCP and might not be displayed due to the decision/intention of video data sent over multiple screens with a uniform color profile. OSD (On-Screen-Display) Controls...
Users Manual
Page 49
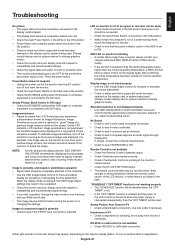
... Picture, Black Screen in DVI input • Check the DVI MODE setting when DVD player or computer equipment is interrupted unexpectedly, then the "OFF TIMER" will be reset. Image persistence • Please be aware that a supported mode has been selected on the display card or system being used . (Please consult display card or system manual to change graphics mode.) Selected resolution is not displayed properly • Use OSD Display Mode to enter Information menu...
... Picture, Black Screen in DVI input • Check the DVI MODE setting when DVD player or computer equipment is interrupted unexpectedly, then the "OFF TIMER" will be reset. Image persistence • Please be aware that a supported mode has been selected on the display card or system being used . (Please consult display card or system manual to change graphics mode.) Selected resolution is not displayed properly • Use OSD Display Mode to enter Information menu...

Users Manual
Page 50
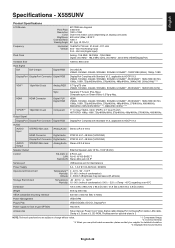
....9 (H) x 3.8 (D) inches Weight 29.5 kg (65.0 lbs) VESA compatible mounting interface 400 mm x 400 mm (M6, 4 Holes) Power Management VESA DPM Plug & Play VESA DDC2Bi, DDC/CI, DisplayPort Power supply for Slot 2 type OPTION 16V/3.6 A Accessories Setup manual, Power Cord, Video Signal cable (DisplayPort to DisplayPort cable), LAN cable, Clamp x 3, Screw x 3, CD-ROM, Thumbscrew for detailed information. *4: Displayed text may decrease with Standard V1.2, applicable to change without notice. *1: Compressed image. *2: Common terminal. *3: When you use option...
....9 (H) x 3.8 (D) inches Weight 29.5 kg (65.0 lbs) VESA compatible mounting interface 400 mm x 400 mm (M6, 4 Holes) Power Management VESA DPM Plug & Play VESA DDC2Bi, DDC/CI, DisplayPort Power supply for Slot 2 type OPTION 16V/3.6 A Accessories Setup manual, Power Cord, Video Signal cable (DisplayPort to DisplayPort cable), LAN cable, Clamp x 3, Screw x 3, CD-ROM, Thumbscrew for detailed information. *4: Displayed text may decrease with Standard V1.2, applicable to change without notice. *1: Compressed image. *2: Common terminal. *3: When you use option...
Users Manual
Page 51
... KHz (16/20/24bit) DisplayPort Connector Digital Audio PCM 32, 44.1, 48 KHz (16/20/24bit) AUDIO Output STEREO Mini Jack Analog Audio Stereo L/R 0.5 Vrms Speaker Output External Speaker Jack 15 W + 15 W (8 ohm) Control RS-232C In: 9 Pin D-sub LAN: RJ-45 10/100 BASE-T Remote IN: Stereo Mini jack 3.5 Service port USB service port for maintenance Power Supply 3.4 - 1.2 A @ 100-240V AC, 50/60Hz Operational Environment Temperature*3: 0 - 40°C / 32 - 104...
... KHz (16/20/24bit) DisplayPort Connector Digital Audio PCM 32, 44.1, 48 KHz (16/20/24bit) AUDIO Output STEREO Mini Jack Analog Audio Stereo L/R 0.5 Vrms Speaker Output External Speaker Jack 15 W + 15 W (8 ohm) Control RS-232C In: 9 Pin D-sub LAN: RJ-45 10/100 BASE-T Remote IN: Stereo Mini jack 3.5 Service port USB service port for maintenance Power Supply 3.4 - 1.2 A @ 100-240V AC, 50/60Hz Operational Environment Temperature*3: 0 - 40°C / 32 - 104...


