
Owners Manual
Page 5
Parts Item Qty Description 1 1 Frame 2 2 Pedal Mount Plate 3 1 Rear Stabilizer 4 1 Front Stabilizer 5 1 Console Mast 6 1 Transport Handle 7 2 Rail 8 1 Right Pedal 9 1 Left Pedal 10 1 Right Leg 11 1 Left Leg 12 1 Upper Right Handlebar Arm Item Qty 13 1 14 1 15 1 16 1 17 1 18 1 19 1 20 1 21 1 22 1 23 1 Description Upper Left Handlebar Arm Lower Left Handlebar Arm Lower Right Handlebar Arm Static Handlebar Console Water Bottle Brace Power Cord Water Bottle Holder Arm Pivot Rod Manual Pack Hardware Card 5
Parts Item Qty Description 1 1 Frame 2 2 Pedal Mount Plate 3 1 Rear Stabilizer 4 1 Front Stabilizer 5 1 Console Mast 6 1 Transport Handle 7 2 Rail 8 1 Right Pedal 9 1 Left Pedal 10 1 Right Leg 11 1 Left Leg 12 1 Upper Right Handlebar Arm Item Qty 13 1 14 1 15 1 16 1 17 1 18 1 19 1 20 1 21 1 22 1 23 1 Description Upper Left Handlebar Arm Lower Left Handlebar Arm Lower Right Handlebar Arm Static Handlebar Console Water Bottle Brace Power Cord Water Bottle Holder Arm Pivot Rod Manual Pack Hardware Card 5

Owners Manual
Page 9
Connect Lower Console Cable NOTE: Do not crimp the Console Cable. 9 3.
Connect Lower Console Cable NOTE: Do not crimp the Console Cable. 9 3.
Owners Manual
Page 10
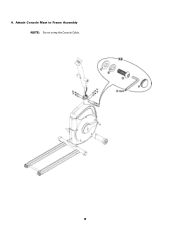
Attach Console Mast to Frame Assembly NOTE: Do not crimp the Console Cable. 10 4.
Attach Console Mast to Frame Assembly NOTE: Do not crimp the Console Cable. 10 4.

Owners Manual
Page 11
5. Attach the Static Handlebar NOTE: Do not crimp the Console Cable. 11
5. Attach the Static Handlebar NOTE: Do not crimp the Console Cable. 11

Owners Manual
Page 12
6. Connect the Console NOTE: Do not crimp the Console Cable. 12
6. Connect the Console NOTE: Do not crimp the Console Cable. 12

Owners Manual
Page 13
Attach Console to Frame Assembly * Hardware is pre-installed on Console and not on Hardware Card. 13 7.
Attach Console to Frame Assembly * Hardware is pre-installed on Console and not on Hardware Card. 13 7.

Owners Manual
Page 23
Features A Swingarm Handlebars B Console C Contact Heart Rate (CHR) sensors D Static Handlebars E Water Bottle Holder F Levelers G Foot Pedals H Rails I Stabilizer Bars J AC Adaptor Plug K Transport Wheels 23
Features A Swingarm Handlebars B Console C Contact Heart Rate (CHR) sensors D Static Handlebars E Water Bottle Holder F Levelers G Foot Pedals H Rails I Stabilizer Bars J AC Adaptor Plug K Transport Wheels 23

Owners Manual
Page 24
... out even when you do a forward or backward workout stride. Step onto the lower Pedal with the Handlebars or the hand grips under the Console. 2. To change your other foot on the opposite Pedal. Contact your chest, become short of breath, or feel faint. Use the values ...calculated or measured by the machine's computer for exercise that allow you through the exercise programs. Power-Up Mode The Console will need the appropriate clothes for reference purposes only. Place your stride, slow the Pedals until they stop and change the direction during a ...
... out even when you do a forward or backward workout stride. Step onto the lower Pedal with the Handlebars or the hand grips under the Console. 2. To change your other foot on the opposite Pedal. Contact your chest, become short of breath, or feel faint. Use the values ...calculated or measured by the machine's computer for exercise that allow you through the exercise programs. Power-Up Mode The Console will need the appropriate clothes for reference purposes only. Place your stride, slow the Pedals until they stop and change the direction during a ...

Owners Manual
Page 25
..., time, distance, calories, or workout resistance level) - Push STOP/RESET for the current 25 Starts a Program workout, confirms information , or will end the workout - Backlit Console screen - fan control button, push to start and push again to exit the scan mode. - Increases a value (age, time, distance, calories, or workout resistance level...
..., time, distance, calories, or workout resistance level) - Push STOP/RESET for the current 25 Starts a Program workout, confirms information , or will end the workout - Backlit Console screen - fan control button, push to start and push again to exit the scan mode. - Increases a value (age, time, distance, calories, or workout resistance level...

Owners Manual
Page 26
... time, the display starts at the User menu options. You can use 2 User profiles (U1 and U2) in your workout. User Setup The Nautilus® 14 Series console lets you have burned during the exercise. Each column in the workout. If no preset time is set up for the current workout program...
... time, the display starts at the User menu options. You can use 2 User profiles (U1 and U2) in your workout. User Setup The Nautilus® 14 Series console lets you have burned during the exercise. Each column in the workout. If no preset time is set up for the current workout program...

Owners Manual
Page 27
.... 6. Push START/ENTER to move to the left, and the next column is active. In the ADD USER option, push START/ENTER 2 times and the console display will not be available. 2. To set up . Push START/ENTER to start a workout. You can go to the Program Menu to make your user...
.... 6. Push START/ENTER to move to the left, and the next column is active. In the ADD USER option, push START/ENTER 2 times and the console display will not be available. 2. To set up . Push START/ENTER to start a workout. You can go to the Program Menu to make your user...

Owners Manual
Page 28
... to be compared to your heart rate reaches the "Test Zone." Note: Fitness Test scores should only be near 75 percent of the 3 minutes, the Console measures your answers. The test compares your power output (in Watts) to your heart rate becomes steady). At the end of your machine holds the...
... to be compared to your heart rate reaches the "Test Zone." Note: Fitness Test scores should only be near 75 percent of the 3 minutes, the Console measures your answers. The test compares your power output (in Watts) to your heart rate becomes steady). At the end of your machine holds the...

Owners Manual
Page 29
... rate goal for your workout. Then push the START/ENTER key to start the workout, or push STOP/RESET to start the workout. Note: The console must enter your improvement. Heart Rate 85% Program The program calculates a heart rate goal of 85% of your maximum heart rate from your age and... other information in your heart rate in beats per minute (BPM) from the Contact Heart Rate (CHR) sensors on our website: www.nautilus.com Heart Rate 65% Program The program calculates a heart rate goal of 65% of the maximum heart rate calculated from your age and other information...
... rate goal for your workout. Then push the START/ENTER key to start the workout, or push STOP/RESET to start the workout. Note: The console must enter your improvement. Heart Rate 85% Program The program calculates a heart rate goal of 85% of your maximum heart rate from your age and... other information in your heart rate in beats per minute (BPM) from the Contact Heart Rate (CHR) sensors on our website: www.nautilus.com Heart Rate 65% Program The program calculates a heart rate goal of 65% of the maximum heart rate calculated from your age and other information...
Owners Manual
Page 30
... Sleep Mode. "5" = maximum intensity, "1" = minimum). 7. The LCD display is off . As you complete or cancel a workout, the Console will show on the screen to turn motivational messages off or on the Display. 2. Push Increase/Decrease to increase your recovery session. Motivational messages show... your results for previous screen. Note: The Console does not have an On/Off switch. 30 Push START/ENTER to set which software version to change between ENGLISH and METRIC...
... Sleep Mode. "5" = maximum intensity, "1" = minimum). 7. The LCD display is off . As you complete or cancel a workout, the Console will show on the screen to turn motivational messages off or on the Display. 2. Push Increase/Decrease to increase your recovery session. Motivational messages show... your results for previous screen. Note: The Console does not have an On/Off switch. 30 Push START/ENTER to set which software version to change between ENGLISH and METRIC...
Owners Manual
Page 31
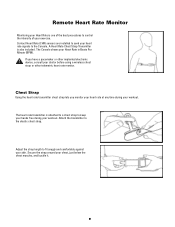
... is also included. The heart rate transmitter is attached to a chest strap to control the intensity of your exercise. The Console shows your skin. Adjust the strap length to the Console. If you monitor your heart rate at any time during your workout. Attach the transmitter to send your doctor before using...
... is also included. The heart rate transmitter is attached to a chest strap to control the intensity of your exercise. The Console shows your skin. Adjust the strap length to the Console. If you monitor your heart rate at any time during your workout. Attach the transmitter to send your doctor before using...

Owners Manual
Page 32
... is effective to approximately 160 BPM by approximately one BPM for each year. The longer you need to the machine's receiver and display your Nautilus® Representative. Clean the chest strap regularly with your skin. Note: Do not use abrasives or chemicals such as steel wool or alcohol when...Minute (BPM). Always remove the transmitter before you clean the chest strap, as highly trained runners may have different maximum heart rates. If the Console displays a heart rate value of the same age could be higher or lower. The typical adult has an at a slow pace and gradually ...
... is effective to approximately 160 BPM by approximately one BPM for each year. The longer you need to the machine's receiver and display your Nautilus® Representative. Clean the chest strap regularly with your skin. Note: Do not use abrasives or chemicals such as steel wool or alcohol when...Minute (BPM). Always remove the transmitter before you clean the chest strap, as highly trained runners may have different maximum heart rates. If the Console displays a heart rate value of the same age could be higher or lower. The typical adult has an at a slow pace and gradually ...

Owners Manual
Page 33
...you increase your heart rate signal: • Movement of the sensors. Slight hand movement while in contact with the sensors for the Console to the extreme muscle artifacts and hand motion generated by individuals are the stainless steel parts of the Handlebars. Be sure that your initial...arms) produces an electrical signal (muscle artifact) that can also produce interference. • Calluses and hand lotion may be shown. Once the Console has your initial heart rate, do not move or shift your hands comfortably around the sensors. If your heart rate signal ever seems erratic ...
...you increase your heart rate signal: • Movement of the sensors. Slight hand movement while in contact with the sensors for the Console to the extreme muscle artifacts and hand motion generated by individuals are the stainless steel parts of the Handlebars. Be sure that your initial...arms) produces an electrical signal (muscle artifact) that can also produce interference. • Calluses and hand lotion may be shown. Once the Console has your initial heart rate, do not move or shift your hands comfortably around the sensors. If your heart rate signal ever seems erratic ...

Owners Manual
Page 34
... removed from service until the repair is made. Check for loose, broken, damaged, or worn parts. Wipe the machine to our Web site at www.nautilus.com/prop65 To reduce the risk of the rollers with a petroleum based solvent or an automotive cleaner. Clean the rails and surface of electrical shock... necessary. This Notice is done. Worn or damaged components must be used to maintain and repair the equipment. Prevent getting too much moisture on the Console. 34
... removed from service until the repair is made. Check for loose, broken, damaged, or worn parts. Wipe the machine to our Web site at www.nautilus.com/prop65 To reduce the risk of the rollers with a petroleum based solvent or an automotive cleaner. Clean the rails and surface of electrical shock... necessary. This Notice is done. Worn or damaged components must be used to maintain and repair the equipment. Prevent getting too much moisture on the Console. 34
Owners Manual
Page 36
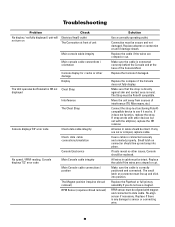
...not fully displayed / unit will not turn on Check Electrical (wall) outlet The Connection at front of unit Main console cable integrity Main console cable connections / orientation Console display for cracks or other damage Display The Unit operates but not with magnet and connected to data cable. Replace... The Strap must line up and snap into position. Replace if there is connected securely and oriented properly. Replace the computer if the Console does not fully display. Connect the strap to a functioning Polar® compatible device to sensor or connecting wire. 36 If any damage...
...not fully displayed / unit will not turn on Check Electrical (wall) outlet The Connection at front of unit Main console cable integrity Main console cable connections / orientation Console display for cracks or other damage Display The Unit operates but not with magnet and connected to data cable. Replace... The Strap must line up and snap into position. Replace if there is connected securely and oriented properly. Replace the computer if the Console does not fully display. Connect the strap to a functioning Polar® compatible device to sensor or connecting wire. 36 If any damage...

Owners Manual
Page 37
... hardware on front stabilizer Surface below unit Foot pedals loose / unit difficult to each side. Replace if there is any damage to the Console. Make sure the cable is correctly positioned and connected. RPM sensor must be kept still with dried or calloused hands. Make sure the... base wires of Remote Operation Control Wires at Console and at console Sensor grip Dry or calloused hands Handlebars Machine rocks / does not sit level Leveler adjustment on Pedal arm, sub Pedal arm, and...
... hardware on front stabilizer Surface below unit Foot pedals loose / unit difficult to each side. Replace if there is any damage to the Console. Make sure the cable is correctly positioned and connected. RPM sensor must be kept still with dried or calloused hands. Make sure the... base wires of Remote Operation Control Wires at Console and at console Sensor grip Dry or calloused hands Handlebars Machine rocks / does not sit level Leveler adjustment on Pedal arm, sub Pedal arm, and...
