
Owners Manual
Page 2
... 74" x 130" (190 cm x 330 cm). Use caution to loosen, unless instructed otherwise. 4. Nautilus, Inc. (www.nautilus.com) trademarks include NAUTILUS®, BOWFLEX®, STAIRMASTER®, SCHWINN® and UNIVERSAL® and respective logos. Follow these basic ... "Important Safety Instructions" before assembly. 2. Assembly 3 Operations 24 Specifications 4 Remote Heart Rate Monitor 31 Tools 4 Maintenance 34 Parts 5 Level the Machine 35 Hardware 6 Moving the Machine 35 Assembly 7 Troubleshooting 36 Important Safety Instructions - Para obtener este manual...
... 74" x 130" (190 cm x 330 cm). Use caution to loosen, unless instructed otherwise. 4. Nautilus, Inc. (www.nautilus.com) trademarks include NAUTILUS®, BOWFLEX®, STAIRMASTER®, SCHWINN® and UNIVERSAL® and respective logos. Follow these basic ... "Important Safety Instructions" before assembly. 2. Assembly 3 Operations 24 Specifications 4 Remote Heart Rate Monitor 31 Tools 4 Maintenance 34 Parts 5 Level the Machine 35 Hardware 6 Moving the Machine 35 Assembly 7 Troubleshooting 36 Important Safety Instructions - Para obtener este manual...

Owners Manual
Page 3
... means a potentially hazardous situation which, if not avoided, could compromise the safety and can void the warranty. • If replacement parts are assembling at all times. • Do not connect power supply to the machine until the machine has been fully assembled and inspected...can lead to change the design or functionality of this machine before first use only genuine Nautilus® replacement parts and hardware. Use a second person when doing the assembly steps involving these parts. Obey the following warnings: Read and understand all assembly steps in death or serious injury...
... means a potentially hazardous situation which, if not avoided, could compromise the safety and can void the warranty. • If replacement parts are assembling at all times. • Do not connect power supply to the machine until the machine has been fully assembled and inspected...can lead to change the design or functionality of this machine before first use only genuine Nautilus® replacement parts and hardware. Use a second person when doing the assembly steps involving these parts. Obey the following warnings: Read and understand all assembly steps in death or serious injury...

Owners Manual
Page 5
Parts Item Qty Description 1 1 Frame 2 2 Pedal Mount Plate 3 1 Rear Stabilizer 4 1 Front Stabilizer 5 1 Console Mast 6 1 Transport Handle 7 2 Rail 8 1 Right Pedal 9 1 Left Pedal 10 1 Right Leg 11 1 Left Leg 12 1 Upper Right Handlebar Arm Item Qty 13 1 14 1 15 1 16 1 17 1 18 1 19 1 20 1 21 1 22 1 23 1 Description Upper Left Handlebar Arm Lower Left Handlebar Arm Lower Right Handlebar Arm Static Handlebar Console Water Bottle Brace Power Cord Water Bottle Holder Arm Pivot Rod Manual Pack Hardware Card 5
Parts Item Qty Description 1 1 Frame 2 2 Pedal Mount Plate 3 1 Rear Stabilizer 4 1 Front Stabilizer 5 1 Console Mast 6 1 Transport Handle 7 2 Rail 8 1 Right Pedal 9 1 Left Pedal 10 1 Right Leg 11 1 Left Leg 12 1 Upper Right Handlebar Arm Item Qty 13 1 14 1 15 1 16 1 17 1 18 1 19 1 20 1 21 1 22 1 23 1 Description Upper Left Handlebar Arm Lower Left Handlebar Arm Lower Right Handlebar Arm Static Handlebar Console Water Bottle Brace Power Cord Water Bottle Holder Arm Pivot Rod Manual Pack Hardware Card 5
Owners Manual
Page 8
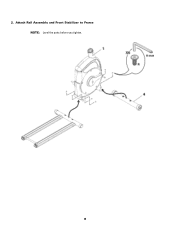
2. Attach Rail Assembly and Front Stabilizer to Frame NOTE: Level the parts before you tighten. 8
2. Attach Rail Assembly and Front Stabilizer to Frame NOTE: Level the parts before you tighten. 8

Owners Manual
Page 20
...or tightness in this weight. • This machine is the recommended safe distance for loose parts or signs of the machine clear. Contact your chest, become loose, unreadable or dislodged, contact Nautilus® Customer Service for future reference. Use the values calculated or measured by the machine... out of the machine can be let on them. This machine contains moving parts. • Set up and operate this equipment, obey the following warnings: Read and understand the complete Owner's Manual. Contact Nautilus® Customer Service for home use only. • Do not wear loose...
...or tightness in this weight. • This machine is the recommended safe distance for loose parts or signs of the machine clear. Contact your chest, become loose, unreadable or dislodged, contact Nautilus® Customer Service for future reference. Use the values calculated or measured by the machine... out of the machine can be let on them. This machine contains moving parts. • Set up and operate this equipment, obey the following warnings: Read and understand the complete Owner's Manual. Contact Nautilus® Customer Service for home use only. • Do not wear loose...

Owners Manual
Page 33
.... CHR detection may act as an insulating layer to reduce the signal strength. • Some Electrocardiogram (EKG) signals generated by individuals are the stainless steel parts of the sensors. Hold firm, but not too tight or loose. After the Console detects four stable pulse signals, your hands comfortably around the sensors...
.... CHR detection may act as an insulating layer to reduce the signal strength. • Some Electrocardiogram (EKG) signals generated by individuals are the stainless steel parts of the sensors. Hold firm, but not too tight or loose. After the Console detects four stable pulse signals, your hands comfortably around the sensors...

Owners Manual
Page 34
... made. Do not use , inspect for smooth roller operation. Check for loose, broken, damaged, or worn parts. Tighten if necessary. If you would like additional information, please refer to our Web site at www.nautilus.com/prop65 To reduce the risk of these conditions exist. Prevent getting too much moisture on the...
... made. Do not use , inspect for smooth roller operation. Check for loose, broken, damaged, or worn parts. Tighten if necessary. If you would like additional information, please refer to our Web site at www.nautilus.com/prop65 To reduce the risk of these conditions exist. Prevent getting too much moisture on the...