NF-501 Manual - English
Page 3
...screen. WARNING: Please power off before cleaning. The screen of the Digital Photo Frame is a risk of fire or electric shock, do not expose the unit to the card/USB and the unit. Failure to do so may moisten the cleaning cloth with water before inserting or removing a card or USB device. Cleaning the Screen ● Treat the screen... block the ventilation holes on the screen, we recommend using a soft, non-abrasive cloth such as a camera lens cloth to rain or moisture. 1 Do not use only ● To avoid risk of electric shock and there are no user-serviceable parts inside.
...screen. WARNING: Please power off before cleaning. The screen of the Digital Photo Frame is a risk of fire or electric shock, do not expose the unit to the card/USB and the unit. Failure to do so may moisten the cleaning cloth with water before inserting or removing a card or USB device. Cleaning the Screen ● Treat the screen... block the ventilation holes on the screen, we recommend using a soft, non-abrasive cloth such as a camera lens cloth to rain or moisture. 1 Do not use only ● To avoid risk of electric shock and there are no user-serviceable parts inside.

NF-501 Manual - English
Page 4
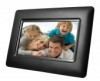
...display modes: slideshow, preview, rotate function. 8. Adjustable brightness, contrast, saturation 10. OSD languages: English, Spanish, German, and Italian Packaging Check List: 1. 7 inch digital photo frame 2. AC/DC adapter 4. Auto Slideshow when a Memory Card is designed to view photos from cards & memory 11. Copy files to use your digital camera, mobile phone, or a memory storage card quickly and easily. Bracket 1 piece 1 piece 1 piece 1 piece 2 Please read this User Manual carefully to learn the correct way to memory and delete files from your new Digital Photo Frame. USB...
...display modes: slideshow, preview, rotate function. 8. Adjustable brightness, contrast, saturation 10. OSD languages: English, Spanish, German, and Italian Packaging Check List: 1. 7 inch digital photo frame 2. AC/DC adapter 4. Auto Slideshow when a Memory Card is designed to view photos from cards & memory 11. Copy files to use your digital camera, mobile phone, or a memory storage card quickly and easily. Bracket 1 piece 1 piece 1 piece 1 piece 2 Please read this User Manual carefully to learn the correct way to memory and delete files from your new Digital Photo Frame. USB...
NF-501 Manual - English
Page 5
Calendar 7 6. Technical Specifications 7 8. CONTENTS 1. Operating Instruction 5 3.1 Card and USB 5 3.2 Picture Mode 5 3.3 Copy & Delete function 6 4. Setup 7 7. Getting Started 4 3. File 6 5. Troubleshooting Guide 8 3 Product Diagram 4 1.1 Left Side of Frame 4 1.2 Rear of Frame 4 2.
Calendar 7 6. Technical Specifications 7 8. CONTENTS 1. Operating Instruction 5 3.1 Card and USB 5 3.2 Picture Mode 5 3.3 Copy & Delete function 6 4. Setup 7 7. Getting Started 4 3. File 6 5. Troubleshooting Guide 8 3 Product Diagram 4 1.1 Left Side of Frame 4 1.2 Rear of Frame 4 2.
NF-501 Manual - English
Page 6
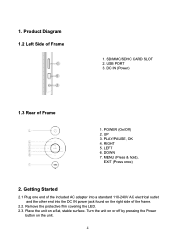
... (Power) 1.3 Rear of the frame. 2.2. MENU (Press & hold), EXIT (Press once) 2. POWER (On/Off) 2. Remove the protective film covering the LED. 2.3. RIGHT 5. DOWN 7. Place the unit on the unit. 4 1. Turn the unit on or off by pressing the Power button on a flat, stable surface. USB PORT 3. PLAY/PAUSE, OK 4. SD/MMC/SDHC CARD SLOT 2. Getting Started 2.1 Plug one end of the included AC adapter...
... (Power) 1.3 Rear of the frame. 2.2. MENU (Press & hold), EXIT (Press once) 2. POWER (On/Off) 2. Remove the protective film covering the LED. 2.3. RIGHT 5. DOWN 7. Place the unit on the unit. 4 1. Turn the unit on or off by pressing the Power button on a flat, stable surface. USB PORT 3. PLAY/PAUSE, OK 4. SD/MMC/SDHC CARD SLOT 2. Getting Started 2.1 Plug one end of the included AC adapter...

NF-501 Manual - English
Page 7
... the Card Selection interface. 3.1 Card and USB The frame supports SD/MMC/SDHC cards and USB memory sticks. Press PLAY to the Main Menu after 3-5 seconds. Operating Instruction After turning on the frame, it will show the startup screen, and then automatically go to SETUP, and then choose SLIDE MODE (single-, four-, or triple-windows). Change the slide mode as follows: press MENU to go to start automatically. Note: Make sure there are supported photo files...
... the Card Selection interface. 3.1 Card and USB The frame supports SD/MMC/SDHC cards and USB memory sticks. Press PLAY to the Main Menu after 3-5 seconds. Operating Instruction After turning on the frame, it will show the startup screen, and then automatically go to SETUP, and then choose SLIDE MODE (single-, four-, or triple-windows). Change the slide mode as follows: press MENU to go to start automatically. Note: Make sure there are supported photo files...
NF-501 Manual - English
Page 8
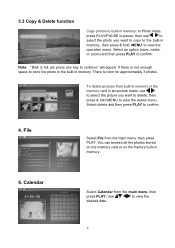
... & hold MENU to view the operation menu. There is not enough space to view the desired date. 6 To delete pictures from built-in memory or the memory card in memory, then press & hold MENU to view the delete menu. You can browse all the photos stored on the memory card or on the frame's built-in memory. Use to store the photo in the built-in memory. 5. File Select File from the main menu, then press PLAY. Calendar Select Calendar from...
... & hold MENU to view the operation menu. There is not enough space to view the desired date. 6 To delete pictures from built-in memory or the memory card in memory, then press & hold MENU to view the delete menu. You can browse all the photos stored on the memory card or on the frame's built-in memory. Use to store the photo in the built-in memory. 5. File Select File from the main menu, then press PLAY. Calendar Select Calendar from...
NF-501 Manual - English
Page 9
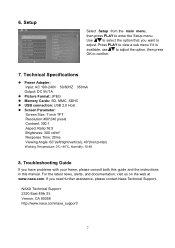
... that you have problems with your frame, please consult both this guide and the instructions in this manual. NAXA Technical Support 2320 East 49th St. Vernon, CA 90058 http://www.naxa.com/naxa_support/ 7 Technical Specifications Power Adapter: Input: AC 100-240V 50/60HZ 350mA Output: DC 5V/1A Picture Format: JPEG Memory Cards: SD, MMC, SDHC USB connection: USB 2.0 Host Screen Parameter: Screen Size: 7 inch TFT Resolution...
... that you have problems with your frame, please consult both this guide and the instructions in this manual. NAXA Technical Support 2320 East 49th St. Vernon, CA 90058 http://www.naxa.com/naxa_support/ 7 Technical Specifications Power Adapter: Input: AC 100-240V 50/60HZ 350mA Output: DC 5V/1A Picture Format: JPEG Memory Cards: SD, MMC, SDHC USB connection: USB 2.0 Host Screen Parameter: Screen Size: 7 inch TFT Resolution...
NF-501 Manual - English
Page 10
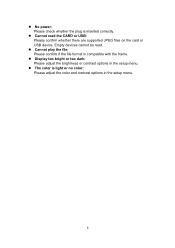
Empty devices cannot be read. Cannot play the file: Please confirm if the file format is compatible with the frame. Display too bright or too dark: Please adjust the brightness or contrast options in the setup menu. The color is inserted correctly. Cannot read the CARD or USB: Please confirm whether there are supported JPEG files on the card or USB device. No power: Please check whether the plug is light or no color: Please adjust the color and contrast options in the setup menu. 8
Empty devices cannot be read. Cannot play the file: Please confirm if the file format is compatible with the frame. Display too bright or too dark: Please adjust the brightness or contrast options in the setup menu. The color is inserted correctly. Cannot read the CARD or USB: Please confirm whether there are supported JPEG files on the card or USB device. No power: Please check whether the plug is light or no color: Please adjust the color and contrast options in the setup menu. 8
