
English and Spanish Manual
Page 1
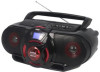
17240-CD009BT P/N.:227-009BTBN17-012L9 SIZE:120X175MM 70G 40 20 , THENEWGENERATIONINTECHNOLOGY Instruction Manual PORTABLE BLUETOOTH/MP3/CD/USB PLAYER WITH PLL AM/FM STEREO RADIO CASSETTE RECORDER MODEL: NPB-273 IMPORTANT: Please read before using and keep for future reference.
17240-CD009BT P/N.:227-009BTBN17-012L9 SIZE:120X175MM 70G 40 20 , THENEWGENERATIONINTECHNOLOGY Instruction Manual PORTABLE BLUETOOTH/MP3/CD/USB PLAYER WITH PLL AM/FM STEREO RADIO CASSETTE RECORDER MODEL: NPB-273 IMPORTANT: Please read before using and keep for future reference.
English and Spanish Manual
Page 2
... the instructions in this manual carefully and save it comes to the minute news, alerts, and documentation for reference. If they cannot help you, please contact our Naxa Support team atwww.naxa.com/naxa_support. • NPB-273 Portable CD/MP3/Radio/Cassette/Bluetooth Player • AC power cord • Remote Control • User's Manual Support If... to offer! In the Box Please take a moment to make every effort to get immediate assistance. Vernon, CA 90058 Toll Free: (866) 411-6292 http://www.naxa.com/supportcenter/ 2 thank you have problems with your device. We trust...
... the instructions in this manual carefully and save it comes to the minute news, alerts, and documentation for reference. If they cannot help you, please contact our Naxa Support team atwww.naxa.com/naxa_support. • NPB-273 Portable CD/MP3/Radio/Cassette/Bluetooth Player • AC power cord • Remote Control • User's Manual Support If... to offer! In the Box Please take a moment to make every effort to get immediate assistance. Vernon, CA 90058 Toll Free: (866) 411-6292 http://www.naxa.com/supportcenter/ 2 thank you have problems with your device. We trust...

English and Spanish Manual
Page 3
... the Box...2 Warnings and Precautions 4 Important Safety Information 5 LOCATION AND CONTROLS 9 FEATURES AND CONTROLS 10 LOADING THE BATTERIES INTO THE REMOTE HANDSET 10 REMOTE CONTROL OPERATION 11 POWER SOURCE 11 AC/DC OPERATION 11 BASIC FUNCTIONS 11 Turning on the unit 11 Volume adjusting 11 Bass Boost System 12 AUX in Operation 12 USING THE RADIO 12 Tuning Radio Stations 12 Radio Station Memory Operation 12 USING THE CASSETTE 13 Playing the Cassette 13 CD/MP3/USB Recording 15 USING THE CD/MP3 15 Discs for Playback...
... the Box...2 Warnings and Precautions 4 Important Safety Information 5 LOCATION AND CONTROLS 9 FEATURES AND CONTROLS 10 LOADING THE BATTERIES INTO THE REMOTE HANDSET 10 REMOTE CONTROL OPERATION 11 POWER SOURCE 11 AC/DC OPERATION 11 BASIC FUNCTIONS 11 Turning on the unit 11 Volume adjusting 11 Bass Boost System 12 AUX in Operation 12 USING THE RADIO 12 Tuning Radio Stations 12 Radio Station Memory Operation 12 USING THE CASSETTE 13 Playing the Cassette 13 CD/MP3/USB Recording 15 USING THE CD/MP3 15 Discs for Playback...
English and Spanish Manual
Page 4
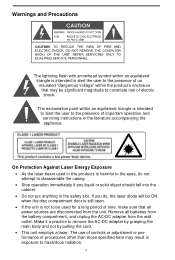
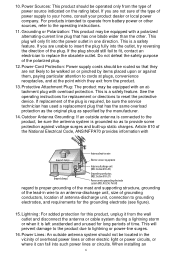
... be ON when the disc compartment door is still open. • If the unit is intended to alert the user to the presence of time, make sure that may result in the literature accompanying the appliance. On Protection Against Laser Energy Exposure • As the laser beam used for a long period of important operation and servicing instructions in exposure to hazardous...
... be ON when the disc compartment door is still open. • If the unit is intended to alert the user to the presence of time, make sure that may result in the literature accompanying the appliance. On Protection Against Laser Energy Exposure • As the laser beam used for a long period of important operation and servicing instructions in exposure to hazardous...
English and Spanish Manual
Page 5
...; Invisible laser radiation when open and interlock has failed or been defeated. These openings should use liquid cleaners or aerosol cleaners. This product should not be placed in a built-in the operating instructions should be blocked by the manufacturer or sold with care. Heed Warnings: All warnings on the product and in installation such as lighted candles) on...
...; Invisible laser radiation when open and interlock has failed or been defeated. These openings should use liquid cleaners or aerosol cleaners. This product should not be placed in a built-in the operating instructions should be blocked by the manufacturer or sold with care. Heed Warnings: All warnings on the product and in installation such as lighted candles) on...
English and Spanish Manual
Page 6
... feature. Lightning: For added protection for long periods of power source indicated on or pinched by the manufacturer. 14. Article 810 of antenna-discharge unit, connection to grounding electrodes, and requirements for replacement or directions to operate from the type of time. For products intended to reset the protective device. Power-Cord Protection: Power supply cords should be equipped with a polarized alternating-current line plug that...
... feature. Lightning: For added protection for long periods of power source indicated on or pinched by the manufacturer. 14. Article 810 of antenna-discharge unit, connection to grounding electrodes, and requirements for replacement or directions to operate from the type of time. For products intended to reset the protective device. Power-Cord Protection: Power supply cords should be equipped with a polarized alternating-current line plug that...

English and Spanish Manual
Page 7
... such power lines or circuits, as contact with Part 15 of the FCC Rules. Object and Liquid Entry: Never push objects of any way; Never spill liquid of any service or repairs to this can radiate radio frequency energy and, if not installed and used replacement parts specified by following two conditions: (1) this device may cause undesired operation. Adjust only those controls that...
... such power lines or circuits, as contact with Part 15 of the FCC Rules. Object and Liquid Entry: Never push objects of any way; Never spill liquid of any service or repairs to this can radiate radio frequency energy and, if not installed and used replacement parts specified by following two conditions: (1) this device may cause undesired operation. Adjust only those controls that...
English and Spanish Manual
Page 8
... to operate the equipment. CAUTION ON MODIFICATIONS Any changes or modifications not expressly approved by the grantee of this equipment does cause harmful interference to radio or television reception, which can be determined by turning the equipment off and on, the user is encouraged to try to correct the interference by the FCC to radio communications. instructions...
... to operate the equipment. CAUTION ON MODIFICATIONS Any changes or modifications not expressly approved by the grantee of this equipment does cause harmful interference to radio or television reception, which can be determined by turning the equipment off and on, the user is encouraged to try to correct the interference by the FCC to radio communications. instructions...

English and Spanish Manual
Page 9
LOCATION AND CONTROLS 9
LOCATION AND CONTROLS 9

English and Spanish Manual
Page 10
.../FUNCTION BUTTON 4. BUTTON 5. CASSETTE FUNCTION KEYS (RECORD-PLAY-REWIND -FAST FORWARD -STOP/EJECT -PAUSE) 17. AC SOCKET 22. PROG. LCD DISPLAY 7. AUX IN JACK 24. M+ / M- KEY 4. STOP KEY 9. Forward/Backward) Key 11. FUNCTION KEY 16. AC VOLTAGE SELECTOR (optional for dual voltage) 20. FOLD.+/+10 KEY 5. BATTERY DOOR 10 CASSETTE COMPARTMENT 18. SPEAKERS(L&R) 16. FM TELESCOPIC ANTENNA 19. TUN./SKIP(Search - REMOTE SENSOR 17. BUTTON 10.BASS BUTTON 11.CD DOOR PUSH OPEN...
.../FUNCTION BUTTON 4. BUTTON 5. CASSETTE FUNCTION KEYS (RECORD-PLAY-REWIND -FAST FORWARD -STOP/EJECT -PAUSE) 17. AC SOCKET 22. PROG. LCD DISPLAY 7. AUX IN JACK 24. M+ / M- KEY 4. STOP KEY 9. Forward/Backward) Key 11. FUNCTION KEY 16. AC VOLTAGE SELECTOR (optional for dual voltage) 20. FOLD.+/+10 KEY 5. BATTERY DOOR 10 CASSETTE COMPARTMENT 18. SPEAKERS(L&R) 16. FM TELESCOPIC ANTENNA 19. TUN./SKIP(Search - REMOTE SENSOR 17. BUTTON 10.BASS BUTTON 11.CD DOOR PUSH OPEN...

English and Spanish Manual
Page 11
... being used for a long time. Bright sunlight or room light conditions can interfere with the remote control, point the remote handset at the remote sensor on the front panel and press the appropriate button on remote control to your local voltage. Install 8 pcs UM-1/D size batteries (not included) into AC jack on remote control to turn off the sound. DC Operation Open the BATTERY COMPARTMENT DOOR. REMOTE CONTROL OPERATION To operate the unit with the remote control. Volume adjusting...
... being used for a long time. Bright sunlight or room light conditions can interfere with the remote control, point the remote handset at the remote sensor on the front panel and press the appropriate button on remote control to your local voltage. Install 8 pcs UM-1/D size batteries (not included) into AC jack on remote control to turn off the sound. DC Operation Open the BATTERY COMPARTMENT DOOR. REMOTE CONTROL OPERATION To operate the unit with the remote control. Volume adjusting...
English and Spanish Manual
Page 12
... every time. 1. Bass sound is on remote control to start playback. Press PLAY of sound. USING THE RADIO Tuning Radio Stations 1. Radio Station Memory Operation You may pre-store 30 (AM and FM) radio stations in an open location. The button can be pushed to the AUDIO OUT jack of the unit. Press the STANDBY/FUNCTION button on unit or FUNCTION key on remote control to choose the other functions or press STANDBY button to FM stereo station, press MO/ST. MP3 player) to...
... every time. 1. Bass sound is on remote control to start playback. Press PLAY of sound. USING THE RADIO Tuning Radio Stations 1. Radio Station Memory Operation You may pre-store 30 (AM and FM) radio stations in an open location. The button can be pushed to the AUDIO OUT jack of the unit. Press the STANDBY/FUNCTION button on unit or FUNCTION key on remote control to choose the other functions or press STANDBY button to FM stereo station, press MO/ST. MP3 player) to...

English and Spanish Manual
Page 13
... remote control to TAP. 2. Playing a Cassette Tape 1. Close the door securely. 5. Press REWIND or F.FWD to move tape to begin playing the tape. 7. Press PLAY button to the desired starting point. 6. F.FWD - USING THE CASSETTE Understanding the Buttons RECORD - STOP/EJ. - Press the M+ or M- Press to enter. 4. Press to stop mode, press to make proper recording on remote control again to record from the radio or CD/MP3/USB/AUX/BT player. May be programmed...
... remote control to TAP. 2. Playing a Cassette Tape 1. Close the door securely. 5. Press REWIND or F.FWD to move tape to begin playing the tape. 7. Press PLAY button to the desired starting point. 6. F.FWD - USING THE CASSETTE Understanding the Buttons RECORD - STOP/EJ. - Press the M+ or M- Press to enter. 4. Press to stop mode, press to make proper recording on remote control again to record from the radio or CD/MP3/USB/AUX/BT player. May be programmed...

English and Spanish Manual
Page 14
... stances should you recorded, follow instructions in PLAYING A CASSETTE TAPE. 14 Recording from being operated. Load a blank tape into view. Press the STANDBY/FUNCTION button on unit or the FUNCTION key on remote to lubricate any time you attempt to bright head and pinch roller into the tape compartment and close the door. 2. Press RECORD key to required station by pressing the PLAY button to record and find it...
... stances should you recorded, follow instructions in PLAYING A CASSETTE TAPE. 14 Recording from being operated. Load a blank tape into view. Press the STANDBY/FUNCTION button on unit or the FUNCTION key on remote to lubricate any time you attempt to bright head and pinch roller into the tape compartment and close the door. 2. Press RECORD key to required station by pressing the PLAY button to record and find it...
English and Spanish Manual
Page 15
... playback starts from track 1 automatically when reading the disc. 2. Radio Recording Tips To temporarily pause the recording, press PAUSE key on the display. 3. B. Press the STANDBY/FUNCTION button on unit or the FUNCTION key on the cassette deck instead of tracks and the disc type will appear on remote to open CD compartment lid, grasp the CD by pressing the CD PLAY/PAUSE/PAIR button. If no . NOTE: PAUSE FOR A MOMENT - Using...
... playback starts from track 1 automatically when reading the disc. 2. Radio Recording Tips To temporarily pause the recording, press PAUSE key on the display. 3. B. Press the STANDBY/FUNCTION button on unit or the FUNCTION key on the cassette deck instead of tracks and the disc type will appear on remote to open CD compartment lid, grasp the CD by pressing the CD PLAY/PAUSE/PAIR button. If no . NOTE: PAUSE FOR A MOMENT - Using...

English and Spanish Manual
Page 16
... on remote, the total number of disc are programmed. 5. Press the NEXT/TUN.+ button on unit or the TUN./SKIP SEARCH FORWARD on the remote control each time to store other desired tracks until all tracks are possible when playback is stopped. Repeat steps 2 & 3 to skip forward or backward 10 tracks, then press the NEXT/TUN.+ or BACK/TUN.- To stop mode or during playback...
... on remote, the total number of disc are programmed. 5. Press the NEXT/TUN.+ button on unit or the TUN./SKIP SEARCH FORWARD on the remote control each time to store other desired tracks until all tracks are possible when playback is stopped. Repeat steps 2 & 3 to skip forward or backward 10 tracks, then press the NEXT/TUN.+ or BACK/TUN.- To stop mode or during playback...

English and Spanish Manual
Page 17
... USB PLAYBACK 1. To Erase the Memory (Program) To clear the program, you press the STOP button. 2. To cancel repeat play will be played over and over and then stop playing. repeat folder - To repeat all )/program play " " shows steadily on remote control once in play mode till the "RAND" shows steadily on the display, the random play , press the P-MODE key on the display, the current directory will show the total number of...
... USB PLAYBACK 1. To Erase the Memory (Program) To clear the program, you press the STOP button. 2. To cancel repeat play will be played over and over and then stop playing. repeat folder - To repeat all )/program play " " shows steadily on remote control once in play mode till the "RAND" shows steadily on the display, the random play , press the P-MODE key on the display, the current directory will show the total number of...
English and Spanish Manual
Page 18
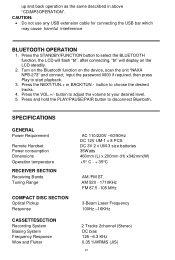
... harmful interference BLUETOOTH OPERATION 1. button to adjust the volume to select the BLUETOOTH function, the LCD will flash "bt", after connecting, "bt" will display on the device, scan the unit "NAXA NPB-273" and connect, input the password 0000 if required, then press Play to disconnect Bluetooth. AM 520 - 1710KHz FM 87.5 -108 MHz 3-Beam Laser Frequency 100Hz -16KHz 2 Tracks 2channel (Stereo) DC bias...
... harmful interference BLUETOOTH OPERATION 1. button to adjust the volume to select the BLUETOOTH function, the LCD will flash "bt", after connecting, "bt" will display on the device, scan the unit "NAXA NPB-273" and connect, input the password 0000 if required, then press Play to disconnect Bluetooth. AM 520 - 1710KHz FM 87.5 -108 MHz 3-Beam Laser Frequency 100Hz -16KHz 2 Tracks 2channel (Stereo) DC bias...
English and Spanish Manual
Page 19
AUDIOSECTION Power output Woofer Power output ACCESSORIES Instruction Booklet Remote Sensor AC Cord Max. 5 Wattsx2 Max. 10Watts 1 1 1 Note: Product is improved continuously. We reserve the right to modify the product and specifications without prior notice. 19
AUDIOSECTION Power output Woofer Power output ACCESSORIES Instruction Booklet Remote Sensor AC Cord Max. 5 Wattsx2 Max. 10Watts 1 1 1 Note: Product is improved continuously. We reserve the right to modify the product and specifications without prior notice. 19


