English and Spanish Manual
Page 1
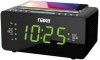
1.2" DUAL ALARM CLOCK DIGITAL FM RADIO with Wireless charging Technology NRC-191 Instruction Manual Please read carefully before use and keep for future reference.
1.2" DUAL ALARM CLOCK DIGITAL FM RADIO with Wireless charging Technology NRC-191 Instruction Manual Please read carefully before use and keep for future reference.

English and Spanish Manual
Page 2
... prong are provided for replacement of 7. MOISTURE. - Heed all instructions. 5. Protect the power cord from being walked on or pinched particularly at plugs, convenience receptacles, and the point where they exit from the apparatus. Do not use this apparatus near any ventilation...other apparatus (including am- Install in the literature accompanying the appliance. shock to alert the user 6. Do not install near water. Do not defeat the safety purpose of impo-r tant operating and maintenance (servicing) instru-c 9. WARNING: This product contains lead, a chemical known...
... prong are provided for replacement of 7. MOISTURE. - Heed all instructions. 5. Protect the power cord from being walked on or pinched particularly at plugs, convenience receptacles, and the point where they exit from the apparatus. Do not use this apparatus near any ventilation...other apparatus (including am- Install in the literature accompanying the appliance. shock to alert the user 6. Do not install near water. Do not defeat the safety purpose of impo-r tant operating and maintenance (servicing) instru-c 9. WARNING: This product contains lead, a chemical known...
English and Spanish Manual
Page 3
... acco-r When a cart is used in a residential - This equipment generates, uses and can be determined by turning the equipment o and on a circuit di e-r ent from tip-over. CAUTION ON MODIFICATIONS cept any way, such as power-supply cord or plug is no guarantee to Part 15 ufacturer. 11. - Use only with the limits for a Class B digital device, pursuant to avoid...
... acco-r When a cart is used in a residential - This equipment generates, uses and can be determined by turning the equipment o and on a circuit di e-r ent from tip-over. CAUTION ON MODIFICATIONS cept any way, such as power-supply cord or plug is no guarantee to Part 15 ufacturer. 11. - Use only with the limits for a Class B digital device, pursuant to avoid...
English and Spanish Manual
Page 4
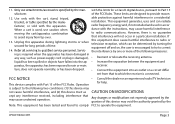
... adjust radio stations. (-) 4. OFF/ POWER Press to power on the display. (Mid, Low, High) 3. At a Glance 1. Clock/MEM Press and Hold to set Time. In FM/AUX Mode, press to set snooze time. (10-90 mins) 6. HOUR/SKIP- Speakers Dual Speakers 11. DC 5V Power Jack Power Adapter port Page 4 Naxa Electronics Press and Hold to temporarily shut o alarm for Alarm/Clock 8. DIM Press to select dimmer level on /o (standby) Press to toggle between FM/AUX inputs. Snooze/Sleep Press to Auto-Scan stations...
... adjust radio stations. (-) 4. OFF/ POWER Press to power on the display. (Mid, Low, High) 3. At a Glance 1. Clock/MEM Press and Hold to set Time. In FM/AUX Mode, press to set snooze time. (10-90 mins) 6. HOUR/SKIP- Speakers Dual Speakers 11. DC 5V Power Jack Power Adapter port Page 4 Naxa Electronics Press and Hold to temporarily shut o alarm for Alarm/Clock 8. DIM Press to select dimmer level on /o (standby) Press to toggle between FM/AUX inputs. Snooze/Sleep Press to Auto-Scan stations...

English and Spanish Manual
Page 5
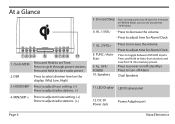
AUX IN Jack 3.5 mm stereo mini jack to charge wirelessly www.naxa.com Page 5 Qi (Wireless Location where to place mobile Charging) Area phone to connect external media player/mobile phone 16. At a Glance 13. USB Charge USB Charge port to connect to Port mobile phone (charging only) 15. FM Antenna Antenna Wire for time/alarm backup 14. Battery Door Battery door cover for 2 (AAA) batteries for FM Radio Wire 17.
AUX IN Jack 3.5 mm stereo mini jack to charge wirelessly www.naxa.com Page 5 Qi (Wireless Location where to place mobile Charging) Area phone to connect external media player/mobile phone 16. At a Glance 13. USB Charge USB Charge port to connect to Port mobile phone (charging only) 15. FM Antenna Antenna Wire for time/alarm backup 14. Battery Door Battery door cover for 2 (AAA) batteries for FM Radio Wire 17.
English and Spanish Manual
Page 6
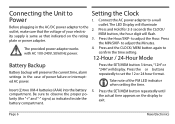
...-Hour Mode Battery Backup Battery backup will preserve the current time, alarm settings in the AC/DC power adapter to adjust the Hour. Press the or buttons repeatedly to observe the proper po- Be sure to set the 12 or 24 hour format. ity supply is same as indicated inside the exit. to Setting the Clock Power 1. Connecting the Unit to adjust the Minutes. the actual time appears on the rating plate or power adapter. 3. The LED Display...
...-Hour Mode Battery Backup Battery backup will preserve the current time, alarm settings in the AC/DC power adapter to adjust the Hour. Press the or buttons repeatedly to observe the proper po- Be sure to set the 12 or 24 hour format. ity supply is same as indicated inside the exit. to Setting the Clock Power 1. Connecting the Unit to adjust the Minutes. the actual time appears on the rating plate or power adapter. 3. The LED Display...

English and Spanish Manual
Page 7
... AL.2/ VOL+ button as the Alarm time will ash. button as the Alarm time will ash. 2. the alarm setting. 4. After alarm has been set , press the AL.1/ 4. Alarm 2 Settings: With the unit in the chart below . button to toggle between alarm settings to Buzz, Radio, or OFF as illustrated in Clock mode: 1. button to toggle between alarm settings to AL. 2 AL. 2 indicator will remove from display Wake up Mode: Buzz Radio OFF Display or Indicators "BUZZ...
... AL.2/ VOL+ button as the Alarm time will ash. button as the Alarm time will ash. 2. the alarm setting. 4. After alarm has been set , press the AL.1/ 4. Alarm 2 Settings: With the unit in the chart below . button to toggle between alarm settings to Buzz, Radio, or OFF as illustrated in Clock mode: 1. button to toggle between alarm settings to AL. 2 AL. 2 indicator will remove from display Wake up Mode: Buzz Radio OFF Display or Indicators "BUZZ...

English and Spanish Manual
Page 8
... radio station number will display on the screen. (87.5 - 108) Press and hold the SNOOZE/SLEEP button until the sleep timer appears on the display to set the brightness level of the display. (Middle, Low, High). OFF/POWER button to display the remaining time and press the AL. To turn the alarm OFF. Press the SNOOZE/SLEEP button repeatedly to activate the sleep function. How to Set the SLEEP TIMER In Radio or AUX playback mode, press and hold the FUNC/Auto...
... radio station number will display on the screen. (87.5 - 108) Press and hold the SNOOZE/SLEEP button until the sleep timer appears on the display to set the brightness level of the display. (Middle, Low, High). OFF/POWER button to display the remaining time and press the AL. To turn the alarm OFF. Press the SNOOZE/SLEEP button repeatedly to activate the sleep function. How to Set the SLEEP TIMER In Radio or AUX playback mode, press and hold the FUNC/Auto...

English and Spanish Manual
Page 9
... the CLOCK/MEM then HOUR/SKIP- / MIN/ 2. remove the mobile device from the unit. buttons to select which preset number you want to con rm and store. 4. Once completed with your mobile device should begin charging. 3. Press the CLOCK/MEM button to store the selected radio station. (P1 - The Qi inidicator light will display as illustrated below. www.naxa.com Page 9 While in Radio Mode, press...
... the CLOCK/MEM then HOUR/SKIP- / MIN/ 2. remove the mobile device from the unit. buttons to select which preset number you want to con rm and store. 4. Once completed with your mobile device should begin charging. 3. Press the CLOCK/MEM button to store the selected radio station. (P1 - The Qi inidicator light will display as illustrated below. www.naxa.com Page 9 While in Radio Mode, press...

English and Spanish Manual
Page 10
... MODE 1. Adjust the volume on the Radio. 2. AUX will be displayed on the unit to change without prior notice. When charging has completed, please remove the mobile device from QI Wireless Charge Port DC---5V, 1000 mA (Max) Accessories 1 x Owner's Manual 1 x AC/DC Adapter (Input: AC 100~240V, 50/60 Hz, 0.5A Output: DC---5V, 2000 mA) Speci cations are subject to your MP3 player...
... MODE 1. Adjust the volume on the Radio. 2. AUX will be displayed on the unit to change without prior notice. When charging has completed, please remove the mobile device from QI Wireless Charge Port DC---5V, 1000 mA (Max) Accessories 1 x Owner's Manual 1 x AC/DC Adapter (Input: AC 100~240V, 50/60 Hz, 0.5A Output: DC---5V, 2000 mA) Speci cations are subject to your MP3 player...

English and Spanish Manual
Page 11
Vernon, CA 90058 866-411-6292 http://www.naxa.com/naxa_support/ www.naxa.com Page 11 Support If you have problems with your device. NAXA Technical Support 2320 East 49th St. For additional assistance, please contact Naxa Technical Support. Please also visit us on the web at www.naxa.com to get the latest news, alerts, and documentation for your device, please review the instructions in this manual.
Vernon, CA 90058 866-411-6292 http://www.naxa.com/naxa_support/ www.naxa.com Page 11 Support If you have problems with your device. NAXA Technical Support 2320 East 49th St. For additional assistance, please contact Naxa Technical Support. Please also visit us on the web at www.naxa.com to get the latest news, alerts, and documentation for your device, please review the instructions in this manual.


