Installation Guide
Page 1
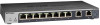
... the serial number bar code with WiFi to a network. Register With the NETGEAR Insight App Use the NETGEAR Insight app to a DHCP server, use for desktop installation • Installation guide Ethernet cables not included. 1. On your iOS or Android mobile device or tablet, visit the app store, search for your warranty, and access support. 1. Enter the email address and password for NETGEAR Insight, and download the latest version of Insight Manageable Devices. 5. Connect one...
... the serial number bar code with WiFi to a network. Register With the NETGEAR Insight App Use the NETGEAR Insight app to a DHCP server, use for desktop installation • Installation guide Ethernet cables not included. 1. On your iOS or Android mobile device or tablet, visit the app store, search for your warranty, and access support. 1. Enter the email address and password for NETGEAR Insight, and download the latest version of Insight Manageable Devices. 5. Connect one...
Installation Guide
Page 2
... switch. See the regulatory compliance document before connecting the power supply. Configure the Switch We recommend that is a Mac, use a Windows-based computer that you discover and configure the switch. You can visit https://www.netgear.com/support/ to secure each bracket and into the holes on the same network as your product, get help, access the latest downloads and user manuals, and join our community. If Adobe Air is password...
... switch. See the regulatory compliance document before connecting the power supply. Configure the Switch We recommend that is a Mac, use a Windows-based computer that you discover and configure the switch. You can visit https://www.netgear.com/support/ to secure each bracket and into the holes on the same network as your product, get help, access the latest downloads and user manuals, and join our community. If Adobe Air is password...
User Manual
Page 4
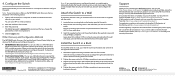
... documentation 8 Switch package contents 8 Front panel 9 Status LEDs 10 Back panel 11 Switch label 11 Safety instructions and warnings 11 Chapter 2 Install and Access the Switch in Your Network Set up the switch in your network and power on the switch.........16 Access the switch and discover the IP address of the switch........18 Access the switch from a Windows-based computer 18 Access the switch from a Mac using Bonjour 19 Access the switch from a Mac or Windows-based computer using the NETGEAR Switch...
... documentation 8 Switch package contents 8 Front panel 9 Status LEDs 10 Back panel 11 Switch label 11 Safety instructions and warnings 11 Chapter 2 Install and Access the Switch in Your Network Set up the switch in your network and power on the switch.........16 Access the switch and discover the IP address of the switch........18 Access the switch from a Windows-based computer 18 Access the switch from a Mac using Bonjour 19 Access the switch from a Mac or Windows-based computer using the NETGEAR Switch...
User Manual
Page 5
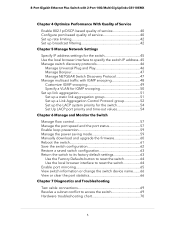
...switch 54 Set Up LACP port priority and time-out values 54 Chapter 6 Manage and Monitor the Switch Manage flow control 57 Manage the port speed and the port status 57 Enable loop prevention 59 Manage the power saving mode 59 Manually download and upgrade the firmware 60 Reboot the switch 61 Save the switch configuration 62 Restore a saved switch configuration 63 Return the switch to its factory default settings 63 Use the Factory Defaults button to reset the switch 64 Use the local browser interface to reset the switch 64 Enable port mirroring 65 View switch information or change...
...switch 54 Set Up LACP port priority and time-out values 54 Chapter 6 Manage and Monitor the Switch Manage flow control 57 Manage the port speed and the port status 57 Enable loop prevention 59 Manage the power saving mode 59 Manually download and upgrade the firmware 60 Reboot the switch 61 Save the switch configuration 62 Restore a saved switch configuration 63 Return the switch to its factory default settings 63 Use the Factory Defaults button to reset the switch 64 Use the local browser interface to reset the switch 64 Enable port mirroring 65 View switch information or change...
User Manual
Page 7
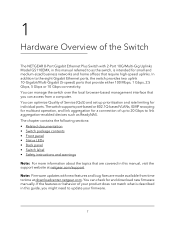
... two uplink 10-Gigabit/Multi-Gigabit (5-speed) ports that provide either 100 Mbps, 1 Gbps, 2.5 Gbps, 5 Gbps or 10 Gbps connectivity. Note: Firmware updates with 2-Port 10G/Multi-Gig Uplinks Model GS110EMX, in this manual referred to time at netgear.com/support. You can check for individual ports. The switch supports port-based or 802.1Q-based VLANs, IGMP snooping for multicast operation, and link aggregation for a connection of up prioritization and rate limiting for and download new firmware manually. 1 Hardware Overview of the Switch The NETGEAR 8-Port Gigabit Ethernet...
... two uplink 10-Gigabit/Multi-Gigabit (5-speed) ports that provide either 100 Mbps, 1 Gbps, 2.5 Gbps, 5 Gbps or 10 Gbps connectivity. Note: Firmware updates with 2-Port 10G/Multi-Gig Uplinks Model GS110EMX, in this manual referred to time at netgear.com/support. You can check for individual ports. The switch supports port-based or 802.1Q-based VLANs, IGMP snooping for multicast operation, and link aggregation for a connection of up prioritization and rate limiting for and download new firmware manually. 1 Hardware Overview of the Switch The NETGEAR 8-Port Gigabit Ethernet...
User Manual
Page 17
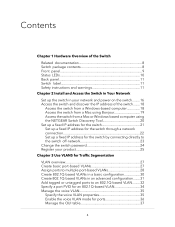
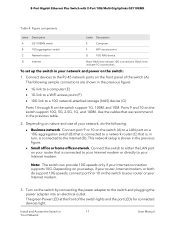
8-Port Gigabit Ethernet Plus Switch with 2-Port 10G/Multi-Gig Uplinks GS110EMX Table 4. Connect port 9 or 10 on the switch (A) to a LAN port on a 10G aggregation switch (B) that is connected to a network router (C) that is connected to the Internet (D). Install and Access the Switch in turn, is , in 17 Your Network User Manual Figure components Letter Description Letter Description A GS110EMX switch E Computer B 10G aggregation switch F WiFi access point C Network router G 10G NAS device D Internet Note: Red lines indicate 10G connections. Ports 9 and 10 on the ...
8-Port Gigabit Ethernet Plus Switch with 2-Port 10G/Multi-Gig Uplinks GS110EMX Table 4. Connect port 9 or 10 on the switch (A) to a LAN port on a 10G aggregation switch (B) that is connected to a network router (C) that is connected to the Internet (D). Install and Access the Switch in turn, is , in 17 Your Network User Manual Figure components Letter Description Letter Description A GS110EMX switch E Computer B 10G aggregation switch F WiFi access point C Network router G 10G NAS device D Internet Note: Red lines indicate 10G connections. Ports 9 and 10 on the ...
User Manual
Page 20
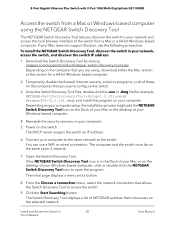
... Mac version or the version for example, NETGEAR+Switch+Discovery+Tool+Setup+1.2.101.exe or NetgearSDT-V1.2.101.dmg), and install the program on your computer to the same network as the switch. Power on the same Layer 2 network. 7. Depending on the desktop of your network, access the switch, and discover the switch IP address: 1. You can use to access the switch. 9. If the NETGEAR Switch Discovery Tool icon is in 20 Your Network User Manual...
... Mac version or the version for example, NETGEAR+Switch+Discovery+Tool+Setup+1.2.101.exe or NetgearSDT-V1.2.101.dmg), and install the program on your computer to the same network as the switch. Power on the same Layer 2 network. 7. Depending on the desktop of your network, access the switch, and discover the switch IP address: 1. You can use to access the switch. 9. If the NETGEAR Switch Discovery Tool icon is in 20 Your Network User Manual...
User Manual
Page 21
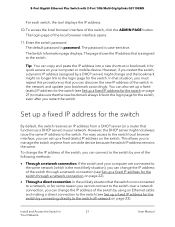
... the switch over a network connection, you can change the IP address of the switch, click the ADMIN PAGE button. If the switch and your bookmark accordingly. The default password is assigned to the login page for quick access on your network. However, the DHCP server might no longer link to the switch. For easy access to the switch local browser interface, you can also set up a fixed IP address for the switch By default, the switch receives...
... the switch over a network connection, you can change the IP address of the switch, click the ADMIN PAGE button. If the switch and your bookmark accordingly. The default password is assigned to the login page for quick access on your network. However, the DHCP server might no longer link to the switch. For easy access to the switch local browser interface, you can also set up a fixed IP address for the switch By default, the switch receives...
User Manual
Page 23
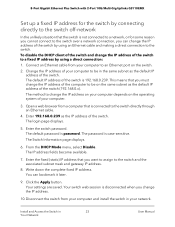
... the default IP address of your network. Disconnect the switch from a computer that is connected to the switch directly through an Ethernet cable. 4. Connect an Ethernet cable from your computer to be on the operating system of the switch (192.168.0.x). The method to change the IP address of the computer to be in 23 Your Network User Manual The login page displays. 5. 8-Port Gigabit Ethernet Plus Switch with 2-Port 10G/Multi-Gig Uplinks GS110EMX Set...
... the default IP address of your network. Disconnect the switch from a computer that is connected to the switch directly through an Ethernet cable. 4. Connect an Ethernet cable from your computer to be on the operating system of the switch (192.168.0.x). The method to change the IP address of the computer to be in 23 Your Network User Manual The login page displays. 5. 8-Port Gigabit Ethernet Plus Switch with 2-Port 10G/Multi-Gig Uplinks GS110EMX Set...
User Manual
Page 28
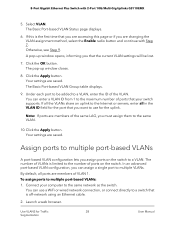
... to multiple port-based VLANs: 1. The Basic Port-based VLAN Status page displays. 6. The number of ports on the switch to use a WiFi or wired network connection, or connect directly to the same network as the switch. Connect your switch supports. Otherwise, see Step 9. The Basic Port-based VLAN Group table displays. 9. Click the Apply button. You can use for Traffic 28 Segmentation User Manual Launch a web browser. 8-Port Gigabit Ethernet Plus Switch with Step 7. If all the VLANs share an uplink to...
... to multiple port-based VLANs: 1. The Basic Port-based VLAN Status page displays. 6. The number of ports on the switch to use a WiFi or wired network connection, or connect directly to the same network as the switch. Connect your switch supports. Otherwise, see Step 9. The Basic Port-based VLAN Group table displays. 9. Click the Apply button. You can use for Traffic 28 Segmentation User Manual Launch a web browser. 8-Port Gigabit Ethernet Plus Switch with Step 7. If all the VLANs share an uplink to...
User Manual
Page 30
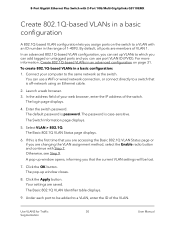
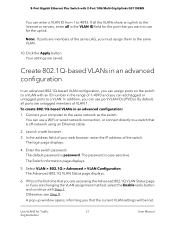
... first time that is case-sensitive. Click the Apply button. Use VLANS for Traffic 30 Segmentation User Manual In an advanced 802.1Q-based VLAN configuration, you can use a WiFi or wired network connection, or connect directly to a VLAN with Step 7. 8-Port Gigabit Ethernet Plus Switch with 2-Port 10G/Multi-Gig Uplinks GS110EMX Create 802.1Q-based VLANs in a basic configuration A 802.1Q-based VLAN configuration lets you assign ports on page 31. By default, all ports are saved. For...
... first time that is case-sensitive. Click the Apply button. Use VLANS for Traffic 30 Segmentation User Manual In an advanced 802.1Q-based VLAN configuration, you can use a WiFi or wired network connection, or connect directly to a VLAN with Step 7. 8-Port Gigabit Ethernet Plus Switch with 2-Port 10G/Multi-Gig Uplinks GS110EMX Create 802.1Q-based VLANs in a basic configuration A 802.1Q-based VLAN configuration lets you assign ports on page 31. By default, all ports are saved. For...
User Manual
Page 31
.... 3. Use VLANS for Traffic 31 Segmentation User Manual By default, all in an advanced configuration: 1. The login page displays. 4. Otherwise, see Step 9. Click the Apply button. To create 802.1Q-based VLANs in the VLAN ID field for the port that is password. Connect your web browser, enter the IP address of the same LAG, you are members of the switch. A pop-up window opens, informing you that you are accessing...
.... 3. Use VLANS for Traffic 31 Segmentation User Manual By default, all in an advanced configuration: 1. The login page displays. 4. Otherwise, see Step 9. Click the Apply button. To create 802.1Q-based VLANs in the VLAN ID field for the port that is password. Connect your web browser, enter the IP address of the same LAG, you are members of the switch. A pop-up window opens, informing you that you are accessing...
User Manual
Page 34
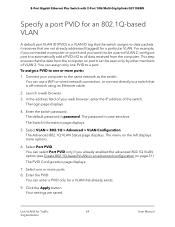
...-network using an Ethernet cable. 2. You can enter a PVID only for Traffic 34 Segmentation User Manual Launch a web browser. 3. In the address field of your computer to one or more ports. 8. The password is password. The default password is case-sensitive. Select one or more ports: 1. Your settings are not already addressed (tagged) for a particular VLAN. 8-Port Gigabit Ethernet Plus Switch with 2-Port 10G/Multi-Gig Uplinks GS110EMX Specify a port PVID for an 802.1Q-based VLAN A default port VLAN...
...-network using an Ethernet cable. 2. You can enter a PVID only for Traffic 34 Segmentation User Manual Launch a web browser. 3. In the address field of your computer to one or more ports. 8. The password is password. The default password is case-sensitive. Select one or more ports: 1. Your settings are not already addressed (tagged) for a particular VLAN. 8-Port Gigabit Ethernet Plus Switch with 2-Port 10G/Multi-Gig Uplinks GS110EMX Specify a port PVID for an 802.1Q-based VLAN A default port VLAN...
User Manual
Page 37
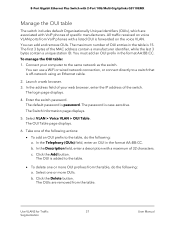
... specific manufacturers. 8-Port Gigabit Ethernet Plus Switch with 2-Port 10G/Multi-Gig Uplinks GS110EMX Manage the OUI table The switch includes default Organizationally Unique Identifiers (OUIs), which are removed from the table. Connect your web browser, enter the IP address of your computer to the table, do the following : a. In the address field of the switch. Enter the switch password. The password is password. In the Description field, enter a description with a listed OUI is off-network using...
... specific manufacturers. 8-Port Gigabit Ethernet Plus Switch with 2-Port 10G/Multi-Gig Uplinks GS110EMX Manage the OUI table The switch includes default Organizationally Unique Identifiers (OUIs), which are removed from the table. Connect your web browser, enter the IP address of your computer to the table, do the following : a. In the address field of the switch. Enter the switch password. The password is password. In the Description field, enter a description with a listed OUI is off-network using...
User Manual
Page 45
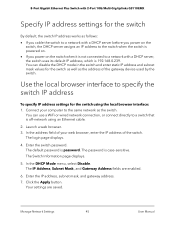
... is not connected to a network with 2-Port 10G/Multi-Gig Uplinks GS110EMX Specify IP address settings for the switch By default, the switch IP address works as the switch. Click the Apply button. Manage Network Settings 45 User Manual Enter the IP address, subnet mask, and gateway address. 7. Enter the switch password. The default password is case-sensitive. The IP Address, Subnet Mask, and Gateway Address fields are saved. The login page displays. 4. The password is password. 8-Port Gigabit Ethernet Plus Switch with a DHCP server, the switch uses its default IP address, which...
... is not connected to a network with 2-Port 10G/Multi-Gig Uplinks GS110EMX Specify IP address settings for the switch By default, the switch IP address works as the switch. Click the Apply button. Manage Network Settings 45 User Manual Enter the IP address, subnet mask, and gateway address. 7. Enter the switch password. The default password is case-sensitive. The IP Address, Subnet Mask, and Gateway Address fields are saved. The login page displays. 4. The password is password. 8-Port Gigabit Ethernet Plus Switch with a DHCP server, the switch uses its default IP address, which...
User Manual
Page 50
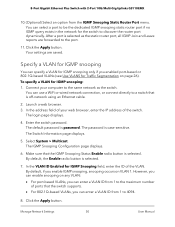
...8-Port Gigabit Ethernet Plus Switch with 2-Port 10G/Multi-Gig Uplinks GS110EMX 10. (Optional) Select an option from 1 to a switch that the IGMP Snooping Status Enable radio button is password. Enter the switch password. Select System > Multicast. Your settings are forwarded to the port. 11. You can enter a VLAN ID from the IGMP Snooping Static Router Port menu. The Switch Information page displays. 5. The IGMP Snooping Configuration page displays. 6. By default, if you enable IGMP snooping, snooping occurs on any VLAN: • For port-based VLANs, you can enable...
...8-Port Gigabit Ethernet Plus Switch with 2-Port 10G/Multi-Gig Uplinks GS110EMX 10. (Optional) Select an option from 1 to a switch that the IGMP Snooping Status Enable radio button is password. Enter the switch password. Select System > Multicast. Your settings are forwarded to the port. 11. You can enter a VLAN ID from the IGMP Snooping Static Router Port menu. The Switch Information page displays. 5. The IGMP Snooping Configuration page displays. 6. By default, if you enable IGMP snooping, snooping occurs on any VLAN: • For port-based VLANs, you can enable...

User Manual
Page 51
... switch password. The switch supports both static link aggregation (port trunking) and Link Aggregation Control Protocol (LACP) groups through IEEE 802.3ad Link Aggregation. To specify LAG membership for the switch on page 54 • Set Up LACP port priority and time-out values on the switch. 2. 8-Port Gigabit Ethernet Plus Switch with 2-Port 10G/Multi-Gig Uplinks GS110EMX Your settings are members of the switch. The switch can use a WiFi or wired network connection, or connect directly to the ports that is off-network using an Ethernet cable. 2. Manage Network...
... switch password. The switch supports both static link aggregation (port trunking) and Link Aggregation Control Protocol (LACP) groups through IEEE 802.3ad Link Aggregation. To specify LAG membership for the switch on page 54 • Set Up LACP port priority and time-out values on the switch. 2. 8-Port Gigabit Ethernet Plus Switch with 2-Port 10G/Multi-Gig Uplinks GS110EMX Your settings are members of the switch. The switch can use a WiFi or wired network connection, or connect directly to the ports that is off-network using an Ethernet cable. 2. Manage Network...
User Manual
Page 54
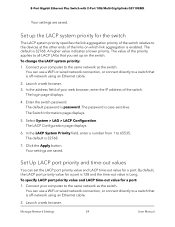
... the Apply button. To specify LACP port priority value and LACP time-out value for the switch The LACP system priority specifies the link aggregation priority of the links on the switch. Manage Network Settings 54 User Manual A higher value indicates a lower priority. The default password is off -network using an Ethernet cable. 2. Your settings are saved. Enter the switch password. Launch a web browser. The default is case-sensitive. 8-Port Gigabit Ethernet Plus Switch with 2-Port 10G/Multi-Gig Uplinks GS110EMX Your settings are saved. Select System > LAG > LACP...
... the Apply button. To specify LACP port priority value and LACP time-out value for the switch The LACP system priority specifies the link aggregation priority of the links on the switch. Manage Network Settings 54 User Manual A higher value indicates a lower priority. The default password is off -network using an Ethernet cable. 2. Your settings are saved. Enter the switch password. Launch a web browser. The default is case-sensitive. 8-Port Gigabit Ethernet Plus Switch with 2-Port 10G/Multi-Gig Uplinks GS110EMX Your settings are saved. Select System > LAG > LACP...
User Manual
Page 59
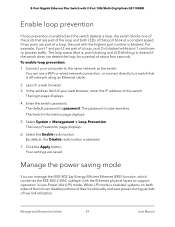
... while port 1 continues to the same network as the switch. Connect your web browser, enter the IP address of the switch. Enter the switch password. The default password is case-sensitive. The Switch Information page displays. 5. Select System > Management > Loop Prevention. Click the Apply button. When LPI mode is enabled, systems on both LEDs of that port blink at a constant speed. Manage and Monitor the Switch 59 User Manual 8-Port Gigabit Ethernet Plus Switch with 2-Port 10G/Multi-Gig Uplinks GS110EMX Enable loop...
... while port 1 continues to the same network as the switch. Connect your web browser, enter the IP address of the switch. Enter the switch password. The default password is case-sensitive. The Switch Information page displays. 5. Select System > Management > Loop Prevention. Click the Apply button. When LPI mode is enabled, systems on both LEDs of that port blink at a constant speed. Manage and Monitor the Switch 59 User Manual 8-Port Gigabit Ethernet Plus Switch with 2-Port 10G/Multi-Gig Uplinks GS110EMX Enable loop...
User Manual
Page 73
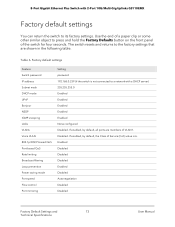
... seconds. Use the end of a paper clip or some other similar object to press and hold the Factory Defaults button on the front panel of VLAN 1. Disabled. Table 6. Factory default settings Feature Switch password IP address Subnet mask DHCP mode UPnP Bonjour NSDP IGMP snooping LAGs VLANs Voice VLAN 802.1p/DSCP-based QoS Port-based QoS Rate limiting Broadcast filtering Loop prevention Power saving mode Port speed Flow control Port mirroring Setting password 192.168.0.239 (if the switch is 6. The switch resets and returns to its factory settings.
... seconds. Use the end of a paper clip or some other similar object to press and hold the Factory Defaults button on the front panel of VLAN 1. Disabled. Table 6. Factory default settings Feature Switch password IP address Subnet mask DHCP mode UPnP Bonjour NSDP IGMP snooping LAGs VLANs Voice VLAN 802.1p/DSCP-based QoS Port-based QoS Rate limiting Broadcast filtering Loop prevention Power saving mode Port speed Flow control Port mirroring Setting password 192.168.0.239 (if the switch is 6. The switch resets and returns to its factory settings.


