GS110T Hardware Installation Guide
Page 1
NETGEAR GS110T Smart Switch Hardware Installation Guide 350 East Plumeria Drive San Jose, CA 95134 USA October 2011 202-10884-01 1.0
NETGEAR GS110T Smart Switch Hardware Installation Guide 350 East Plumeria Drive San Jose, CA 95134 USA October 2011 202-10884-01 1.0

GS110T Hardware Installation Guide
Page 2
NETGEAR GS110T Smart Switch © 2011 NETGEAR, Inc. and/or its subsidiaries in any form or by any liability that may occur due to change without notice. All rights reserved. Technical Support Thank you for more information about the topics covered in this manual, visit the Support website at http://support.netgear....com Phone (US & Canada only): 1-888-NETGEAR Phone (Other Countries): Check the list of phone numbers at http://support.netgear.com/app/answers/detail/a_id/984 Trademarks NETGEAR, the NETGEAR logo, and Connect with ...
NETGEAR GS110T Smart Switch © 2011 NETGEAR, Inc. and/or its subsidiaries in any form or by any liability that may occur due to change without notice. All rights reserved. Technical Support Thank you for more information about the topics covered in this manual, visit the Support website at http://support.netgear....com Phone (US & Canada only): 1-888-NETGEAR Phone (Other Countries): Check the list of phone numbers at http://support.netgear.com/app/answers/detail/a_id/984 Trademarks NETGEAR, the NETGEAR logo, and Connect with ...
GS110T Hardware Installation Guide
Page 3
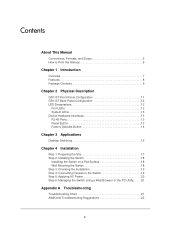
...this Manual 6 Chapter 1 Introduction Overview 7 Features 8 Package Contents 9 Chapter 2 Physical Description GS110T Front-Panel Configuration 11 GS110T Back-Panel Configuration 12 LED Designations 12 Port LEDs 12 System LEDs 13 Device Hardware Interfaces 13... RJ-45 Ports 13 Reset Button 13 Factory Defaults Button 14 Chapter 3 Applications Desktop Switching 15 Chapter 4 Installation Step 1: Preparing the Site 17 Step 2: Installing the Switch 18 Installing the Switch...
...this Manual 6 Chapter 1 Introduction Overview 7 Features 8 Package Contents 9 Chapter 2 Physical Description GS110T Front-Panel Configuration 11 GS110T Back-Panel Configuration 12 LED Designations 12 Port LEDs 12 System LEDs 13 Device Hardware Interfaces 13... RJ-45 Ports 13 Reset Button 13 Factory Defaults Button 14 Chapter 3 Applications Desktop Switching 15 Chapter 4 Installation Step 1: Preparing the Site 17 Step 2: Installing the Switch 18 Installing the Switch...

GS110T Hardware Installation Guide
Page 5
... manual is used to highlight special messages: Note: This format is intended for readers with intermediate computer and Internet skills. About This Manual 0 The NETGEAR® ProSafeTM GS110T Hardware Installation Guide describes how to highlight information of importance or special interest. The information in the following paragraphs: • Typographical Conventions. This manual... manual uses the following formats to highlight a procedure that will save time or resources. Tip: This format is used to install and power on the GS110T Smart Switch.
... manual is used to highlight special messages: Note: This format is intended for readers with intermediate computer and Internet skills. About This Manual 0 The NETGEAR® ProSafeTM GS110T Hardware Installation Guide describes how to highlight information of importance or special interest. The information in the following paragraphs: • Typographical Conventions. This manual... manual uses the following formats to highlight a procedure that will save time or resources. Tip: This format is used to install and power on the GS110T Smart Switch.

GS110T Hardware Installation Guide
Page 6
NETGEAR GS110T Smart Switch DANGER: This is written for the GS110T Smart Switch according to these specifications: Product Version Manual Publication Date GS110T Smart Switch October 2011 Note: Product updates are available on a single sheet of any page in a browser window. - Failure to Print this Manual To print this manual, ... result in personal injury or death. • Scope. How to take heed of the window. Tip: If your printer supports printing two pages on the NETGEAR, Inc. The PDF version of any page. - Click the Complete PDF Manual link at http://kbserver...
NETGEAR GS110T Smart Switch DANGER: This is written for the GS110T Smart Switch according to these specifications: Product Version Manual Publication Date GS110T Smart Switch October 2011 Note: Product updates are available on a single sheet of any page in a browser window. - Failure to Print this Manual To print this manual, ... result in personal injury or death. • Scope. How to take heed of the window. Tip: If your printer supports printing two pages on the NETGEAR, Inc. The PDF version of any page. - Click the Complete PDF Manual link at http://kbserver...

GS110T Hardware Installation Guide
Page 7
... discovery of the network. This chapter serves as a desktop or wall-mountable switch, the GS110T Smart Switch is not intended to the Gigabit Advanced Smart Switch family. This product offers support for the NETGEAR GS110T Smart Switch. The switch's management features include configuration for port and switch information, VLAN for traffic control, port trunking for the observation, configuration, and...
... discovery of the network. This chapter serves as a desktop or wall-mountable switch, the GS110T Smart Switch is not intended to the Gigabit Advanced Smart Switch family. This product offers support for the NETGEAR GS110T Smart Switch. The switch's management features include configuration for port and switch information, VLAN for traffic control, port trunking for the observation, configuration, and...

GS110T Hardware Installation Guide
Page 8
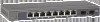
... The following list identifies the key features of the GS110T Smart Switch: • Eight RJ-45 10/100/1000 Mbps autosensing Gigabit Ethernet switching ports. • Two 1000M SFP Gigabit Ethernet switching ports. • Full NETGEAR Smart Switch functionality. • Full compatibility with IEEE standards: ...-duplex IEEE 802.3x pause frame flow control. • Active flow control to build the packet-forwarding information table. NETGEAR GS110T Smart Switch Ethernet, or Gigabit Ethernet devices. The maximum segment length is 328 feet (100 meters) over Category 5 Unshielded Twisted-...
... The following list identifies the key features of the GS110T Smart Switch: • Eight RJ-45 10/100/1000 Mbps autosensing Gigabit Ethernet switching ports. • Two 1000M SFP Gigabit Ethernet switching ports. • Full NETGEAR Smart Switch functionality. • Full compatibility with IEEE standards: ...-duplex IEEE 802.3x pause frame flow control. • Active flow control to build the packet-forwarding information table. NETGEAR GS110T Smart Switch Ethernet, or Gigabit Ethernet devices. The maximum segment length is 328 feet (100 meters) over Category 5 Unshielded Twisted-...
GS110T Hardware Installation Guide
Page 9
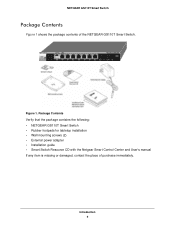
Introduction 9 NETGEAR GS110T Smart Switch Package Contents Figure 1 shows the package contents of purchase immediately. Figure 1. Package Contents Verify that the package contains the following: • NETGEAR GS110T Smart Switch • Rubber footpads for tabletop installation • Wall mounting screws (2) • External power adapter • Installation guide • Smart Switch Resource CD with the Netgear Smart Control Center and User's manual If any item is missing or damaged, contact the place of the NETGEAR GS110T Smart Switch.
Introduction 9 NETGEAR GS110T Smart Switch Package Contents Figure 1 shows the package contents of purchase immediately. Figure 1. Package Contents Verify that the package contains the following: • NETGEAR GS110T Smart Switch • Rubber footpads for tabletop installation • Wall mounting screws (2) • External power adapter • Installation guide • Smart Switch Resource CD with the Netgear Smart Control Center and User's manual If any item is missing or damaged, contact the place of the NETGEAR GS110T Smart Switch.

GS110T Hardware Installation Guide
Page 10
NETGEAR GS110T Smart Switch Introduction 10
NETGEAR GS110T Smart Switch Introduction 10

GS110T Hardware Installation Guide
Page 11
...-Panel Configuration • LED Designations • Device Hardware Interfaces GS110T Front-Panel Configuration The GS110T has eight 10/100/1000 Mbps autosensing and two 1000 Mbps SFP Gigabit Ethernet switching ports. Physical Description 2 This chapter describes the NETGEAR GS110T Smart Switch hardware features. 2. GS110T Front Panel The GS110T front panel contains the following: • Eight RJ-45 connectors...
...-Panel Configuration • LED Designations • Device Hardware Interfaces GS110T Front-Panel Configuration The GS110T has eight 10/100/1000 Mbps autosensing and two 1000 Mbps SFP Gigabit Ethernet switching ports. Physical Description 2 This chapter describes the NETGEAR GS110T Smart Switch hardware features. 2. GS110T Front Panel The GS110T front panel contains the following: • Eight RJ-45 connectors...

GS110T Hardware Installation Guide
Page 12
... Green = A valid link is established on the port. • Flashing Green = Packet transmission or reception is occurring on the port. GS110T Back Panel The back panel contains the following: • External 12V/1A power adapter for each RJ-45 port. There are two LEDs for... the GS110T Power Connector LED Designations Port LEDs Table 1 describes the RJ-45 and SFP port LED designations. Table 1. Figure 3. Each SFP port has its own indication LED. Physical Description 12 NETGEAR GS110T Smart Switch GS110T Back-Panel Configuration Figure 3 illustrates the...
... Green = A valid link is established on the port. • Flashing Green = Packet transmission or reception is occurring on the port. GS110T Back Panel The back panel contains the following: • External 12V/1A power adapter for each RJ-45 port. There are two LEDs for... the GS110T Power Connector LED Designations Port LEDs Table 1 describes the RJ-45 and SFP port LED designations. Table 1. Figure 3. Each SFP port has its own indication LED. Physical Description 12 NETGEAR GS110T Smart Switch GS110T Back-Panel Configuration Figure 3 illustrates the...

GS110T Hardware Installation Guide
Page 13
... ports are autosensing ports. This action is disconnected. Physical Description 13 NETGEAR GS110T Smart Switch System LEDs Table 2 describes the system LED designations. When inserting a cable into the opening to a PC) or an "uplink" connection (such as the switch performs its Power On Self Test (POST). All ports support only... speed (10, 100, or 1000 Mbps) and duplex mode (half-duplex or full-duplex) of the attached device. Reset Button The Smart Switch has a Reset button on the front panel to allow you to powering the unit off and back on. The last saved configuration is a ...
... ports are autosensing ports. This action is disconnected. Physical Description 13 NETGEAR GS110T Smart Switch System LEDs Table 2 describes the system LED designations. When inserting a cable into the opening to a PC) or an "uplink" connection (such as the switch performs its Power On Self Test (POST). All ports support only... speed (10, 100, or 1000 Mbps) and duplex mode (half-duplex or full-duplex) of the attached device. Reset Button The Smart Switch has a Reset button on the front panel to allow you to powering the unit off and back on. The last saved configuration is a ...

GS110T Hardware Installation Guide
Page 14
When you can remove the current configuration and return the device to press the recessed button for two seconds. Physical Description 14 NETGEAR GS110T Smart Switch Factory Defaults Button The Smart Switch has a Factory Defaults button on the front panel so that you enable the Factory Defaults button, all settings including the password, VLAN settings, and port configurations are removed. To operate the Factory Defaults button, insert a device such as a paper clip into the opening to its factory settings.
When you can remove the current configuration and return the device to press the recessed button for two seconds. Physical Description 14 NETGEAR GS110T Smart Switch Factory Defaults Button The Smart Switch has a Factory Defaults button on the front panel so that you enable the Factory Defaults button, all settings including the password, VLAN settings, and port configurations are removed. To operate the Factory Defaults button, insert a device such as a paper clip into the opening to its factory settings.
GS110T Hardware Installation Guide
Page 15
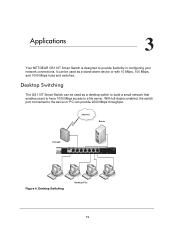
... Mbps access to provide flexibility in configuring your network connections. Internet Server Firewall ` ` ` ` Figure 4. Desktop Switching Desktop PCs 15 Applications 3 Your NETGEAR GS110T Smart Switch is designed to a file server. It can provide 2000 Mbps throughput. Desktop Switching The GS110T Smart Switch can be used as a stand-alone device or with 10 Mbps, 100 Mbps, and 1000...
... Mbps access to provide flexibility in configuring your network connections. Internet Server Firewall ` ` ` ` Figure 4. Desktop Switching Desktop PCs 15 Applications 3 Your NETGEAR GS110T Smart Switch is designed to a file server. It can provide 2000 Mbps throughput. Desktop Switching The GS110T Smart Switch can be used as a stand-alone device or with 10 Mbps, 100 Mbps, and 1000...

GS110T Hardware Installation Guide
Page 16
NETGEAR GS110T Smart Switch Applications 16
NETGEAR GS110T Smart Switch Applications 16

GS110T Hardware Installation Guide
Page 17
You also need the mounting screws supplied with your NETGEAR GS110T Smart Switch. Switch installation involves the following steps: Step 1: Preparing the Site Step 2: Installing the Switch Step 3: Checking the Installation Step 4: Connecting Devices to the front panel RJ-45 ports, view .... Provide a flat table or shelf surface. • Wall-mount installations - Access Locate the switch in a position that allows access to the Switch Step 5: Applying AC Power Step 6: Managing the Switch using a Web Browser or the PC Utility Step 1: Preparing the Site Before you install the...
You also need the mounting screws supplied with your NETGEAR GS110T Smart Switch. Switch installation involves the following steps: Step 1: Preparing the Site Step 2: Installing the Switch Step 3: Checking the Installation Step 4: Connecting Devices to the front panel RJ-45 ports, view .... Provide a flat table or shelf surface. • Wall-mount installations - Access Locate the switch in a position that allows access to the Switch Step 5: Applying AC Power Step 6: Managing the Switch using a Web Browser or the PC Utility Step 1: Preparing the Site Before you install the...

GS110T Hardware Installation Guide
Page 18
... least 6 ft. (1.83 m) away from heat sources such as a photocopy machine. Step 2: Installing the Switch The GS110T Smart Switch can accidentally turn off power to the slots on the bottom side of electromagnetic noise, such as direct sunlight,...adhesive rubber footpads. Keep the switch away from nearest source of the GS110T, then mount the switch. Installation 18 Ensure the AC outlet is installed. • Operating conditions - NETGEAR GS110T Smart Switch Table 3. Install the switch in the room or wiring closet where the switch is not controlled by covering ...
... least 6 ft. (1.83 m) away from heat sources such as a photocopy machine. Step 2: Installing the Switch The GS110T Smart Switch can accidentally turn off power to the slots on the bottom side of electromagnetic noise, such as direct sunlight,...adhesive rubber footpads. Keep the switch away from nearest source of the GS110T, then mount the switch. Installation 18 Ensure the AC outlet is installed. • Operating conditions - NETGEAR GS110T Smart Switch Table 3. Install the switch in the room or wiring closet where the switch is not controlled by covering ...
GS110T Hardware Installation Guide
Page 19
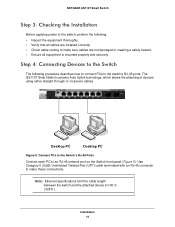
... the attached device to 100 m (328 ft.). Step 4: Connecting Devices to the Switch The following : • Inspect the equipment thoroughly. • Verify that all equipment is mounted properly and securely. NETGEAR GS110T Smart Switch Step 3: Checking the Installation Before applying power to the switch, perform the following procedure describes how to connect PCs to the...
... the attached device to 100 m (328 ft.). Step 4: Connecting Devices to the Switch The following : • Inspect the equipment thoroughly. • Verify that all equipment is mounted properly and securely. NETGEAR GS110T Smart Switch Step 3: Checking the Installation Before applying power to the switch, perform the following procedure describes how to connect PCs to the...

GS110T Hardware Installation Guide
Page 20
...as a wall socket or power strip. When applying power, the Power LED on the Smart Switch Resource CD. If this does not resolve the problem, refer to apply AC power: 1. NETGEAR GS110T Smart Switch Step 5: Applying AC Power Before connecting the power cord, select an AC outlet that the ...power source is good. Connect the AC power adapter cable into a power source such as the performance of the switch. 2. After powering up , there is...
...as a wall socket or power strip. When applying power, the Power LED on the Smart Switch Resource CD. If this does not resolve the problem, refer to apply AC power: 1. NETGEAR GS110T Smart Switch Step 5: Applying AC Power Before connecting the power cord, select an AC outlet that the ...power source is good. Connect the AC power adapter cable into a power source such as the performance of the switch. 2. After powering up , there is...

GS110T Hardware Installation Guide
Page 21
...transfer is slow or performance degradation is off or intermittent. Troubleshooting A This chapter provides information about troubleshooting the NETGEAR Smart Switch. Check the power adapter connection, the ON/OFF switch, and the connected device. Ensure all cables used are functioning. No power is off . Check the crimp... on the switch and the connected device are correct and comply with Ethernet specifications. A. Link LED is received. Make sure the ...
...transfer is slow or performance degradation is off or intermittent. Troubleshooting A This chapter provides information about troubleshooting the NETGEAR Smart Switch. Check the power adapter connection, the ON/OFF switch, and the connected device. Ensure all cables used are functioning. No power is off . Check the crimp... on the switch and the connected device are correct and comply with Ethernet specifications. A. Link LED is received. Make sure the ...

