
GS7xxTS Hardware manual
Page 23
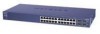
...Hardware Interfaces Front and Back Panel Configuration GS724TS Front and Back Panels The NETGEAR GS724TS Smart Switch is a 24-Port 10/100/1000 + 4-Port SFP Combo port switch, with each RJ45 ports capable of sensing the line speed and...NETGEAR GS724TS Smart Switch front panel: Figure 3-1 The front panel contains the following: • 24 RJ-45 connectors for 10Base-T, 100Base-T and 1000Base-T. • Four SFP slots for SFP modules supporting 1000(1000Base-SX/LX)/100M SFP. • Reset button to restart the device. • Recessed default Reset button to restore the device back to the factory...
...Hardware Interfaces Front and Back Panel Configuration GS724TS Front and Back Panels The NETGEAR GS724TS Smart Switch is a 24-Port 10/100/1000 + 4-Port SFP Combo port switch, with each RJ45 ports capable of sensing the line speed and...NETGEAR GS724TS Smart Switch front panel: Figure 3-1 The front panel contains the following: • 24 RJ-45 connectors for 10Base-T, 100Base-T and 1000Base-T. • Four SFP slots for SFP modules supporting 1000(1000Base-SX/LX)/100M SFP. • Reset button to restart the device. • Recessed default Reset button to restore the device back to the factory...

GS7xxTS Hardware manual
Page 24
...-T and 1000Base-T. • Four Gigabit Interface Converter (SFP) slots for full-duplex stacking linking. Figure 3-3 illustrates the NETGEAR GS748TS Smart Switch front panel: Figure 3-3 The front panel contains the following : • A 100-240VAC/50-60 Hz universal input, which is a 48-Port 10/100/1000 + 4-Port SFP Combo port smart stackable switch, with each RJ45 ports capable of sensing the line...
...-T and 1000Base-T. • Four Gigabit Interface Converter (SFP) slots for full-duplex stacking linking. Figure 3-3 illustrates the NETGEAR GS748TS Smart Switch front panel: Figure 3-3 The front panel contains the following : • A 100-240VAC/50-60 Hz universal input, which is a 48-Port 10/100/1000 + 4-Port SFP Combo port smart stackable switch, with each RJ45 ports capable of sensing the line...

GS7xxTS Hardware manual
Page 35
... 1-3 8-pin 2-9 A AC Power 2-6, 2-7 AGM731F 2-10 AGM732F 2-10 AGM733 2-10 Applying AC Power 4-17 Attaching Switch to a Rack 4-15 Auto Sensing 1-2 Auto Uplink 2-9, 2-10 Auto-negotiating 1-3 Auto-sensing 2-9 B Back-pressure ...Port 2-10 Combo Ports 1-2 Connecting Devices to the Switch 4-16 Copper 1-1 Crossover 2-9 D Default IP Address 4-18 Default Reset Button 2-5, 2-7 Device Hardware Interfaces 2-9 Duplex Mode 2-9 E Example of Desktop Switching 3-12 F Factory Default Button 2-10 Factory Defaults 2-5 Fan LED 2-9 Fiber Connectivity 1-1 Flat Surface 4-14 Full-duplex 1-2 G GBIC 1-2, 2-10 Gigabit Ports...
... 1-3 8-pin 2-9 A AC Power 2-6, 2-7 AGM731F 2-10 AGM732F 2-10 AGM733 2-10 Applying AC Power 4-17 Attaching Switch to a Rack 4-15 Auto Sensing 1-2 Auto Uplink 2-9, 2-10 Auto-negotiating 1-3 Auto-sensing 2-9 B Back-pressure ...Port 2-10 Combo Ports 1-2 Connecting Devices to the Switch 4-16 Copper 1-1 Crossover 2-9 D Default IP Address 4-18 Default Reset Button 2-5, 2-7 Device Hardware Interfaces 2-9 Duplex Mode 2-9 E Example of Desktop Switching 3-12 F Factory Default Button 2-10 Factory Defaults 2-5 Fan LED 2-9 Fiber Connectivity 1-1 Flat Surface 4-14 Full-duplex 1-2 G GBIC 1-2, 2-10 Gigabit Ports...

GS7xxTS User Manual
Page 8
GS700TS Smart Switch Software Administration Manual Port Security ...6-17 Protected Ports ...6-19 ACL ...6-20 MAC ACL ...6-21 MAC Rules ...6-22 MAC Binding Configuration 6-24 IPv4 ACL ...6-25 IPv4 Rules ...6-26 IPv4 Binding Configuration 6-28 IPv6 ACL ...6-29 IPv6 Rules ...6-30 IPv6 Binding Configuration 6-32 Binding Table ...6-33 Chapter 7 Monitoring the Switch Setting Monitoring Options 7-1 Logs ...7-1 Logs Configuration...
GS700TS Smart Switch Software Administration Manual Port Security ...6-17 Protected Ports ...6-19 ACL ...6-20 MAC ACL ...6-21 MAC Rules ...6-22 MAC Binding Configuration 6-24 IPv4 ACL ...6-25 IPv4 Rules ...6-26 IPv4 Binding Configuration 6-28 IPv6 ACL ...6-29 IPv6 Rules ...6-30 IPv6 Binding Configuration 6-32 Binding Table ...6-33 Chapter 7 Monitoring the Switch Setting Monitoring Options 7-1 Logs ...7-1 Logs Configuration...

GS7xxTS User Manual
Page 220
... this chapter describes configuring and managing maintenance options in the GS700TS Smart Switch. There are two options to manage your GS700TS Smart Switch with features under the following options: • "Device Reboot" • "Factory Default" Device Reboot The Device Reboot screen resets the device. Click Maintenance > Reset > Device Reboot. The Device Reboot screen displays: 8-1 V1.0, June 2009...
... this chapter describes configuring and managing maintenance options in the GS700TS Smart Switch. There are two options to manage your GS700TS Smart Switch with features under the following options: • "Device Reboot" • "Factory Default" Device Reboot The Device Reboot screen resets the device. Click Maintenance > Reset > Device Reboot. The Device Reboot screen displays: 8-1 V1.0, June 2009...

GS7xxTS User Manual
Page 221
... a unit number or All as the Reboot Unit Number in erasing the configuration file. The stacking defaults are : - 1, 2, 3, 4, 5, 6 - Click Maintenance > Reset > Factory Default. GS700TS Smart Switch Software Administration Manual Figure 8-1 The Device Reboot screen contains the following fields: • Reboot Unit Number - Select the unit to confirm unit changes. 2. The possible ...
... a unit number or All as the Reboot Unit Number in erasing the configuration file. The stacking defaults are : - 1, 2, 3, 4, 5, 6 - Click Maintenance > Reset > Factory Default. GS700TS Smart Switch Software Administration Manual Figure 8-1 The Device Reboot screen contains the following fields: • Reboot Unit Number - Select the unit to confirm unit changes. 2. The possible ...
GS7xxTS User Manual
Page 222
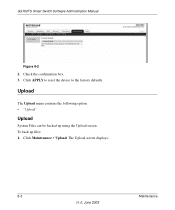
Click APPLY to reset the device to the factory defaults. To back up using the Upload screen. Click Maintenance > Upload. Upload The Upload menu contains the following option: • "Upload" Upload System Files can be backed up files: 1. The Upload screen displays: 8-3 Maintenance v1.0, June 2009 Check the confirmation box. 3. GS700TS Smart Switch Software Administration Manual Figure 8-2 2.
Click APPLY to reset the device to the factory defaults. To back up using the Upload screen. Click Maintenance > Upload. Upload The Upload menu contains the following option: • "Upload" Upload System Files can be backed up files: 1. The Upload screen displays: 8-3 Maintenance v1.0, June 2009 Check the confirmation box. 3. GS700TS Smart Switch Software Administration Manual Figure 8-2 2.

GS7xxTS User Manual
Page 230
...Port Speed Port Duplex Flow Control (half duplex) Flow Control (full duplex) IP Configuration Password VLAN Link Aggregation (Trunk) Traffic Prioritization (QoS) GS700TS Default Setting Auto-negotiation Auto-negotiation Disabled Disabled DHCP enabled password 802.1q based VLAN Disabled Optimized for the NETGEAR Model GS700TS Smart Switch. Table A-1. You can always configure the switch... to default settings by using the Factory Reset function from a Web browser. Chapter A...
...Port Speed Port Duplex Flow Control (half duplex) Flow Control (full duplex) IP Configuration Password VLAN Link Aggregation (Trunk) Traffic Prioritization (QoS) GS700TS Default Setting Auto-negotiation Auto-negotiation Disabled Disabled DHCP enabled password 802.1q based VLAN Disabled Optimized for the NETGEAR Model GS700TS Smart Switch. Table A-1. You can always configure the switch... to default settings by using the Factory Reset function from a Web browser. Chapter A...


