
GS716Tv2/GS724Tv3 Hardware manual
Page 22
... Browser or the PC Utility The NETGEAR Smart Switch contains software for viewing, changing, and monitoring the way it works. Note: When the device powers up the switch for the switch to work. The default IP address is a default IP address already configured on the Smart Switch Resource CD. For more information about managing the switch, see the GS716T/GS724T Series...
... Browser or the PC Utility The NETGEAR Smart Switch contains software for viewing, changing, and monitoring the way it works. Note: When the device powers up the switch for the switch to work. The default IP address is a default IP address already configured on the Smart Switch Resource CD. For more information about managing the switch, see the GS716T/GS724T Series...

GS716Tv2/GS724Tv3 Hardware manual
Page 29
... Installation 4-15 Class of Service 1-1 Combo Port 2-9 Combo Ports 1-2 Connecting Devices to the Switch 4-16 Copper 1-1 Crossover 2-8 D Default IP Address 4-18 Default Reset Button 2-5, 2-6 Device Hardware Interfaces 2-8 Duplex Mode 2-8 E Example of Desktop Switching 3-11 F Factory Default Button 2-9 Factory Defaults 2-5 Fiber Connectivity 1-1 Flat Surface 4-14 Full-duplex 1-2 G GBIC 1-2, 2-9 Gigabit Ports 1-1 H High-speed Servers 1-1 Hz 2-6, 2-7 v1.0, June 2009 Index-27
... Installation 4-15 Class of Service 1-1 Combo Port 2-9 Combo Ports 1-2 Connecting Devices to the Switch 4-16 Copper 1-1 Crossover 2-8 D Default IP Address 4-18 Default Reset Button 2-5, 2-6 Device Hardware Interfaces 2-8 Duplex Mode 2-8 E Example of Desktop Switching 3-11 F Factory Default Button 2-9 Factory Defaults 2-5 Fiber Connectivity 1-1 Flat Surface 4-14 Full-duplex 1-2 G GBIC 1-2, 2-9 Gigabit Ports 1-1 H High-speed Servers 1-1 Hz 2-6, 2-7 v1.0, June 2009 Index-27

GS716Tv2/GS724Tv3 Installation Guide
Page 1
...default to 192.168.0.239 for installing the switch in the network. Next, Connect Your Smart Switch in the Correct Order These instructions assume you are using static IP addressing in your network: 1. If you are using DHCP in your network, configure the switch IP...to the online GS716T/ GS724T Software Administration User's Manual is on the switch. 5. )NSTALLATION'UIDE NETGEAR GS716T/GS724T Smart Switch™ Start Here Follow these connections. First, Verify Package Contents • NETGEAR Smart Switch • Rubber footpads for tabletop installation • Power cord •...
...default to 192.168.0.239 for installing the switch in the network. Next, Connect Your Smart Switch in the Correct Order These instructions assume you are using static IP addressing in your network: 1. If you are using DHCP in your network, configure the switch IP...to the online GS716T/ GS724T Software Administration User's Manual is on the switch. 5. )NSTALLATION'UIDE NETGEAR GS716T/GS724T Smart Switch™ Start Here Follow these connections. First, Verify Package Contents • NETGEAR Smart Switch • Rubber footpads for tabletop installation • Power cord •...

GS716Tv2/GS724Tv3 Installation Guide
Page 2
... Equipment (the WEEE Directive). In most cases, computers should be sure the switch and computer are securely plugged in. Turn off the switch and computer. If your network uses static IP addresses, be treated and recycled in accordance with a securely plugged in Ethernet cable..., locate the serial number on the switch and wait two minutes. Enter the default password of your product, and use our telephone support service. cable connections are multiple switches in your jurisdiction implementing the WEEE Directive. © 2009 by NETGEAR, Inc. If there are secure,...
... Equipment (the WEEE Directive). In most cases, computers should be sure the switch and computer are securely plugged in. Turn off the switch and computer. If your network uses static IP addresses, be treated and recycled in accordance with a securely plugged in Ethernet cable..., locate the serial number on the switch and wait two minutes. Enter the default password of your product, and use our telephone support service. cable connections are multiple switches in your jurisdiction implementing the WEEE Directive. © 2009 by NETGEAR, Inc. If there are secure,...

GS716Tv2/GS724Tv3 Software Admin Manual
Page 12
...and Scope The conventions, formats, and scope of information about a feature or technology. GS716Tv2 and GS724Tv3 Software Administration Manual • Chapter 5, "Managing Device Security" on page 6-1 describes how to view a variety of this manual are described ...switch and its port, and to configure how the switch monitors events. • Chapter 7, "Maintenance" on page 7-1 describes features to help you manage the switch. • Appendix A, "Hardware Specifications and Default Values" on page B-1 contains hardware specifications and default values on the GS716T/GS724T switch...
...and Scope The conventions, formats, and scope of information about a feature or technology. GS716Tv2 and GS724Tv3 Software Administration Manual • Chapter 5, "Managing Device Security" on page 6-1 describes how to view a variety of this manual are described ...switch and its port, and to configure how the switch monitors events. • Chapter 7, "Maintenance" on page 7-1 describes features to help you manage the switch. • Appendix A, "Hardware Specifications and Default Values" on page B-1 contains hardware specifications and default values on the GS716T/GS724T switch...

GS716Tv2/GS724Tv3 Software Admin Manual
Page 17
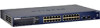
...or BOOTP client on your NETGEAR GS716T/GS724T Gigabit Smart Switch and accessing the user interface. The switch comes up with a default IP address of the switch through the steps to use the SmartWizard Discovery utility. To access the switch over a network, you must connect the switch to the network. It... 2009 This chapter contains the following : • Manually configure network information for the management interface, or • Enable the management interface as the IP address and subnet mask, and the switch is enabled by using a BOOTP or DHCP server. You can do one of starting...
...or BOOTP client on your NETGEAR GS716T/GS724T Gigabit Smart Switch and accessing the user interface. The switch comes up with a default IP address of the switch through the steps to use the SmartWizard Discovery utility. To access the switch over a network, you must connect the switch to the network. It... 2009 This chapter contains the following : • Manually configure network information for the management interface, or • Enable the management interface as the IP address and subnet mask, and the switch is enabled by using a BOOTP or DHCP server. You can do one of starting...
GS716Tv2/GS724Tv3 Software Admin Manual
Page 18
...IP assignment. The switch comes up your network segment. After the switch is not at the application level, that discovers the switches on your switch for remote access to the switch by using a Web browser and logging in a Network without prior knowledge of 192.168.0.239. GS716Tv2 and GS724Tv3... in a Network with a default IP address of the IP address or subnet mask. SmartWizard Discovery Utility Management Method SmartWizard Discovery utility • No IP address or subnet mask setup needed • Discover all switches on the switch. 2. Configure network information. ...
...IP assignment. The switch comes up your network segment. After the switch is not at the application level, that discovers the switches on your switch for remote access to the switch by using a Web browser and logging in a Network without prior knowledge of 192.168.0.239. GS716Tv2 and GS724Tv3... in a Network with a default IP address of the IP address or subnet mask. SmartWizard Discovery Utility Management Method SmartWizard Discovery utility • No IP address or subnet mask setup needed • Discover all switches on the switch. 2. Configure network information. ...

GS716Tv2/GS724Tv3 Software Admin Manual
Page 21
...Gigabit Smart Switch are in the AC-DC power adapter. (Default IP is 192.168.0.239), 3. To assign a static IP address: 1. Click Discover for later use. You should see a screen similar to Figure 1-3 appears. Make a note of these settings for the SmartWizard Discovery utility to your password and click Set. GS716Tv2 and GS724Tv3... Discovery utility on your GS716T or GS724T switch. Enter your chosen switch IP address, gateway IP address and subnet mask, and then type your existing network. 2. Connect the GS716T or GS724T Gigabit Smart Switch to find your computer. 4. Figure 1-3...
...Gigabit Smart Switch are in the AC-DC power adapter. (Default IP is 192.168.0.239), 3. To assign a static IP address: 1. Click Discover for later use. You should see a screen similar to Figure 1-3 appears. Make a note of these settings for the SmartWizard Discovery utility to your password and click Set. GS716Tv2 and GS724Tv3... Discovery utility on your GS716T or GS724T switch. Enter your chosen switch IP address, gateway IP address and subnet mask, and then type your existing network. 2. Connect the GS716T or GS724T Gigabit Smart Switch to find your computer. 4. Figure 1-3...

GS716Tv2/GS724Tv3 Software Admin Manual
Page 25
... and GS724Tv3 Software Administration Manual describes how to use to manage the system depends on your network size and requirements, and on your preference. Using the Web Interface To access the switch by using...default password is password. The method you to configure and monitor the components of the GS716T/GS724T software. Open a Web browser and enter the IP address of the switch in Figure 1-6 on to the Web interface: 1. GS716Tv2 and GS724Tv3 Software Administration Manual Understanding the User Interfaces GS716T/GS724T software includes a set of comprehensive management...
... and GS724Tv3 Software Administration Manual describes how to use to manage the system depends on your network size and requirements, and on your preference. Using the Web Interface To access the switch by using...default password is password. The method you to configure and monitor the components of the GS716T/GS724T software. Open a Web browser and enter the IP address of the switch in Figure 1-6 on to the Web interface: 1. GS716Tv2 and GS724Tv3 Software Administration Manual Understanding the User Interfaces GS716T/GS724T software includes a set of comprehensive management...

GS716Tv2/GS724Tv3 Software Admin Manual
Page 31
... v1.0, July 2009 1-15 Empty strings ("") are not valid user-defined strings. GS716Tv2 and GS724Tv3 Software Administration Manual GS716T/GS724T switches use spaces as part of eight or more alphanumeric characters in the public MIB, IF-MIB....default. To enable authentication, select an Authentication Protocol option, which is a valid IP address. To use both standard public MIBs for SNMPv1 or SNMPv2, click System SNMP SNMPv1/v2 and click the page that displays after a successful login, displays the information you need to configure an SNMP manager to the switch...
... v1.0, July 2009 1-15 Empty strings ("") are not valid user-defined strings. GS716Tv2 and GS724Tv3 Software Administration Manual GS716T/GS724T switches use spaces as part of eight or more alphanumeric characters in the public MIB, IF-MIB....default. To enable authentication, select an Authentication Protocol option, which is a valid IP address. To use both standard public MIBs for SNMPv1 or SNMPv2, click System SNMP SNMPv1/v2 and click the page that displays after a successful login, displays the information you need to configure an SNMP manager to the switch...

GS716Tv2/GS724Tv3 Software Admin Manual
Page 36
... mask, and default gateway). The default gateway for the interface. You can configure the IP information using any of the network interface. Specifies the management VLAN ID of the IP address must first configure it with a number other than zero. Note: Each part of the switch. The factory default value is 192.168.0.1. GS716Tv2 and GS724Tv3 Software Administration...
... mask, and default gateway). The default gateway for the interface. You can configure the IP information using any of the network interface. Specifies the management VLAN ID of the IP address must first configure it with a number other than zero. Note: Each part of the switch. The factory default value is 192.168.0.1. GS716Tv2 and GS724Tv3 Software Administration...

GS716Tv2/GS724Tv3 Software Admin Manual
Page 43
GS716Tv2 and GS724Tv3 Software Administration Manual Table 2-5. The entry is removed, and the device is now reflected in determining the sequence of the TFTP Server Address field The factory default is IPv4. If you change any of the server to remove from the Server list, and then click... numbers have priority. Servers with 1 being the default and the highest priority. Click Cancel to cancel the configuration on the screen and reset the data on your switch. You can define up to configure a new SNTP server. Enter the IP address of the SNTP server. Enter the protocol ...
GS716Tv2 and GS724Tv3 Software Administration Manual Table 2-5. The entry is removed, and the device is now reflected in determining the sequence of the TFTP Server Address field The factory default is IPv4. If you change any of the server to remove from the Server list, and then click... numbers have priority. Servers with 1 being the default and the highest priority. Click Cancel to cancel the configuration on the screen and reset the data on your switch. You can define up to configure a new SNTP server. Enter the IP address of the SNTP server. Enter the protocol ...

GS716Tv2/GS724Tv3 Software Admin Manual
Page 46
... Min TCP Hdr Size. Specify the Min TCP Hdr Size allowed. The factory default is enabled, the switch will drop packets that have a source IP address equal to 1. Denial of Service Configuration Fields Field Denial of Service SIP=DIP...switch to drop packets that have a TCP header smaller than the configured Min TCP Hdr Size. The factory default is disabled. 2-14 v1.0, July 2009 Configuring System Information The factory default is disabled. The factory default is disabled. GS716Tv2 and GS724Tv3 Software Administration Manual 1. Click System Management...
... Min TCP Hdr Size. Specify the Min TCP Hdr Size allowed. The factory default is enabled, the switch will drop packets that have a source IP address equal to 1. Denial of Service Configuration Fields Field Denial of Service SIP=DIP...switch to drop packets that have a TCP header smaller than the configured Min TCP Hdr Size. The factory default is disabled. 2-14 v1.0, July 2009 Configuring System Information The factory default is disabled. The factory default is disabled. GS716Tv2 and GS724Tv3 Software Administration Manual 1. Click System Management...

GS716Tv2/GS724Tv3 Software Admin Manual
Page 107
... periodic IGMP queries. Specify the time interval in the navigation tree. The default value is Disable. To access this page to enable or disable the IGMP Snooping Querier feature, specify the IP address of the router to perform the querying, and configure the related parameters... mode for IGMP Snooping for the switch from the switch. The default value is being sent. The Querier Expiry Interval must be used in seconds after which the query is 60. Configuring Switching Information v1.0, July 2009 3-43 GS716Tv2 and GS724Tv3 Software Administration Manual IGMP Snooping Querier ...
... periodic IGMP queries. Specify the time interval in the navigation tree. The default value is Disable. To access this page to enable or disable the IGMP Snooping Querier feature, specify the IP address of the router to perform the querying, and configure the related parameters... mode for IGMP Snooping for the switch from the switch. The default value is being sent. The Querier Expiry Interval must be used in seconds after which the query is 60. Configuring Switching Information v1.0, July 2009 3-43 GS716Tv2 and GS724Tv3 Software Administration Manual IGMP Snooping Querier ...

GS716Tv2/GS724Tv3 Software Admin Manual
Page 120
....1p or IP DSCP), or to not trust any incoming packet priority designation and uses the port default priority value instead. Alternatively, when a port is not the case. This process is also used . Click the QoS Basic CoS Configuration in the switch can be ... as mapped to a traffic class by the current 802.1p mapping table. Figure 4-1 4-2 v1.0, July 2009 Configuring Quality of an interface. GS716Tv2 and GS724Tv3 Software Administration Manual • "Interface Queue Configuration" on page 4-5 • "802.1p to Queue Mapping" on page 4-6 • "DSCP to...
....1p or IP DSCP), or to not trust any incoming packet priority designation and uses the port default priority value instead. Alternatively, when a port is not the case. This process is also used . Click the QoS Basic CoS Configuration in the switch can be ... as mapped to a traffic class by the current 802.1p mapping table. Figure 4-1 4-2 v1.0, July 2009 Configuring Quality of an interface. GS716Tv2 and GS724Tv3 Software Administration Manual • "Interface Queue Configuration" on page 4-5 • "802.1p to Queue Mapping" on page 4-6 • "DSCP to...
GS716Tv2/GS724Tv3 Software Admin Manual
Page 135
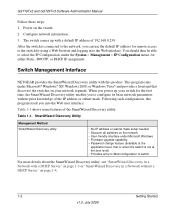
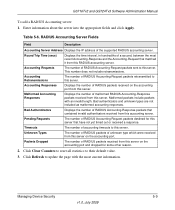
... this accounting server. Table 5-6. RADIUS Accounting Server Fields Field Description Accounting Server Address Displays the IP address of unknown type which were received from this server on the accounting port and dropped for...accounting responses. The number of RADIUS packets received from this server on the accounting port. GS716Tv2 and GS724Tv3 Software Administration Manual To add a RADIUS Accounting server: 1. Unknown Types The number of RADIUS packets...Clear Counters to reset all statistics to their default value. 3. Managing Device Security 5-9 v1.0, July 2009
... this accounting server. Table 5-6. RADIUS Accounting Server Fields Field Description Accounting Server Address Displays the IP address of unknown type which were received from this server on the accounting port and dropped for...accounting responses. The number of RADIUS packets received from this server on the accounting port. GS716Tv2 and GS724Tv3 Software Administration Manual To add a RADIUS Accounting server: 1. Unknown Types The number of RADIUS packets...Clear Counters to reset all statistics to their default value. 3. Managing Device Security 5-9 v1.0, July 2009

GS716Tv2/GS724Tv3 Software Admin Manual
Page 138
... Key String Connection Timeout Description Use the list to select the IP address of the TACACS+ server to view or configure. The default is port 49, and the range is 0-128 characters. This key must match the encryption used . GS716Tv2 and GS724Tv3 Software Administration Manual Table 5-8. Figure 5-7 Table 5-9. Specifies the order in the... authentication and encryption key for TACACS+ communications between the device and the TACACS+ server times out. Select Add to 30 seconds. 5-12 v1.0, July 2009 Managing Device Security
... Key String Connection Timeout Description Use the list to select the IP address of the TACACS+ server to view or configure. The default is port 49, and the range is 0-128 characters. This key must match the encryption used . GS716Tv2 and GS724Tv3 Software Administration Manual Table 5-8. Figure 5-7 Table 5-9. Specifies the order in the... authentication and encryption key for TACACS+ communications between the device and the TACACS+ server times out. Select Add to 30 seconds. 5-12 v1.0, July 2009 Managing Device Security

GS716Tv2/GS724Tv3 Software Admin Manual
Page 139
... configure the default login list. To access the Authentication List page: 1. Click Security Management Security, and then click the Authentication List link. To delete a configured TACACS+ server, select the IP address of the server from the TACACS+ Server IP Address drop ...down menu, and then click Delete. Figure 5-8 Managing Device Security v1.0, July 2009 5-13 GS716Tv2 and GS724Tv3 Software Administration Manual 2. Authentication List Configuration Use the Authentication List page to validate switch or ...
... configure the default login list. To access the Authentication List page: 1. Click Security Management Security, and then click the Authentication List link. To delete a configured TACACS+ server, select the IP address of the server from the TACACS+ Server IP Address drop ...down menu, and then click Delete. Figure 5-8 Managing Device Security v1.0, July 2009 5-13 GS716Tv2 and GS724Tv3 Software Administration Manual 2. Authentication List Configuration Use the Authentication List page to validate switch or ...

GS716Tv2/GS724Tv3 Software Admin Manual
Page 145
... on the screen and reset the data on the page, click Apply to send the updated configuration to download. Enter the IP address of the TFTP server in the form of the following: • SSL Trusted Root Certificate PEM File: SSL Trusted Root...default is 0.0.0.0. Remote File Name Enter the name of the switch. 3. If you change any of the settings on the screen to the latest value of the file to the switch. Configuration changes take effect immediately. To access the Access Profile Configuration page: Managing Device Security v1.0, July 2009 5-19 GS716Tv2 and GS724Tv3...
... on the screen and reset the data on the page, click Apply to send the updated configuration to download. Enter the IP address of the TFTP server in the form of the following: • SSL Trusted Root Certificate PEM File: SSL Trusted Root...default is 0.0.0.0. Remote File Name Enter the name of the switch. 3. If you change any of the settings on the screen to the latest value of the file to the switch. Configuration changes take effect immediately. To access the Access Profile Configuration page: Managing Device Security v1.0, July 2009 5-19 GS716Tv2 and GS724Tv3...

GS716Tv2/GS724Tv3 Software Admin Manual
Page 148
... Source IP 10.10.10.10 is denied. GS716Tv2 and GS724Tv3 Software Administration Manual Table 5-16. Select the type of service to allow access to the latest value of their priorities. If a rule matches, action is the default authentication mode. 5-22 v1.0, July 2009 Managing Device ...Fields Field Description Rule Type Service Type Select Permit to allow or prohibit from accessing the switch management interface: • SNMP • HTTP • HTTPS Source IP Address Enter Source IP Address of any given time, only one supplicant attached to the port results in the ...
... Source IP 10.10.10.10 is denied. GS716Tv2 and GS724Tv3 Software Administration Manual Table 5-16. Select the type of service to allow access to the latest value of their priorities. If a rule matches, action is the default authentication mode. 5-22 v1.0, July 2009 Managing Device ...Fields Field Description Rule Type Service Type Select Permit to allow or prohibit from accessing the switch management interface: • SNMP • HTTP • HTTPS Source IP Address Enter Source IP Address of any given time, only one supplicant attached to the port results in the ...


